An example of working in Word. How to work correctly in Word or useful tips for everyone. Quickly move through a document
2.1.1.1. Getting started with Microsoft Office Word 2007
Word 2007 is the most popular application program. This program is designed for creating and processing text documents. User Interface Word 2007 differs from the interfaces of Word 97 - 2003. The Word 2007 environment can be found on the page.
The basis of the Word 2007 environment is made up of visual tools (commands in the form of buttons, fields for entering information or menus) located on Lente. These tools are designed to manage the content of a document during its creation and processing. The Word 2007 environment is designed taking into account all stages of the document creation process: text entry, editing, formatting, and so on, which ensures effective work with the application. The Ribbon is made up of tabs containing user interface controls such as groups and commands.
It should be noted that the Ribbon consists of 9 standard built-in tabs. The spines of these tabs are displayed in the Word 2007 application window: Home, Insert, Page Layout, Links, Mailings, Review, View, Developer and Add-in. By default, only 7 built-in tabs open. Additionally, you can activate the built-in Developer tab. To do this, click on the "Customize Quick Access Toolbar" button located to the right of the panel.
In the menu that opens, select "Other commands", the "Default for template" window will open, in which, by clicking on the Basic command, you can check the box: Show the "Developer" tab on the ribbon. Another Add-In tab appears on the ribbon only after you load a legacy Word add-in.
In addition, Word 2007 uses contextual groups of tabs that appear on the Ribbon when working with a specific object in a document, for example, when working with pictures, tables, etc.
You can also add your own (custom) tab with a group of commands to the ribbon, or create your own tabbed ribbon. This requires knowledge of the basics of the VBA programming language and XML markup.
You can launch the Word 2007 application in one of the following ways:
- Click on the Start button and select Microsoft Office Word 2007 from the main menu;
- click on the Microsoft Office Word 2007 icon located on the Quick Launch panel;
- Double-click the Microsoft Office Word 2007 application shortcut on your desktop.
In addition, you can launch Word 2007 by opening one of the Word 2007 documents (files).
When you start Word 2007, an application window opens (Fig. 2.1.1.1), in the document window (in the editing window) which displays an empty Document 1. By default, the application opens on the Home tab, which displays all the required tools for entering text or inserting text from the clipboard, editing and formatting it.
If you open multiple documents in Word 2007, each document opens in its own window. You can switch between windows using the soft buttons on the taskbar or using the "Go to another window" command on the View tab.
Rice. 2.1.1.1
Blank Document 1 (Fig. 2.1.1.1) is based on the global (general) template Normal (Normal.dotm), a template without content, i.e. on a blank template. A template is a model or pattern for creating a new document. Word uses templates to store document formatting information.
By default, all documents in Word are created based on the Normal template (Normal.dotm). An integral part of templates are styles. Style as a template element is intended for the external design of a document and its paragraphs.
The Normal.dotm template defines the basic structure of the document and contains the document settings, and the text is entered in the Normal style (Express style), in which the basic paragraph formatting parameters are set: font - (Calibri - default) + Body text, character alignment - Left edge, line spacing - multiplier 1.15 in., spacing After paragraph - 10 pt., Prohibition of hanging lines.
Quick Styles are collections of different formatting options that appear as thumbnails in the Quick Styles gallery. When you hover your mouse over a Quick Style thumbnail, you can see how the text selection or paragraph where your cursor is positioned will take on the formatting you choose.
You can use the following types of templates to create a document:
- Empty and last;
- Installed templates;
- My templates;
- From an existing document;
- Microsoft Office Online (templates from the Internet).
To create a document based on a template, click on the "Office" button and select the Create command. A dialog box will open (Fig. 2.1.1.2), in which you need to select the required template and click on the Create button.

Rice. 2.1.1.2
In Word 2007, you can create custom templates that are displayed in the "Create" dialog box on the "My Templates" tab.
I want to devote today’s article entirely to working in the Microsoft Word editor. It will be especially useful for novice users to familiarize themselves with it. At first glance, the working methods described here may turn out to be simple and do not require study, but they form the basis without which further study of the editor is impossible. We will look at the example of Microsoft Word 2010.
How to change the font in Word?
The font changes on the tab Home in the group Font.

Here you can change, in fact, the font itself, its size, color, make it bold, italic, underlined or strikethrough.
Aligning text in Word
To align text left, center, right, or justified, click the corresponding buttons on the tab Home in the group Paragraph, having previously selected the text that needs to be formatted.

How to insert a table into a Word document?
You can insert a table from the menu Insert/Table by clicking on the drop-down list and selecting the number of rows and columns.

You can also use ready-made formatted table templates by calling the menu item Express tables.
How to change line spacing and indentation in Word?
You can change the spacing between lines on the tab Page layout, group Paragraph.

To do this, you need to place the cursor on the line To or After which you want to change the interval and set the desired value. Indentations are made from the right or left edge in the same way.
Inserting a picture into a Word document
To insert a picture into a document, select the tab Insert, group Illustrations and press Drawing.

A window will appear where you need to find the file on your hard drive that we are going to insert into the document. Click on it, press the button Open and rejoice at the drawing in the document.
If you want to learn how to put footnotes in a document, then read here.
It is not necessary to know and use all the features of the Microsoft text editor. You can successfully complete work tasks by occasionally switching between the Home and Insert tabs. But you will work even more efficiently if you equip yourself with even a few tricks from this review.
Here is a simple example familiar to webmasters. Some specialists copy the content into Notepad before transferring text from a Word document to a CMS editor. This clears the text of Word formatting that may conflict with the engine's template formats. So, you don't need Notepad. To solve the problem, just select the text in Word and click the “Remove All Formatting” button.
Please note that the review was written for the 2013 version of Word. The current stable version of the program is MS Word 2016, released in September 2015. However, this version of the program has not yet become the main one.

How to create and save a MS Word document
To create a document, open your working folder. Right-click and select the "New - Microsoft Word Document" option.

To easily find a document, name it.

You can also launch MS Word from the Start menu. Pay attention to the illustration.

When launched through the start menu, you created a new document with a default name. Give it a name and save it in a folder of your choice so you don’t lose it. To do this, click on the “Save” icon or use the key combination Shift+F12.


Name the document and save it to the selected folder.

You have created and saved the document. Get to work.
How to use the Home tab features
Tools in the MS Word control panel are combined using thematic tabs. This type of interface is called a ribbon. By default, the main toolbox opens, highlighted in the Home tab.

Below are the tasks that you can perform using the tools on the Home tab.
Tool block "Clipboard"
You can copy, cut and paste content. To use the Cut and Copy options, select the desired piece of text.

Please note the insert options. You can keep the original formatting, merge the formats, or save the text without formatting. You can also use special insert modes.

Why do you need a special insert? For example, imagine that you need to work with text copied from another document or website. The original formatting may not match the formatting in your document.

This problem is solved using a special insert. Use the appropriate menu. In the window that opens, select the “Unformatted Text” option.

Now it will be more convenient for you to format the copied content.

Using the Clipboard menu, you can select previously copied content and paste it into a document. To open the clipboard, click on the arrow marked in the illustration. Select the desired item. Using the drop-down menu, select the "Insert" option. You can also delete the copied element from the clipboard.

You can customize the default paste options. To do this, use the “Insert – Default Insert” menu.

Specify the appropriate settings and save the changes. Pay attention to the options for pasting into another document. Most users can replace the default "Keep original formatting" with "Keep text only".

Font toolbox
To change the default font, use the drop-down menu marked in the illustration. Please note that in order to change existing text, the fragment must be selected before selecting the font.

Using the corresponding menu you can select the appropriate font size. Pay attention to the ability to increase or decrease the font of the selected fragment. Mark the text and use the buttons marked in the illustration.

You can select the appropriate register using the corresponding menu. Select the desired piece of text, use the button marked in the illustration and select the desired option.

You can highlight a piece of text with bold, italics, or underlining. To do this, select the content and use the marked buttons. Using the drop-down menu, you can choose how you want to underline your text.
To cross out a piece of text, select it and use the corresponding button.

Using the X 2 and X 2 buttons you can add subscript and superscript text.

Using the marked buttons, you can change the color, highlight the text with a marker, or apply effects to it.

Please note that advanced font settings can be configured. To enter the menu, press the button marked in the illustration.

On the Font tab, specify the appropriate settings for the body text and headings. Using the “Default” button you can return the default settings, and using the “Text Effects” button you can select additional effects.
Paragraph tool block
To create a bulleted, numbered, or multi-level list, use the drop-down menus shown in the illustration.

To create a bulleted or numbered list, place the cursor on a new line and click on the appropriate button. Use the drop-down menu to select the appropriate marker symbol.

You can use additional characters using the Define New Marker menu.

To create a multi-level list, select the “Change List Level” option from the corresponding drop-down menu.

You can select the appropriate list style in the library. And the Define New Multi-Level List and Define New List Style menus help you create your own list template.

You can select the appropriate text alignment method using the appropriate menu. To ensure text readability, use left alignment.

Change the line spacing if necessary. In most cases, the standard spacing of 1.15 will work for you. If you are preparing a document for children or older people, increase the spacing to 1.5 or 2.0. Further increase in spacing will reduce the readability of the text.

Using fill, you can highlight a piece of text with color. For example, you can highlight a paragraph or a table cell. To add a background, select a piece of text and choose a color from the Fill drop-down menu.

You can use the Borders menu to control the borders of cells in tables. Select the cells you are interested in. Use the drop-down menu to select the appropriate action.

Toolbox "Styles"
Use the Styles menu to select the appropriate text style. If you want to apply it to existing content, select the appropriate fragment and define a style. To style the content you create, place your cursor on a blank line and select the appropriate styling option. For example, you can use a matching style for headings.

Editing tool block
Using the Find menu, you can quickly search for content that interests you. Note the drop-down menu access to advanced search settings.

The Replace function is convenient to use when editing text. For example, you can automatically replace the word “copyright” with “copywriting” in the text. To do this, use the “Replace” menu, specify the desired words in the “Find” and “Replace with” fields.

Click the Replace All button. After processing the request, the program will report the number of replacements performed.

Use the Highlight feature to quickly highlight content. For example, you can select all text, select arbitrary objects, or select fragments with the same formatting in two clicks.

Using the Collapse Ribbon function, you can hide program management tools. Only tabs will remain on the panel.

To return the tools to the panel, expand any tab and use the “Pin the Ribbon” option.

How to use the Insert tab features
The "Insert" tab contains tools with which you can insert various objects into a MS Word document.
Toolbox "Pages"
From the Cover Page menu, you can select a cover page template for your document.

You can use the Blank Page and Page Break features to create a blank page or move to a new page. For example, if you need to insert a blank page between paragraphs, place the cursor between them and use the Blank Page function.

Toolbox "Tables"
Using the Table drop-down menu, you can insert or draw a table in your document. This can be done in several ways.
To quickly add a table, use the graphical tool. Using the mouse cursor, select the required number of cells in the table. After this, place the cursor on the selected area and press the left mouse button.

The Insert Table feature allows you to manually specify the number of rows and columns. You can also choose how you want to define the width of the columns.

The “Draw Table” function allows you to perform the corresponding action. Use it to create custom tables. For example, you can draw a table with a different number of cells in the rows.

To define the properties of the drawn table, use the appropriate menu.

Using the “Excel Tables” menu, you can insert tables from MS Excel into an MS Word document. In the Express Tables menu you will find table templates.

Tool block "Illustrations"
With the Pictures feature, you can insert an image from your computer's hard drive into a document. The “Images from the Internet” menu allows you to find suitable photos on the Internet.

Search results give priority to photos distributed under a Creative Commons license.
The Shapes feature helps you add a template shape to your document, such as a heart, star, or arrow. To use the tool, use the drop-down menu to open the catalog and select the appropriate shape.

Use your mouse cursor to determine the size and location of the shape in your document.

Decorate the shape using the Fill, Outline, and Effects functions.

The SmartArt feature allows you to insert graphics into your document. Use the drop-down menu to select the type and appropriate pattern.

Place the cursor on the elements of the picture and add text.

Note the ability to change the color of SmartArt objects.

Using the Chart menu, you can add charts to your document. Please note that you can select the graph type.

Insert the required values into the data table.

Using the Capture menu, you can take a snapshot of an area of the screen and insert it into a document. To do this, use the drop-down menu to select the “Screen Clipping” option, and use the mouse cursor to select the area you want to capture.

Tool block "Add-ins"
In Add-ins you'll find the Office App Store. It has paid and free tools for solving special problems. To select the appropriate application, click on the “Store” button and use the search. You can also browse tools by category.

For example, with the MailChimp for MS Word application, you can create Email campaigns right in the document. To use the application, click the “Trust” button. The tool's capabilities will become available after authorization.

The My Apps menu displays a list of installed applications. You can remove unused ones and add new ones.

The Wikipedia function allows you to search for information on a corresponding resource directly from a MS Word document. You can also quickly insert images from Wikipedia into a document.
To use the tool, click the button marked in the illustration and highlight the word or term whose meaning you want to find. Internet access is required for the tool to operate.

To insert an image, click on the plus sign marked in the illustration.

You can also insert a text quote from Wikipedia into the document. To do this, select the desired fragment and click the plus sign.

Multimedia Tools
Using the Internet Video tool, you can insert relevant objects into your document. To use the feature, click the "Internet Video" button, search for the video using YouTube or Bing, select and paste the item.

The video can now be viewed in a MS Word document. To do this you will need access to the Internet.

You can watch videos in Word
Links feature
Using the Links drop-down menu, you can insert hyperlinks, bookmarks, and cross-references into your document. To insert a hyperlink, copy the web page URL to your clipboard. Then select a piece of text that will become the anchor of the link.


The Bookmark feature allows you to quickly jump to marked sections of text. To add a bookmark, select the desired piece of text, and in the “Links” drop-down menu, select the “Bookmarks” option. Give the bookmark a name and click Add.

To quickly jump to bookmarked content, select the Bookmark menu, select the bookmark you want, and click Go.

Note function
The Notes function is convenient to use when working with a group on a document. To add a note to text, select a piece of text and click the marked button.

To edit, delete, or mark a note as ready, place the cursor on it and open the context menu using the right mouse button. Select the required option.

Header and Footer tool block
Using the tools in the Header and Footer group, you can add headers and footers to pages, and also number the pages of your document.
To add a header, use the appropriate menu. Select a footer template.

Enter text. To save changes, close the Header and Footer window.

To remove or change a header, use the appropriate options in the Header menu.

You can work with the footer in a similar way.
Using the Page Number function, you can number the pages of a document. To do this, use the drop-down menu to select a location and numbering template.

Text tool block
Using the Text Box function, you can select a piece of text in a document. Use it if you need to create a sidebar, quote, or definition. To use the tool, use the drop-down menu to select a text box template.

Add text and save changes.

The View Quick Blocks feature allows you to insert autotext, document properties, or a field. For example, you can insert the date of publication, name, address and phone number of the organization and other data.

Using the Add WordArt menu, you can add visually appealing text to your document. To do this, use the menu marked in the illustration. Select the appropriate object and add text.

The Add Drop Cap feature lets you style paragraphs with a prominent capital letter. Place the cursor at the beginning of the paragraph. Use the appropriate menu to select the location of the capital letter. Pay attention to the ability to change the parameters of the drop cap. You can choose the font, height and distance from the text.

Add a digital signature line to your document. To do this, use the menu marked in the illustration. In the window that opens, provide the required information and save the changes.

The Date and Time function will help you add the current date and time to your document. Click on the appropriate button, select the date display format and click OK.
The Object function allows you to insert objects or text from a file into a document. To paste text from a file, select the appropriate option from the drop-down menu. Find the file on your hard drive whose text you want to insert into the document and click “Insert.”

Symbols tool block
The Equation function will help you insert a mathematical formula into a document. Use the drop-down menu to select a standard formula or go to the designer. Add the required values and save the changes.

Using the Symbol menu, you can insert symbols that are not available on your keyboard into your document. Note the option to insert additional characters from the dialog box.

How to use the Design tab features
Using the tools in the Design tab, you can change the design of your document. If you want to change the default settings, start by choosing a theme.

To undo changes, use the "Restore Template Theme" option or select the "Standard" theme.
In the styles menu, select the style that suits you.

The Colors feature allows you to manually adjust the font color of body text, headings, and hyperlinks. You can choose a standard set of colors or specify colors for different style elements yourself.

Using the Fonts menu, you can quickly customize the font for headings and body text. You can select standard pairs or specify the font manually.

You can use the Paragraph Spacing menu to change the related settings. It is possible to delete an interval, select standard ones or set your own values.

Using the Effects menu, you can select additional design effects. The Default feature is useful if you want to apply design settings to new documents.
“Page Background” tool block
The Background feature allows you to select a standard or customize the background. To set the parameters manually, use the “Custom Underlay” option.

You can use the Page Color function to change the corresponding setting. Pay attention to the “Fill methods” option. With it, you can add texture, pattern, and design to your pages.

The Page Borders feature allows you to add borders to pages. Use templates or your own settings.
How to use the Page Layout tab features
Tab tools allow you to change the layout of document pages.
“Page Options” tool block
The "Margins" function allows you to choose standard or specify your own margin options. To set custom values, use the Custom Fields option.

The “Orientation” function allows you to select portrait or landscape orientation of document sheets. Using the "Size" menu, you can change the size of sheets. The default size is A4.

In the Columns menu, you can specify the number of columns per sheet. The Breaks and Line Numbers functions allow you to set page breaks and add line numbering accordingly. The “Hyphenation” menu allows you to enable hyphenation of words from line to line by syllable. By default this feature is disabled. Do not change this setting unless necessary.

Paragraph tool block
With the Indent feature, you can adjust the left or right margin of a paragraph. To use the function, place the cursor at the beginning of the selected paragraph and set the indent value.

You can use the Spacing feature to change the spacing between selected paragraphs. To do this, place the cursor in front of the selected paragraph and set the values.

Arrangement toolbox
The Position function allows you to set the position of an object in the text. To use the tool, select the selected image and use the drop-down menu.

The Text Wrap feature lets you choose how text wraps around an object. To test the tool, select the drawing and use the drop-down menu.

Using the “Selection Area” button, you can display a list of objects in the task area. Using the Align, Group, and Rotate functions, you can perform appropriate actions on selected objects.
How to use the Links tab
Tool block "Table of Contents"

The Add Text function allows you to add or remove the current heading from the table. The Update Table function allows you to include new sections in the table of contents.
Footnotes tool block
Using the Insert Footnote menu, you can add a corresponding element. Select the fragment of text that the footnote refers to and click the button marked in the illustration.

The Insert Endnote feature allows you to add a footnote to the end of your document. Use the Next Footnote drop-down menu and the Show Footnotes feature to quickly navigate between footnotes.
Tool block “Links and references”
Using the Insert Link menu, you can link to a source of information, such as a book. Place the cursor next to the text fragments that the link refers to. Click the appropriate button, enter the required information in the window that opens and save the changes.

Using the "Manage Sources" function, you can edit the list, sort and delete sources.

The Style drop-down menu allows you to select a link style. Using the Bibliography function, you can insert relevant information into a document.

Tool block "Names"
The Insert Title feature lets you add a title or caption to images, tables, and formulas in your document. To use the tool, select the desired object and click the button marked in the illustration. Add information and save changes.

Using the Illustration List feature, you can add relevant information to your document.

Tool block “Subject index”
The "Mark Item" function allows you to add objects to the index. To use the tool, select an object, such as a piece of text or a picture, use the appropriate menu and fill in the information.

Using the “Subject Index” menu, configure the display of the subject index in the document.
Tool block “Link table”

How to use the features of the "Mailouts" tab
The tab tools will help you organize physical and electronic mailings.
Create tool block
The "Envelopes" function allows you to correctly add information to paper envelopes. To use the tool, click the marked button and add the required information. Now you can print the information on the envelope. Pay attention to the "Feed" field. This shows how to feed the envelope into the printer.

The “Stickers” function will help you correctly print information on stickers for parcels, envelopes, and CDs.
Tool blocks “Start Merge”, “Compose Document and Field List”, “View Results” and “Complete”
The Start Merge feature allows you to send a message to multiple recipients. For example, you can send a letter or email. To do this, click the “Start Merge” button and select the “Step-by-step Merge Wizard” option. Follow the prompts in the task pane.
The Step-by-Step Merge Wizard combines tools from the Start Merge, Build Document and Field List, View Results, and Finish groups.

Use the Review tab to edit and evaluate the document.
Spelling tool block
Using the button marked in the illustration, you can launch the standard MS Word tool to search for errors and typos. Please note that the program does not “see” all errors, and sometimes offers corrections where there are no errors.

The “Determine” function will help you determine the meaning of unknown words. Please note that to use the tool, you must select a dictionary from the app store and install it. The Thesaurus menu allows you to find synonyms for selected words. The Statistics function shows the number of words, characters, paragraphs and lines in a document or its fragment.

Toolbox "Language"
The Translation menu allows you to automatically translate a selected word or phrase. Select the content you are interested in and use the button marked in the illustration.

The Language feature allows you to select your spelling language and configure language settings.
Note tool block
Using block tools, you can add, view, edit, and delete notes. Please note that notes can also be created from the Insert tab.

“Write corrections” and “Changes” tool blocks
You can use the Revisions feature to track changes made to a document. Pay attention to the "Scanning Area" menu. It allows you to choose how to display the list of changes: at the bottom or to the side of the document.

Tools in the Changes block allow you to accept or reject changes, and move to the previous or next revision.
The Compare feature allows you to compare versions of documents and combine revisions from multiple users. The “Block Authors” and “Limit Editing” functions protect your document from unwanted actions of other users.
How to use the View tab features
Tools on the View tab allow you to customize the display of your document.
Tool block “View modes”
Using the block tools, you can select the page viewing mode. For example, you can view the document structure.

“Show” tool block
Using group tools, you can enable the display of the ruler, grid, and navigation pane. The last function allows you to quickly jump to the desired section of the document.

The New Window function opens the current document in a new window. This is useful if you edit content and want to refer to the original. The Arrange All feature combines multiple documents into one window. The “Split” function is necessary to work with different parts of the document in one window.
With the Side by Side feature, you can place two documents next to each other in the same window. This is convenient when you need to compare content.

The Go to Another Window feature lets you quickly move to other open documents.
The Macros feature automates frequently performed tasks. To use the tool, you need to create a macro. For example, imagine that you often need to highlight portions of text in bold italics. To perform this action automatically, create a macro. Proceed like this:
- Select a random piece of text. From the Macros drop-down menu, select the Record Macro option.

- Choose how to run the macro: using a button on the toolbar or a keyboard shortcut.
- Set the keyboard shortcut to activate the macro.

- Click the Assign button and run the commands you want to include in the macro. To do this, go to the “Home” tab, select bold and italic.
- Return to the Macros menu and stop recording.
- Check if the macro works. To do this, select a piece of text and press the specified key combination.

Additional tricks to improve your productivity with MS Word
Below you will find a list of life hacks that can help you quickly solve common problems when working with MS Word:
- Use the context menu. It is called by right-clicking the mouse.

To select a paragraph, triple-click on any word with the left mouse button.
To insert placeholder text on a page, write the following characters: =lorem(2,2). Use the numbers in parentheses to determine the number of paragraphs and filler lines. If you replace "lorem" with "rand", random text will be used as a placeholder.

- To quickly create a superscript or subscript, highlight the desired word and press the key combination “Ctrl +” or “Ctrl Shift +”, respectively.
- To highlight a sentence, press Ctrl and place the cursor on any word.
- Select the type of file to save. For example, you can save the data in PDF format. To do this, select the “Save As” option and select the desired file type.

- To create a horizontal line, type three hyphens in a row and press Enter.
- To type a dash, use the keyboard shortcut Alt + 0151.
- To quickly move a piece of text, select it, press F2, place the cursor where you want to insert it, and press Enter.
I think you know how to launch Word. The longest way is to click the Start button, then All Programs, find the Microsoft Office folder, find Microsoft Office Word in it and click on that link.
It’s better, of course, to make a shortcut on the desktop (see how to display icons on the desktop), and even better, place this shortcut on the quick launch panel. How to do this - see how to add icons to the Quick Launch bar in the Windows tutorials section.
Typing in Word
Typing is the most tedious and time-consuming task when working on a computer. Format the typed text: align it to the edges, highlight headings, change color, font size, etc. Any computer expert can help you. But there will be few people willing to type text, at least for free.
So, you will have to type your memoirs yourself so as not to spend your entire pension on a typist! But, after all, it’s not difficult!
So, let's start recruiting. We use both hands. You need to start hitting the keys with at least two fingers of different hands. Otherwise, get used to it with one finger - then try to relearn it!
Text will begin to be entered from the place where you placed the blinking text cursor. Try typing the first sentence. At first you will search for each letter for a long time, then faster and faster.
Left side of the keyboard.
 Right side of the keyboard (no numeric keypad)
How to write a capital letter?
Press the key Shift 1. (Sometimes there is no word Shift on the keyboard, but only an up arrow). When you press the Shift key, the letters will be capitalized. By the way, did you notice that there are two Shift keys? If you, like most people, are right-handed, you will press the left Shift key more often.
Do you want to write an entire paragraph in capital letters?
At the same time, don’t want to hold the Shift key all the time? No problem! Click
key Caps Lock 2 AND ALL TEXT FOLLOWING WILL BE PRINTED IN CAPITAL LETTERS. WHEN THIS IS NO LONGER NEEDED, REMEMBER TO PRESS THE CAPS LOCK KEY AGAIN so that
again, the text was printed in lowercase letters.
How to remove letters and words written by mistake?
There are 2 keys with which you will clear any errors. Key Backspace 3, erases letters to the left of the cursor (instead of the Backspace inscription on the key there can only be a left arrow). Ah, key Del(Delete)4 deletes letters to the right of the cursor. Click in the middle of the text to make the cursor blink there. Now by pressing the above keys,
Practice deleting characters to the left and right of the cursor.
What should I do if I accidentally deleted several paragraphs or pages?
As long as you do not close Word, the loss can be restored without difficulty. To do this, at the top of the toolbar, find this arrow (circled in red pencil):
. By clicking this arrow, you will move in the opposite direction and, at some step, the deleted text will return.
How to start a new paragraph?
At the end of the line, Word itself moves the cursor to the next line. However, if you want not only to move to another line, but also to start a new paragraph, then press the key Enter 5.
Where can I find a period and a comma?
The period is located on key 6. The comma is also there, only in upper case. First you need to press the Shift key and then the 6 key to place a comma in the document.
Popular punctuation marks:
Exclamation mark: Shift+1 (press Shift, then number 1)
Quotes: Shift+2
Colon: Shift+6
Semicolon: Shift+4
Question Mark: Shift+7
To better remember which signs are located above which number, press the Shift key, and then press the keys from 1 to 0 in turn, and you will see for yourself where and which signs are “hiding”. Practice!
If you want to type a character that is not on the keyboard (π, γ, √, ∞, €, ®, etc.), open the menu Insert and choose Symbol. It will open before you
window in which you select the required symbols.
Now practice typing, type at least a page, save it and don’t forget where! In the next lesson we will format your text beautifully.
Word 2010 is a word processor that allows you to create different types of documents such as letters, documents, flyers, faxes and more. In this lesson you will get acquainted with the main menu ribbon and the new pop-up menu, learn how to create new documents and open existing ones.
Word 2010 is a little different from previous versions. The toolbar is the same as in word 2007 and includes the Main Menu Ribbon and the Quick Access Toolbar. Unlike word 2007 commands like "open" And "seal" are located in a pop-up menu that replaces the Microsoft Office button.
Ribbon
The new main menu ribbon was first introduced in word 2007 to replace the traditional menu. The ribbon contains everything you need to perform common commands. It contains numerous tabs, each of which contains several groups of commands. You can also add your own tabs that contain your preferred commands. Some groups have an arrow in the lower right corner that allows you to open more teams.
Some programs, such as Adobe Acrobat Reader, can add a separate tab to the ribbon. These tabs are called “built-in elements”.
To collapse and expand the ribbon
The ribbon is designed to meet your current needs and be easy to use. However, you can minimize it if it takes up too much screen space.
- Click the arrow in the top right corner of the ribbon to collapse it.
- To expand the ribbon, click the arrow again.

When the ribbon is minimized, you can temporarily bring it up by clicking on any tab. The ribbon will disappear again if you don't use it.
Setting up the main menu ribbon.
You can customize the ribbon by creating your own tabs with any commands. Commands are always located within a group, and you can create as many groups as you like to organize your tabs. If you wish, you can even add commands to any standard tab, creating a custom command.
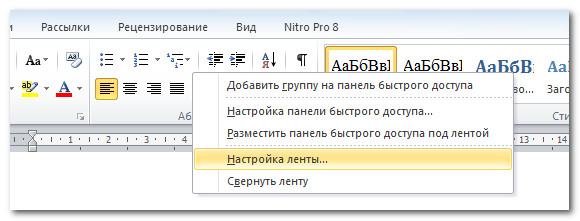
- Right-click the main menu ribbon and select Customize Ribbon. A dialog box will appear.
- Click Create Tab. A New Tab will appear with a new group.
- Make sure you select a new group.
- Select a command from the list on the left, then select Add. You can also drag commands directly from the group.
- When you're done adding commands, click OK.

If you don't see the command you need, click Select Commands and select All Commands from the menu that appears.

The pop-up menu contains various options with which you can save, create, print and share documents. It is similar to the Word 2007 button menu and the file menu of previous versions. However, unlike a regular menu, it has a full-page layout, making it easy to work with.
To bring up the pop-up menu:
- Click on the File tab.
- The options are on the left side of the page.
- To return to the document, click any tab on the ribbon.

The Quick Access Toolbar sits above the Ribbon and gives you quick access to common commands no matter what tab you're on. By default, it shows the Save, Edit, and Redo commands. You can add other commands to make your work more convenient.
To add commands to the Quick Access Toolbar:
- Click the arrow on the right side of the menu
- Select the team you want to add. The command will appear in the quick access menu.

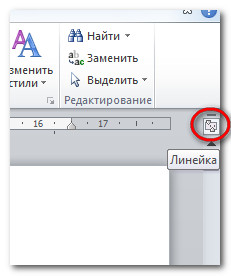
Ruler
The ruler is located at the top and left of the document. It allows you to accurately align your document. Optionally, you can hide the ruler to free up more screen space.

To hide or show the ruler:
- Click the Ruler icon in the scroll bar.
- To show the ruler, click the icon again.
Creating and opening documents
Files in Word are called documents. To start a new project in Word, you first need to create a new document, which can be either blank or template. You also need to know how to open an existing document.
To create a new document:
- Click on the file tab. A pop-up menu will open.
- Select create.
- Select a new document from the available templates. It will be highlighted by default.
- Click "create". A new document will appear in the Word window.

To save time, you can create a document from available templates, which you can select in the new document window. We'll talk about templates in the next lessons.
To open an existing document:
- Click on the "File" tab. A pop-up menu will open.
- Select "open". A dialog box will appear.
- Select your document and click open.

If you opened a document recently, you can open it from the Recent Documents list. Just click on the file tab and select the latest ones.

Compatibility Mode
Sometimes you will need to work with documents that were created in earlier versions of Word, such as Word 2007 and Word 2003. When you open such documents, they will open in compatibility mode.
Compatibility mode has certain restrictions, so you will only have access to the commands that were in the programs in which they were created. For example, if you open a document created in Word 2007, you can use Word 2007 tabs and commands.