Programs for checking SSD disks for errors and speed. SSD disk check: the best utilities for diagnosing and improving performance
Not long ago I bought myself a solid-state hard drive on Aliexpress, in other words, an SSD, and even . The disk arrived, was installed and worked great for several months. But lately I began to notice that the disk began to “choke” often, and sometimes I just had to ROUGHly turn off the laptop. Doubt crept in: was my Chinese “friend” screwed up? How to check SSD functionality?
At the beginning I began to sin on Ubuntu, maybe it started to glitch? I often install new programs, and although Linux is much more stable in this regard than Windows, it can also be ruined.
And so yesterday I decided to reinstall the system so that I would have time. Decided . But that was not the case! After the first installation, I was unable to access my home folder, which is encrypted.
Although I did not scan (perhaps in vain) to the end, it was clear that in general all the cells were working perfectly. But I didn’t calm down and downloaded another program - HDDScan, and scanned it for her.
And this program showed that my first sector was killed! Just one, could it cause such problems? Or is this program only suitable for regular HDDs? I don't know yet, but I know what I will do.
Since this is the first sector, when marking the disk, I will leave an unmarked area at the beginning so that this sector does not work. If this doesn't help, then I don't know what to do.
How to check SSD for errors in Linux?
In Linux, as I understand it, there is only a console program for this purpose (although maybe I was looking poorly), everything is checked like this:
Sudo badblocks -v /dev/sdc > ~/test.list
The badblocks utility will check the disk for bad sectors and produce a report in the test.list file, which will appear in the home directory. Yes, it’s not very clear, but you can still check it. Maybe you know better programs?
I will try to install Linux 15.04 on this SSD disk, I will test both the new Ubuntu (I haven’t tried installing it yet) and the disk at the same time. I’ll write down in the comments what came out of all this...
After purchasing a mobile phone and SIM card, people expect uninterrupted communication at any time. If you also purchase a 3g modem in the kit...
I have a wonderful tablet - Lenovo S2109. Everything about it is good, but it’s impossible to remove the built-in software, since root access rights are by default...
Didn't find the answer to your question? Use the site search:
10 comments
Today I tried to install Ubuntu 15.04 on this SSD disk, leaving the initial area of the disk unallocated - the installation froze.
I didn’t continue and decided to install Windows 7 - everything was installed, although I don’t know yet whether it will work without failures.
I decided to do this: I inserted an SSD with Windows 7 into the laptop, and installed Linux on the external HDD. Now I can work in Windows if necessary, but I can boot into Linux from an external drive, so that everything is simple with Linux.
I had some strange problem with the disk (only it was a simple disk), in lninuch it wrote that it was restarting something there, although it was working. In Windows it just started getting really stupid and crawled furiously across the disk. Although everywhere it showed that everything was fine with the disk.
It turned out that I needed to switch to the IDE controller in the BIOS, instead of some strange new one, and everything became okay.
And this happens, but SSD drives are still very different from regular ones and the technology is not yet well developed, which is why there are problems, especially on Chinese ones. But we need something cheaper!
I personally have been using an SSD as a system drive for about six months now. I had a Sony VAIO laptop with a regular hard drive. Then I installed my SSD there. I’m running Ubuntu 14.04.3; rebooting, if necessary, takes 11-12 seconds - I personally measured it with a stopwatch :-) In the laptop, instead of a drive, there is an additional 1TB hard drive (mount point home directory) .
I use BTRFS everywhere. Previously I used Ext4. I didn't notice any glitches.
Oh yes! I have an SD card from Kingston for 120 gigs. Mounted as root.
Just a few years ago, you could find a regular hard drive in almost every home computer. Nevertheless, today many users prefer to install SSD drives in their PC for a number of obvious reasons: compactness, reliability, temperature and read/write speed. Yes, their price is significantly higher compared to HDDs, but it's worth it. Installing even the cheapest solid-state drive can increase the performance of an old computer several times.
However, unfortunately, SSD drives are not as durable as classic HDDs, which can live in quite harsh conditions for literally years. SSDs have their own limited resource, which, by the way, is usually indicated by the disk manufacturers. And therefore, all users from time to time need to conduct tests of various types for their SSD in order to make sure that it is in satisfactory condition.
In today's article we will look at how you can check an SSD disk for errors, bad sectors, how to check the read/write speed of an SSD disk, and also briefly look at a small additional section - restoring MicroSD cards. So let's get started.
Checking an SSD disk for bad sectors and errors
Unfortunately, even solid-state drives are not immune to various errors and bad blocks. Therefore, users need to diagnose SSD drives for all sorts of problems. It is especially important to perform diagnostics on SSDs that are not new and on which various operations were carried out every day.
But how is diagnosis done? The answer is with the help of specialized software. There is an incredibly huge amount of software on the Internet, both from the drive manufacturers themselves and from third-party developers, that can check the status of the SSD. Now we will look at the three best programs for diagnosing SSD drives. Let's go.
CrystalDiskInfo
Perhaps the most popular choice among software for this purpose is a program called CrystalDiskInfo. This utility was developed by a talented Japanese programmer and is distributed completely free of charge. Moreover, the program has been translated into 32 languages, including Russian, which is undoubtedly a huge plus.

CrystalDiskInfo is able to display general information about the SSD, which also includes the health of the media, monitor S.M.A.R.T. values. and even monitor/control the operating temperature of the disk. All in all, an extremely useful and lightweight utility that will help you diagnose your SSD drive in a matter of minutes.
The author of the program understood that the average user, having opened the CrystalDiskInfo window, would get confused in the variety of different attributes of his disk, so he decided to summarize them all, collecting them in the “Technical Condition” section, which shows the condition of the disk as a percentage. We launched CrystalDiskInfo and looked at the information in the left corner - it’s as simple as that.
Let's move on to the second program on our list. SSDLife is a small application with a fairly simple user interface. After launching the utility, you will see a small window in front of you in which you can see the model of your disk, its total capacity and remaining space, total operating time, number of starts, health, and even the estimated remaining service life.

Unlike CrystalDiskInfo, the SSDLife utility is designed primarily for the most ordinary user who wants to make sure that everything is in order with his SSD disk. However, you can familiarize yourself with the S.M.A.R.T. information by clicking on the appropriate button if the need arises. The utility is distributed in two versions: a free version and a professional version, which costs about 300 rubles. It was in prof. version there is a view of S.M.A.R.T parameters.
Data Lifeguard Diagnostic
And let's move on to the last program to check the status of the SSD drive. Data Lifeguard Diagnostic is another utility that you can use to check your drive. However, it is worth noting that its user interface is somewhat more complex than that of the previous two programs on this list. The program was developed by Western Digital, however, it is excellent at diagnosing third-party drives.
Like other programs on the list, Data Lifeguard Diagnostic will automatically run a quick diagnostic of your disk, the results of which you can view in the main window. However, it is worth noting that the details of this check are quite sparse and you will need to perform another check manually. To do this, double-click on your drive in the program window with the left mouse button.

Another small window with several options will appear in front of you. Here you will need to select a quick or advanced (in-depth) disk scan. Having selected the desired type of test, for example, extended, upon completion you will need to click on the “VIEW TEST RESULT” button. Then another window will appear in front of you, where you can view the results of the check.
In this window you should pay attention to the line “TEST RESULTS” (test results). PASS - means that your SSD drive is in perfect order and there is no need to worry. Well, if the value FAIL is located there, then there is really something wrong with your drive.
SSD speed test software - CrystalDiskMark
Let's now look at a utility that will help you test the speed of your SSD. Have you forgotten about a program called CrystalDiskInfo? So, the developer of this program has another program, but only to check the speed of the disk.

CrystalDiskMark is rightfully the best program for testing HDD and SSD speed. It supports the Russian language and can be run on all modern Windows operating systems, from Windows XP to the latest versions of Windows 10.
To perform a speed test, you will need to do the following:
- download and open the CrystalDiskMark program;
- select the number of read/write cycles you need;
- select the size of the tested file;
- select disk partition;
- click on the “All” button;
The speed test may take some time, so you may want to get distracted by something else. However, we do not recommend that you boot your computer or SSD in any way while CrystalDiskMark is running, because... this may affect the test results. We look at the results and find out if there are any problems with your SSD drive. And the programs from the list above will help you with this.
How to recover a MicroSD card?

Let's move on to the next section - restoring MicroSD cards. Many of the users of such storages, often used for mobile devices, often ask one question: is it possible to recover deleted or damaged data on a memory card? The answer is yes. However, there are some nuances here.
Specialized software, which can easily be obtained in the public domain on the Internet, will help you recover the necessary data on such media. Let's look at several popular programs for recovering MicroSD cards.
CardRecovery

CardRecovery is an excellent free program from WinRecovery Software for recovering images, video and audio files. Unfortunately, using CardRecovery it is not possible to recover ordinary files, for example, text documents or disk images. So let's see how you can recover MicroSD:
- download and install CardRecovery;
- then run the program and wait for the window to appear;
- in the program window you will need to do the following:
- select in the “Drive letter” section (partition letter) the letter under which your microsd flash drive is located;
- Next, you will need to select the device type in the section called “Camera Brand and File type” and the type of files you want to recover;
- in the “Destination Folder” section, select the folder on your computer where the data recovered from the flash drive will be placed;
- and finally, click on the “Next” button;
- Next, a list of files that were recovered should appear in the CardRecovery program window. All you have to do is check the boxes next to the files you need (or all files) and click on the “Next” button again;
As you can understand, working with the CardRecovery program is quite simple and it will not take up much space on your disk. An ideal option for most users who do not want to bother with many functions. However, if you need more, then let's move on.
PC Inspector Smart Recovery

If you need something more functional, then PC Inspector Smart Recovery is ideal for you. This software has a wider range of different functions and can recover almost all types of files. Among other things, it can work with non-removable storage.
So, to use PC Inspector Smart Recovery, you will need to do the following:
- download PC Inspector Smart Recovery and run it;
- click on the first green arrow icon;
- check the box next to “Select a logical drive” in the “Recovering deleted files” section;
- in the disk selection window, select your memory card and click on the green checkmark to confirm;
- Next you will need to set the range of sectors; set "0" in the starting sector and media volume in the ending range;
- click on the green checkmark to confirm;
- then a window will appear in front of you with the recovered files and folders on the flash drive;
- Click on the floppy disk icon to save the recovered files.
PC Inspector Smart Recovery is somewhat more difficult to work with than the previous program on the list, but everything is within the knowledge of ordinary Windows users. Let's move on to the latest program for “repairing” MicroSD cards.
R-Studio

Perhaps one of the most popular programs for restoring MicroSD cards (and not only) is a program called R-Studio. The software is a group of full-featured utilities for recovering data from HDD, SSD, flash drives and more. To use R-Studio, you will need to do the following:
- download and install R-Studio on your computer;
- run the program;
- click on the microsd card in the “Drivers” section;
- check the boxes next to the folders/files in the “Folders” and “Content” sections;
- Click on the “Recover” button in the menu bar of the program window.
That, in fact, is all you need to restore the necessary content on a MicroSD card. On the Internet you can find a whole bunch of different software with similar functionality, but users often advise using CardRecovery, PC Inspector Smart Recovery or R-Studio.
Found a typo? Select the text and press Ctrl + Enter
During the operation of any drive, various types of errors may appear over time. While some can simply interfere with work, others can completely damage the disk. That is why it is recommended to periodically scan disks. This will allow you not only to identify and fix problems, but also to copy the necessary data to reliable media in a timely manner.
So, today we will talk about how to check your SSD for errors. Since we physically cannot do this, we will use special utilities that will diagnose the drive.
Method 1: Using the CrystalDiskInfo utility
To test the disk for errors, we will use a free program. It is quite easy to use and at the same time fully displays information about the status of all disks in the system. We just need to launch the application and we will immediately receive all the necessary data.

In addition to collecting information about the drive, the application will conduct a S.M.A.R.T analysis, the results of which can be used to judge the performance of the SSD. In total, this analysis contains about two dozen indicators. CrystalDiskInfo displays the current value, worst case value, and threshold of each indicator. At the same time, the latter means the minimum value of the attribute (or indicator) at which the disk can be considered faulty. For example, let's take an indicator like "Remaining SSD resource". In our case, the current and worst value is 99 units, and its threshold is 10. Accordingly, when the threshold value is reached, it’s time to look for a replacement for your solid-state drive.

If, when analyzing your disk, CrystalDiskInfo reveals erasure errors, software errors or crashes, in this case it is also worth thinking about the reliability of your SSD.

Based on the test results, the utility also provides an assessment of the technical condition of the disk. In this case, the assessment is expressed both as a percentage and qualitatively. So, if CrystalDiskInfo rated your drive as "Fine", then there is nothing to worry about, but if you see the rating "Anxiety", which means we should expect the SSD to fail soon.

Method 2: Using the SSDLife utility
SSDLife is another tool that will allow you to evaluate the performance of the disk, the presence of errors, and also conduct S.M.A.R.T analysis. The program has a simple interface, so even a beginner can understand it.

Like the previous utility, immediately after launch SSDLife will conduct an express check of the disk and display all the basic data. Thus, to check the drive for errors, you just need to launch the application.
The program window can be divided into four areas. First of all, we will be interested in the upper area, where an assessment of the condition of the disk is displayed, as well as the approximate service life.

The second area contains information about the disk, as well as an estimate of the health of the disk in percentage terms.

If you want to get more detailed information about the status of the drive, then click the button "S.M.A.R.T." and get the results of the analysis.

The third area is information about the exchange with the disk. Here you can see how much data was written or read. This data is for informational purposes only.
And finally, the fourth area is the application control panel. Through this panel you can access settings, help information, and restart the scan.

Method 3: Using the Data Lifeguard Diagnostic Utility
Another testing utility is developed by Western Digital, called Data Lifeguard Diagnostic. This tool supports not only WD drives, but also other manufacturers.
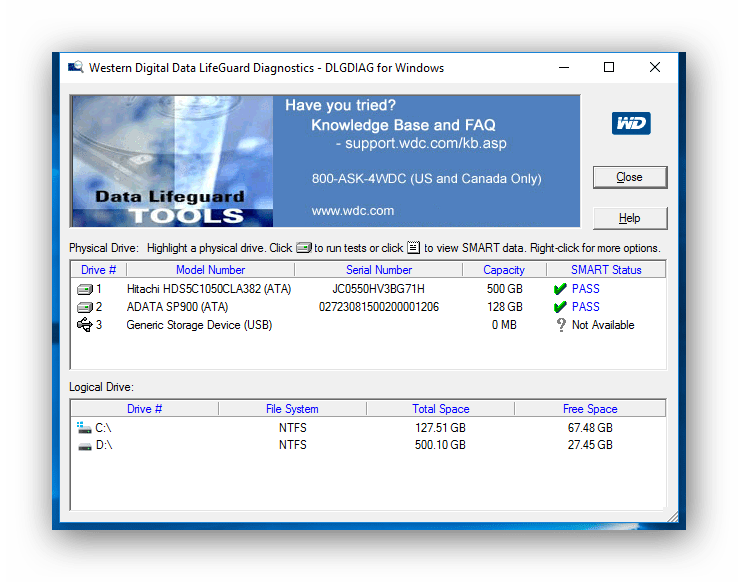
Immediately after launch, the application diagnoses all disks that are in the system? and displays the result in a small table. Unlike the tools discussed above, this one displays only the condition assessment.
For a more detailed scan, just double-click with the left mouse button on the line with the desired drive, select the desired test (quick or detailed) and wait for the end.

Then, by clicking on the button "VIEW TEST RESULT"? You can view the results, which will display brief information about the device and a status assessment.

Conclusion
Thus, if you decide to diagnose your SSD drive, then there are quite a lot of tools at your service. In addition to those discussed here, there are also ones that can analyze the drive and report any errors.
The topic of SSD drives is gaining popularity every year, which is due to the reasonable price of these devices and the speed of their operation. However, users are often interested in the same questions: “How long can an SSD hard drive last?”, “How to assess the condition of an SSD?”.
How to find out how long an SSD drive will last?
On the Internet you can find dozens of programs that are designed to work with SSD drives. Among them, the following are especially popular: EaseUS Partition Master, AOMEI Partition Assistant Standard Edition and SSD-LIFE. The first two are ideal for testing the disk, and with SSD-LIFE you can find out the age of the device and its condition. The utility does not need to be installed. Just download and run the file. The software has a Russian-language interface and works free of charge, although there is also a paid version. Let's look at testing an SSD drive using the SSD-LIFE program as an example.
After starting the program, click on the “SMART” button and wait until the disk is scanned for errors and damage.
Under the health line, the operating time of the disk and its estimated failure date will be indicated. Above you can see the overall rating of the disc.
You can also find out how long the SSD will last using the Hard Disk Sentinel program. It differs from the previous one in a more detailed interface. There are tabs for disk operating time, number of starts, temperature, errors, warnings.

You can also use other programs to test SSDs.
Since an SSD disk has a certain number of data recording cycles, many users believe that once they are exhausted, the disk will become unusable. This is actually a myth. To dispel it, we will carry out precise calculations.
Let's say you have a 120 GB disk. The number of write cycles for this volume is 3000 (according to the manufacturer). Every day you use an example of 20 GB of data, write it down and erase it. In this mode, the disk can operate for 49 years (in theory) or 18 thousand days. However, if we assume the presence of 5-10 flaws and the load on the controller, then such a disk can only work for 8 years without problems. Where does this figure come from? We convert the disk volume into terabytes and divide by the number of megabytes used daily and for another 365 days. For example, 64,000 (120 GB): 20: 365 = 8.7 years.
Thus, the disk will function normally for the calculated years. However, once the number of provided write cycles is exhausted, the disk's performance will deteriorate. It won't fail.
Tip: if you use an SSD drive as a system drive, you do not need to transfer the page file or browser cache to other drives. An SSD drive is needed to speed up the system, and scattering files around only slows it down. But if you download movies in gigabytes, it is better to choose an HDD drive for this purpose. Otherwise, the quality life of the SDD disk will be reduced by several years.
Good afternoon.
The speed of the disk determines the speed of the entire computer as a whole! Moreover, surprisingly, many users underestimate this point... But the loading speed of the Windows OS, the speed of copying files to/from a disk, the speed of launching (loading) programs, etc. - it all depends on the speed of the disk.
Nowadays there are two types of disks in PCs (laptops): HDD (hard disk drive - traditional hard drives) and SSD (solid-state drive - a newfangled solid-state drive). Sometimes their speed differs significantly (for example, Windows 8 on my computer with an SSD starts in 7-8 seconds, versus 40 seconds with an HDD - the difference is colossal!).
And now about what utilities and how you can check the speed of the disk.
One of the best utilities for checking and testing disk speed (the utility supports both HDD and SSD drives). Works in all popular Windows OS: XP, 7, 8, 10 (32/64 bits). It supports the Russian language (although the utility is quite simple and easy to understand even without knowledge of English).
Rice. 1. CrystalDiskMark main window
To test your disk in CrystalDiskMark you need to:
- select the number of write and read cycles (in Fig. 2 this number is 5, the optimal option);
- 1 GiB - file size for testing (optimal option);
- “C:\” - drive letter for testing;
- To start the test, simply click the “All” button. By the way, in most cases they always focus on the line “SeqQ32T1” - i.e. sequential writing/reading - therefore, you can simply select a test specifically for this option (you need to press the button of the same name).
The first speed (Read column, from English “read”) is the speed of reading information from the disk, the second column is writing to the disk. By the way, in Fig. 2 we tested an SSD drive (Silicon Power Slim S70): the read speed is 242.5 Mb/s - not the best indicator. For modern SSDs, the optimal speed is considered to be at least ~400 Mb/s, provided the connection is via SATA3* (although 250 Mb/s is more than the speed of a regular HDD and the increase in speed is visible to the naked eye).
* How to determine the operating mode of a SATA hard drive?
From the link above, in addition to CrystalDiskMark, you can also download another utility - CrystalDiskInfo. This utility will show you the SMART of the disk, its temperature, and other parameters (in general, an excellent utility for obtaining information about the device).
After starting it, pay attention to the line “Transfer mode” (see Fig. 3). If this line displays SATA/600 (up to 600 MB/s), then the drive is operating in SATA 3 mode (if the line displays SATA/300, i.e., the maximum throughput of 300 MB/s is SATA 2) .
AS SSD Benchmark
Author's website: http://www.alex-is.de/ (download link at the very bottom of the page)
Another very interesting utility. Allows you to easily and quickly test the hard drive of your computer (laptop): quickly find out the read and write speed. No installation required, use as standard (as with the previous utility).