Checking Windows 7 for errors. Checking your hard drive for errors in Windows. Checking the disk using CHKDSK
Despite all the significance and innovation of Windows 10, it nevertheless has no fewer problems than its predecessors.
System Troubleshooting
A Windows 10 laptop or computer has many system built-in tools that provide many ways to solve problems that arise. One of the main such tools is the troubleshooter, which scans the system and offers his own solutions.
There are two ways to run this utility:
By running this utility, the user you will need to choose the necessary category and subcategory to which his problem belongs. Then all you have to do is follow the built-in tips.
Windows Defender Security Center includes built-in protection, antivirus, firewall, and many other security protocols. 
You can launch this utility by going to the Start section and starting typing its name in the search bar. Here you can manage various protection modes by enabling or disabling additional features and protective lines. In addition, there is the ability to scan your PC for viruses, various errors and threats, which is done using the buttons in the main window of the tool.
Command line
The Command Line is a fairly multifunctional tool aimed at managing various components of the operating system, as well as fixing Windows 10 errors. Using the appropriate commands, you can perform many actions that are inaccessible in other standard ways. However, first of all, the command line must be found and launched, for which it is provided several options: launch via Start (type cmd in the search), Windows system folder, through the Run window (Win+R and enter cmd), task manager.
One of the command line utilities is DISM, the essence of which is restoration damaged system files. In order to run it you will need to enter in the command line such a command: dism/Online/Cleanup-Image/RestoreHealth
This will start checking the system for errors, and if there are any, it will automatically fix them.
System File Checker or SFC a command similar in property and launched using the command: sfc/scannow
UtilityChkdsk fixes file system and hard drive errors. On the command line, enter the command: chkdsk c: /f (where “c” is the name of the drive that needs error checking).
The Scanreg utility is designed to check and registry fixes.
Power Shell
Power Shell is a modern and more functional version of the command line that allows you to more flexibly manage your computer. There are several ways to open Power Shell in Windows 10:

Full system recovery
The Windows 10 operating system provides many ways to restore the system, using various means, however, their goal is common. The main purpose of this function is return OS state to the original one, or to the latest working version. 
This could be returning a computer or laptop to its original state. 
Or rollback to a previously created recovery point.
In addition, there are options for creating images and recovery disks for complete or partial transformation of the system state.
MwFix utility
By launching the MwFix utility, the user will have access to a lot of built-in tools for eliminating various errors arising in the operation of the system.
FixWin program
FixWin 10 presents tool set, aimed at solving most of the failures and problems that arise in the tenth version of Windows.
Functionality and capabilities
You can download winfix on the official website of the developer: http://www.thewindowsclub.com/fixwin-for-windows-10
All tools and utilities included in the program are divided into several sections, each of which is responsible for a separate category of problems:
- Welcome. This section provides general information about a specific computer and its operating system.
- File Explorer. Section related to conductor violations.
- Internet and Connectivity. Section of failures that occur when connecting to the Internet network.
- Windows 10. Category of standard problems.
- System Tools. Deals with system errors.
- Troubleshooters. Windows 10 computer diagnostics for selected programs and devices.
- Additional Fixes. Additional tools.
In order to resolve a specific type of fault, you should select the appropriate section. Here, in each of them, more than a dozen typical cases or a whole group of them are presented; after choosing the most suitable option, you should click on button "Fix» , that is, “fix” and the program will automatically do everything.
Considering that the program is not Russified, all sections will be presented in detail separately with translations of error categories.
File Explorer section
This section is devoted directly conductorWindows and is responsible for problems with labels, display of elements, etc. 
Internet & Connectivity
Most of the points in this section concern problems withInternet Explorer, which is now practically not used. Thus, other points not related to IE will be presented below. 
Windows 10 partition
This is one of the most popular sections, which contains a lot of useful functions. 
System Tools
This toolkit comes to the rescue in those difficult moments when the main system tools and assistants for one reason or another are not available in traditional ways. 
Troubleshooters
This section allows you to make computer scan for violations of a certain type. These can be malfunctions of both hardware and software. 
Additional Fixes
Obviously, here you can find everything that was not included in the previous sections or does not have a strict classification.  This is the least popular section among others.
Common Mistakes
During the operation or launch of the Win10 OS, all sorts of problems are common. Of course, to correct the situation, updates and patches are being released one after another. However, it is possible to define a whole list most common situations:
- errors with updates;
- problems with drivers;
- hardware failures;
- registry malfunctions;
- problems with starting.
Of course, this is not a complete list. Most problems are identified by their own code, which allows them to be quickly identified and the necessary actions taken.
Errors when loading the system
Windows 10 users may sometimes experience a blue or black screen when booting up their computer. This is a system failure caused by some error. Often the code, name, or number of the breakdown is given in the same window, which allows the user to get more information about a specific situation regarding the causes of its occurrence and ways to eliminate it. Since the reason may lie in both hardware and software problems, then ways to solve the problem in each individual case may be different.
Memory Management Error
It occurs after installing new software or hardware, or in the installation process. In general, the causes of a Memory Management type error can be caused by a number of problems in firmware, hardware, drivers or software. 
Error code 10016
In the Windows 10 event log after the system starts, sometimes an error with code 10016 may appear. This is a system event that indicates inability to start a specific application with a specific service. To eliminate it, you will need to manually edit the system registry, which is not recommended for inexperienced users.
Netwlv64 error
Netwlv64.sys may be present in the operating system as a third-party device driver or one of the important system files. 
Errors of this type occur when equipment malfunction or the file itself and they are issued when you try to start a computer, program, or individual function. Reinstalling and updating drivers should relieve the user of this problem.
ActiveX/COM error
A fairly common error that is associated with problems in the registry. Most often it occurs during the first stages of a new operating system, while its registry is not yet stable. Easily removed with programsCCleaner using the registry scanning and repair function.
Code 31
The main source of this error is any damage or driver conflict. Additional reasons include possible damage to the registry and system files under the influence of malicious elements. As a rule, Code 31 is eliminated using a system restore.
Error code 80073712
This error is related to the update center and usually occurs during the installation of new components. 
This is a purely system error that occurs due to impairments update repositories. Eliminated using the PowerShell system utility.
Nobody likes it when the usual customized Windows 10 starts to crash and freeze. Let's figure out what reasons this may be associated with, and learn how to identify and correct the problems that have arisen.
Checking Windows 10 for errors
There are two types of errors in the operation of computer devices:
- hardware - physical damage to the device’s hardware is to blame for their appearance;
- software - associated exclusively with the software component.
Let's figure out how to identify these failures and correct them using various means.
If hardware errors can be “cured” only by replacing or repairing the damaged part, then software failures can be corrected using special built-in or third-party utilities.
Diagnostics Windows 10 using SFC
SFC.exe is a system utility built into Windows 10, which is responsible for checking the integrity and functionality of system files. If any of them are damaged, the program automatically repairs them. SFC is not omnipotent: it is recommended to use it in conjunction with DISM, which will be discussed later. However, using this utility is practically the first thing to do in case of system failures.

For some (sometimes quite a long) time, the utility will check system files for integrity. After completion of the work, it will give the user the result.
SFC cannot repair some of the system files while Windows is running, because they are currently in use by the system. If the SFC check shows that there are problems, but it cannot solve them, the utility must be run again, but not from the system, but from the Windows recovery tool.
You can open the Windows Recovery Tool in the following ways:
- go to “Start” - “Settings” - “Update and Security” - “Recovery” - “Special boot options” - “Restart now”;
The Update & Security item in Windows Settings allows you to access the special boot options menu
- select the "System Restore" option when booting from installation media (or from a recovery disk);
Click on the "System Restore" button when booting from installation media
- Instead of pressing the start button, press a special button that allows you to enter recovery mode. It is available on some laptops, for example Lenovo. As a rule, such a button is located either next to the system start button or next to the charger connector.
Some laptops have a button that opens the recovery menu
From the recovery menu, do the following:

This time, the SFC utility will be able to repair all files, even those that are usually inaccessible to it.
Video: how to run the SFC utility
Scan and repair Windows 10 using DISM
DISM is another utility for recovering damaged files. Its scope of application is much wider than that of SFC. You can even use it to make system backups. DISM and SFC are responsible for different groups of system files, and using them together is more effective than using them individually.
Diagnostics and repair of system files using DISM are also carried out through the “Command Line”. How to enter it is described above. There are several options for using the command:
- dism /Online /Cleanup-Image /CheckHealth - no check is performed, the utility displays the latest saved data on the status of the files;
The command dism /Online /Cleanup-Image /CheckHealth shows what results the disk check gave last time
- dism /Online /Cleanup-Image /ScanHealth - checks the integrity of files without “fixing” the problems found;
The command dism /Online /Cleanup-Image /ScanHealth starts checking all system files through DISM without “repairing”
- dism /Online /Cleanup-Image /RestoreHealth - starts checking the integrity of files and then restoring damaged files.
Checking system files in DISM and then repairing damage is started with the command dism /Online /Cleanup-Image /RestoreHealth
Scanning and restoring files takes quite a long time. It is also a completely normal feature of the DISM utility that the status bar freezes at 20%.
Video: how to check the integrity of Windows 10 using SFC and DISM
Checking the hard drive for failures
In addition to physical damage to the hard drive, there are also errors that can be “cured” using the built-in diagnostic tools of Windows 10. To fix more serious problems (for example, bad sectors), you can use third-party utilities, but after a while the disk will still have to be replaced.
Using the Command Line
Using the Command Line, you can run the built-in Check Disk utility, which checks the disk for errors and, if possible, corrects them. In a Windows environment, this program will not be able to check the system drive (drive C): it will prompt you to reboot and will check during the reboot before the OS starts.
If the chkdsk utility receives a system disk as input, it suggests rebooting the system to check it
The utility is launched in the “Command Line” (how to enter there is described above) using the chkdsk command<имя диска с двоеточием>with the given parameters:
- /f - auto-correction of found errors;
- /r - check for bad sectors and attempt to restore damaged information;
- /offlinescanandfix - offline scan, in which the program first “disconnects” the disk from processes in the system, and then checks it. Applies if the disk is in use and a “simple” run of Check Disk cannot fix the errors;
- /? - help on the command.
The command with the /r option can take up to several hours to complete.
As a result, chkdsk will display the disk data obtained during the scan
Video: how to check your hard drive for failures using chkdsk
Using StorDiag
The storage diagnostic utility is present only in Windows 10 and is not used in other versions of the system. Just like Check Disk, it is launched via the “Command Line” using the command stordiag.exe -collectEtw -checkfsconsistency -out<путь к папке, куда сохранится отчёт>.
StorDiag does not correct the errors found, but only diagnoses them and writes the received data to a report file. However, its diagnostic scope is wider than that of Check Disk, and if you are an advanced user, you can use this program to more accurately determine the cause of problems with your device.
Checking the disk using the StorDiag storage diagnostic utility will allow you to diagnose problems and write the resulting data to a separate file
Using PowerShell
Windows PowerShell is a “Command Prompt” shell used in Windows as another management tool. It is distinguished from a regular console by a wider range of applications, the ability to use scripts and other improvements.
PowerShell is located at Start - All Programs - Windows PowerShell. The console can also be found by simply typing its name in the Start menu search.
To check the disk, enter one of the following commands in the PowerShell “Command Prompt” running as administrator (right-click on the PowerShell icon - “Run as administrator”):
- Repair-Volume-DriveLetter<буква диска без двоеточия>- normal check with recovery;
- Repair-Volume-DriveLetter<буква диска без двоеточия>-OfflineScanAndFix - offline check (what it is was described above).
The specified commands entered in PowerShell will launch the disk diagnostic and treatment tool
Using Explorer and Control Panel
You can diagnose your hard drive for errors by running the diagnostic utility through Explorer. To do this, follow the path: “My Computer” - right mouse button on the disk that needs checking - “Properties” - “Service” - “Check for errors”. The check performed is similar to Check Disk.
Diagnostics and error correction can be started from the disk properties window
In addition, through the “Control Panel” you can activate system maintenance, which includes checking hard drives. It is located along the path “Start” - “Control Panel” - “Security and Service Center” - “Maintenance”. In the maintenance window, you can view the results of the previous scan or start it again using the “Start maintenance” button.
To start disk maintenance, you need to click on the corresponding button
Video: how to check your hard drive for errors using the built-in diagnostic utility
Windows Registry Diagnostics
The registry is another Windows component that often gets damaged, leading to crashes, glitches and freezes. To prevent this from happening, you need to periodically clean it, removing outdated branches, consequences of failures and erroneous entries.
Manually cleaning the registry is very labor-intensive and time-consuming. In addition, it is easy to make a mistake when carrying out this process, which can lead to negative consequences (including system crash). Therefore, we will touch on the topic of manual cleaning in passing.

If you don’t want to waste time on manual cleaning, use one of the special programs that will automatically clear the registry of unnecessary and erroneous entries. The most popular of them is CCleaner - a free utility that not only corrects registry errors, but also cleans your computer of junk and accumulated temporary files. Let's figure out how to work with it.

You can download CCleaner from the official website of the developer.
Video: how to clean the Windows 10 registry manually and using CCleaner
When system failures are corrected, Windows begins to “fly” and delight the user with its impeccable work. Check the system for errors in a timely manner so as not to miss any problems that have started, and it will serve you for a long time.
Every time you start Windows, there is a small chance that the system will crash a little. And the longer you work with this OS, the faster this will happen, because it’s no secret that Windows tends to get clogged. If you are sure that your operating system is not working correctly, then you have the opportunity to check your computer for errors by using the built-in Windows tools. And the main thing here is that no matter what OS version you have (Windows 7.8 or 10), this process will be the same everywhere. So let's see how to check the operating system for errors.
Checking Windows for errors

In addition to searching for such files, Windows can also restore them. To do this, restart your computer after checking.
Of course, very often there are situations when Windows cannot recover all damaged files. You will also be notified about this in the console after verification. In this case, you can do the following:
- Open the command prompt again.
- Write and run this command: findstr /c:"" %windir%\Logs\CBS\CBS.log >"%userprofile%\Desktop\sfc.txt"
- After this, a text document will be created on the desktop of your computer, which will indicate the operating system objects that are damaged.
- In case of urgent need, you can copy these same files to yourself from another computer and look.
Now you know how you can check Windows for errors and restore damaged files. However, checking and cleaning already damaged elements may not be entirely enough, because it is much easier to protect your computer from critical errors. To do this, we recommend that you use a PC cleaning utility of your choice to remove system junk. If you are interested, you can read it. That's all for us. Use our tips and your computer will work stably and without interruptions.
Hi all! Many PC owners often catch themselves thinking that their machine is not working fast enough, or “freezes,” so to speak.
In this case, it is worth testing your “iron friend” and identifying the reason for this behavior. Today I will tell you how to check the speed of your computer. But first, let's decide why we need to do this.
Why is verification needed?
You should spend valuable time on tests for a number of reasons:
- Testing will allow you to understand which tasks your computer can perform easily and which are difficult for it.
- If you are going to purchase a new PC or laptop, then using the results of the check, you can choose the most suitable model that will meet all your needs.
- You'll know which components are slow and can replace them during the upgrade.
- You can compare the characteristics of your computer with the PC of one of your friends and find out whose PC is the most powerful.
How to do this?
Well, checking speed is a very necessary and important thing, but how can you find out the speed, how can it be measured? In order to find out the speed of your computer, you will need a PC with Windows installed on it, the usual set of applications for this OS, and my instructions, which I will describe below.
You can check using three simple methods:
- using the Windows Experience Level Index;
- using the Windows Task Manager, which should already be familiar to you;
- based on the use of special programs.
Let's look at each of them in detail.
First way
Windows has a very useful utility called " Performance index" This application takes measurements of your PC's performance, shows you a score for each, and, of course, evaluates overall system performance. In this case, the size of the overall indicator does not exceed the smallest indicator among the elements.
In versions 7, 8 of Windows and Vista, in the Control Panel you need the “Performance Counters and Tools” section (in Windows xp you cannot check performance in this way).

If we talk about the 7th version: the maximum score is 7.9, the average is from 3.5 to 5. If the performance level index is more than five, then you don’t have to worry about anything. However, if the scores are below the “3.5” rating, then your PC should either be replaced with a new one or upgraded to the old one (which will be much cheaper).
In Vista the maximum is 5.9, and in 8 it is 9.9.
In Windows 8.1 and 10, performance testing is done using PowerShell. To open it, write “PowerShell” in the search bar on the start screen, right-click on the icon of the found utility in the search results and select “Run as administrator” in the context menu.
In Windows PowerShell, type winsat formal and press Enter. As a result of these actions you will see the following:

There is one small feature: if you are doing the test on a laptop, it must be connected to a 220V network, otherwise the program will generate an error.
The whole process may take a few minutes, and the result will be saved here:
C:\Windows\Performance\WinSAT\DataStore\...Formal.Assessment (Recent).WinSAT.xml.
You cannot test the system in Windows PowerShell without administrator rights; you can only view the performance ratings from the previous test. To do this, write down "Get-CimInstance Win32_WinSAT" and press Enter. As a result you will see:

Second way
If you want to have an extremely accurate idea of what the speed of your system is, then this method will be most convenient for you. Its main advantage over the above is that it is able to demonstrate not only how fast the computer itself is, but also how fast its individual elements are.
To determine the quality of work using this method, you must perform the following steps:
- Press the Alt, Ctrl, Delete keys simultaneously.
- Click on “Task Manager”.
- In the task manager, select the tab called “Performance”.
In “Performance” you will see how well your computer is functioning. If the level of quality of its work is insufficient, then you can try to upgrade your machine.

The graphs allow you to determine what is causing the slow operation of your PC: processor load or lack of RAM. The green line indicates excellent work, the yellow line indicates an acceptable level, but if the line is red, then urgent action must be taken.
Third way
This method involves using special programs. There are special applications that are created specifically to collect data about the state of the computer.
There's just a ton of all kinds of tests, numbers and information. With these products you can get the most comprehensive data about the performance of your PC. What kind of programs are these? Here is a list of those that I have used at least once:
Everest. It was created primarily for analyzing PC configurations, but it provides a large number of different tests.
SiSoftware Sandra. At the moment, the best option if you want to test the level of performance.
3Dmark. His main specialization is testing computer video cards. Consists of a huge number of different texturing tests, working with 3D modeling, etc. There is also a comprehensive testing option, reminiscent of a video game that is played not by you, but by the program. During its work, it evaluates the stability of the video card during heavy loads and measures the frame rate.
PCMark. This is lightweight software intended for limited use. Serves only to check performance. Allows you to perform integral testing of any PC component. The main feature is the ability to compare the performance of your own computer with the world average.
You can download these programs from the official Internet resources of their developers online.
Well, that’s all, dear friends! In the end, I would like to tell you about a training course, the effectiveness of which I was able to “test” on myself. We are talking about the course Secrets of successful computer work».
What distinguishes this course from a huge number of other similar courses is primarily the author’s high professionalism and simplicity of presentation. All the intricacies of working on a PC are explained so simply and clearly that even elderly people, who, as we know, shy away from modern technology, turn into experienced users in a couple of months of training.
I wish you to be computer literate people, and I and my blog will help you become so. Therefore, do not forget to subscribe to updates and follow the release of a new article.
Share information on social media. networks, see you!
Sincerely! Abdullin Ruslan
Hard disk (HDD) is the most important element of a computer on which all the necessary information, programs and user files are stored. Like any other component, over time the hard drive wears out, its normal operation is disrupted, and failures begin to occur. Along with physical wear and tear, which leads to the appearance of so-called bad sectors (bad blocks), logical errors associated with the file system, indexes and the main file table often arise.
For the time being, you may not observe any problems with your hard drive, but this does not guarantee that one day the hard drive will not die. Therefore, it is important to periodically (once or twice a year) check your hard drive for errors and bad sectors that require repair. Regular monitoring will allow you to track the condition of the media and respond in a timely manner to changes in its condition. Of course, you should not neglect such a proven method of protecting information as backup. The most valuable data must be duplicated on a backup storage device.
Symptoms of a failing hard drive
In most cases, HDDs operate smoothly for several years without requiring special attention. However, in case of improper operation (physical impact, lack of proper cooling), the resource of the storage medium is significantly reduced. In rare situations, there may be a manufacturing defect or sudden failure.
Failures in the hard drive may be indicated by loading the operating system for too long, the unreasonable disappearance of files and folders, and slow startup of applications. Obvious symptoms of a hard drive losing its functionality are slowdowns in programs and long periods of copying files. If the computer constantly freezes, and nothing other than restarting helps, then in the process of identifying the causes, checking the hard drive should be the first point.
Using standard Windows 7/10 tools
You can test the media using standard Windows tools. The easiest way is to select the desired hard drive in Explorer, right-click on it and go to the “Service” tab.
Next, click the “Run scan” button and set the scan parameters in the window that opens. If both checkboxes are checked, Windows will automatically correct all system errors and restore damaged sectors during diagnostics.

The results of the audit can be found in the report.

Command line
You can also audit your hard drive using the utility chkdsk called from the command line. In fact, such a check will not differ much from the above option.
So, launch the command line by selecting the required Start menu item. Then enter the command in the window: chkdsk G: /f /r
- G – name of the hard drive being tested (select the drive you will check);
- f – error checking and correction;
- r – detection and recovery of bad sectors.
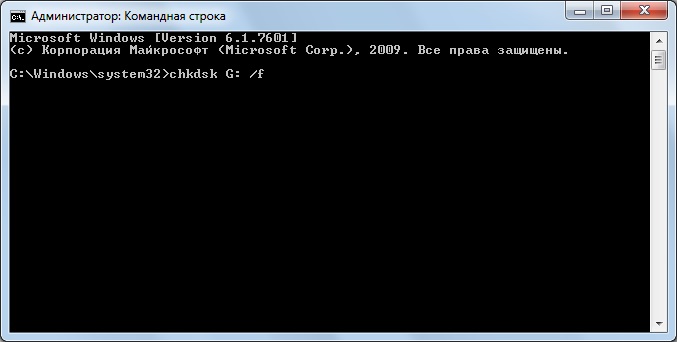
All information about errors and bad sectors found will be displayed as the diagnostics are carried out.

Third-party programs for checking your hard drive
There are many programs and utilities for finding bad sectors and fixing HDD errors. We will list only the most famous ones.
Victoria
Perhaps the most popular hard drive checking tool. The program can be launched both in Windows and in DOS mode from a bootable USB flash drive.
The interface provides five tabs: Standard, SMART, Tests, Advanced and Setup. First of all, go to the section Standard, where in the list of devices we select the hard drive we are interested in. The Drive passport area will display basic information about the HDD.
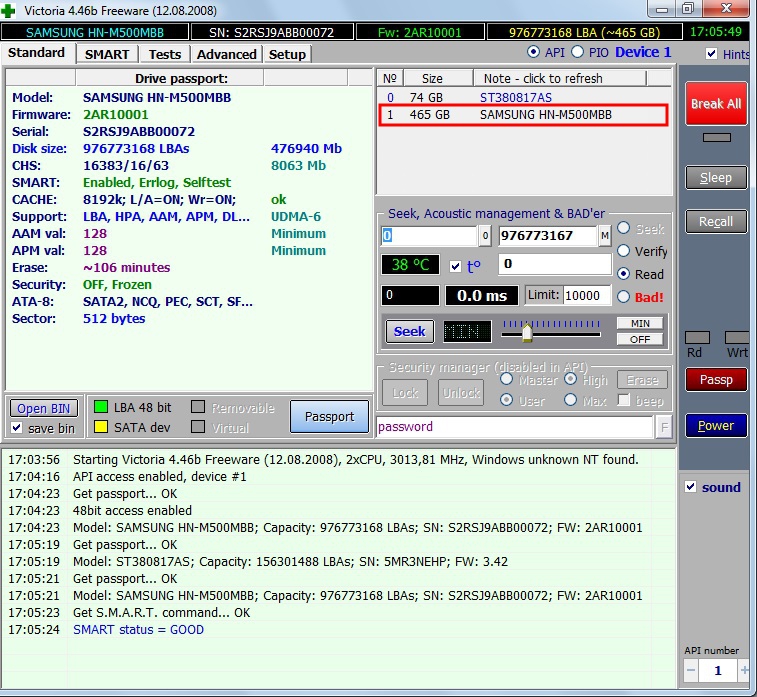
Next, select the tab SMART and press the “Get SMART” button. SMART (Self-Monitoring, Analisys and Reporting Technology) is a hard drive self-monitoring technology. Those. The hard drive monitors its operation during operation, recording information on a set of parameters that allows one to assess the condition of the media. It is this service information that we are trying to obtain.
After clicking “Get SMART”, either the inscription GOOD on a green background or the inscription BAD! will appear to the right of the button. on red. The second option will indicate that the media is in unsatisfactory condition and will most likely have to be replaced. For a more detailed study of SMART statistics, let's pay attention to the list of parameters on the left. Here we are primarily interested in the attribute 5 Reallocated sector count, indicating the number of sectors remapped. If there are too many of them, then the disk has begun to “crumble,” that is, its surface is rapidly degrading and it is urgent to make a copy of all data. In this case, there is no point in restoring the hard drive.

Chapter Tests makes it possible to check the hard drive for bad sectors, as well as try to “cure” or reassign unreadable blocks. For simple testing of the hard drive, set the switch to Ignore and start the test with the Start button. Sector health is assessed by measuring response time. The smaller it is, the better. Each response time range has its own color code. The slowest blocks are marked with green, orange and red colors. Sectors that could not be read at all are marked in blue. If there are a large number of “slow” and unreadable blocks, the hard drive should be replaced.

The Victoria program allows you to restore bad sectors, but we will not consider all the nuances of the procedure. Moreover, “treatment” often contributes only to a slight extension of the service life of the storage medium. To reassign bad blocks, perform a check with the mode enabled Remap. If the restoration was successful, do not rush to rejoice. Re-diagnostics of the disk after a certain period of operation. The appearance of new bad blocks will indicate that the degradation of the hard drive is irreversible, and it’s time to find a replacement.
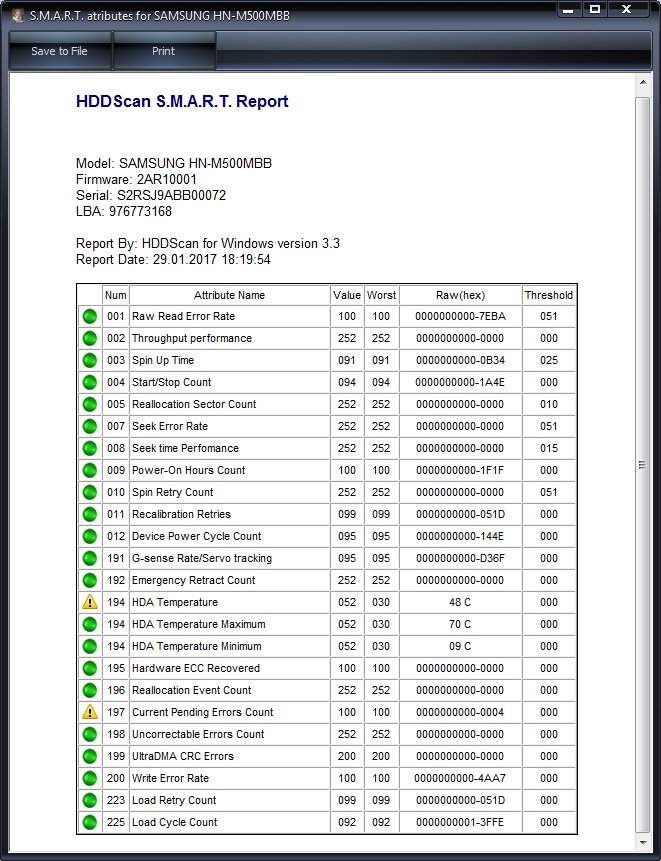
HDDScan
This is another handy program for identifying hard drive problems. After launching the application, select the drive that needs to be checked in the Select Drive list.

Below we click on the “S.M.A.R.T.” button and get acquainted with the provided report.
Now let's diagnose the disk surface. Click on the round button to the right of the drop-down list of media and select Surface Tests in the menu that opens.
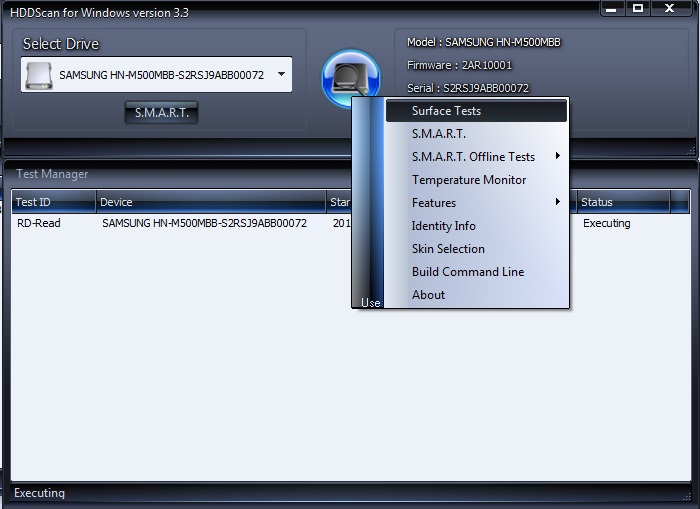
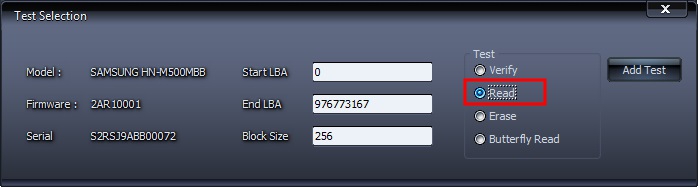
Click on the Add Test button, thereby adding a test to the list and starting its execution.

You can receive information about the testing progress in Graph, Map, and Report modes. All blocks are also distributed into groups with appropriate color marking depending on access time.


At the end, a final report is generated.

Perhaps this is all we wanted to tell you about the methods of checking a computer’s hard drive for functionality. We hope the information provided will be useful to you and help you save important data.