Guide to self-updating bios gigabyte. How to update the BIOS of a gigabyte board - all methods
If you have reached this topic, there is most likely something wrong with your computer. Updating (also called "flashing") the BIOS can help solve some problems, such as incorrect operation of peripheral devices or lack of support for modern processors. But don’t rush to change things; let’s first study the theoretical part.
How to update BIOS Gigabyte
The first and most important thing you need to know is that the BIOS update operation must be treated with extreme caution. If you turn off the computer's power during the update process, there is a high chance that the motherboard will fail. If your PC is working properly, then you should not chase the latest updates so as not to sacrifice performance.
Have you decided? Then go ahead! If possible, connect your PC to an uninterruptible power supply, and fully charge the battery on your laptop.
There are two main ways to update Gigabyte BIOS:
Method 1: Q-Flash
Q-Flash is a utility from the manufacturer Gigabyte built into the BIOS. “Firmware” with its help is a simple and understandable process, and the update can be carried out by an ordinary user who does not have deep knowledge in the field of computer technology. If you have an older BIOS version that does not have Q-Flash, proceed to method No. 2.
We will analyze the update using the example of the Gigabyte GA-H110M-S2H motherboard:
- Go to Gigabyte official website.
- Click on the magnifying glass (search button) in the upper right corner of the screen.

- Enter the equipment model (in our case GA-H110M-S2H) and select a model from the drop-down list.

- Click on the link "Advantages", then click on "Support".

- Click on the button "BIOS", select the latest version and click on the download icon.

- Unpack the downloaded archive, from it you only need one firmware file, in this case it is "H110MS2H.F21".

- Copy this file to a flash drive, first save it in FAT32.
It is advisable that the flash drive only contains the firmware file!
- Restart the computer, after starting press the key "END" until the Q-Flash utility loads.
- Select an item "Update BIOS from Drive" and press "ENTER".

- From the drop-down list, select a flash drive, most likely its name will be “HDD 1-0” (depending on the number of media connected to your computer) and click "ENTER".
- Select the file with the firmware (if you listened to our advice in step 7, then there is only one and you won’t have to look for it) and click twice "ENTER".
- Wait until the update process completes and a completion message appears.
- Press any key and you will be taken to the initial menu. Next click "ESC" And "ENTER", after which the computer will reboot.
Method 2: @BIOS Utility
@BIOS Utility is a utility for Windows OS that can update the BIOS directly from the system. In order to use the @BIOS utility, you must first download and install the .Net Framework version 4.5 or higher and APP Center (an application from Gigabyte for making the most of the motherboard's capabilities).
- Follow the first four steps from method No. 1.
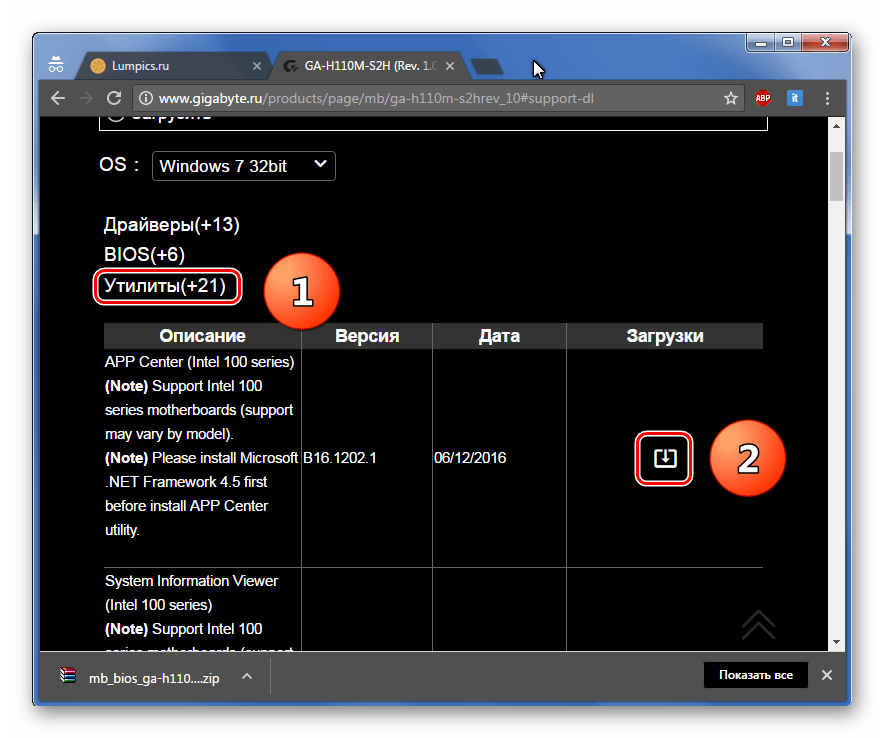
- Click on the button "Utilities", and then to the loading icon in the line with the phrase "APP Center".
- Unpack and install APP Center.
- Find the phrase in the table "@BIOS" and click on the download icon.

- Unpack and install @BIOS Utility.
- Launch the utility.
- Click on the button with the text "Update BIOS from GIGABYTE Server". The firmware file will be automatically downloaded and the program will update the BIOS.

When downloading the firmware, stable power supply to the computer and Internet connection must be provided!
- You can also use the firmware file downloaded manually in method No. 1, to do this, click "Update BIOS from File" and select the file.
- Wait for the update to complete and restart your computer.
In this article, we looked at two ways to update the Gigabyte BIOS. It turns out that there is nothing complicated about “reflashing”. The main thing to remember is that you must not allow a power outage or internet connection (if the second method is used).
Unpleasant conflicts expressed in the frequent failure of your operating system to work correctly with a certain group of drivers, as well as a completely justified desire to increase the performance and expand the functionality of the motherboard used, can become a unique reason for your genuine interest in resolving the issue of how to update the Gigabyte BIOS. And only when you are completely confident in the advisability of carrying out such an important operation, which is flashing the microchip of the basic input/output system, and at the same time are determined to dot all the i’s, then let’s upgrade your “iron friend”...
The point is...
Now the time has come to doubt the modern competence of the once impeccable model of your motherboard from the leader of the IT industry of the Taiwanese company GIGABYTE Technology Co. Ltd. A fully functional machine instantly lost its “authority” when you connected a hard drive of sufficiently large capacity or, perhaps, purchased a new, more powerful one. As a result of the upgrade, the BIOS simply cannot manage such “progressive” equipment, since the software part of the code is outdated and requires practical update. Therefore, in such a situation, the question of how Gigabyte becomes not just important, but extremely in need of a solution.

Choosing the only and trouble-free update method
Of course, you can flash the BSVV (basic input/output system) of a computer in a variety of ways. But it is highly not recommended to perform a knowingly incorrect update from the Windows environment. This is purely the prerogative of DOS, so the operating system should not perform intermediary functions. The BIOS flash memory must be accessed directly. Only this way and no other way. However, this method of firmware requires certain knowledge, so we read, remember and, accordingly, answer the question with independent practical actions: “How to update the Gigabyte BIOS?”
Number, series, revision of the motherboard: where and what exactly to look for?
First of all, you need to have information about the modification of your motherboard. You can find this out from the documentation on your computer, but if you don’t have it, use one of the options below:

We write everything down on a separate piece of paper and plunge into the vast abyss of the Internet - download programs.

BIOS firmware Gigabyte
Knowing the model of the motherboard and the version of our BSVV, we proceed to the next preparatory stage of the software upgrade. On the manufacturer's website, download the available update for your board. This is usually a file up to 3 MB in size, so you won't have to wait long. Next, you need to make a bootable USB flash drive, which will contain the new firmware for your BIOS. Only after all of the above will you be able to carry out the process of “uploading” more advanced program code onto the BSVV microchip, through which the hardware of your computer is controlled.
Preparing the flash drive
Having downloaded a free utility called USB Disk Storage Format from the Internet, all you have to do is carry out some actions with the program interface, that is, configure it properly:
- To do this, in the first line we define our flash drive.
- Specify the file system: FAT32.
- In the Format option line, put a checkmark.
- Check the Create a DOS Bootable Disk option.
- In the window below we write the directory in which our firmware file is located.
- Click Start and wait for the process of creating a bootable flash drive to complete.
Now you can update the BIOS of the Gigabyte motherboard using the built-in BSVV software that needs to be debugged.

The important final stage is setup
By briefly pressing the Delete key we go to the main page
microprogram menu for managing the hardware of our electronic machine. In this case, the flash drive must be installed in the USB connector of the computer.
- To return the Gigabyte BIOS settings to default values, go to the Load Optimaized Defaults tab and press Enter. We agree to save the changes by selecting "Y".
- Press F8 and go to the bootloader menu.
- Disable the first item Keep DMI Data by selecting Disabl.
- It is recommended to save the current firmware version, so select Save Bios to Drive and perform the backup process.
- Click Update Bios from Drive and get into the directory of our flash drive.
- Press the Enter key to launch the firmware file.
Attention: while updating the BIOS, do not turn off the computer under any circumstances, as this can lead to quite serious problems!
- Upon completion of the microcode rewriting process, a window with the message Copy BIOS completed-Pass should appear on the monitor screen. Press any key.
Congratulations, the firmware is completed!

Upgrade your video card
This will probably be a small discovery for you, but the graphics module can also be subjected to high-quality software improvements or brought back to life when it is seen to be inoperable due to a crashed firmware. Question: "How to update the BIOS of a Gigabyte video card?" — needs more detailed consideration. We read about this further and understand the nuances.
- In the Support&Downloads section, select Graphics card.
- In the By Chipset Series window we find our modification of the graphics card.
- Then specify the Mode Name. Click on the Search button.
- Go to the section of the specified video card.
- Go to the Support&Downloads tab again. Where in the Download type window you need to select BIOS, after which in a new window you will be presented with the versions of available updates.
- We download the graphical BIOS from the server and run it in the Windows environment.
Attention: the downloaded version should not be underestimated and should express the correspondence of the symbolic and digital value with a tendency to increase by one unit. That is, the F2 firmware is replaced by F3, and F11 by F12... But in no case: F2 by F11 or F4 by F12! Gigabyte, you already know, now let's take the next step, which will help you upgrade your video card.
Small but remote
However, the VGA Tools@BIOS interface has an option to save the current BIOS version. Despite its miniature size, the utility copes with its assigned task with a bang.
- Using the Backup VGA BIOS button we do
- Using the Flash key we find our firmware file and mount it into the bootloader.
- Click "OK" and after rewriting the BIOS, we will enjoy the new features and more efficient operation of our video card.
In conclusion
To date, no Gigabyte BIOS update program can compare with the functional correctness of the built-in software provided by the manufacturer. Such an important process as rewriting BSVV flash memory in a standard way requires only two things from the user: extreme attention and uninterrupted power supply. The system will handle the rest on its own. Happy upgrades!
Periodically, new versions of Bios are published on the websites of motherboard manufacturers, which eliminate previous shortcomings and various bugs. Motherboard manufacturers themselves also recommend updating Bios regularly.. In any case, you can search the Internet for reviews about the quality of new versions and only after that make a decision about flashing. Personally, I update myself at least once a year.
We will update Bios using the built-in Q-Flash utility, an example is shown on version 2.23. The principle of operation on different motherboards is no different, and these instructions are based on the example of the Gigabyte z68A-D3-B3 motherboard
Here is a list of official websites of motherboard manufacturers where you can download new versions of Bios. The most popular ones in Russia are indicated.
To work, we will need a flash drive, necessarily formatted in FAT32, or a partition on the hard drive formatted in FAT32, otherwise the system may simply not see them. Download the new BIOS version from the office. site, unpack the archive and throw the contents onto a flash drive or screw. Now we insert the flash drive into the USB socket, reboot and, as usual, press the Delete button to get into the BIOS settings.
All actions are carried out using the ESC - cancel, Enter - apply and arrow keys. New motherboards support mouse operation.
The first thing we need to do before flashing the firmware is to reset all settings to default, so that after the update we don’t have any problems with the parameters. To do this, we find the point Load Fail-Safe Defaults, select it with arrows and press Enter:

We agree by pressing the Y key, the settings are reset.

Bios Backup Procedure
Now we look at the navigation menu, it can be located either at the bottom of the screen or on the right. We are looking for where the Q-Flash utility is turned on, in our case the launch is carried out by pressing the F8 key

We see a request to confirm actions, agree by pressing Y (abbreviated Yes) and Enter

In the Q-Flash window, select the item Save Bios to save a backup copy in case of recovery.

The system offers us a choice of storage location, but in this case it only sees a flash drive in FAT32 (or a hard drive in FAT32), so we will save the backup to it

If possible, set a name for the backup and press Enter


Procedure for updating Bios to a new version
After saving the backup copy of the old version of Bios, select Update BIOS.

Let's go back to our flash drive. There are unpacked files downloaded from the office. motherboard manufacturer's website. If you dropped the entire folder, then open it too

We need the firmware file, do not confuse it with a backup copy. Select the firmware and press Enter

We confirm the request to update Bios to the new version by pressing the Enter key

The Bios update process has begun, nothing more can be done during the firmware, this is already critical. If the update fails or there is a power outage, you will have to take your hardware to a service center. The whole procedure also takes only a couple of minutes.

at the end of the update process we receive a message about the successful outcome of our hopeless enterprise :)

Now we go to the main menu by pressing the ESC key - the topmost key on the left, and make the settings we need. We reboot, remembering to remove the flash drive, and use a computer with the new Bios firmware.
http://site/wp-content/uploads/bios_na_materi_gigabyte.pnghttp://site/wp-content/uploads/bios_na_materi_gigabyte-150x150.png 2017-07-16T19:41:48+00:00 Installation Periodically, new versions of Bios are published on the websites of motherboard manufacturers, which eliminate previous shortcomings and various bugs. Motherboard manufacturers themselves also recommend updating Bios regularly. In any case, you can search the Internet for reviews about the quality of new versions and only after that make a decision about flashing the firmware.... User website - Computer for dummiesIf you have reached this topic, there is most likely something wrong with your computer. Updating (also called "flashing") the BIOS can help solve some problems, such as incorrect operation of peripheral devices or lack of support for modern processors. But don’t rush to change things; let’s first study the theoretical part.
How to update BIOS Gigabyte
The first and most important thing you need to know is that the BIOS update operation must be treated with extreme caution. If you turn off the computer's power during the update process, there is a high chance that the motherboard will fail. If your PC is working properly, then you should not chase the latest updates so as not to sacrifice performance.
Have you decided? Then go ahead! If possible, connect your PC to an uninterruptible power supply, and fully charge the battery on your laptop.
There are two main ways to update Gigabyte BIOS:
Method 1: Q-Flash
Q-Flash is a utility from the manufacturer Gigabyte built into the BIOS. “Firmware” with its help is a simple and understandable process, and the update can be carried out by an ordinary user who does not have deep knowledge in the field of computer technology. If you have an older BIOS version that does not have Q-Flash, proceed to method No. 2.
We will analyze the update using the example of the Gigabyte GA-H110M-S2H motherboard:
- Go to Gigabyte official website.
- Click on the magnifying glass (search button) in the upper right corner of the screen.
- Enter the equipment model (in our case GA-H110M-S2H) and select a model from the drop-down list.
- Click on the link "Advantages", then click on "Support".
- Click on the button "BIOS", select the latest version and click on the download icon.
- Unpack the downloaded archive, from it you only need one firmware file, in this case it is "H110MS2H.F21".
- Copy this file to a flash drive, first save it in FAT32.
It is advisable that the flash drive only contains the firmware file!
- Restart the computer, after starting press the key "END" until the Q-Flash utility loads.
- Select an item "Update BIOS from Drive" and press "ENTER".
- From the drop-down list, select a flash drive, most likely its name will be “HDD 1-0” (depending on the number of media connected to your computer) and click "ENTER".
- Select the file with the firmware (if you listened to our advice in step 7, then there is only one and you won’t have to look for it) and click twice "ENTER".
- Wait until the update process completes and a completion message appears.
- Press any key and you will be taken to the initial menu. Next click "ESC" And "ENTER", after which the computer will reboot.
Method 2: @BIOS Utility
@BIOS Utility is a utility for Windows OS that can update the BIOS directly from the system. In order to use the @BIOS utility, you must first download and install the .Net Framework version 4.5 or higher and APP Center (an application from Gigabyte for making the most of the motherboard's capabilities).
- Follow the first four steps from method No. 1.
- Click on the button "Utilities", and then to the loading icon in the line with the phrase "APP Center".
- Unpack and install APP Center.
- Find the phrase in the table "@BIOS" and click on the download icon.
- Unpack and install @BIOS Utility.
- Launch the utility.
- Click on the button with the text "Update BIOS from GIGABYTE Server". The firmware file will be automatically downloaded and the program will update the BIOS.
When downloading the firmware, stable power supply to the computer and Internet connection must be provided!
- You can also use the firmware file downloaded manually in method No. 1, to do this, click "Update BIOS from File" and select the file.
- Wait for the update to complete and restart your computer.
In this article, we looked at two ways to update the Gigabyte BIOS. It turns out that there is nothing complicated about “reflashing”. The main thing to remember is that you must not allow a power outage or internet connection (if the second method is used).