Everything for the VKontakte group. There is some content that is closed from public access, because... it's not for everyone
Graphic elements in the design of the VKontakte community capture the visitor’s attention, hold it, and also increase the recognition of the group or public among thousands of similar communities. In addition, the graphic menu makes it easier to navigate through sections of the group, helping participants and other users of the social network navigate the structure of a large community.
A search on VK or viewing the portfolio of designers will show many successful examples of VKontakte group design, from which you can build when choosing a cover menu for your community.
The following VKontakte group design sizes are used:
- The page cover is shown at the top, across the entire width of the public page, size 1590 x 400 pixels;
- Large avatar - a vertical banner 200x500 px (aspect ratio 2:5), shown in the upper right;
- A small avatar, a round picture, is shown in each group message, size 200x200 pixels.
- Menu image for the VKontakte group, width 510 pixels, height 307 (so that the bottom edge of the menu matches nicely with the bottom of the large avatar on the right).
If a cover image is loaded in the community settings, the large avatar on the right is not shown.
How to make a header for a VKontakte group yourself
In order for the community header to look beautiful, all its graphic components must be designed in the same style (set of colors, logos, fonts) or be part of the same picture. When creating a VKontakte group yourself, the first step is to prepare a background image. This could be a thematic picture from free photo banks (for example, pixabay.com).
Open the image in a graphics editor. Crop or scale to size: length 1590 px, height 400 px. 
Next, you can apply the necessary inscriptions (group name, slogan, call to join the community). Now you need to upload the cover to the community; to do this, go to the “Community Management” menu item: 
Click on “Download” in the “Community Cover” field. 
In the next window, select the cover file previously prepared on your computer and click “Save and Continue.” 
Now your group will have a new cover. Keep in mind that in this case the vertical picture of the large avatar on the right will no longer be shown.
- The picture or photo must correspond to the theme of the community.
- Use high quality images.
- Do not violate other people's copyrights in images (currently, free stocks offer a large number of photographs and illustrations).
- Don't overload the cover with details.
- If you place a photo of a person on the header, it is better that he looks not at the visitor, but at the most important element on the page (menu, website address, message about a promotion, appeal).
- Use high-quality fonts and ensure that the text is legible at any scale.
Header sizes on VKontakte public in a new design
After the redesign of this social network took place, a new design element appeared - the cover. This is a large landscape image measuring 1590 by 400 pixels. The header for the VKontakte group is a static image. Large enough to place on it a bright, memorable photograph or picture and the name of the public, the company slogan, the name of the site, work schedule and other inscriptions. 
How to make a menu for a VK group in a new design
The process of designing a VKontakte group menu consists of the following steps:
- Preparing a list of menu links (this could be pages, community sections or external sites).
- Preparing the background image.
- Applying inscriptions and menu “buttons” to the background image.
- Cutting an image into parts.
- Enable wiki page.
- Loading a graphical menu and formatting it with wiki markup.
The background image should be 510 pixels wide, and the height depends on the number and placement of menu items. To work with images, you will need a raster graphics editor; below are examples using the free and lightweight Paint.Net.
You should immediately plan the placement of menu items so that the picture can be cut into fragments of the same size. This is important for the menu to scale properly on the screen of smartphones or tablets.
Vertical menu of the VK community with items in one column
Open the image in the editor. Using the editor's "Text" tool, write the menu items on top of the background. To make menu labels visible, they can be highlighted in several ways:
- Draw a frame;
- Change the background color under the letters;
- Add a shadow to the letters.
In the screenshot below, each item is highlighted in one of the following ways. 
The next step is cutting the image into parts:

The process of cutting an image can also be performed using a convenient online tool www.imgonline.com.ua/cut-photo-into-pieces.php.
Next, in the “Community Management” menu, go to the “Sections” item and in the “Materials” item, select “Restricted” (this means that only the group administrator can create and edit pages). 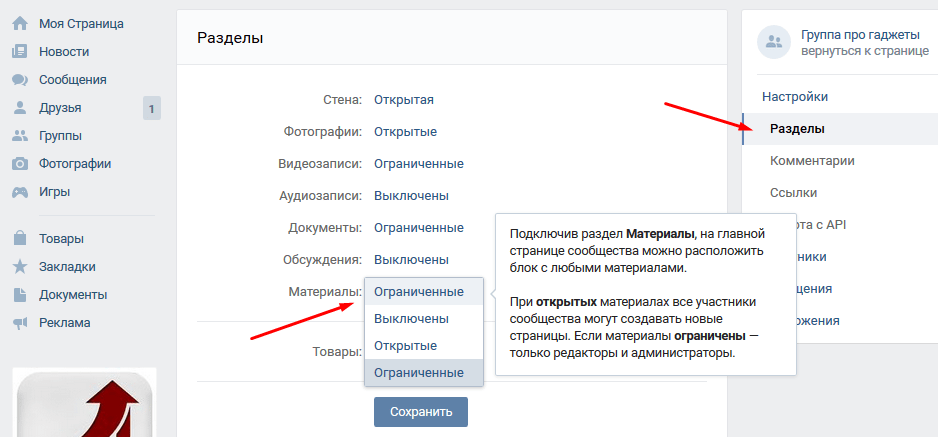
Click save and go to the main group. Near the section with information about the group, a “Latest News” item appeared. 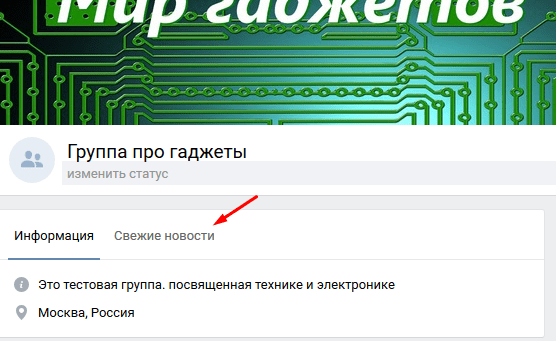
Go to this section and click edit. Change the title to “Menu” and then click on the camera icon to add an image. 
Click on the added image and in the properties window specify the link to the desired section. 
VKontakte automatically reduces images to 400 pixels and inserts extra tags. To fix this you need to go to markup editing mode. 
Each image tag begins with “[[” and ends with “]]” and consists of three parts separated by “|”: the image ID, properties, and link. You need to adjust the size of the pictures and insert the “nopadding” tag into their properties. The properties of pictures are listed through “;”. 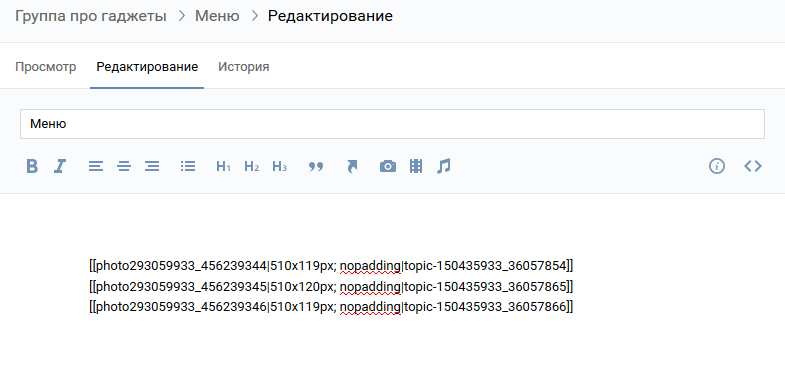
After saving the changes, menu creation is complete. 
Menu with horizontal or multi-line items
In this case, the preparation of images is carried out in the same way, but with the source being cut vertically. The cut fragments are loaded through the page editing interface. The relative position of the rectangular fragments is established using the wiki table markup in VK. Each link image tag described in the previous section is placed inside a table cell.
Table design rules:
- The beginning is indicated by the symbol “(|), the end of the table is indicated by “|)”.
- Additional properties are indicated after "|~"
- The new line starts with "|-".
- Each cell is separated by "|".
To exclude extra spaces, you need to specify the table parameters “fixed nopadding noborder”. The layout of a graphical menu with 2 columns and 2 rows looks like this: 
And the menu itself in the group: 
Group avatar size in a new design for VK public design
VKontakte communities use two avatar options:
- A large rectangular banner 200 by 500 pixels is shown at the top right if the cover is not loaded.
- The thumbnail is 200x200 pixels, shown in posts and discussions as a circle.
VKontakte pleases its users with a large number of interestingly designed groups. Many of them are not inferior in appearance to a full-fledged website. This effect is ensured by proper group design, in particular, menus and avatars. Experienced users can easily cope with this task, but if you are a beginner, then the article will be useful to you.
How to beautifully design a group on VKontakte
Creating a banner
When viewing a group, the user first of all pays attention to the avatar and menu. Below we will talk about how to create two pictures in Photoshop, cut one of them correctly and write a special code indicating
Stage 1
Open Photoshop and create a new document with dimensions 630x725 pixels. Fill it with white. Cut out two windows in the layer. Through these windows the graphic design of the Contact will look out. First, select a rectangular area measuring 200x710 pixels and press the “Del” button. Next, select a rectangular area measuring 382x442 pixels, combine the resulting rectangles at the bottom and press the "Del" key.
Stage 2
Under the resulting layer we will place the graphic design of the group. It is best to write the required text in advance on a picture with the main background, and in addition create the required number of menu items.
Stage 3

Next is the right rectangular area measuring 200x710 pixels. save it as a separate image. The result is a completely finished drawing for the design of the group. It needs to be loaded into the block, which is located in the upper right corner of the page. To do this, click the "Upload photo" button.
What is the left picture for? We cut it into several parts (depending on the number of menu items). For example, our menu has 5 items, which means the output will be 5 pictures 382x50 pixels.
Stage 4
The five pictures received must be uploaded to the group album. Next, go to the group page and select the “News” block, rename it to “Group Menu”, and then click “Edit”.
Stage 5
So we have come to the final stage of the guide “How to beautifully design a group on VKontakte”. Open the tab with the name “Source which is in the lower window, you need to copy and then paste into the “Source Code”. In the text of the code, replace photo with file names and mark the height of the file (382 pixels). Now insert the addresses of the menu links. The file name is taken from the album.
Stage 6
To perfectly combine images, several conditions must be met:
The group name must fit on one line;
The site address is also one line.
The description must contain 10 lines.
Wiki markup VKontakte
To understand how to design it beautifully, you also need to familiarize yourself with the concept of Wiki markup.
What is it?

So, Wiki markup is a system designed to edit pages in a similar way to HTML. Before you start creating a VKontakte group, decide on its type. Design can be graphic and text.
Text menu design
The code for the menu will look like this:
The beginning and end of the code are indicated by tags. Each icon will look like [], then a description.
Graphic menu
The code for such a menu will be compiled according to the following principle:
! !! !!
Of course, this information only scratches the surface of the topic of Wiki markup. You can learn more about it by visiting the official VKontakte group. There is a lot of useful information and video tutorials on how to beautifully design
Today I will continue my “Immersion in VK groups”. In the third part of the “series”, I told and showed. Today, let's talk about designing the VKontakte group menu!
In the first article about creating a menu, there were a lot of questions in the comments, so before starting a new topic, I will answer frequently asked questions.
Question 1: The first and most common: “Where is the code in the menu?” or “if there is no bookmark when editing “Source Code”, how to add an internal page?” or “I still don’t understand what to do if the code doesn’t appear!”
Answer 1: VK has changed the editor, now you can switch between the visual editor and the code with just one click (upper right corner of the editor):

To check which editor you are in: move your mouse over this button, write some text and highlight it in bold - if unusual characters appear, then this is code
Question 2: The second, really problematic: “ how to remove spaces between pictures?»
Answer 2: I admit, I was scared myself when the client’s menu started working for the first time. Now I quickly edit it, but then it was not fun. See:

Add the nopadding tag; and everything will fall into place!
Space creeps in between the pictures and the menu looks broken. For the ignorant, this may not be normal, but for the ignorant, this is at least unprofessional. So what's the big deal? Ah, it's very simple! In VK there are constantly some updates, new algorithms are introduced... and even the editor is crooked... sometimes, for no apparent reason, important tags drop out of the code and then we see this picture. To fix this, you need to look into the code and make the necessary adjustments. The code format should be like this:
Template: [] Example: []
Usually menu pictures are expanded because the code leaves out nopadding; — we put it in place and everything is aligned. Before saving the result, click on the “Preview” button to make sure that everything is smooth.
Question 3: News. In October 2012, VKontakte forcibly cut off the avatars of groups and public pages. Now their size has a common standard of 200x500 pixels. So, if you had a larger avatar in your group, then make an update (update the avatar).
By the way, along with cropping, VK introduced another innovation regarding group photos: now by clicking on the avatar, we, just like in the account, will be able to see all the albums of the community. It's convenient! And from this, new functionality is drawn in the group’s communications.
Soooo, we're done with the questions... now let's move on to creating the menu itself!
Step 1. How to create a menu in contact and make nested pages:
First of all, let’s make sure that you know how to create a group menu in contact and go through a few instructions:

What do you think of my cheat sheet?
This is the cheat sheet I came up with! For greater clarity, I will describe each number:
Do this operation with all subpages and your menu will be ready.
Eat! We created the menu, created the internal pages, filled them in, now let's move on to creating a beautiful graphic menu.
Step 2. How to create a beautiful graphic menu in Contact and install it:
I won’t give you the whole theory of how wiki markup works in contact, we have other goals now. To create a visual menu in a VK group, you don’t need to know all the wiki markup. Let's move on to creating a visual menu!
First, I’ll show you the code and result of my menu:

I admit, I made it specifically to write this article. Everyone “didn’t get around to it,” you know, like “a shoemaker without boots.” But now I have a visual menu in the VK group!
I won’t tell you how to draw a picture for the menu, that’s up to the designers, I draw it myself, but not so professionally. , at the end of the article, I gave a video on how to draw a simple menu in Photoshop, check it out, maybe you can do it on your own. If not, order the menu picture from .
I'll show you a moderately complex menu installation option. The difference is in the number of elements. A menu that is simply cut into strips is the simplest implementation. The more clickable buttons in a line, the more complex its execution. Although, knowing the peculiarity, everything is simple! It's just a matter of time. So, the width of the image should be:
370 px – if you have two or more objects in a line, like I have social media buttons
And max 388 px – if we cut the picture in a simple way, only into lines, without dividing it into small objects. This is the feature you need to know when cutting a menu into buttons. My image size for the entire menu turned out to be 370x456 px.
After the picture is cut into the required number of objects and saved in a separate album, we upload this album to VK. We upload to the account profile, not to the group! Since in group albums there is no longer an option to hide albums. A technical album in a corporate (for example) group is not needed at all, so we hide the menu items in the account album:

Technical album VK
Once you have set up the "Only Me" privacy. Let's move on to installing the menu itself. I’ll give you a code example that would be a template for you and let’s look at what it consists of:
[]
Where, photo7632142_296911699– this is the address of the picture! We look at it in the address bar of the picture:

From the first picture, let's start inserting a menu into the VKontakte group
You need a short address of the image, to do this go to the album itself:

Go to the album itself to get the desired image address!
...and starting from the first picture, move them to the group menu.

Adding image size to the menu code!
So, the address of the image has been added, the size has been indicated, now we put the tag nopadding;- it is needed so that our pictures fit tightly to each other. And the last step is to put a link to the page where the visitor will go after clicking on the picture.
A little clarification here! We write external links, links to VK albums and discussions in full, and links to internal pages in the format page-32734125_44298120. At the beginning and end of the line, do not forget to put two square quotes and no spaces.
Clarification 2: when we link to internal pages without pictures, we use single square quotes for discussions, albums and external links.
Lines in which you have two or more elements are inserted into the code without spaces. Insert each line of the picture one after the other. Because if you press Enter after the line with the picture, the picture will jump to a new line and the menu will move. We need the menu to be displayed as a whole, so we don’t need any extra spaces or “interters”!
After you have transferred all the pictures to the menu and designed them (size, link), save the result and admire your work! All! Ready!
First of all, you need to decorate it beautifully. After all, as you know, we judge everything “by our clothes.” This article will help you beautifully design a VKontakte group on one's own.
How to formalize the name of a VKontakte group?
The first thing you need to pay attention to when creating a VKontakte group is Name. There are three main parameters to consider when choosing a name:
The search for the VKontakte social network works in the following way: there are two groups with the names “Work on the Internet” and “Work on the Internet without investments.” When a VKontakte user enters the query “work on the Internet,” the group with the corresponding name will be higher, even if the number of subscribers is equal or the second group has a slight advantage.
Let's conclude: the owners of the famous online store Ali Express, when creating a group for it, do not have to indicate its topic in the name; most already know it. For a less popular site, online store, forum, when creating a group, it is better to indicate the topic in the name, as we did above..
How to register a status for a VKontakte group?
The status of a VKontakte group is less important than its name, but it is worth paying attention to. Let's figure out how to do it right create a status for a VKontakte group? The main thing is not to overload it too much; it should contain only the most important information:

If at the moment you do not know how to register the status of a VKontakte group, then it is better to postpone it. You shouldn't put just anything in it. The absence of a status will not harm the design of your group, but meaningless information in it may confuse visitors. By the way, For public pages, status is more important, because it appears in the "Pages of Interest" menu as a description.

How to write a description of a VKontakte group?
Now we'll figure it out how to write a description of a VKontakte group, or rather the text that can be entered in the community settings. There are several solutions for this:
In addition, VKontakte has a limit on the size of text in the group description that will be displayed without collapsing - 600 characters with spaces. After exceeding this limit, the description will be minimized, which will make it look unsightly. You can see this situation in the picture below.

In this regard, I recommend using pinned messages in the header when creating a description of a VKontakte group, creating a picture for them with a description, emoticons, text and even a menu. This will all add color to your community.
How to make an avatar for a VKontakte group?
Now we will try to figure out one of the most important aspects of designing a VKontakte group - how to make an avatar? For those who have their own money, you can register on the freelance exchange and order an avatar and other elements for the group (banner, menu, etc.) from an experienced web designer. But you can go another way, make an avatar for the VKontakte group yourself.
First of all, you need to decide what size you will need to create an avatar for the VKontakte group. The maximum width of a group avatar is 200 pixels (hereinafter simply px), and the maximum height is 500 px. Larger avatars will be scaled down according to the specified proportions. Avatars that are smaller than the specified sizes will, on the contrary, be enlarged and distorted in the display. Therefore, create an avatar for the VKontakte group with a width of 200 px and a height of 200 to 500 px.
When creating an avatar for a VKontakte group, you should remember its miniature, which is 200 px in width and height. So the main information load of the avatar (name or description of the group, motto, call to action, etc.) needs to be placed in one area that will correspond to the given dimensions.
The easiest way make an avatar for a VKontakte group in Photoshop. Moreover, it is not necessary to know it and be able to use all the functions. It is enough to learn how to use basic tools (selecting elements, working with layers, etc.). Below you can see an example of an avatar I made for a VKontakte group.
This avatar consists of two combined pictures, a text element and a background. It didn't take much time or effort to create it. Each group owner can cope with such a task, if desired.
And if you want to create complex and beautiful avatars for VKontakte groups, drawing every detail from scratch, then learn Photoshop and learn how to use it professionally. This can be done in several ways:
- Try everything yourself through trial and error.
- Read articles about this program and watch videos.
- Read a book or watch a training course.
The first option is ineffective, since few people have the patience to achieve results in this way. The second option is possible. There are now many websites and YouTube channels on the Internet that are aimed at teaching Photoshop.
However, it will be difficult to structure the information received in this way. In addition, constantly searching for information will take a lot of time. But it’s free, just like the first method.

The easiest way to learn Photoshop is through a video course. Since in it all the information will be presented from simple to complex, describing in detail and teaching you all the basics of the program. And I can recommend a similar video course to you.
"" – training video course for beginners. With it, at any time convenient for you, at home at your computer, you can start learning Photoshop.
In this course you will learn in detail how to use all the functions of Photoshop. After which you can easily create avatars from scratch and beautifully design VKontakte groups. If you were interested in this article, be the first to receive new information.
The graphic design of a group in contact consists of several pictures of different sizes. Each of them performs its own role, therefore it is carried out according to a separate technical specification.
- Avatar. Until the recent appearance of the top cover, it served a major role in the community. But adherents of the old style can still use it as a basis. The avatar should include basic information about the company: logo, company name, contact information and a few words about the direction of activity. One of the most important parts of the avatar is the thumbnail, visible in the contact's search engine and news feed. The width of the avatar is 200 pixels.
- Cover. In the new design, the cover became the main element of the graphic design of the community. When entering a group, the first thing a person pays attention to is the cover, so it should reflect your activities as much as possible. You should also place contact information and the company logo there. The recommended cover size is specified in the group settings when uploading.
- Menu transition banner. The transition image traditionally includes a menu button designed in a community style. Additionally, we recommend placing an offer there that might be of interest to customers.
- Picture with menu items. A navigation element that allows users to step through the contents of a group. The menu can contain all the information participants need: delivery, payment, contacts, about the company, catalog and much more. When creating a picture, it is better to choose it so that you can easily add new buttons to the menu, or think through menu items in advance, avoiding further rework.
- Navigation images for internal pages. These elements serve to conveniently move the user through community sections and provide a pleasant appearance to the internal pages.