Selecting a charger for lithium batteries. Features of charging lithium batteries and chargers for them

Features of charging lithium batteries and chargers for them
Modern people use many electronic gadgets. This is a laptop, mobile phone, tablet, camera and many others. Most of these devices are powered by lithium batteries. After all, we value them precisely because they are mobile devices. However, the portability comes at the cost of having to constantly charge the batteries. To do this, you will need a lithium battery charger. In most cases, chargers are supplied with the device itself. This is the same power adapter for a laptop or phone. Ideally, of course, the standard charger should be used for charging. But what to do if it is lost or damaged. You need to choose a suitable charger. What to take into account will be discussed in this article.
In general, the charger must have an output voltage of 5 volts and a current whose value corresponds to (0.5─1)*Cn. CH is the nominal capacity of the battery. For example, for a lithium cell with a capacity of 2200 mAh, charging should produce a current of 1.1 amperes.

Most chargers from reputable manufacturers charge Li batteries in several stages. The first stage occurs at a constant current value of 0.2─1 C and a voltage of 4.1─4.2 V (here we mean the voltage per element or jar). This stage lasts approximately 40-50 minutes. The second stage is carried out at constant voltage. There are devices that use pulse mode to speed up the charging process. For lithium-ion systems with a graphite system, voltages must be limited to 4.1 volts per cell.
If you use a voltage higher than 4.1 volts, you can increase the energy density of the battery. But at the same time, oxidative reactions begin, which shorten the battery life. In later models this problem was corrected with additives. And the voltage on them during charging can be increased to 4.2 volts with a deviation of 0.05 per element.
If we talk about lithium batteries for industrial use and for the military sector, then chargers for them support a voltage of 3.9 volts. This ensures long service life and reliability.
If the charger produces a current of 1C, the battery will charge in about 2-3 hours. When the charge is fully charged and the voltage reaches the cutoff value, the current decreases sharply and amounts to several percent of the original value.
It is worth saying that as the charging current increases, the charging time practically does not decrease. At a higher current, the voltage rises faster in the first stage of the process, but the second stage of recharging in this case takes longer.
There are chargers that can charge a lithium battery in about an hour. This charger for lithium batteries does not have a second stage and the battery is ready for use after the completion of the first stage. The battery charge level will be 70 percent. But, due to the nature of lithium batteries, this is not critical for them.
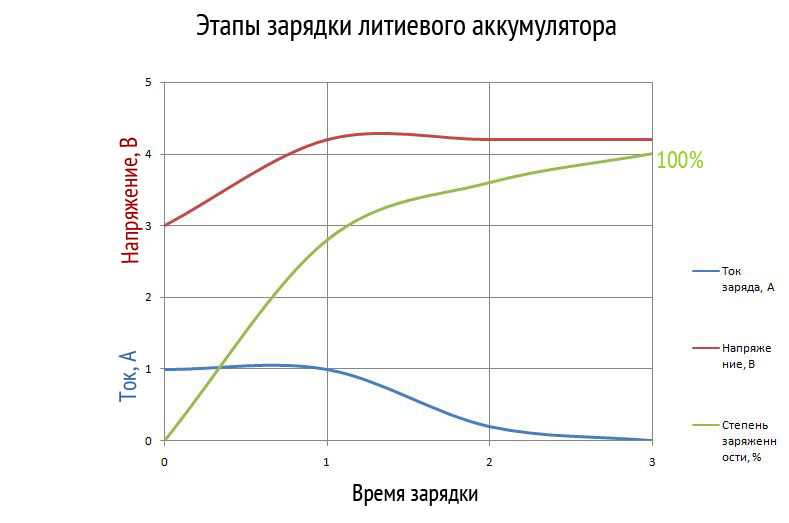
In the graph above you can see three stages of charging a Li battery:
- First. The maximum possible (1C) charge current flows through the battery. This stage ends when the voltage increases to a threshold value;
- Second. The voltage remains maximum (4.1─4.2 volts), and the charging current decreases to 3 percent of the original value;
- Third. Compensating charge during storage (carried out approximately once every 20 days).
During the storage phase, trickle charging is not possible for lithium batteries due to the fact that this leads to metallization of the Li. But short-term recharging with direct current compensates for the loss of charge. This charging should be performed when the cell voltage drops to 4.05 volts. The charging process stops at 4.2 volts.
And one more important point. Lithium battery cells are very sensitive to overcharging. Even with a slight recharge, lithium metallization begins on the surface of the negative electrode. It is very active and interacts with the electrolyte. As a result of the reaction at the cathode, oxygen is released and the pressure increases. As a result, element depressurization, ignition, and even a small explosion may occur.
In addition, if the charging voltage is continuously exceeded, the life of lithium batteries will be reduced. Therefore, in most lithium batteries, in addition to the cells themselves, there is a protection board.


The board controls the process of charging and discharging elements according to the lower and upper voltage limits. Temperature sensors are often used to switch off elements at 90 degrees Celsius. Some types of batteries have a mechanical valve that opens when the pressure inside the case increases above a certain limit.
There are exceptions. For example, batteries containing manganese do not have such protection. Manganese strongly inhibits metallization at the anode and the formation of oxygen. Therefore, such protection is not necessary.
All this needs to be kept in mind when choosing a charger. If you will charge the lithium can directly without a controller, the voltage must be monitored constantly. But it is much better to use devices with automatic control or charge the battery through a protection board.
Chargers for various gadgets
Chargers for smartphone batteries
If you have lost the standard charger for your phone, the “frog” will help you. This is one of the most common devices. The charge received its name for its characteristic shape.

It couldn't be easier to use. The charger has 2 width-adjustable contacts: plus and minus. You need to install them in a position suitable for the battery being charged. Then the battery is inserted so that there is contact with its terminals, and is fixed with the upper clamping bar. Naturally, polarity must be observed during installation. Then the device is inserted into the 220 volt connector and charged until the indicator shows the end of the process.
Since the number of visits to the site’s pages for the request “li-ion battery charging circuit” has increased significantly. You can even say the majority of these requests per day. Therefore, in order to satisfy the information demand, we will devote a separate section to this topic.
To begin with, I present to you the simplest charging circuit for 3.7 volt lithium ion batteries. The power supply is 5 volts, in this circuit it is supplied from a USB computer, a 5 volt DC adapter (for example, a charger from a mobile phone) or a low-power solar battery. The charger power is assumed to be about 1 ampere.
The brain and heart of the circuit is the MCP73831 microchip. Very easy to obtain or purchase at a radio store. The average price is about 1.5 - 2 American evergreens. You can order from the Chinese via the link for only $3.88 for 10 pieces. The MCP73831 is one of the inexpensive microchips in the line of charge controllers for use in limited board space. The datasheet for the MCP73831 can be viewed at. This chip uses a constant current/constant charging algorithm. It also stops charging when the battery is fully charged.
Here's a general diagram:

Have become popular in portable electronics because they boast the highest energy density of any battery used in commercial applications. Advantages include thousands of recharges and no “”, unlike batteries. However, Li-ion batteries must be charged under careful control of constant current and constant voltage. Overcharging and careless handling of lithium-ion cells can cause damage or unstable operation of the battery.
So, as already mentioned, the charge current should be about 1 ampere. The supplied voltage should not exceed 5 volts. The estimated dimensions of the charger board are not large, about 25 x 19 x 10 mm.
All necessary elements are shown in the diagram. The mini USB socket serves as a 5 volt receiver, but your imagination is not limited. You can at least directly solder the wires from the 5 v adapter.
- The ammeter can only be connected to the +5 v input.
- If the input voltage is still slightly higher, the charging current will also be correspondingly higher. But this is okay, since the MCP73831 microchip will cut off excess voltage at the output.
- The microcircuit will also stop charging when the battery voltage reaches 3.7 V.
- It is best that the charging current is 35 - 37% of the capacity of the battery being charged. That is, if the battery is rated at 1000 mA, then the charging current should be about 400 mA.

Ready-made scarves for soldering:

This is what the finished lithium-ion battery charger board looks like.
Let me remind you that the dimensions should be about 25 x 19 x 10 mm.

Although the circuit is extremely simple to design and assemble, and assembling it will not be difficult, I think it is necessary to notify you that you can purchase this circuit for no more than $2, as you may have guessed, from the Chinese.
You can fasten the battery can itself, for example, using neodymium magnets, and also see other options for attaching contacts for can batteries
That's all, soon I will show others and circuits of balancing chargers.
I made myself a charger for four lithium-ion batteries. Someone will now think: well, he did it and did it, there are plenty of them on the Internet. And I want to say right away that my design is capable of charging both one battery and four at once. All batteries are charged independently of each other.
This makes it possible to simultaneously charge batteries from different devices and with different initial charges.
I made a charger for 18650 batteries, which I use in a flashlight, powerbanks, laptop, etc.
The circuit consists of ready-made modules and is assembled very quickly and simply.
Will need
- - 4 pcs.
- - 4 pcs.
- Paper clips.
Manufacturing a charger for different numbers of batteries
First we'll make the battery compartment. To do this, we take a universal circuit board with a large number of holes and ordinary paper clips.
We bite off these corners from the paper clips.

We insert it into the board, having previously tried on the length of the batteries you need. Because such a charger can be made not only for 18650 batteries.

We solder parts of the paper clips to the bottom of the board.

Then we take the charging controllers and place them on the remaining space on the board, preferably opposite each battery.

The charging controller will be mounted on these legs, made from a PLS connector.

Solder the module on top and to the board below. These legs will carry the power current to the module and the charging current to the batteries.

Four sections are ready.

Next, to switch charging points, we will install buttons or toggle switches.

The whole thing connects like this:

You may ask - why are there only three buttons and not four? And I will answer - since one module will always work, because one battery will always be charged, otherwise there is no point in plugging in a charger at all.
We solder the conductive tracks.

The result is that with buttons you can connect a place to charge from 1 to 4 batteries.

An LED is installed on the charge module, which indicates that the battery that is being charged from it is charged or not.
I assembled the entire device in half an hour. It is powered by a 5-volt power supply (adapter), which, by the way, also needs to be chosen wisely so that it charges all four batteries at once. The entire circuit can also be powered from a USB computer.
We connect the adapter to the first module, and then turn on the necessary buttons and the voltage from the first module will go to other places, depending on the switches that are turned on.
How to properly charge a lithium-ion battery and why is it even needed? Our modern devices operate thanks to the presence of autonomous power sources. And it doesn’t matter what kind of devices they are: electric smartphones or laptops. This is why it is so important to know the answer to the question of how to properly charge a lithium-ion battery.
A little about what a lithium-ion battery is
Autonomous power supplies, which are used in modern smartphones and other devices, are usually divided into several different groups. There are quite a lot of them. Take the same ones. But it is in portable equipment, that is, in smartphones and laptops, that lithium-ion batteries (English designation Li-Ion) are most often installed. The reasons that led to this are of different nature.
The advantages of these types of batteries

The first thing to note is how simple and cheap it is to produce these energy sources. Their additional advantages are excellent operating characteristics. Self-discharge losses are a very small indicator, and this also played a role. But the supply of cycles for charging and discharging is very, very large. Together, all this makes lithium-ion batteries leaders among other similar devices in the field of their use in smartphones and laptops. Although exceptions to the rule exist, they account for about 10 percent of the total number of cases. That is why many users ask the question of how to properly charge a lithium-ion battery.
Important and interesting facts

A smartphone battery has its own specific features. Therefore, you need to know certain rules and be familiar with the relevant instructions before you begin the process of forced charging or discharging. It should be noted first of all that most batteries of this type are specially equipped with an additional monitoring device. Its use is determined by the need to maintain the charge at a certain level (also called critical). Thus, the control device, built into, among other things, the battery for a smartphone, does not allow us to cross that fatal line, after which the battery simply “dies,” as service specialists like to say. From the point of view of physics, everything looks like this: during the reverse process (critical discharge), the voltage of the lithium-ion battery simply drops to zero. At the same time, the flow of current is blocked.
How to properly charge digital equipment based on this source of battery life

If your smartphone is powered by a lithium-ion battery, then the device itself must be charged when the battery indicator shows approximately the following numbers: 10-20 percent. The same is true for phablets and tablet computers. This is a short answer to the question of how to properly charge a lithium-ion battery. It should be added that even when reaching 100 percent rated charge, the device must be kept connected to the electrical network for another one to two hours. The fact is that the devices interpret charging incorrectly, and the 100 percent that a smartphone or tablet gives is in fact no more than 70-80 percent.

If your device is equipped with a lithium-ion battery, you should know some of the intricacies of its operation. This will be very useful in the future, because by following them you will be able to extend the life of not only this element, but the entire device as a whole. So, remember, once every three months you need to completely discharge the device. This is done for preventive purposes.
But we’ll talk about how to charge a discharged battery later. For now, we’ll just point out that a desktop computer and laptop are not capable of providing a sufficiently high voltage when connecting a mobile device to these technological wonders via a USB standard port. Accordingly, in order to fully charge the device from these sources, it will take more time. Interestingly, one technique can extend the life of a lithium-ion battery. It consists of alternating charging cycles. That is, once you charge the device completely, 100 percent, the second time - not completely (80 - 90 percent). And these two options alternate in turn. In this case, it can be used for lithium-ion batteries.
Terms of use

In general, lithium-ion power supplies can be called unpretentious. We have already talked about this topic and found out that this characteristic, along with others, has become the reason for their widespread use in computing. However, even such a smart battery architecture does not fully guarantee their long-term performance. This period depends primarily on the person. But we are not required to do anything out of the ordinary. If there are five simple rules that we can remember forever, apply them successfully. In this case, the lithium-ion power supply will serve you for a very, very long time.
Rule one

It lies in the fact that it is not necessary completely. It has already been said that such a procedure should be carried out only once every three months. Modern designs of these power supplies do not have a “memory effect”. Actually, that’s why it’s better to have time to charge the device before it completely runs out. By the way, it is quite noteworthy that some manufacturers of relevant products measure the service life of products in the number of cycles. High-end products can “survive” about six hundred cycles.
Rule two
It states that the mobile device needs to be completely discharged. It should be carried out once every three months for preventive purposes. On the contrary, irregular and unstable charging can shift the nominal minimum and maximum charge marks. Thus, the device into which this source of autonomous operation is built begins to receive false information about how much energy actually remains. And this, in turn, leads to incorrect calculations of energy consumption.
Prophylactic discharge is designed to prevent this. When this happens, the control circuit will automatically reset the minimum charge value. However, there are some tricks here. For example, after a complete discharge, it is necessary to “fill in” the power source, keeping it for an additional 12 hours. Apart from an ordinary electrical network and a wire, we don’t need anything else for charging in this matter. But the operation of the battery after a preventive discharge will become more stable, and you will be able to immediately notice it.
Rule three
If you don't use your battery, you still need to monitor its condition. At the same time, the temperature in the room where you store it should preferably be no more and no less than 15 degrees. It is clear that it is not always possible to achieve exactly this figure, but still, the smaller the deviation from this value, the better it will be. It should be noted that the battery itself must be charged 30-50 percent. Such conditions will allow you to maintain the power source for a long time without serious damage. Why shouldn't it be fully charged? But because a “full to capacity” battery, due to physical processes, loses quite a large part of its capacity. If the power source is stored for a long time in a discharged state, then it becomes practically useless. And the only place where it will really be useful is in the trash. The only way, although unlikely, is to remanufacture lithium-ion batteries.
Rule four
The price of which falls in the range from several hundred to several thousand rubles, should be charged only using original devices. This applies to a lesser extent to mobile devices, since adapters are already included in their package (if you buy them from the official store). But in this case they only stabilize the supplied voltage, and the charger, in fact, is already built into your device. Which, by the way, cannot be said about video cameras and cameras. This is exactly what we are talking about, here the use of third-party devices when charging batteries can cause noticeable harm.
Rule five
Monitor the temperature. Lithium-ion batteries can withstand heat stress, but overheating is detrimental to them. And low temperatures for a power source are not the best that can happen. Although the greatest danger comes precisely from the process of overheating. Remember that the battery should not be exposed to direct sunlight. The range of temperatures and their permissible values begins at - 40 degrees and ends at + 50 degrees Celsius.
Batteries play an important role in any mechanism that does not operate from the mains. Rechargeable batteries are quite expensive due to the fact that you need to purchase a charger along with them. Batteries use different combinations of conductor materials and electrolytes - lead-acid, nickel-cadmium (NiCd), nickel-metal hydride (NiMH), lithium-ion (Li-ion), lithium-ion polymer (Li-Po).
I use lithium-ion batteries in my projects, so I decided to make my own charger for 18650 lithium batteries rather than buy an expensive one, so let's get started.
Step 1: Video
The video shows the assembly of the charger.
Link to youtube
Step 2: List of Electrical Components


Show 3 more images


List of components required to assemble a 18650 battery charger:
- Charger module based on TP4056 chip with battery protection
- Voltage stabilizer 7805, you will need 1 piece
- Capacitor 100 nF, 4 pcs (not needed if there is a 5V power supply)
Step 3: List of Tools


To work you will need the following tools:
- hot knife
- Plastic box 8x7x3 cm (or similar in size)
Now that all the necessary tools and components are prepared for work, let's move on to the TP4056 module.
Step 4: Li-io battery charger module based on TP4056 chip


A little more about this module. There are two versions of these modules on the market: with and without battery protection.
The circuit board containing the protection circuit monitors the voltage using the power circuit filter DW01A (battery protection integrated circuit) and FS8205A (N-channel transistor module). Thus, the breakout board contains three integrated circuits (TP4056+DW01A+FS8205A), while the charger module without battery protection contains only one integrated circuit (TP4056).
TP4056 – charge module for single-cell Li-io batteries with linear charge of constant current and voltage. The SOP housing and the small number of external components make this module an excellent option for use in homemade electrical appliances. It charges via USB just as well as a regular power bank. The pinout of the TP4056 module is attached (Fig. 2), as is the charging cycle graph (Fig. 3) with constant current and constant voltage curves. Two diodes on the switching board indicate the current charging status - charging, charging stopped, etc. (Fig. 4).
To avoid damaging the battery, charge 3.7V lithium-ion batteries at 0.2-0.7 DC current until the output voltage reaches 4.2V, after which the charge will be constant voltage and gradually decreasing (up to 10% of the initial value) current. We cannot interrupt the charge at 4.2 V, since the charge level will be 40-80% of the battery's full capacity. The TP4056 module is responsible for this process. Another important point is that the resistor connected to the PROG pin determines the charging current. In modules on the market, a 1.2 KΩ resistor is usually connected to this pin, which corresponds to a charging current of 1A (Fig. 5). To get other charging current values, you can try using other resistors.
DW01A is a battery protection integrated circuit, Fig. 6 shows a typical connection diagram. MOSFETs M1 and M2 are connected externally by an FS8205A integrated circuit.
These components are installed on the breakout board of the TP4056 lithium-ion battery charger module, which is linked in Step 2. We only need to do two things: give a voltage in the range of 4-8 V to the input connector, and connect the battery poles with both the + and - pins. module TP4056.
After this, we will continue assembling the charger.
Step 5: Wiring Diagram


To complete the assembly of electrical components, we solder them in accordance with the diagram. I have attached a diagram in Fritzing software and a photo of the physical connection.
- + connect the power connector contact to one of the switch contacts, and – connect the power connector contact to the GND pin of the 7805 stabilizer
- We connect the second contact of the switch to the Vin pin of the stabilizer 7805
- We install three 100 nF capacitors in parallel between the Vin and GND pins of the voltage regulator (use a breadboard for this)
- Install a 100 nF capacitor between the Vout and GND pins of the voltage regulator (on the breadboard)
- Connect the Vout pin of the voltage regulator to the IN+ pin of the TP4056 module
- Connect the GND pin of the voltage regulator to the IN pin of the TP4056 module
- Connect the + contact of the battery compartment to the B+ pin of the TP4056 module, and connect the – contact of the battery compartment to the B- pin of the TP4056 module
This completes the connections. If you are using a 5V power supply, skip all the steps with connections to the 7805 voltage regulator, and connect the + and – of the unit directly to the IN+ and IN- pins of the TP4056 module, respectively.
If you use a 12V power supply, the 7805 stabilizer will heat up when a 1A current passes, this can be corrected with a heat sink.
Step 6: Assembly, part 1: cutting holes in the body


Show 7 more images


In order to correctly fit all the electrical components in the housing, you need to cut holes in it:
- Using a knife blade, mark the boundaries of the battery compartment on the case (Fig. 1).
- Use a hot knife to cut a hole according to the marks made (Fig. 2 and 3).
- After cutting the hole, the housing should look like in Fig. 4.
- Mark the place where the USB connector of the TP4056 module will be located (Fig. 5 and 6).
- Using a hot knife, cut a hole in the case for the USB connector (Fig. 7).
- Mark the places on the case where the diodes of the TP4056 module will be located (Fig. 8 and 9).
- Use a hot knife to cut holes for the diodes (Fig. 10).
- In the same way, make holes for the power connector and switch (Fig. 11 and 12)
Step 7: Assembly, part 2: installing electrical components


Follow the instructions to install components in the chassis:
- Install the battery compartment so that the mounting points are on the outside of the compartment/case. Glue the compartment with a glue gun (Fig. 1).
- Replace the TP4056 module so that the USB connector and diodes fit into the corresponding holes, secure with hot glue (Fig. 2).
- Replace the voltage stabilizer 7805 and secure it with hot glue (Fig. 3).
- Reinstall the power connector and switch and secure them with hot glue (Fig. 4).
- The location of the components should look the same as in Fig. 5.
- Secure the bottom cover in place with screws (Fig. 6).
- Later I covered the rough edges left by the hot knife with black electrical tape. They can also be smoothed with sandpaper.
The completed charger is shown in Figure 7. now it needs to be tested.
Step 8: Test


Place the discharged battery in the charger. Turn on the power to the 12V or USB connector. The red diode should blink, this means that the charging process is in progress.
When the charge is complete, the blue diode should light up.
I am attaching a photo of the charger during charging and a photo with a charged battery.
This completes the work.