Aligning objects within specified boundaries. Aligning an image in Photoshop
View->extrs,snap,rules
because the rulers don’t cling to the void... make a new empty layer, fill it completely with something... for example white, and then pull the guides on top and on the sides of the ruler. they will cling to the center of the composition.
then select the layer with the photo and move it to the center. it will already cling to the rulers.
You can set the size of the grid to which, without fills, the guides will also cling.
One thing: in different scales clings unequally, i.e. by 50% increase...etc. at 78% the object will try to attach to the guide slightly differently. The way out is to align all objects along the guide intended for them on the same scale.
What version of Photoshop?
In CS2, when dragging one object over/under another, the dragged object snaps not only to the guides, but also to the boundaries/corners/center of the underlying object.
So, striped’s advice is simplified (in the case of using CS) by as many as three points. :)
This is if I understood everything in the question correctly.
To make it clear why I need this...
When I place a photo in a baguette frame, I leave it between the inside of the frame and the photo itself. free space, I make a kind of passe-partout, while the free fields can be either symmetrical or not, both the same in width and different.
The most general case, when the dimensions of the substrate in pixels are known, as well as the dimensions of the photo itself, you need to put the photo as a second layer on the substrate and symmetrically align it with the edges of this substrate.
2 stripes
I tried it, it worked
That's right.
I thought it was necessary to align one object relative to another.
If you need to align an object relative to the canvas, then nothing will snap anywhere except to the canvas margins.
In this case, polosaty is right.
There is another way -
1. Using the crop tool (the first one in the third row of the toolbar), crop the canvas to the size of the photo. To do this, select the area around the photo. In this case, the fields that are cropped are shaded. Next, by pulling control points(I don’t know what to call them correctly - small squares at the corners of the selection area and in the centers of each side) you should more accurately define the cropping boundaries and press enter. This is exactly where snapping to object boundaries occurs, unless it is disabled in the view\snap menu.
2 change from using canvas size canvas size as required.
IN lately Many authors, including myself, pay a lot of attention to the various tricks and effects that can be created in Photoshop, but many, especially beginners, find it quite difficult to immediately jump into this creative process without getting the basics of the work. Gradually I will try to fill this gap. Today we'll talk about aligning objects on the canvas.
Many of you have probably seen it more than once this set buttons in the Move tool options bar.

These options also appear if there are forms, created by tools Shapes group. But let's start leveling up. The first thing we need is to work with rulers. Create new document keyboard shortcut Ctrl+N, set the size to the one with which it will be convenient for you to work. Press Ctrl+R to display the rulers on the canvas.

Now select Move from the toolbar or press the V key to activate it. Move the cursor over the vertical horizontal ruler and, while holding left button mouse, drag the guide line that appears to the middle of your image. Carry out a similar operation with a horizontal ruler.

Now select the Elliptical Marquee tool and position the cursor at the center of the intersection of the created lines. Press the keyboard shortcut Ctrl+Shift+N to create a new layer. In the dialog box that appears, click OK. Press Alt to create a selection from the center and use the left mouse button to stretch the selection. Now let's reset the colors to default by pressing D on the keyboard. Now Alt+Backspace to fill with foreground color - in in this case black.
Drag the square to the lower left corner (with the Move tool).

Hold down the Shift key and click on our two layers in the Layers palette with the left mouse button.

Let's see our alignment options in action. In order: Align top edges - moves the object to the top edge of the larger one.
Align Vertical Center vertical center) - aligns the object to the center.
Align Bottom Edges - Moves an object to the bottom edge of a larger object.
Align Left Edges - Moves the object to the bottom left edge.
Align Horizontal Centers horizontal centers) - I think it’s obvious from the name that the alignment occurs along a horizontal ruler.
Align Right Edges - Aligns objects relative to the right edge of the larger one.
So, to center our circle, we need to click on Align Horizontal Centers and Align Vertical Center. To place a circle, for example, in the center of the right rectangle, select Rectangular Marquee from the toolbar.
Now make the Move tool active and click the same on Align Horizontal Centers and Align Vertical Center.
Note
Options may not be available if two layers are selected. Since the alignment will be relative to the created selection, you only need to select one layer.
Sergey Toporkov, http://www.cc-studio.ru/
Hello everyone, in this tutorial we will figure out how to align text or shape in a certain space. For example, let's take a blank document and insert some shape or text there. In our case it will be a blue avatar.
With the avatar layer active, click CTRL+A to select the entire document. The selection will act as a frame within which the text will be aligned.

Then select the tool Moving.
The following buttons will become active on the settings panel of this tool:
1) Align to the top edge.

2) Align centers vertically.

3) Align to the bottom edge.

4) Left alignment.

If you click on align centers vertically and then align to the left, it will look like this:

5) Aligning centers horizontally.

6) Right alignment.

Now click first Align Top, then Align Right. Our avatar will move to the corner:

Everything is fine, only the avatar is completely stuck to the edges, you need to make a little indentation. Click CTRL-D to deselect. Then SHIFT+LEFT ARROW And SHIFT+down arrow. By pressing SHIFT and the arrow keys on your keyboard, you can move an object immediately 10 pixels in the desired direction.

Use this knowledge to move objects on your workpaper. It's very convenient. Using the keys Shift + Arrow you will get even spaces between elements. And your design work will look more organized and balanced.
See you in the next lesson!
So how can I rearrange the blocks within a document and position them geometrically correctly relative to each other and the entire document?
Of course, I could try to arrange them manually using the Move Tool, but that would take a fair amount of time and I doubt I would be able to place them accurately using the eyeball method. It's better and much easier to align and organize blocks using special alignment options(Align and Distribute options).
To access these options we must select the Move Tool:
When Move is selected, alignment options will appear as a series of icons in the options bar at the top of the screen. On at the moment, icons are displayed gray and are not available, because In the Layers panel I have only one layer selected, and there is simply nothing to align it with:
Let's see what happens if we select multiple layers. Clamping Ctrl key, I'll select three layers, "Top Left", "Top Right" and "Top Center":

The options are now active. Let's now take a closer look at each of them.
Alignment Options
These are the first six icons in the options group. I list the purpose of the icons from left to right: - alignment to the top edges
- vertical centers of layers
- along the bottom edge
- on the left edge
- horizontal centers
- on the right edge
These options can be applied to content on two or more layers and will start from the edges or centers of the content:
Distribution options
I list them from left to right:
- distribution along the top edges of the content
- at the centers of layers vertically
- along the bottom edges
- on the left edges
- horizontally centered
- on the right edges
Attention! Please note that in order for the option to become available, you must have three or more layers selected!
Now let's see how to put these options into practice to organize the blocks in my document. As you remember, I selected three layers - Top Left, Top Center, and Top Right (top left, top center, top right). I'm going to temporarily disable the other blocks in the document by clicking on each one's visibility icon. I turned off visibility only for clarity; this does not affect the operation of the alignment options at all:

Now only three blocks remain visible in the document window:

To start, I'll align these three blocks horizontally with the top edge of the blocks. To do this, click on the Align Top Edges option in the Options Bar:
In this case, Photoshop determines the position of these three blocks, figures out which one is closest to the top of the document, and then moves the other two blocks to level with the top edge of the top one, in this case, the block with the yellow letter "O", and this action is carried out instantly. To better understand this point, hover your mouse over the picture, and an image with the position of the blocks will be displayed to movements:

This article will teach you a quick and easy way to straighten skewed photos. Let's face it, unless you take all your photos with a camera mounted on a tripod, some of them will be a little lopsided. Luckily, in Photoshop we can straighten them incredibly easily in just a few simple steps!
Here is a photo of the New York Hotel and Casino in Las Vegas:
Original image
A typical tourist photo. It was made with little compact camera while walking around the city, and a little later it turned out that it was a little skewed. The Statue of Liberty is tilted slightly to the right. But don't worry. We will fix all this very soon. Let's get started!
Step 1: Select the Measure Tool
The best way to straighten images in Photoshop is to use the Measure tool, which does most of the work. As you'll see very soon, Photoshop can do almost all the work for you! The “Measurer” tool, by default, is located in the “Pipette” tool menu.
Therefore, to select it, you need to click and hold the mouse button on the Eyedropper tool, "Measurer" will be second or third in the list. Click on the "Meter" tool to select it:

Select the Measure tool from the Tools palette
Step 2: Click and draw a line along something that needs to be straightened
Find some element in the photo that needs to be straightened, either horizontally or vertically. We're going to flatten its edge using the Measure Tool instead of figuring out how skewed the photo actually is. In my case, I'm going to spend horizontal line along the roof of the building located directly behind the Statue of Liberty.
Obviously, the roof should be strictly horizontal, but at the moment this is clearly not the case. I simply click once on the left side of the roof edge, then hold down the mouse button and move the cursor to the right side. This will create a thin line from the point where I first clicked the mouse on the right side of the roof, and the point where I finished moving the mouse and released the button.
Photoshop uses the angle of this line to determine how strong it should be image rotated to straighten it:

If you look at the options bar at the top of the screen, you will see the angle of the line you just drew ( this is the number to the right of the letter "A"). In my case, the line is located at an angle of 1.9 degrees to the horizontal:
Options bar showing the angle of a line drawn with the Measure tool
Photoshop can now use this angle to determine how much to rotate the image to straighten it out.
Step 3: Select the "Rotate Canvas - Freely" command
Go to the “Image” menu, select “Rotate canvas”, and then “Arbitrarily”:
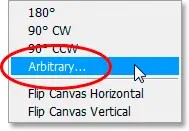
Go to Image > Rotate Canvas > Freely
Every time I do this, I smile because the word "randomly" actually means "by chance" or "by luck." But this is the opposite of what we do. We don't rotate the image randomly, just for luck.
We used the Caliper tool to find out exactly how many degrees to rotate our image, and now Photoshop can use the information we gave it to straighten the image for sure.
As I've said before, most of the problems with learning Photoshop come from terminology. As in this case, I don't know what Adobe was thinking.
Nevertheless, let's move on. Once you select “freely”, the “Rotate Canvas” dialog box will pop up and, as we can see, everything has already been done for us. In my case, Photoshop has already entered the value of 1.85 degrees, and even already knows that the image will need to be rotated counterclockwise, so the CCW option is selected:

Rotate Canvas dialog box with given values angle and direction of rotation
You might be surprised that Photoshop entered an angle of 1.85 degrees when we just recently saw 1.9 in the Options Bar. The reason is that in top panel Photoshop rounds angles to one decimal place, so the panel had a value of 1.9 degrees.
Although in reality the angle measured using the Measure tool was 1.85 degrees. The angle specified in the Rotate Canvas dialog box is more correct.
Step 4: Click OK button to rotate and straighten the image
At this point, all we have to do is click OK in the Rotate Canvas dialog box to exit, and Photoshop will then rotate and straighten the image:

The image is now rotated and aligned
Everything looks great, the Statue of Liberty no longer leans to the right. We were able to straighten the image without any manual manipulation, thanks to the Measure tool and the Rotate Canvas command.
Step 5: Crop the Image Using the Crop Tool
Of course, there is a small problem. By rotating the image inside the document window, we added some white areas to the canvas around the outer edge of the photo. We must complete the processing by trimming these areas. And for this, we can use the “Crop” tool. Select "Crop" from the tool palette, or simply press the letter C on your keyboard.