Windows 7 won't start, how to restore it. What to do if Windows does not start. Checking your computer for viruses
The topic that I want to discuss in this article is very popular and talking about it in detail so that you understand how and what to do is not so simple. But still, I will try to describe possible ways of what to do if Windows 7 does not boot on a laptop or computer. We will also find out why this could happen?! The task ahead of us is not an easy one, namely, to correct the current situation, but there is no need to be afraid. Just follow the clear instructions and everything will be great! Some points may be suitable for other operating systems, but I will focus on Windows 7.
Dear reader, if you really want to solve the problem, then I strongly recommend reading the article in full, and then drawing some conclusions. I cannot talk about all the nuances in one paragraph.
Safe Mode and Last Known Good Configuration
This is a must try! Reboot the computer, press the F8 key continuously.
Attention! In Windows 8, entering Safe Mode is a little different, so it's best to follow the link below to find out all the details. In the list that appears, we are interested in the item called “Last Known Good Configuration (Advanced).” Select and press Enter.
About how to enter safe mode on different systems:
What to do if the information above did not help you? We repeat the steps described in the previous paragraph, but select “Safe Mode”.
Next, you can make a choice: fix the problem due to which Windows 7 does not boot manually, or try to do it in semi-automatic mode. Usually I do everything manually, for example, if Windows does not boot after installing the drivers, then I delete the drivers and try to boot. I think you understand that the manual method requires more knowledge on your part, so Windows offers you another option, which I will describe below.
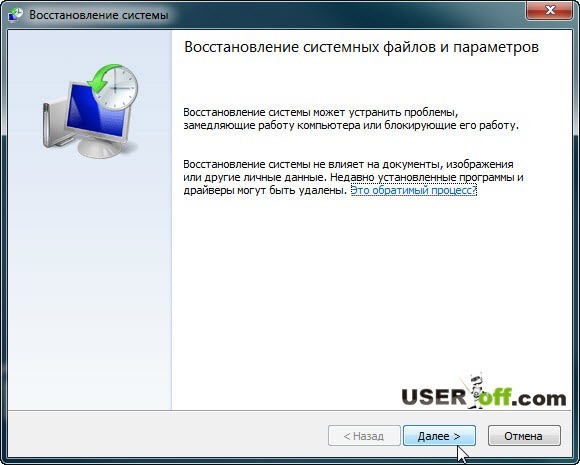
If everything loads, go to the Start menu, Control Panel, System and Security. In the “Support Center” tab, click on the inscription “Restore the computer to a previous state.” See the “Run System Restore” button? Great, then you've come to the right place.

Now click it and follow the instructions.
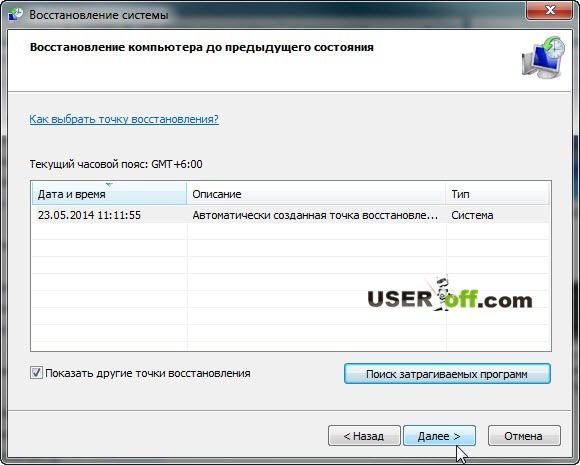
Next, you will need to select a restore point. In my case, I am asked to select a point on the 23rd, and now the calendar shows the 29th. Therefore, you need to click on “Search for affected programs” to find out what actions you will need to take after recovery.
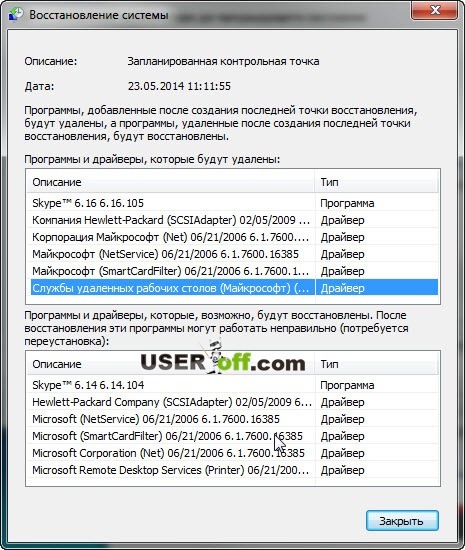
So, you have become familiar with the affected software during system recovery and can now close this window. After closing the window, click "Next".
If you were unable to enter safe mode to restore Windows, then do not despair. Below we will look at another method.
Note: at the very beginning, when Windows 7 was just coming out, there was one strange glitch that you might have too. When you turn on the computer, the welcome screen follows and a black screen appears. As I remember, it seemed like there was still an arrow, but nothing else was visible. The cure was very simple - go into safe mode and restart the computer as usual. After this, I was able to log into my account without any additional manipulations with Windows.
You may need to reinstall Windows
This option should be considered when you have tried to revive Windows, but all attempts have produced no results.
The very first thing that comes to mind for many, and for me too, is reinstalling Windows 7. But this method, you see, is very long, and if you are a busy person, then access to the computer should be almost constant. Reinstallation is suitable for those who have a lot of free time, or do not have time to understand faster methods, or for those who will not be helped by any of the methods I have listed below for restoring the Windows operating system.
I will not dwell in detail on installing Windows, since I wrote about this on my blog:
Here are brief instructions: since you do not have access to the desktop, go to the BIOS, look for the Boot or Advanced BIOS Features tab, or search for it yourself. Then in it we find the line “1st Boot Device”, set the value to CD-ROM. What have we done? What we have done is that now when the computer boots, it will boot from the disk that is installed in your CDRom, and not from the hard drive. After turning it on, when the inscription “Press any key...” appears on a black background, press any button and get into the Windows installation wizard. Then follow the instructions on the screen.
You can read more about how to boot from disk in my article: “”.
I decided to talk about the installation at the very beginning, because if you were going to reinstall Windows, then perhaps this is some kind of sign to implement it))). But as I said at the very beginning, we will now try to bring your Windows back to life without reinstalling it.
System Restore
First of all, you can use the function that is in the installation disk “System Restore”. I will give an example of the Windows 7 system, but if you have a different system, then this is not a reason to think that you cannot do on your system. The names of the buttons may differ, but the principle remains the same.
So, for this procedure we need a Windows installation disk or its image (can be downloaded on the Internet). If you are unable to download the image or do not have a disk, then write to me by email [email protected] or contact your friends who have already installed Windows themselves.
If you don’t have a working disk drive or don’t have one at all, then the article “” will help you create a bootable flash drive.
When you have a Windows distribution, insert it into the drive and restart the computer. If the BIOS is configured for installation, you will see the line:

When it appears, press any key.
If it is not there or Windows boots as usual, then you need to make manipulations in the BIOS. Namely, set loading priorities. Usually the hard drive is set in the BIOS settings, since that is where your Windows is installed.
In order for the computer to start booting from the disk that is in your drive, you need to go into the BIOS and specify CDRom as the first boot device. I have already talked about this above, if you have not read this point, then it’s time to do so.
So, you pressed any key, now a window will appear where you click “Next”.

In the next window you need to click “System Restore”.

A search will be performed for installed systems. If you have one system installed, then there will be one operating system in the list. Select it and click Next.

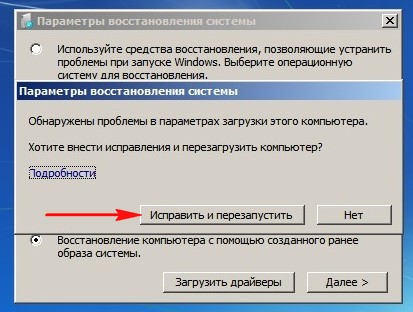
Often at this stage a message may appear in which you will be asked to restore the system. If this message is displayed on your screen, then click “Fix and restart”. After that, try to log into your account.
If the message does not appear, then in the next window you select your system and click “Next”.
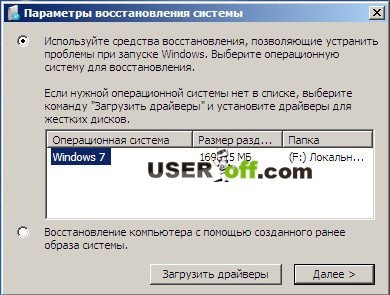
After this, a window will appear where you can select system recovery methods.

– automatic problem solving.
System Restore – you can use this method, but provided that this function has been enabled.
Restoring a system image – if you have a Windows recovery image.
Command line– using certain commands you can revive Windows. This method will be discussed further.
Now click “Startup Repair”. Now you need to wait a bit for the utility to try to automatically find the problem and solve it.
System Restore via Command Line
Then enter and press Enter.
A list of commands that can be used in this utility will appear; now you need to enter: Bootrec.exe /FixMbr and press Enter.
Now enter . exe / , then clicking on Enter. Next, exit the utility by typing exit and pressing Enter. Now you can try to log into your account, since the recovery work is complete.
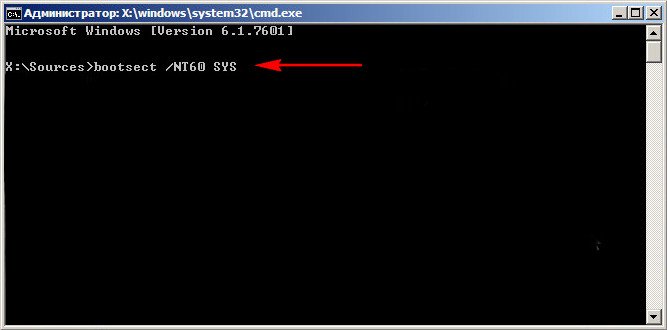
You can also try updating the boot code by entering the command bootsect /NT60 SYS. Then leave as a team Exit.
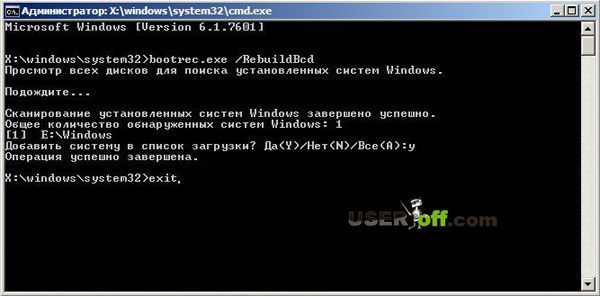
If the above commands did not help you, then go to the command line and enter Bootrec.exe /RebuildBcd. Using this command, you will scan your hard drive to find the systems installed on it.

When the scan is finished, a list of installed operating systems on your hard drive will appear. To add it to the download list, click Y And Enter. After successful completion of the operation, enter Exit and press Enter.
So, we have dealt with the command line. In principle, this should help to get your system to boot.
Inactive hard drive partition
This situation does not occur often, but it is still necessary to talk about it, otherwise the article can be said to be truncated. Let me give you an example, after which you will understand what's what.
Let's say you have several Windows operating systems installed on your computer, which are installed on different hard drives. If you assign incorrect attributes to hard drive partitions, you will have problems booting a particular version of Windows.
To check or fix this, you can use the Acronis Disk Director boot disk to change the partition attributes. So, download and burn the Acronis Disk Director boot disk and boot from it. How to do this? Insert the disc into the drive, restart the computer, and it will begin booting from the disc in the drive. But before that, check your download priorities. There should be a CDRom, just like when installing Windows. We have already talked about this in this article above.
When the program loads, pay attention to the checkboxes that are on the hard drive partitions.
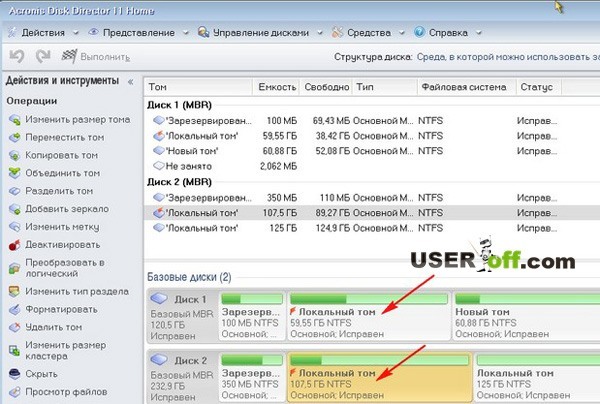
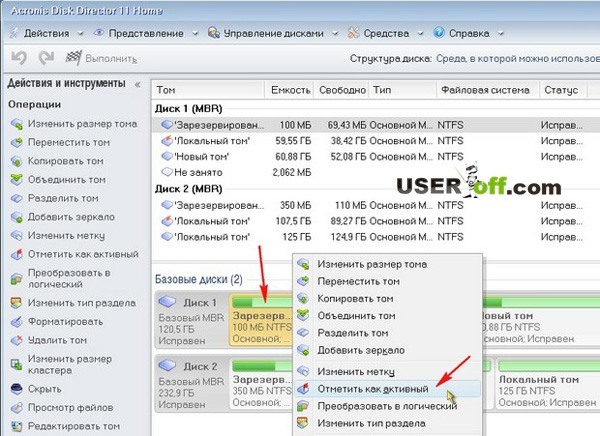
In the image above we see that the checkboxes are on the second partitions of the hard drive. You need to make sure that these checkboxes are on the first sections. We got to practice ;). You need to right-click on each first partition of your hard drive and select “Mark as active.”
A message should appear where you click “OK”. This is what it looks like after the whole procedure:
Now all that remains is to click on the “Run” checkbox, wait for the operation to complete and restart the computer. Be sure to remove the disc from the drive.
Hardware problems, BIOS and viruses
Hard drive. If your system unit, or rather your hard drive, makes suspicious sounds: clicking or tapping, then there is a possibility that the hard drive needs to be replaced. To verify this, you need to open the cover of the system unit, turn on the computer and listen to the operation of the hard drive. Also check the wire connection to the hard drive. It is possible that the wires have become disconnected and the computer cannot see the hard drive.
If you suspect that the problem is with the hard drive, then you need to copy all important data to another medium. Otherwise, you may lose them completely.
BIOS. Go to the BIOS settings and put the hard drive first so that it starts booting from it. Above we looked at an example where we set up a CDROM; you do the same with a hard drive. Just don’t forget to save the changes in the BIOS by pressing the F10 key.
The second method – you won’t believe it, but it actually works! Just go into the BIOS and, without changing anything there, exit, saving the changes that actually never happened (by pressing the F10 button). I personally once fixed my friends’ laptop this way, and when they asked me how I did it, my answer was: “Magic and nothing more 😉.” So give it a try, maybe everything will be much easier than you think.
Viruses. Sometimes viruses prevent Windows from booting. If there are viruses on your computer, you need to scan the entire disk for viruses. Here are articles that will be useful to you: “” and “”.
Of course, if you check your hard drive for viruses, you will need to disconnect it and connect it to another computer, since in your case Windows will not load. Or you can use special boot programs with which you can scan your computer for viruses even if you cannot boot your Windows. Here are a couple of them: and.
Attention! There are cases when, after installing updates, Windows 7 stopped loading! Therefore, you may want to try uninstalling recent updates that were installed before the Windows boot problem occurred.
Important! If you see a specific error on your screen, I recommend using a search in Google or Yandex. You can enter into the search not only the error code, but also the words that are used in it. Thus, you will save your time searching for the problem and its solution.
Important! If the system unit makes squeaks when turned on, then you need to determine the problem by this squeak. Ask how? Here's an article on this topic: "".
That's all I wanted to say. The article turned out to be long, and I sincerely hope that at least one of the methods I described helped you.
Says a lot of unnecessary things, but there is useful information for you:
We will fix errors in Windows 10. But approximately the same will need to be done in Windows XP, 7 and 8. In Windows 7 and later releases, the developers have improved the recovery system for startup problems. In older versions of the system, serious errors often have to be resolved by reinstallation.
Disable peripherals
positive.orgTry to remember what changes you recently made to the system: did you install new devices or switch something. There may be a problem with one of the hardware components. Try disabling:
- USB drives.
- Card readers.
- Printers.
- Scanners.
- Cameras.
- All other external devices.
If this does not help, disconnect the keyboard and mouse: you need to exclude all possible sources of malfunction.
It can also be caused by internal components, such as RAM. On a desktop PC, you can check the performance of the RAM by connecting the strips one by one.
Check power
 takprosto.cc
 If the computer does not turn on at all, pay attention to the power cable and sockets. Don't forget the power switch on the back of your desktop computer.
If everything works at this level, but the computer still does not turn on, then most likely the problem is in the power supply, which you are unlikely to be able to fix yourself: you will have to replace it or have it repaired by a specialist.
It is possible that the computer turns on, but only for a short time. This is the same problem with the power supply.
Configure the disk to boot the system
Errors may appear during startup: An operating system wasn’t found. Try disconnecting any drives that don’t contain an operating system. Press Ctrl+Alt+Del to restart or Boot failure. Reboot and Select Proper Boot device or Insert Boot Media in selected Boot device.
The BIOS or UEFI settings may be set to boot from an external device or other logical partition rather than from the system drive. You can restore default settings like this:
- Restart your computer.
- Immediately after restarting, press the system key, for example F2. This may be another key: usually during system boot it can be found at the bottom of the screen with the logo of the laptop or motherboard manufacturer.
- In the settings, set the desired disk to the first place in the boot.
- Select the Save and Exit option to save your changes.
If the above does not help, you will have to restore the system bootloader. To do this, you will need a bootable USB flash drive or recovery disk with a system of suitable capacity. How to make a bootable USB flash drive or disk, read Lifehacker about installing Windows.

Start the system from a flash drive or disk by selecting the desired option in the boot menu. In the Windows installation menu that opens, select “System Restore.”

From the recovery menu, select Troubleshooting → Advanced options → Startup Repair. After this, the system will try to automatically fix the bootloader. In most cases this solves the problem.
The same can be done manually via the command line, but it is better to select the automatic option so as not to aggravate the situation.
If this method does not help, the problem probably lies in the hardware: the hard drive is damaged.
From the recovery menu, select Troubleshooting → Advanced Options → Command Prompt.

At the command line, you need to enter the following commands one by one: diskpart → list volume (be sure to remember the name of the Windows disk) → exit.
To check the disk for errors and damage, enter the command chkdsk X: /r (where X is the name of the Windows disk). The check usually takes quite a long time, you will have to wait.
Start Windows in Safe Mode
Due to a sudden shutdown of the computer during the installation of operating system updates, cleaning of viruses and unnecessary entries in the registry, or due to the fault of utilities to speed up Windows, system files may be damaged. In this case, a “blue screen of death” will appear when the system boots.

Try starting Windows in safe mode without loading drivers and programs in startup. If the computer is running in this mode, you will have to remove the drivers, perform a system rollback, and scan for viruses.

If you have restore points, this problem is quite easy to solve. You just need to roll back to the previous stable configuration.
Reinstall system files
The steps above may not help. Then you will have to reset Windows settings and reinstall the system while saving the files. Unfortunately, all programs will need to be reinstalled.

In the recovery environment, select Troubleshoot → Reset this PC → Keep my files → Reset.
The system will roll back to the original settings.
Before you figure out how to restore Windows 7 to start, you need to understand what the cause of the problem is. To do this, it will be useful to learn a little general information about how the download occurs and what stages it includes.
General information about downloading
Conventionally, the launch of Windows 7 can be divided into three stages, which, in turn, are divided into several phases.
OSLoader
This is the first stage of system startup, which starts immediately after the BIOS code is executed. First, a small group of drivers starts working, allowing you to read data from the hard drive. The Windows 7 boot loader (winload.exe) then begins initializing and loading the kernel. The registry hive “SYSTEM” and another group of drivers are loaded into RAM. The first stage lasts about 2 seconds and ends with the appearance of the operating system logo on the screen. 
MailPathBoot
The main and longest stage of system startup. Visually, it continues from the appearance of the logo until the desktop starts loading. It consists of several phases, the duration of which can vary - from a few seconds to a couple of minutes.
PreSMSS
During this phase, the Windows kernel is initialized, the plug and play device manager starts working, and the remaining drivers are launched. Errors that occur at this moment are usually associated with problems with the main components of the computer or incorrect operation of their software.
SMSSInit
The visual start of this phase is difficult to determine, but part of it is already the empty field that appears between the splash screen and the appearance of the welcome screen. The system at this moment performs the following actions:
- Initializes the registry.
- Starts the next wave of drivers that are not marked "BOOT_START".
- Starts subsystem processes.
Most often, problems during this boot phase are related to video card drivers.
WinLogonInit
WInlogon.exe is the file that launches the welcome screen, so the “WinLogonInit” phase begins at this point. During this stage, group policy scripts are executed and services are started. The duration of the phase varies greatly depending on the processor power.
Failures at this stage are often caused by incorrect operation of third-party applications, including antivirus.
ExplorerInit
Begins with the start of the shell and ends with the start of the window manager. During this phase, program icons appear on the desktop and services continue to start. These processes are accompanied by an increase in the load on the computer hardware - processor, RAM, hard drive.
Problems at this stage are usually associated with insufficient power of the equipment or its malfunction.
PastBoot
The last stage, which begins with the appearance of the desktop and ends after all startup components have loaded. At this stage, all applications that start with Windows begin to work. After the “PastBoot” stage ends, the system goes into idle mode.
Problems that arise at this stage are usually related to virus activity or incorrect operation of automatically downloaded programs.
Crashes at various stages of loading
Problems at different stages of Windows startup manifest themselves differently: some are related to hardware, others to the registry, and others to drivers or important system files. Therefore, it is so important to understand what processes occur when the system starts up so that you can quickly determine the cause of the problem.
Hardware problems
It is often difficult to determine what is not working - some specific hardware or operating system. However, based on some signs, certain assumptions can be made about which device has failed:

All the errors described are usually related to the computer hardware, however, there may be exceptions.
Boot files are damaged
The appearance of a message like “Bootmgr is missing” at an early stage of system startup indicates the absence of critical files, without which Windows cannot boot.  However, sometimes no notifications appear - the cursor just blinks on the screen, but no progress occurs.
Bootmgr is a standard Windows boot loader that is not accessible to the user, as it is stored on a separate hidden partition. You cannot accidentally delete it, but you can unknowingly format a hidden volume using external media.
When booting from external media, the hidden volume with the bootloader looks like this: 
Other files important for startup are stored on the system disk in the “Windows” directory. System registry data is also stored here.
The registry is damaged
If the registry is damaged or inaccessible, Windows may not even start loading. In this case, the system usually diagnoses the error on its own and offers to run the recovery tool. 
Often, the built-in system restore tool can help you fix a registry problem by copying its configuration files from a backup store. However, there are situations when there are no registry files on the hard drive or they are inoperative. In this case, the user must manually perform the system registry recovery procedure.
Startup recovery tools
The easiest way to restore startup is to use the built-in Windows tools:

A list of means for restoring system functionality will appear, in which you must select “Startup recovery”.  It will scan and automatically correct any errors found, if possible.
If nothing worked with the startup, you can try to restore the system by rolling it back to its previous state. Everything is standard here: select a control point with a working configuration and return the system to that period. 
Another method that often helps is restoring the Windows bootloader via the command line. You can also launch it through the “Recovery Options” menu. On the command line you need to enter several queries (all commands are entered without quotes):

After all commands have been successfully completed and the report appears, Windows 7 should start up normally.
Need good advice on how to produceWindows 7 Boot Loader Recovery, if restoring the startup using the 7 installation disk did not help. I’ll briefly explain what’s going on: Windows 7 was first installed on the computer, then the second system needed Windows XP, after installation it naturally started alone, to boot two operating systems I used the EasyBCD program. Later, XP was no longer needed and I formatted the partition on which it was located from Windows 7. Now, when loading, there is nothing except a black screen. What can be done in this case? More details if possible. Sergey.
Restoring the Windows 7 bootloader
Hello friends! The most important thing is not to worry, your problem is not complicated and, in principle, the simple “Windows 7 Startup Recovery” tool described in our article should help, but! If this article does not help you, then two others should help:
These articles describe several more good ways to restore the boot of your operating system, besides them there is one more, so try it and don’t just give up.
Let me remind you that you cannot install an older operating system after a younger one; Windows 7 will under no circumstances boot after installing Windows XP on a computer, since the latter overwrites the master boot record (MBR) during installation. Therefore, you installed an additional boot manager, which is used to configure the boot of several operating systems and, in turn, has its own bootloader.
- I also want to say that file system errors are often to blame for unsuccessful loading of Windows 7; they can be corrected even if the operating system does not boot; all the details are in our other article." "
- Friends, in this article we will work with the Windows 7 recovery environment, or more precisely, with the recovery environment command line. I will give you the necessary commands, but if it is difficult for you to remember them, you can. This will make your work much easier.
- The master boot record (MBR) is the first sector on the hard drive, which contains a partition table and a small bootloader program that reads from this table the data from which partition of the hard drive to boot the OS, and then the information is transferred to the partition with the installed operating system, to download it. If the master boot record contains incorrect information about the location of the system, then we will receive various errors during boot, here is one of them “BOOTMGR is missing press CTR-Alt-Del for restart” or we will see a black screen. The problem is being fixed restoring the Windows 7 bootloader.
When you uninstalled old XP along with EasyBCD, you left your computer to the mercy of fate with an incomprehensible boot record, and it gives you a black screen as a sign of gratitude. To rectify the situation, we will carry out boot recovery Windows 7, namely, we will overwrite the master boot record using the Bootrec.exe utility located on the recovery disk or on the Windows 7 installation disk (friends, if you have a netbook and you want to use the recovery environment located on a flash drive, then read the comments first). We will also use this utility to record a new boot sector, understandable to Windows 7.
Recovering Windows 7 bootloader automatically
We boot from a recovery disk or installation disk with Windows 7, in the initial phase of booting the computer, when you are prompted to boot from the disk “Press any key to boot from CD...”, press any key on the keyboard for 5 seconds, otherwise you will not boot from the disk

There is a short search for installed Windows systems and analysis of problems that prevent them from loading

Usually problems are quickly found and the recovery environment offers to fix them automatically. Click on the "Fix and restart" button, after which the computer will restart and boot Windows 7 will be restored.
If problems with loading the system continue or you are not prompted to fix the problems automatically, then in this window you need to select the operating system that you need to restore, you most likely have one and Next.

First of all, choose a productStartup recovery, it can also solve Windows 7 boot problems

Restoring the Windows 7 bootloader manually
If this remedy does not help, choose a remedy Command line

Enter the commands:
diskpart
lis vol (we display a list of hard drive partitions and see that “Volume 1” is a hidden System Reserved partition, volume 100 MB, Windows 7 boot files should be located on it and this is what needs to be made active). We also see a partition with Windows 7 installed, it has the letter D:, the volume is 60 GB.
sel vol 1 (select Volume 1)
activ (make it active)
exit (exit diskpart)
bcdboot D:\Windows (where D: the partition with Windows 7 installed), this command restores the Windows 7 boot files (bootmgr file and boot storage configuration files (BCD))!
"Download files created successfully"

Restoring the Windows 7 bootloader manually (method No. 2)
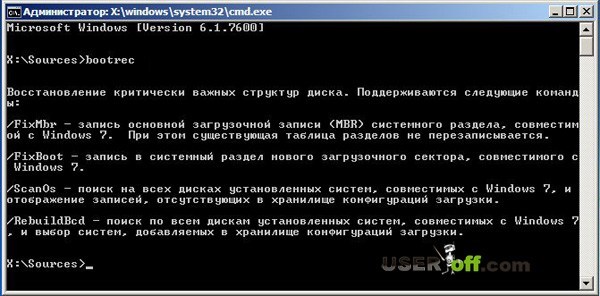
In the command line window, enter the command Bootrec and Enter
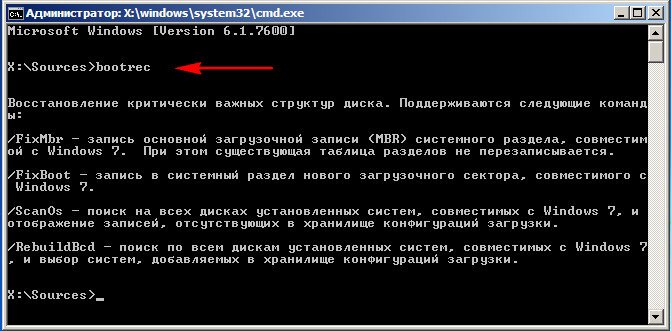
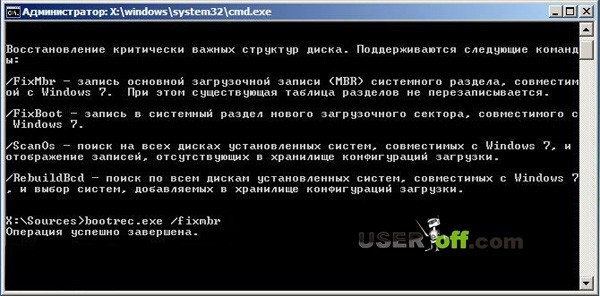
full information about the capabilities of the utility is displayed. Select the master boot record entry Bootrec.exe /FixMbr.
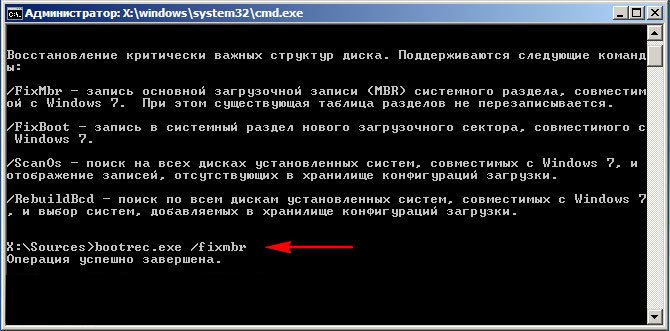
The operation was completed successfully. A new boot record is written to the first sector of the boot partition.
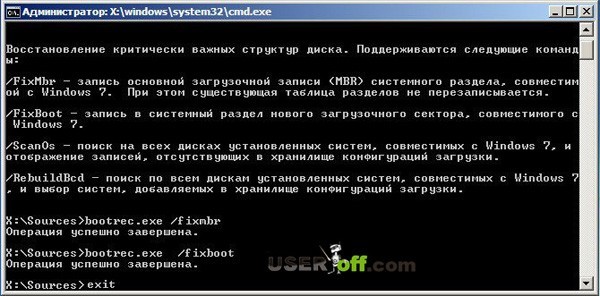
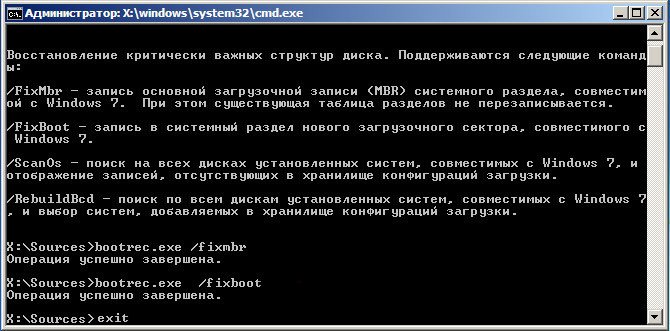
The second command, Bootrec.exe /FixBoot, writes a new boot sector.

The operation was completed successfully. Exit. Next, we try to load our Windows 7.
Friends, if the Bootrec.exe /FixMbr and Bootrec.exe /Fixboot commands do not help you, do not despair, there is another remedy.
Method No. 3
Enter the command Bootrec/ScanOs, it will scan all your hard drives and partitions for the presence of operating systems and if any are found, an appropriate warning will be issued. Then you need to enter the command Bootrec.exe /RebuildBcd, this utility will offer to add the found Windows to the boot menu, we agree and enter Y and press Enter, all the found Windows are added to the boot menu.
In my case, two operating systems were found. Everything can be seen on the screenshot.

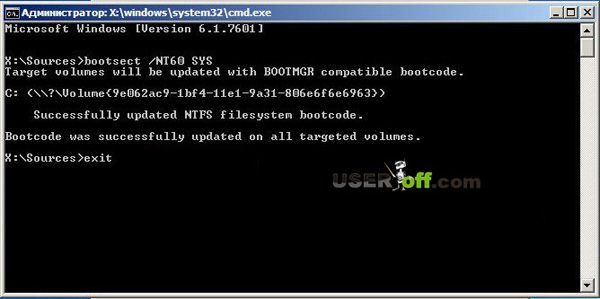
In addition to the above method, there is another one, enter bootsect /NT60 SYS on the command line, the main boot code, it will also be updated.
Exit

So, the error is that on both hard drives the first hidden System Reserved partitions should be marked with a red flag. On Windows 7, the volume of such a partition is 100 MB, and on Windows 8, 350 MB, these partitions have the following attributes: System. Active and it is on these partitions that the boot store configuration files (BCD) and the system boot manager file (bootmgr file) are located. And it turns out that these attributes are carried by other sections. Because of this, Windows 7 and Windows 8 will not boot.

Select the first hard disk 1, right-click on the first System Reserved partition and select "Mark as active"

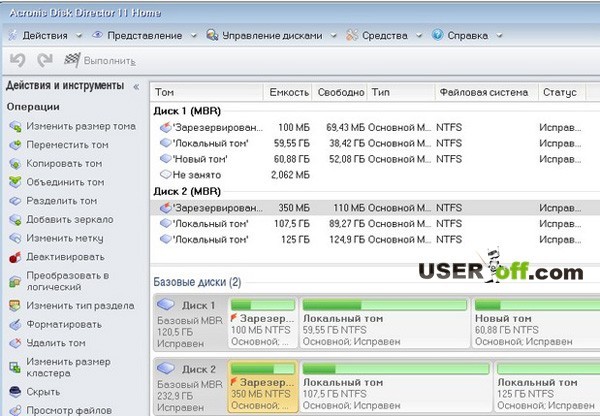
The System Reserved volume will be marked as active. Click OK.

We do the same with Disk 2. Acronis Disk Director works in pending operation mode; for the changes to take effect, click the “Apply pending operations” button

Continue.

As you can see, after our changes, those sections that were needed became active.

We exit the program and reboot. The result of the work is positive - both operating systems are loaded one by one.
- Enter the account name and password:
- A menu will now appear with the option to select a recovery tool:
Let's consider their purpose:
- Automatic diagnostic mode. Fixes most minor bugs.
- Rollback the operating system to a previous checkpoint.
- Allows you to restore Windows from a copy that the user saved on your hard drive or external storage device in advance.
- The memory test program is launched if problems with RAM are observed. For example, the “blue screen of death” when working with a PC.
- Allows you to execute commands outside the running OS.
Using points 2 and 3 is possible only in cases where the user has taken care of creating checkpoints/archiving data in advance.
To begin, select the first item.
- The PC will launch the diagnostic tool, which will automatically start working. This one looks like this:
- Wait until the end, no matter how long the verification procedure takes. The utility will ask your permission to restore. Click “Restore”:
- After another couple of minutes, the software will finish working, and you will see the final window. Click on the marked button and wait for the device to reboot:
- A black splash screen with the Windows 7 logo will appear on the screen - the usual startup of the operating system:
If the procedure was successful, then you can easily start your PC and continue to use it as before. If the problem cannot be fixed, and the computer still freezes or does not start when loading, then we try other methods.
Restore from a checkpoint
Windows, by default, periodically creates checkpoints tied to certain events. You can perform a rollback from a working OS, but not in our case.
- To do this, open the troubleshooter again according to the previous instructions and run the second option:
- After this, we wait for the checkpoint wizard to turn on and follow the algorithm. On the first screen, click “Next”.
- We select a save point based on the date when there was no OS malfunction. We continue the procedure.
- We start the recovery process with the “Finish” button. After this, a confirmation window will appear.
- If the restore is successful, you will see the following window. Reboot the computer.
- Wait until your computer turns on. If the operation is successful, the following message will appear on the screen. You can simply close it and continue using the device!
In most cases, the checkpoint option helps when making incorrect changes to system settings or the registry.
If the user previously created a backup copy of the system, he will be able to restore the state of the OS using it. To do this you need to do this:
- Open the diagnostic and recovery tool again when you start the computer using the F8 key. Select the third item.
- Check the box “Select a system image” and move on to the next step.
- The table should contain a list of archived operating systems to which the computer has access. Select the one you need and click “Next”. After this, automatic recovery of Windows from the image will begin. If the list is missing, as shown in the screenshot, it means that the system did not archive automatically.
The software is restored along with all user settings and configuration.
Another option available in the standard recovery wizard. With its help, you can install a backup copy of the registry, diagnose system files, and restore boot files.
- Open the corresponding item in the recovery environment:
- A regular command line window appears in front of us with only one difference: for cmd launched without Windows, the hard drives are offline. Therefore, entering commands will look slightly different. Enter the line sfc /scannow /offbootdir=C:\ /offwindir=C:\Windows, where the first path indicates the system drive letter, and the second indicates the path to the Windows folder. Press Enter to apply.
Now we wait for the end of checking the structure of system files. If the utility was able to find problematic sectors or data, then the next time you turn on the computer will work properly.
Safe Mode
When you turn on your PC, you can launch a menu with an expanded list of actions. Among them there is both Lunch Startup Repair, described above, and other extremely useful tools.
Safe Mode does not always start. If there is serious damage or malfunction of the equipment, this option does not work.
- When restarting the computer, press F8. You need to be in time before the Windows boot screen appears. If you click at the right time, you will see the following:
- Here you need to start safe mode (normal, with network drivers for Internet access or with the command line). To restore, it is advisable to choose the third option. Then you need to wait until the program downloads all the files:
Externally, Safe Mode of Windows 7 is very different from the standard OS. A simplified interface and a black desktop will appear on the screen. In this mode, you can rollback to a checkpoint.
We can say that the functionality of Safe Mode is an analogue of the recovery tool mentioned above. However, you can run some programs and work with files here, which is a plus.
Let's look at the instructions for starting recovery from a checkpoint:
- Open “Start” and go to “Control Panel”.
- Go to the “Recovery” section.
- Now click the marked button to launch the wizard.
It is not possible to restore using a system image in safe mode (only in normal mode).
Now let's look at the command line functionality in Safe Mode:
- We launch the application through a search in the Start menu or Win + R by entering the cmd command.
- Enter the command chkdsk /r and press Enter to analyze the hard drive.
- Accept the prompt to check the disk at next restart using the Y key.
- Restart your PC, then wait until the scan is completed. If possible, the utility will correct errors and damage.
It is impossible to analyze the active partition while Windows is running, which is why the procedure will be carried out during restart.
The next option to use the command line for your own purposes is to restore startup files. This method will help get rid of the error with the text “BOOTMGR is missing”, after which the computer endlessly reboots. In cmd you need to enter the command bcdboot.exe C:\Windows (you need to change the letter of the system partition to yours) and press Enter:
The damaged startup files will be replaced with new ones. After reinstallation, you need to check the “Seven” for trouble-free activation.
Repairing the Windows registry
Now let's restore the registry log via the command line. The properties and capabilities of the registry include recording all system changes. If the user has updated any parameters or installed software, the registry records this. Due to failures in it, problems may arise when starting Windows 7. Consider manually restoring registry backups:
- Launch the command line through “Troubleshoot your computer” and enter the command notepad. We will need a notepad to gain access to the explorer.
- Press the combination Ctrl + O so that the explorer appears. Now open the path C:\\Windows\system32\config.
- Here are the files with the names marked in the screenshot - this is the current registry. You need to rename them. For example, add ".OLD" at the end.
- When all the files have been renamed, open the “RegBack” folder, where the backup copies are stored.
- Select one file at a time (it will not be possible to copy everything together), press Ctrl + C.
- We return to the “Config” directory and use Ctrl + V to paste the backup file. We perform the same operation with all other documents.
- Now all that remains is to restart the computer and check the status of Windows
To use this method, you must restart your computer again and press F8.
Pay attention to the “Last Known Good Configuration” item:
When choosing this option, the program selects the optimal parameters of the “seven”, at which the system launched successfully.
Virus check
A protected computer works much more stable and longer. There is often a situation where a PC is so infected with viruses that it refuses to start or be updated through special tools. Since we cannot check this in the usual way, a safe one comes to the rescue. We turn it on, load the network drivers and do the following:
- To scan the system and remove viruses, you need a similar scanner. You may ask: can I scan my PC with my antivirus? Of course you can if you have it installed.
- Launch the downloaded file. The utility does not undergo long initialization and will not be updated - this is its advantage over antiviruses. On the first screen, check the box.
- Now click the “Start scan” button.
- We are waiting for the application to scan the entire system. If the ticker stops for a while, don't be alarmed - this is normal.
- At the end of the procedure, you will see the following window. If the problem is not a virus, then the threats will not be detected. Otherwise, the program itself will delete them or quarantine them.
Setting download priority
If, when you turn on the computer, a screen appears with the text “DISK BOOT FAILURE, INSERT SYSTEM DISK AND PRESS ENTER,” then there is a high probability that the priority in the BIOS parameters is incorrectly set.
Don't forget to check the connection of the hard drive to the computer, perform a performance test on another device, and run diagnostics. If the equipment is working properly, then “Seven” does not load due to priority.
Let's learn how to open BIOS and work with it:
- When the PC just turns on, you need to press F2 on the first screen. After this you will see the following interface:
- Now we also select the position of the hard drive on which the OS is installed. Using + we move our drive to first place.
- You can save changes and immediately restart your PC by pressing F10. After this, we agree to the action with the “Yes” button.
The appearance and management of the BIOS may vary slightly depending on the motherboard model or specific firmware. However, the principle of operation and the names of the sections are as similar as possible.
If you manage to load Windows, then rejoice - no additional operations will be required, and your OS is working. If this does not give results, then do not be discouraged and move on according to the instructions.
Using a bootable USB flash drive
If you don’t have a boot drive for Windows 7, you can create one yourself using an empty flash drive/DVD and instructions from our website.
So, to launch the bootable media menu, the skill of working with BIOS, acquired in the previous section of the instructions, will be useful. Press the menu start key again (it may differ depending on the model and firmware) when the computer starts, and go through the steps to set the priority. Only this time the connected flash drive is put in first place.
Restart your computer to launch the Windows 7 installer. After that, follow the instructions:
- At the language setting stage, click “Next”.
Use this option in situations where Windows has completely crashed (the recovery environment does not even open).
If the user has changed the boot priority to an external drive, then the next time he starts he needs to either remove it or put the hard drive in first place again.
PC cleaning
One of the reasons why Windows hangs or works poorly could be dust contamination or oxidation of contacts. In particularly advanced cases, by completely cleaning the equipment inside the case and external connectors, it is possible to bring the OS back to life.
Even if Windows 7 does not turn on after removing the dust, the work was not done in vain - this allows you to make your computer faster and more productive in the future.
Resetting the motherboard
Perhaps the cause of the failure lies in the BIOS settings. You need to open the PC case and carefully inspect the motherboard. Find the following battery on it:
To reset the settings to factory settings, you need to disconnect the computer from the network, remove the battery and after 1-2 minutes put it back. After this, turn on the device and check operation. Remember that with such a reset, the date and time in the settings disappears - you need to set them again.
If the date and time are constantly reset to factory settings, then you cannot do without replacing the battery with a new one.
Option for laptops
If your licensed Windows 7 on your laptop crashes, repairs can be done without diagnostic tools or bootable media. The OS is restored using the built-in recovery utility. Each laptop manufacturer has them differently, but they have approximately similar controls and interface in Russian.
The application can be launched both in the working “Seven” and before turning on the laptop. One of the system keys or a combination is responsible for launching. For example, on HP devices it is F11, on Acer Alt +F10 and so on. Through this application, an OS license is installed, which does not require further activation.
When nothing helps
You may also need the help of a specialist if we are talking about hardware faults. Often the cause is the motherboard, hard drive or RAM. Without professional knowledge, you won't be able to fix your PC.
Conclusion
The topic of restoration is broad and complex, since failure can depend on many factors. If you own a boot disk and use a standard diagnostic tool correctly, you can eliminate most common software errors.
Write in the comments about cases and breakdowns of Windows 7 that you fixed yourself. Feel free to ask questions about unclear points and nuances of the instructions!
5 / 5 ( 2 voices)