Yandex disk open mail. Yandex disk: logging into your disk? How to create a cloud for storing files for free on Yandex. Create your account
Cloud storage Yandex Disk is an application that allows users to get rid of the need to constantly use a flash drive, because all important information will be stored in the Yandex “cloud” and accessed from any computer connected to the Internet.
If you decide to protect your files from various types of crashes, after which the file can no longer be read or is deleted from the hard drive, then pay attention to the program from Yandex. The disk is created automatically after installing the program. To log into Yandex Disk, you just need to have an account on Yandex.

With this application, you can transfer all important documents to the so-called “cloud” and open them from there. But, unlike storing them on a computer, they will be safe there. In addition, you can access them from any PC. All you need is to enter your username and password.

The program is easy to understand. Firstly, when you use it for the first time, you will be given brief instructions. And secondly, using a disk is not much different from working with local disks on a computer.
Yandex Disk features:
- 10 GB storage of any file format
- checking downloaded files with antivirus
- distribution of access to your documents
- You do not need to copy the file to your computer to view it.
Advantages of Yandex Disk:
- your data is securely protected
- documents from Microsoft Office 2013 are loaded with one click
- Additional storage space is awarded from time to time
- if you are installing Yandex Disk for the first time and don’t know how to use it, then you will be greeted with brief operating instructions
- Russian interface language, you can download Yandex Disk for free.
Things to work on:
- after using 10 free GB, you will have to pay for additional space;
- the browser version has more advanced features;
- Registration is required to log into Yandex Disk.
A necessary and useful program that has many positive aspects. But at the same time, no serious shortcomings were noticed, so we advise you to use this application for regular use.
Good day!
To quickly transfer files to other people, and even between your PC, laptop and phone, it is very convenient to use Yandex disk (cloud file storage service). I uploaded photos to it once (for example) - and they can be viewed from all devices that have access to the Internet. In addition, you can significantly save space in your phone’s memory (many people often don’t have enough of it) by setting up automatic uploading of videos and photos to the cloud.
Add to this the ability to work with Word, Excel and Power Point documents online (without installing anything on your PC). It's very convenient!
Not to mention that information on cloud drives is more reliably protected from various misunderstandings (viruses, file system problems, erroneous formatting, etc.) than on a classic HDD. Those. it makes sense to send some of the information to the cloud for backup (by the way, this can be done automatically, more on that later in the article).
Actually, in this article I wanted to show how all this can be quickly configured and used. I think the note will be useful to everyone who is still new to cloud disks.
And so, closer to the topic...
Registration and login to the drive [On Windows and Android]
In general, registration on the service is quite standard for such products. First, follow the link below to the official Yandex disk website and click the “Start disk” button (see screenshot below).

Next, you need to provide your details: first name, last name, login, password and phone number. By the way, if you already have mail from Yandex (or you use other products of this company), then registration is faster (just log into your account, the link will be located above the registration form).

After you register, you can start downloading applications for Windows and Android (to access and work with files on the disk).
For Windows

I won’t show the entire installation process, because... The installation is standard (like other programs) and does not contain anything complicated (interesting).

After installing the application, a characteristic “Yandex disk” icon will appear on your desktop and in the system tray, see the screenshot below. Clicking on it will open a window with all files, folders

The window for working with disk files is no different from the classic Explorer: all actions are the same. As a rule, creating, editing and deleting files and folders does not cause any difficulties even for novice users.

For Android
Installing the application on Android is also standard. Just go to Google Play (link above) and click the install button.

After installation, open the application shortcut, enter your username and password (specified during registration), set a PIN code (this is necessary so that no one except you can access the disk, even if you lose your phone), and woo-a-la - you're in the disk. See screenshots below.

How to increase free space on Yandex disk
In general, the allocated disk space is constantly changing (depending on different promotions, conditions, etc.): for example, several years ago I was given 10 GB during registration (it’s difficult to predict how much they will give you at the time of registration).
They also give extra as a bonus. space for using the mailbox (in my case 9 GB), and for installing the application on the phone (32 GB). In total, it turns out to be about 47 GB (which is quite enough for documents, photos, files).

If you need significantly more space, you can buy it for a small amount per month. In order to see the current rates: just open the Yandex Disk application and at the bottom of the window click on the “Buy more” link (see screenshot below).

For example, today “extra” 100 GB costs only 67 rubles/month. If you need much more, for example, 1 TB, you will have to fork out 167 rubles/month.

How to upload files and photos to disk
On Windows
This question is usually asked by people who have not yet worked with Yandex disk. In general, everything is actually very simple: first you need to open the disk (you can use the tray icon, see screenshot below).

After some time, the files will be downloaded: opposite them you will see small green checkmarks (synchronized). See example below.

By the way, it is not necessary to launch the Yandex Disk application: for example, in Explorer (Windows 10) there is a link to the folder with the disk. Just open the desired directory and copy files into it (if you have synchronization enabled in the application settings, the files will also be sent to the cloud).


To automatically upload photos to Yandex disk:
- launch the application;
- then in the menu open the “Settings” tab;
- enable auto-upload of photos via Wi-Fi (or even select the “Over any network” option if you use unlimited Internet on your phone);
- Now all photos will be automatically uploaded to Yandex disk. Even if something bad happens to your phone, you can quickly restore all your pictures. Reliable and convenient!

How to make files available for download by other users
Option #1
If you use the Yandex Disk application, this is done very quickly - just select a file or folder and click on the “Copy link” button in the menu.


Option #2


Option #3 (if we are talking about Android)
First, open the Disk application and go to the desired directory.


How to set up automatic creation of copies of my documents to a cloud drive (backup!)
Everything is quite simple. I'll look at it step by step.
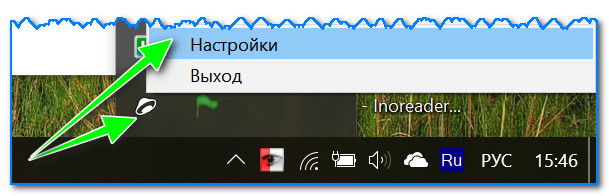
1) First, open the Yandex disk settings (to do this, you can use the tray icon, next to the clock. See the screenshot below).
2) Next, I immediately recommend going to the “Advanced” tab and checking that synchronization is enabled (that is, all created and modified files in your folder on your hard drive will be immediately uploaded to the Yandex disk in auto mode (that is, duplicated) )).

3) In the "Basic" tab, check that the program starts automatically. Then open the folder location settings.

4) Look where the folder that will be synchronized with the cloud is located (if necessary, move it to another HDD partition).

5) Now open Explorer, right-click on the system Documents folder and open its properties. Example below.

Open File Explorer and go to the properties of the Documents folder.
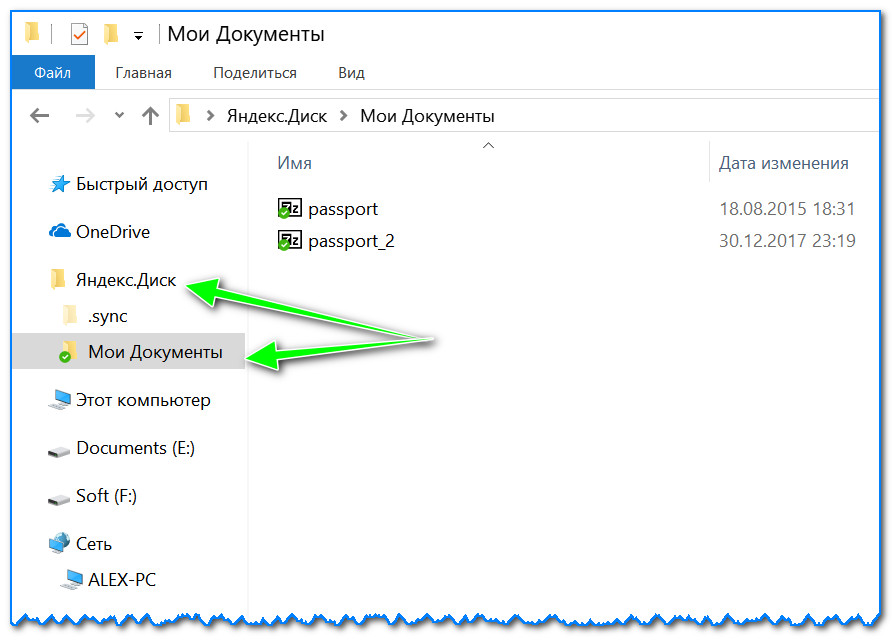
6) In the "Location" tab, click the "Move" button and move it to any of the folders located in "C:\Users\alex\YandexDisk" * (* the path is shown as an example, you will have your own directory - see point 4 just above, where we looked at directories in the application settings) . Those. We are moving our system folder "Documents" to a folder that will be synchronized with Yandex disk.

7) Personally, I named my folder “My Documents”, into which I moved the system “Documents”. Now all files (photos, documents, videos, etc.) that fall into this folder will be automatically duplicated to the cloud drive!

8) You can work with the transferred documents, both in the directory located on the HDD, and by opening the Yandex disk application. Comfortable!

Restoring a modified file
By the way, what else is captivating about Yandex disk: you can view the history of file changes. Just imagine, you edited a document incorrectly and saved it. And then they remembered that they had removed the unnecessary stuff from it... What should I do?

Additions are welcome...
That's all, good luck!
Editor's Choice
How to log into your page in Yandex.Disk? Instructions for all devices
Today, any user can access a cloud account, regardless of the characteristics of their account or location.
Despite open access to the storage from, users often have difficulty logging into the disk and getting started.
Registration and login via browser
Any browser can be used.
To log into the cloud you need an existing email account. If you don't have an account, please register one first. Follow the instructions:
- Open your browser;
- Enter the address yandex.ru in the address bar and go to the search engine page;
- At the top right of the page, find the login panel. Since you don’t have mail yet, this window will not work for us. Click on the “Create mail” tab, as shown in the figure:

Rice. 2 – main window of the Yandex search engine
- Next, you will be automatically redirected to a new page in which a form will appear for entering personal data for a new account. Fill out the First Name and Last Name fields with real data, because as a result of registration, other services that require real user identification will also be linked to your page. If you enter fictitious data, difficulties may arise in the future using some services;
- Create a strong password that consists of at least 8 characters, including lowercase and uppercase letters, numbers and special characters. This will significantly increase the security of your account and protect it from hacking. Duplicate the password in the confirmation column to make sure it is entered correctly;
- Enter . You will receive a registration confirmation code. Instead of a phone number, you can set a security question, however, this method of verifying the user does not provide the proper level of protection. We recommend that you link your phone number to your account;
- Enter the captcha and confirm registration.

Rice. 3 - registration of a new user
Now go to the yandex.ru page again and log into the email window using the data you came up with at the registration stage.

Rice. 4 – login to your account via browser
Go to the email client window and in the top tabs find the link to go to cloud storage.

Rice. 5 – login to the cloud via email
If you have already registered in the Yandex system, you can access the disk using the link https://disk.yandex.ru/ - just enter the login and password for your mail account.
After successful login, the browser will redirect you to the cloud home page. It looks like this:

Rice. 6 – main directory of Yandex cloud storage
Pay attention! If you are using a Yandex browser, after logging in, a cloud storage icon will appear on the toolbar. By clicking on it, you will be automatically redirected to your file storage directory.
Recovering login data via browser
If you have a created Yandex account, but do not remember your login or password, use the access recovery form.
Then type the code that came via SMS to your phone into the text field. Access will be restored and you will be able to set a new password.

Rice. 7 – access recovery page
If the user does not remember the login, you need to indicate this in the recovery tab. Next, the system will scan your browser for the latest successful authorizations in Yandex.
You will be offered several options for the logins you used to log in. Select the one you need and restore access to your profile.

Rice. 8 – automatic login recovery
Authorization via Windows application

After installing the file, run the program. A disk login form will appear. Enter your login and password. Check the “Remember” box and log in.

A folder will appear in which all your files will be displayed. Now you can easily move files and folders from your computer directly to the service.
File synchronization requires .

Rice. 11 – display storage on PC
Login to the program for Mac OS
Go to the disk through a browser and select the field in the main window "Applications for all platforms":

Rice. 12 – main window of the cloud
In the tab that opens, select the desired operating system and download the installation file to your computer. Install the client and open it.
A login form will appear. Enter your account information and confirm the action.

Rice. 13 – logging into the client for Mac OS
View a short slide show on using the program and click on setting the location of the storage folder.
Now click on “Edit” and select the directory from Finder in which the cloud storage data will be displayed.

Rice. 14 – getting started with the client for Mac OS
As a result of the setup, a storage icon will appear on the desktop; by clicking on it, you will see a pop-up window with the latest files added to the disk.

Rice. 15 – viewing the Yandex cloud folder on Mac OS
The synchronization status is displayed at the bottom of the disk folder.
If a system error message occurs, check your Internet connection and log out of your account, and then log in again.
Running a cloud on Android
And also, you can upload any other file formats to disk or download documents and folders from the cloud to your gadget.
Go to the installed application and log in. After a few seconds, a window with cloud folders will appear:

Rice. 16 – main window of the Android application
Instructions for iOS
As a rule, IOS users use Yandex disk as additional cloud storage, because all Apple gadgets.
Thanks to the increasing popularity of the Yandex cloud, developers have created a client application for owners and . You can download the program through the official App Store.
In addition, you can additionally purchase utilities for encrypting data in the cloud. Before sending a file from a PC to the service, it is encrypted with one of the cryptographic algorithms.
Advantages of the cloud from Yandex:
- Structured interface. A beginner will be able to quickly understand the basics of how the cloud service works, and an advanced user will configure it based on their preferences;
- The function of creating folders and files on the disk itself is available;
- Multiplatform - access from any device that is connected to the global network. All existing client applications are very well adapted to their OS. Do not cause crashes or errors even when downloading large files;
- Russian-language interface. All design is fully adapted for Russian-speaking users. If necessary, you can easily change the language in the settings;
- Free distribution. You don't have to pay to install the drive app on your computer, smartphone or tablet. All programs are available in official stores for free;
- The service provides 10 free GB to each user. In the future, to increase your space, you can use bonus programs or top up your account. On your account birthday you will receive an additional 2 GB of memory absolutely free.
To log into your Yandex cloud storage account, just select the device and application that you will use in the future.
Then log in through your mailbox or login form in the program and enjoy using the best cloud on the RuNet.
Thematic videos:
Installation of YandexDisk and link to download instructions
Hello, dear viewer! In the last lesson, we created an archive of our instructions. Since we will have to transfer the archive of this instruction to our partners, in order to automate this transfer process, it is best for us to upload the archive with the course to the Internet, receive a download link and provide this link to our partners. This way, they will be able to download and use the instructions provided on their own.
How to quickly log into your mail on Yandex
A small tweak in the Opera browser and we can log into our mail much faster. Video tutorial for beginner Internet users
Yandex.Disk is a cloud file storage. Allows you to gain remote access to data from various devices, as well as transfer it to other users of the global network, and provide download links.
After registering on Disk, 10GB is available to the user. If desired, it can increase the storage capacity. Add another 10, 100 or 1024 GB for a fee.
Files on Yandex.Disk can be managed through the web interface, directly in the browser, or through a special system application. Data is stored in the service cloud for an unlimited time, downloaded via an encrypted Internet channel and scanned by an antivirus.
Online (without downloading to a PC) in the cloud you can play and view:
- video (AVI, MP4, WMV, MKV);
- audio (MP3, MKA, AAC);
- books (EPUB, FB2);
- documents (Word - DOC/DOCX, RTF, TXT);
- images (JPG, GIF, BMP, GIF);
- archives (RAR, TAR, ZIP).
1. To register in the cloud, open the page in your browser - https://disk.yandex.ru/.
2. Click the “Start your disk” button.
3. In the registration form, indicate your first and last name.
4. Create your own login or select one of the options generated by the service based on your data (click under the name field).

5. Create a password of 15-20 Latin letters and numbers (mixed) and enter it in the two subsequent fields (“Create a password”, “Repeat...”).

6. Set up additional authentication, verification of rights to the profile (optional - via phone or security question):
- Via mobile: enter your mobile number with international code; click “Get code”; In the drop-down field, enter the verification code received via SMS.
- Without a phone: above the “Get code” button, click the “I don’t have a phone” link; Click to open the list in the “Security question” line, select the appropriate question; on the next line print the answer.

Installing and launching the application
After creating your account, the service will prompt you to install an application for working with storage. To use it, follow the instructions below:
1. When you first log into your profile, on the additional panel, click “Download Disk...”.

Note. If you have closed the panel with the link, on your profile page, at the top right, under the “Applications for all platforms” caption, click the “Windows” icon (or other platform you use).
2. Run the downloaded file.
3. If you do not want to install additional Yandex products (browser, manager, search engine on the start page), uncheck the boxes next to their names in the installer window.

4. Click "Done". Wait for the installation to complete.
5. In the “Settings” application window, click “Login”.

6. To change the location of the Yandex.Disk folder, follow the link “Customize location...”.

7. In the “Location” block, click the “Change” option. Specify the new path in the window that opens.

To avoid creating another folder in the specified directory, click on the checkbox in the “Create subfolder...” setting. Click "OK".
How to use the Yandex.Disk folder?
1. To open a folder, press “Win + E”, click its shortcut in the window that appears. Or double-click the application icon on your desktop.

2. Creating a new folder in a directory is carried out in exactly the same way as in Windows:
- open the Yandex.Disk directory;
- right-click on the free space;
- in the drop-down context list, select: “Create” → “Folder”;
- Name the folder according to the type of data you intend to store in it (for example, bookmarks, music, books, etc.).

3. To copy a file from your computer to a cloud folder, do this:
- left-click on it once;
- Press the “Ctrl” + “C” keys together (the “Copy” command);
- go to the cloud folder (see previous instructions);
- right-click to open the context menu;
- click “Insert”;


2. A settings panel will appear in the upper right part of the profile. Click “Share” in it to make the downloaded data available to other users.
Have a comfortable time working online!
Yandex disk is one of the services from Yandex, and its main feature is cloud data storage. That is, the ability to store some files (programs, documents, music, etc.) both on our computer and simultaneously in the “cloud,” that is, on Yandex servers.
This is a very convenient feature, especially when you work on a laptop or computer. Or you use a PC at work. You no longer have to constantly copy the necessary files to a flash drive, or . We simply use the Yandex disk folder on the computer and all files are copied to the “cloud” via the Internet. In order to access these files on another computer or even phone, it will be enough to enter your password and login on the site, or install a special program.
You can also easily share your files with other people by providing them with a personalized download link. In a word, let's look at the Yandex disk registration process and the basics of work.
To begin with, it’s worth saying that if you have already, for example, created mail, then you can safely skip this step. Since having one account from Yandex, you can use it in absolutely all services.
And we will continue.
To go through the process registration in Yandex Disk All you need to do is enter a minimum amount of your data, come up with a username and password. All this at: https://passport.yandex.ru/registration?mode=register. By pressing the yellow button " Register» our account will be created.

Now in the same browser we open the Yandex Disk website. Here is the link: https://disk.yandex.ru/client/disk. And we are welcomed here and immediately offered download Yandex Disk- a program with which we can easily manage our files. Click the button at the bottom of the window “ Download Disk for Windows».

Now you need install Yandex Disk. The process is easy. Just run the downloaded file.

And we wait until the necessary files are downloaded from the official website.

After that, uncheck the boxes so as not to change or install anything unnecessary, and then click the “Finish” button.

The installation of Yandex Disk is complete and in literally 5 steps we are introduced to the capabilities of the program:
1. The ability to store data, work with it on any device, and exchange it with friends.

2. You can launch Yandex Disk using the icon in the Notification Area.

3. Transfer files to the Disk folder and, after waiting for loading, access them from any device (laptop, PC, smartphone, tablet).

4. You can share files simply by copying the link by right-clicking on the file.

5. We are also reminded that there are applications for smartphones.

The first thing after installing the program is to launch it and enter your Yandex username and password.


And on the “Basic” tab, change the folder where the files will be stored. By default, the system drive is selected there, which is not very good. We indicate some folder on another drive, for example, (D:).

Everything is fine. Now try to open this folder (which you specified to Yandex disk in the settings) and place in it the files that you would like to access from other computers, laptops, and smartphones. This is what it looks like for me.

By the way, a green checkmark at the bottom of the folder means that the file was successfully uploaded to the server.
And one more thing. You can open the Yandex disk folder in a very quick way. To do this, just go to Computer and find the Yandex.Disk icon under the disks.


You open it and see your files there. You can place new ones there and remove old ones if necessary. This way you can manage these files on your computer. Any changes made (deleting, editing, adding a new one) are immediately applied on the Yandex server.
If you now open Yandex Disk via or any other: https://disk.yandex.ru/client/disk, you will see your files there.

Here you can also work with them (open, delete, download new ones). This is the easiest way to work with your files from someone else's computer. Went to Yandex disk website, entered your username and password, completed the required work and clicked the Logout button. The changes will be saved, and when we return home and turn on our PC, the latest changes will be synchronized via the Internet.
By the way, the latest versions of Drive have added the function of saving screenshots. If you use your computer from time to time, then perhaps this function will be interesting to you. Pay attention to the desktop. There is an additional shortcut " Screenshots in Yandex.Disk».

This is an additional utility for Disk, by running which we can take screenshots: of the entire screen, of a selected area, of the active window. Everything is your choice.

Later, after taking a screenshot, you can edit it and save on Yandex Disk, and it’s natural to share a link to this file if you need to share it on the Internet with friends or acquaintances.
I will conclude here, and if some point is still not clear to you, then please ask questions in the comments - I will help as best I can.