Yandex mail iphone problems displaying letters. Setting up mail on iPhone and iPad
In our previous articles, you learned how to create mail on your iPhone, and if not yet, then you should. This article will be useful to those who have already set up their mail, and then suddenly remembered that they have two, or eight, as you like. And so let's get started...
Set up multiple mailboxes on iPhone
Since you are already experienced gurus in setting up mail, we will not dwell on the details and immediately go to the menu item “Settings” -> “Mail, addresses, calendars”, there we see the account we have already created, do not touch it, but click “Add” ".
Next, we follow the usual instructions for setting up mail, for those who have forgotten how, and repeat. After we have added a second account, we need to go into each one and check that they are both active, as shown in the figure.

After which we exit the settings and go to our mail.

There we already see several mailboxes, each with a separate Inbox folder. Using the same scheme, you can configure as many mailboxes as you like. You will be notified of the arrival of new letters by a number above the “Mail” button, so checking your mail regularly will be as easy as receiving SMS. You can ask us any questions you have about setting up mail, and we will solve your problem together.
The Mail program (or Mail) is a standard application of the iOS system and does not require additional installation from the App Store. However, to work with the mail client, you must first carry out the “Mail” setup procedure. This article will discuss all the possible stages of setting up an email client using the native Mail application as an example.
Standard Mail setup on iPhone/iPad
To configure the email client, go to “Settings” -> “Mail, addresses, calendars”. Here the user is given a choice of services, such as Google, Yahoo, iCloud, Outlook and so on. To connect a service account that is not included in the general list, you need to click on the “Other” button, however, in this case, the procedure for connecting an account may differ from the standard one.
Having selected a service in which you already have an account, you need to tap on its logo, and then indicate the basic information of your account: name, e-mail, password. After checking the information, if there are no errors, the Mail application will be ready for use. But don’t rush to leave the “Mail, Addresses, Calendars” section. Here you can also customize some design styles, notifications, signatures and other little things.
By the way, if necessary, it is possible to add several accounts of various mail services at once.

Adding an account for Tut.by, Rambler, Yandex, etc. to the Mail app on iPhone/iPad
You can add a Tut.by or Rambler account to the standard iOS mail client “Mail” only by linking the server address. To do this, in the service selection window, click “Others”. In the menu that appears, enter your name, email and password.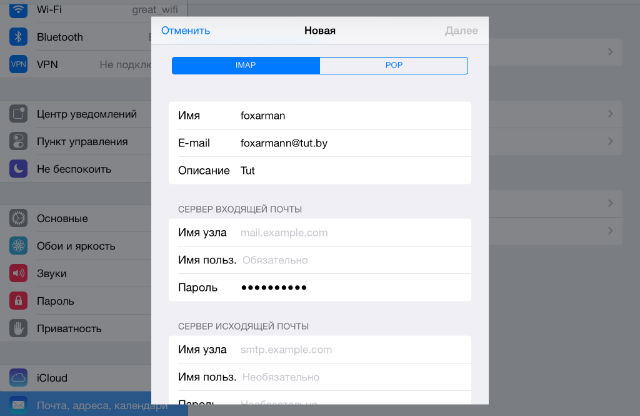
- Mail.ru - pop.mail.ru
- Yandex - pop.yandex.ru
- Rambler - pop.rambler.ru
- Tut.by - pop.gmail.com
- Mail.ru - smtp.mail.ru:25
- Yandex -smtp.yandex.ru
- Rambler - smtp.rambler.ru
- Tut.by - smtp.gmail.com
If you encounter the error “The server rejected the recipient because. it does not allow relay" or "Relay error" in your email client, check that the information is filled in correctly.
As a final step, in the last settings menu that appears, we indicate those sections that we want to synchronize with the mail service (contacts, calendars, etc.), save all the settings made and check the operation of the mail. If an error occurs in the operation of the mail service, try repeating the entire procedure again. Perhaps you just missed something at one of the stages.

Also check that in the settings of your mail account, in the “outgoing mail” section, in the “primary server” item, the use of SSL is activated. If this does not help and mail continues to not work on your iPhone or iPad, then, in the same section, change the numerical value of the server port to 465 or 25.
Google two-step verification: setting up mail on iPhone or iPad
Often, Gmail users activate the two-step verification feature to increase the security of their Google account. From the moment it is turned on, the active mail account on the iPhone and iPad stops working, displaying the error "Invalid username or password". In this case, re-entering the password or checking the username (just in case) does not bring any benefit.In this case, you need to do the following:
Step 1. Log into your Google account through a browser and go to the “Security” section.
Step 2. Look for the line “Two-Step Verification” and go to “Settings”.

Step 3. You will be prompted to enter your Google account password, after which you will be taken to the settings for this function. We need a second tab “Application Passwords”. Click on the “Manage application passwords” button and enter the password again.

Step 4. We see a list of all applications that have access to your Google account and mail, including. Here you can give access to the Mail application on your iPhone and iPad. To do this, click on the “Applications” menu, select “Mail”, and on the right, click on the “Device” menu, select iPhone or iPad and click the “Create” button.

Step 5. After all the manipulations, instructions will immediately open containing a new password for setting up an account on your device.

Following the instructions, go to “Settings” -> “Mail, addresses, calendars”, select your Gmail account from the list and change the password to the one specified in the instructions. Ready!
Email clients from the App Store
Despite the availability of quite high-quality standard ones on iOS, good alternative options can be: Mailbox, myMail, Boxer (lite version available) and standard clients from Google, Yandex, Yahoo, and so on. Each application has a unique design and boasts interesting features that will make working with emails much easier and more convenient. The choice is yours.If you haven’t found an answer to your question or something didn’t work out for you, and there is no suitable solution in the comments below, ask a question through ours. It's fast, simple, convenient and doesn't require registration. You will find answers to your and other questions in the section.
In principle, like all actions performed on the iPhone, setting up mailboxes has its own characteristics. It is not complicated, it is enough just to know some of the nuances when adding each of the services. It is advisable to connect your iPhone to the Internet before the procedure so that you can immediately check the correctness of the entered data and the presence of a box with the same name. And also to make sure that the created setting works. But this is not mandatory; everything can be done remotely. The first time you connect to the network, all necessary checks will be carried out.
If we are talking about our own (iCloud) or Apple-friendly resources - Yahoo, Outlook.com or Gmail, then even an inexperienced user can set them up without any problems. This is due to the fact that the standard client built into the iPhone operating system - iOS - Mail.app, can automatically add server settings for incoming and outgoing mail services. It will be enough to simply enter your information into your account and add the existing mailbox to the smartphone’s memory.
To do this, from the settings menu, go to the mail, addresses, calendars tab. Click on the item - Add account.
In the dialog box provided, select one of the automatically configured accounts. At the moment, the user is offered six options. Such a selection once again shows that iPhones are “tailored” for the American market.

After this, you will need to fill in your data in the standard four fields: username, E-mail address, password, as well as a description (the name of the future link is indicated here, you can simply duplicate your address here), and the mail manager can do everything else itself.
This is how, for example, the process of setting up the Gmail service will look like.

After entering personal data into the dialog boxes, the system will offer to save everything and synchronize mail, all contacts and calendars with notes between the mailbox and the iPhone. To do this, activate the slider opposite the desired action, if necessary. Ready.
If you suddenly want to make any changes after installation, this option is available at any time. All you have to do is select a specific account and correct the data.
For all other services offered by the manufacturer in accounts, the settings algorithm is exactly the same.
What about Russian-language postal services?
The situation is a little more complicated with other mail agents Rambler, Mail.ru or Yandex, popular in our latitudes. You will have to manually enter the data into the existing fields. Since they all have their own characteristics, we will consider each of them separately.
So, in order to set up your mailbox on the sixth iPhone Yandex- you need to partially repeat the path described above. Just select this time the item – Other – at the very bottom of the accounts menu.

Enter your name, email, password and description (the first and last are optional). Built-in mail settings manager in iPhone will prompt you to create your mailbox in the standard IMAP protocol, but when filling it out an error will probably be displayed. You will need to exit the automatically downloaded IMAP window and switch to POP. Select the appropriate tab on the right - POP. Most of the remaining data will be linked automatically.

Then you should change the host names for the incoming and outgoing mail servers to the following:
In the server subsection for incoming mail, next to - Host name - enter pop.yandex.ru;
In the server subsection for outgoing - Host name - on smtp.yandex.ru.

After checking and confirming the entered data, save all changes made. Synchronize contacts if necessary. After this, the mailbox will work safely on the iPhone.
Now let's repeat this procedure for Rambler. Don't forget to switch to the POP protocol. When trying to set up a new Rambler service mailbox, sometimes data about the mail server host name is not entered automatically after filling out the top user fields. If this happens to you, enter them manually, they should have the following names:
— Host name in the incoming mail server tab — enter pop.rambler.ru;
— The host name in the server tab for outgoing mail is smtp.rambler.ru.
This is what it should look like:

After the saving and synchronization procedure described above, this box in Rambler will also be linked to iPhone, and ready to go.
For Mail.ru – We repeat the same procedure again, but only in the settings menu of our mailbox, in addition to personal data, we enter:
The node name in the incoming server tab is pop3.mail.ru;
The host name in the outgoing server tab is smtp.mail.ru.
And a picture to illustrate these actions.

You can add several mailboxes from different mail services to your iPhone’s memory at once. Or configure one of them so that all incoming letters from different addresses flow to it.
That's all the manipulations you need to do yourself. It is enough to carry out this simple procedure once, and you can safely enjoy all the advantages of modern technologies - have unlimited access to incoming letters and respond to them promptly.
We have described the simplest option for designing and installing email services on an iPhone - via the POP protocol. Of course, to expand their capabilities it is better to use the more advanced IMAP protocol. But you can’t just install it from an iPhone. Before this, you will need to activate permission to use this protocol in the settings of each specific mail server. It is clear that this method is not suitable for beginners, since they will also have to familiarize themselves with their features and manuals. Therefore, if it is enough for you to simply send and receive letters, then make a simple and quick registration of the mailbox via the POP protocol, as described in this article. Good luck!
In this manual you will find the answer to the question “How to set up mail on an iPhone (iPhone)” of any model. Follow the steps and everything will work out.
All you need for this is Internet access. Owners of Iphone mobile phones often wonder: how to set up mail on their gadget? In this article we will try to give step-by-step instructions for setting up mail on an iPhone.
If you have difficulties setting up mail on your iPhone and you are a resident of St. Petersburg, you can contact our service center staff for help. We work daily and without breaks. We can also repair your iPhone using original spare parts.
To become a mobile mail user, you need to do the following:
- Open the “Settings” section (for English versions - “Settings”);
- Select the item “Mail, addresses, calendars”;
- In the “Accounts” item, select “Add...” (AddAcount);
- From the list of suggested email sites, select the one you need, or click “Other”;
- In the window that appears, select “New Account” and then enter your name. The entered name will be displayed to those to whom you will send letters;
- In the next “Email” field, enter your email address. This could be a mailbox opened on Mail.ru, Yandex.ru, Rambler.ru, and so on. Be extremely careful when entering your address. It must be written in the same format as on the website;
- In the “Password” field, enter the password for your email;
- In the “Description” column (“Decription”), enter a name for the configured mail to easily distinguish one configured mailbox from another;
- And finally, click “Save”;
- After completing the operations, exit the settings menu and click on Pop on the screen.
Video instructions on how to set up mail on iPhone.
In this section you need to configure the incoming mail server (for English-language Iphone phones - Incoming mail server):
- In the “Node name” column, enter pop.rambler.ru or pop.mail.ru, or another site on which the email box was created;
- In the “Username” column, again enter the postal address very carefully, without errors;
- There is no need to enter the password, because you have already written it down.
- In the “Node name” column, enter smtp.yandex.ru or smtp.rambler.ru;
- In the “Username” column, again very carefully enter the entire email address, for example [email protected];
- Enter the mailbox password.
- We save the changes, and your mail is ready to use!
Apple products are a kind of quality mark, a symbol of modern technology and further progress. However, these latest technologies sometimes develop so rapidly that ordinary users cannot always keep up with them. As a result, setting up Rambler mail on iPhone may not be the easiest task for some. To avoid such problems, let's see how to do it correctly.
Creating a Profile
To access the Rambler mailbox on the iPhone 5 or other versions of Apple smartphones, the first step is to create a new account. If you know how to set up mail on iPhone, then you can handle this task without any problems.
Open “Settings”. Go to the “Mail, Addresses, Calendars” section.  In the Accounts field, click the Add button.
A list of email services that iPhone works with by default will appear on the screen. Unfortunately, you will not be able to find Rambler among these email services.
Therefore, scroll down the screen and click the “Other” button. 
The Other menu appears. In the "Mail" field, click the "New Account" button. 
A window called “New” will appear. Here you need to enter:

After filling out all the specified lines, click the “Forward” button.
Parameters of the mail service
Next, you need to provide information for the mailbox to work. Rambler mail works through an IMAP server, so in the next window you need to select the appropriate tab. The Name, Address and Description fields should be filled in by default.  Scroll down the screen. Here you need to specify the host name, registered mailbox and mail password.
The next field is “Outgoing mail server”. You only need to specify the host name – mail.rambler.ru. No other parameters need to be entered.  Click "Forward" to start checking the specified data.
If you entered everything correctly, a check mark will appear next to each line, indicating that the mail is configured correctly.
The final window looks like this:  Click the "Save" button to start using the created account. If necessary, you can delete your mailbox on Rambler, as well as remove the created account from your mobile device.