Setting up an Internet connection on Windows XP. Connecting to the Internet in Windows XP
This instruction useful for those who configure a modem or router in Bridge mode or connect a cable from the Internet directly to a computer using only a network card. The configuration for all cases is made in high-speed connection mode (PPPoE) on Windows XP.
Creating a connection
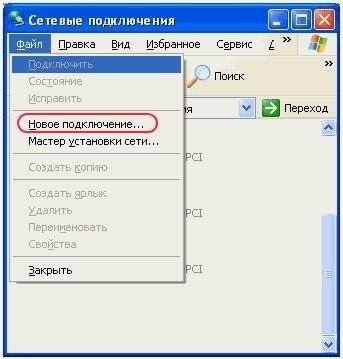
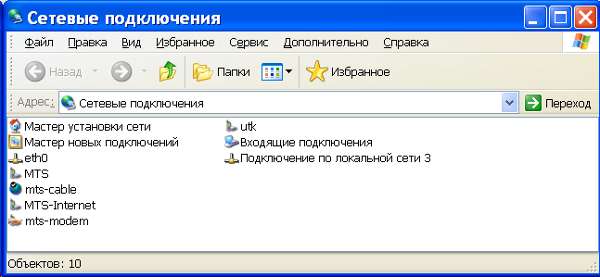
On the desktop or in the Start menu, open My Computer, then select Control Panel. In the window that opens, go to the folder “ Network connections"as shown in the picture.
Click the “File” menu item (in the upper left corner of the window), select “New connection” or right-click on the empty area of the window next to the icon (if you do not have a menu, press the “Alt” key on your keyboard).
The “New Connection Wizard” window will open, click “Next”.

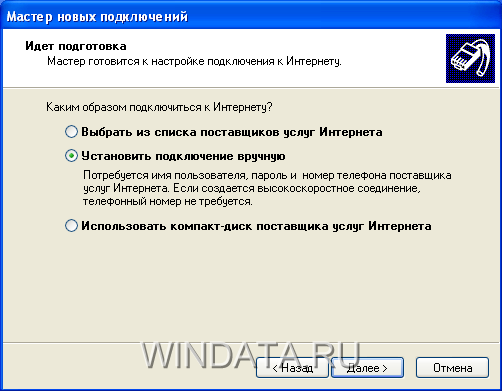
Check the “Connect to the Internet” option and click the “Next” button.

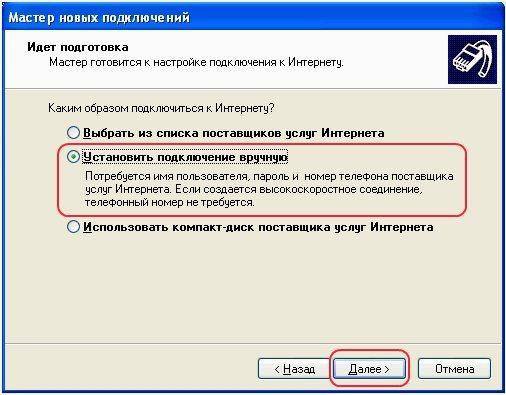
Check the box “Set up a connection manually” and click the “Next” button.
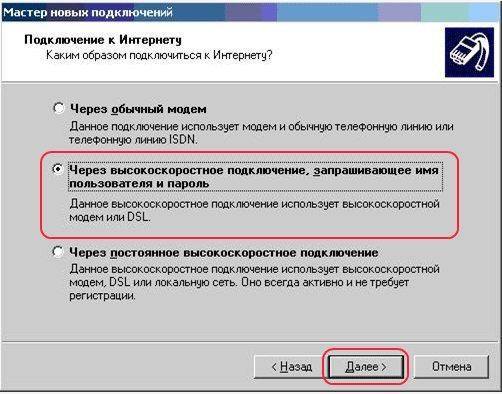
Check the box "Via a broadband connection that requires a username and password" and click the "Next" button.
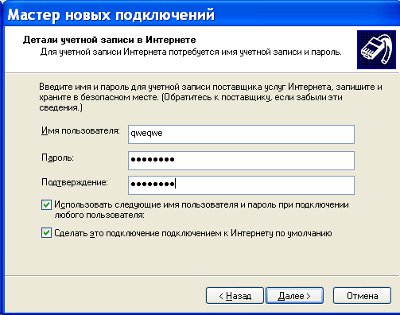
In the “Service Provider Name” field, enter the name of the Internet connection; it can be anything, for example, “Rostelecom” (This is the future name of the shortcut for the connection, which can later be placed on the desktop).

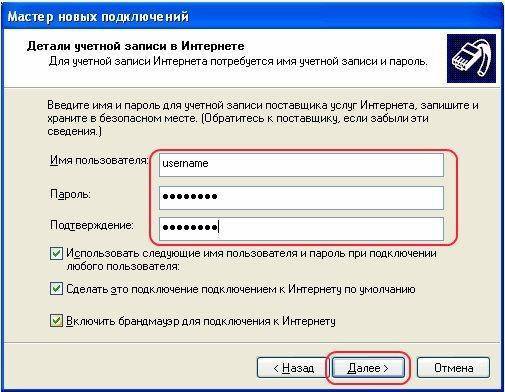
In the next window, you need to fill in the most important fields. Be careful when filling out, follow the case (large and small characters are different, write this data exactly as the provider provided it to you).
- “Username” - login for Internet access.
- “Password” - login password.
- “Confirmation” - Password confirmation.
All specified details are given to you by the provider when concluding an agreement; as a rule, these details are indicated in your agreement or on a special access card.
You can leave the remaining checkboxes as default, as indicated above. Click the "Next" button.
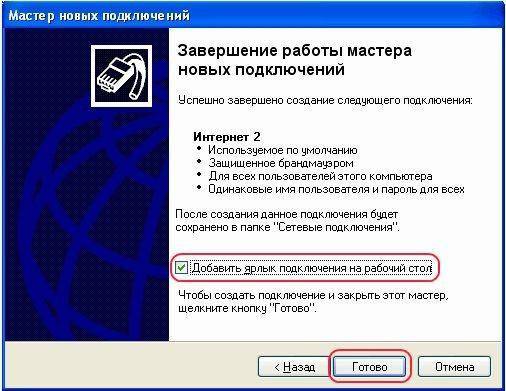
Check the box for “Add a connection shortcut to the desktop” and click the “Finish” button.
Internet connection
Possible errors
Video on setting up an Internet connection
Found a typo? Select the text and press Ctrl + Enter
After setting up the main workers Windows settings you can start configuration network equipment and parameters network services to set up access to the World Wide Web.
Creating a network connection to the Internet is very simple. Many operations are automated and require the user to perform only a few steps, be it setting up dial-up access telephone line(dial-up) or high speed connection.
To create an Internet connection, open the Control Panel window, click the Network and Internet Connections icon, and then the Network Connections icon. The window shown below will open.
To start creating a new connection, you must select the File>New connection command in the main menu or click on the Create a new connection link, which is located on the left side of the window. When you perform any of these actions, the New Connection Wizard window will open.
After reading brief information about the wizard's capabilities, click the Next button. In the new window you should select the type of new connection. Since you are creating an Internet connection, select the Connect to the Internet radio button and click Next.
In the next window you need to select a method to connect to the Internet. Select the Set up a connection manually radio button and click the Next button.
In the next wizard window, you need to select the type of device connected to the Internet.

This is one of the key connection steps. It is in this window that you can specify which device will be used to connect to the Internet - a regular modem for a dial-up connection or a modem for a high-speed connection (such as a DSL or cable modem). In other words, setting up an Internet connection in Windows for different types connections are made almost identically.
In the next window, in the Service Provider Name field, you must enter the name of your Internet service provider. In most cases, the name of the connection is the name of the Internet service provider, but you can specify any custom name. Click the Next button.
Now you need to provide a username and password (usually your ISP will provide the username and password information). By checking the appropriate boxes, you can enable additional options account. After completing these steps, click the Next button to proceed to the final stage of creating an account.
Click the Finish button and the New Connection Wizard will be completed. To add a shortcut to the created connection on your desktop, select the Add connection shortcut to desktop checkbox.
After completing all listed actions The icon for the created connection will be presented in the Network Connections window. To connect to the Internet, double-click on this icon and in the window that opens, click on the Call button. To simplify the connection task, it is recommended to place a shortcut to the created connection on your desktop. If you did not create such a shortcut after finishing the New Connection Wizard, right-click the connection icon and select Create Shortcut. Then transfer the created shortcut to your desktop.
Settings pppoe connections FTTx or DSL "Home Internet" in Windows XP is a little more complicated than pppoe in Ubuntu, and it probably won't be done in a minute. Such a connection must be created to connect to high-speed cable access services, which are now provided by many telecom operators. If you have Windows 7 then read another article - Setting up PPPoE in Windows 7. But first, a little theory.What is PPPoE
This abbreviation stands for: Point-to-point protocol over Ethernet. This is a tunnel protocol that runs on top of the Ethernet protocol used in local networks. The fact is that the Ethernet protocol does not provide for user authorization. That is, access cannot be allowed or denied at the logical level via Ethernet.
The PPPoE protocol solves this problem. It is used to control access to certain network resources. In practice, PPPoE is most often used to provide high-speed Internet access. Today, the most common high-speed Internet access is implemented using DSL (xDSL) technology. To an apartment or office, communication goes through a telephone wire; in the apartment (office) a DSL modem is installed and this modem is connected via network cable connects to the computer.
But now another technology is being actively implemented - FTTx:
- FTTB (Fiber to the Building)- fiber optic cable to the building.
- FTTH (Fiber to the Home)- fiber optic cable to the apartment.
A fiber optic cable is laid to a building or even an apartment, and a regular network cable is connected to it inside the building or apartment. Using this technology, the Internet is now provided by such telecom operators as Rostelecom (Home Internet service), MTS (Home Internet and TV service), Beeline (Home Internet service).
Regardless of which channel is used, DSL or FTTx, the connection settings on the client computer will be the same - this is the pppoe connection setting. With the exception of Beeline - they connect using the VPN protocol.
PPPoE Windows XP
Configure " home Internet" in Windows XP is easy.
Press the Win+R keys and enter “ncpa.cpl” in the dialog box, then click the “OK” button:
Then in the “Network Connections” applet window, click on “Network Connections Wizard”:
Or through the Start menu - Settings - Network Connections:

A wizard will launch, to which you will need to specify the parameters step by step, in the second window click the “Next” button:

In the third window, select “Set up a connection manually” and click “Next” again:

In the fourth window, specify “Via... the requesting username and password” and click the “Next” button again:

In the fourth window, specify the name of the connection and click “Next” again:

In the fourth window, enter your username, password and click “Next” again:
After this, a window will open in which you can establish a connection:

Connecting to the Internet in Windows XP
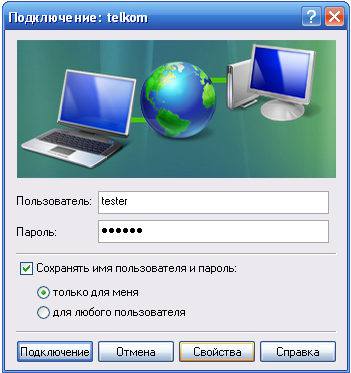
After the connection has been created, you can connect to the Internet using it through the Start menu - Settings - Network Connections - connection name:

After this, a connection dialog box will open, in which you need to click the “Connect” button.
Note. To disconnect from the Internet, you need to do the same, only the button will be " Disable".
Possible errors
Errors may occur when connecting to the Internet via pppoe. For example 651 connection error:

If such an error occurs, first try to connect again two or three times. Perhaps this is just a temporary glitch. This error means that it was not possible to establish a pppoe session with a DSL concentrator or PPPoE server, while the Ethernet connection was established. The reasons for this may be different, for example, for MTS it may be a MAC address blocking network card your computer. To correct such an error, you need to contact the technical support of your provider.
No matter what errors occur when connecting via pppoe, it is important to understand that this connection is created “on top” network connection Ethernet, so diagnostics should begin by checking the operation of the network card and network cable in the area from the computer to the router or modem.
Optional pppoe connection settings
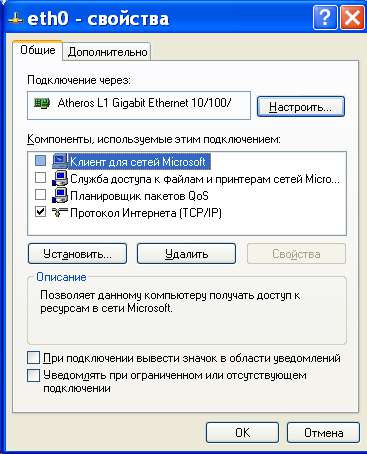
After creating and configuring a pppoe connection, you can disable protocols not used in this connection. Open the “Network Connections” applet (see earlier in this article), then on the network connection through which the incoming network cable is connected, right-click and open “Properties” in the menu.
Then, in the connection properties, on the "General" tab, disable the "File Access Service", "Microsoft Networks Client" protocols and click the "OK" button:
If you found this article useful or simply liked it, then do not hesitate to financially support the author. This is easy to do by throwing money at Yandex Wallet No. 410011416229354. Or on the phone +7 918-16-26-331 .
Even a small amount can help write new articles :)
Setting up the Internet in Windows XP is not particularly difficult. This applies to both wired and wireless connections. In the first case, the parameters are set in the section "Network Connections", which is located in the Control Panel. In the second, everything is done with loading drivers if they are not initially in the system.
Connection setup
If the setting goes for wired connection, then you need to know certain network parameters. But this does not apply to the case when the computer is connected to a Wi-Fi router via a cable. Relatively wireless network things are different.
If the laptop has pre-installed Wi-Fi, then just download necessary drivers and connect to your home network. The procedure for a discrete adapter is similar. It's even easier for owners of 3G/4G modems: just download the necessary software, enter the SIM card PIN code, if required, and activate the connection.
Method 1: Direct Wired Connection
Open menu "Start" and click on "Control Panel". There, switch to the classic display view, if such an option is available. Expand the element "Network Connections".
Several devices can be displayed in the window. Find the one whose status is signed "Connected", and double-click on it. There select the item with the name "Internet Protocol"TCP/IP" and open its properties. 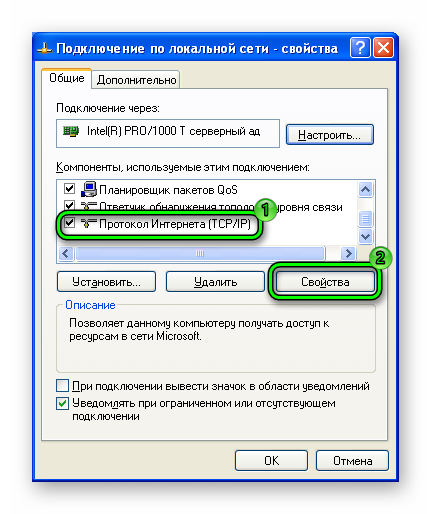 Check the checkboxes for manual input mode, and then specify your network settings. Button "OK" will be confirmation of your actions.
Note: the Internet may not work even with the correct parameters. This is because your connection is configured to network device with anotherMAC address. In this case, you need to call the provider and describe the problem, technical support everything will be fixed within a few minutes.
Method 2: Wired connection via Wi-Fi router
Now let’s figure out how to connect the Internet with a cable via a router on Windows XP. In this case it is not required detailed setup, since the device parameters are already set as required. All that remains is to connect it to your computer or laptop using an Ethernet cable.
Important: initially two cables are suitable for the router: one for power, the second for the Internet. There is no need to touch them. Connect the third one into one of the free numbered sockets, then insert it into network adapter on the computer.
When physical connection completed, all that remains is to configure the computer for correct operation. Most likely, even this will not be required; the Internet will start working immediately. If this does not happen, then follow these steps:

Close the settings window and go to any program that works with the Internet, for example, a browser. There you can check the connection status. If the instructions did not give any results, then there is a problem with the router settings.
Method 3: Wireless network
Setting up Wi-Fi in Windows 7, as well as external modem different from a wired connection. First you need to find and install drivers for the device. They are usually included in the package and are also available for download from the official website. The shortcut to enable 3G/4G is located on the desktop. Open it and then press the connect button.
The connected Wi-Fi will be displayed in the tray. Click on its icon, select home network and enter the access code for it.