It says no internet access. Use of standard tools. Checking the physical connection
Good day.
When installing new Windows, as a rule, the system automatically configures many parameters (will put universal drivers, will set the optimal firewall configuration, etc.) .
But it just so happens that some things are not automatically configured when reinstalling Windows. And many who reinstalled the OS for the first time are faced with one unpleasant thing - the Internet not working.
In this article I want to look at the main reasons why this happens and what to do about it. (especially since there are always a lot of questions regarding this topic) …
The most common reason why there is no Internet (note after installing a new Windows OS) - this is the absence of a network card driver in the system. Those. the reason is that network card it just doesn't work...
In this case, a vicious circle results: There is no internet, because... there is no driver, and the driver cannot be downloaded - because... no internet ! If you don’t have a phone with Internet access (or another PC), then most likely you won’t be able to do without the help of a good neighbor (friend)…
Usually, if the problem is with the driver- then you will see something like the following picture: a red cross will be lit above the network icon, and an inscription something similar to this: "Not Connected: No connections available"…
In this case, I also recommend going to panel Windows management , then open the section Network and Internet, then Network Control Center and shared access .
In the control center - on the right there will be a tab " Changing adapter settings" - it needs to be opened.
In network connections you will see your adapters with drivers installed. As you can see in the screenshot below, my laptop does not have a driver for Wi-Fi adapter (there is only an Ethernet adapter, and even that is disabled).
By the way, check, it’s possible that you have the driver installed, but the adapter itself is simply turned off (as in the screenshot below - it will just be gray and it will say “Disabled”). In this case, simply enable it by right-clicking on it and selecting the appropriate menu in the pop-up context menu.
Network connections
I also recommend taking a look at device Manager: there you can see in detail which equipment has drivers and which do not. Also, if there is a problem with the driver (for example, it is not working correctly), then the device manager marks such equipment with yellow exclamation marks...
To open it, do the following:
- Windows 7 - in the Run line (in the START menu), paste devmgmt.msc and press ENTER.
- Windows 8, 10 - press the WIN+R button combination, paste devmgmt.msc and press ENTER (screenshot below).
In Device Manager, open the " Network adapters ". If your equipment is not on the list, it means there are no drivers in the Windows system, which means that the equipment will not work...
How to solve the driver issue?
- Option #1- try updating the hardware configuration (V device manager: Just right click on the title network adapters and in the context menu that pops up, select the desired option. Screenshot below).
- Option No. 2- if the previous option did not help, you can use special utility 3DP Net (It weighs about 30-50 MB, which means it can be downloaded even using your phone. Moreover, it works without an Internet connection. I talked about it in more detail here:);
- Option number 3 - download on the computer of a comrade, neighbor, friend, etc. special driver package - ISO image by ~10-14 GB, and then run it on your PC. There are a lot of such packages floating around the Internet, I personally recommend Driver Pack Solutions (link to it here:);
- Option No. 4 - if none of the previous ones worked and did not give results, I recommend looking for the driver by VID and PID. In order not to describe everything in detail here, I will give a link to my article:
And this is what the tab will look like when the driver for the Wi-Fi adapter is found (screen below).
If you can't connect to the network after updating the driver...
In my case, for example, Windows refused to search for available networks and after installing and updating the drivers, it still showed an error and an icon with a red cross.
Next, the troubleshooter will automatically begin to fix problems associated with network inaccessibility and advise you on each step. After the button has been pressed "Show list available networks» - the troubleshooting wizard configured the network accordingly and that’s it available Wi-Fi networks became visible.
Actually, I stayed finishing touch- select your network (or the network from which you have a password to access :)), and connect to it. Which is what was done...
Entering data to connect to the network... (clickable)
2. Network adapter disabled / Not connected network cable
Another common reason for the lack of Internet is a disabled network adapter (if installed driver). To check this, you need to open the tab (where all network adapters that are installed in the PC and for which there are drivers in the OS will be shown) .
The easiest way to open is to press the buttons together WIN+R and enter ncpa.cpl (then press ENTER. In Windows 7, the run line is in START) .
Opening the Network Connections tab in Windows 10
In the tab that opens network connections- pay attention to the adapters that are displayed gray (i.e. colorless). Next to them there will also be an inscription: “Disabled”.
Important ! If there is nothing at all in the list of adapters (or there is no adapter that you are looking for) - most likely you simply do not have it in your system the required driver(the first part of this article is devoted to this).
To enable such an adapter, simply right-click on it and context menu select "Enable" (screenshot below).
After the adapter is turned on, pay attention to whether there are any red crosses on it. As a rule, the reason will even be indicated next to the cross, for example, in the screenshot below “The network cable is not connected.”
3. Incorrect settings: IP, default gateway, DNS, etc.
Some Internet providers require you to manually set certain settings TCP/IP (this applies to those who don’t have one, in which you entered these settings once, and then you can reinstall Windows at least 100 times :)) .
You can find out whether this is so in the documents that your Internet provider gave you when concluding the contract. Usually, they always indicate all the settings for Internet access (as a last resort, you can call and check with support).
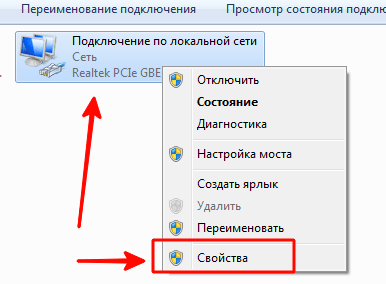
Everything is set up quite simply. IN network connections (how to access this tab is described above, in the previous step of the article) , select your adapter and go to this properties.
Ethernet Network Adapter Properties
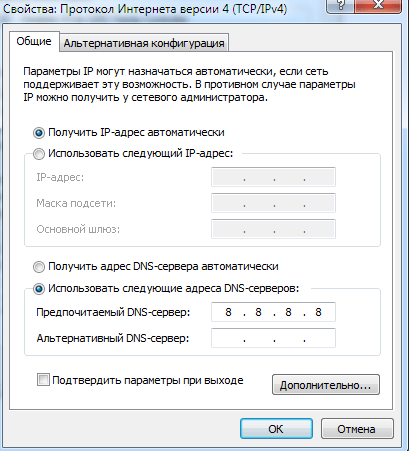
In the properties you need to specify the data that your Internet provider provides to you, for example:
- IP address;
- subnet mask;
- main gateway;
- DNS server.
If the provider does not stipulate this data, and you have some unfamiliar IP addresses set in the properties and the Internet does not work, then I recommend simply setting the receiving IP address and DNS automatically (screenshot above).
4. PPPOE connection not created (as an example)
Most Internet providers provide Internet access using the PPPOE protocol. And, say, if you don’t have a router, then after Windows reinstallation- your old configured connection to connect to the PPPOE network will be deleted. Those. you need to create it again...
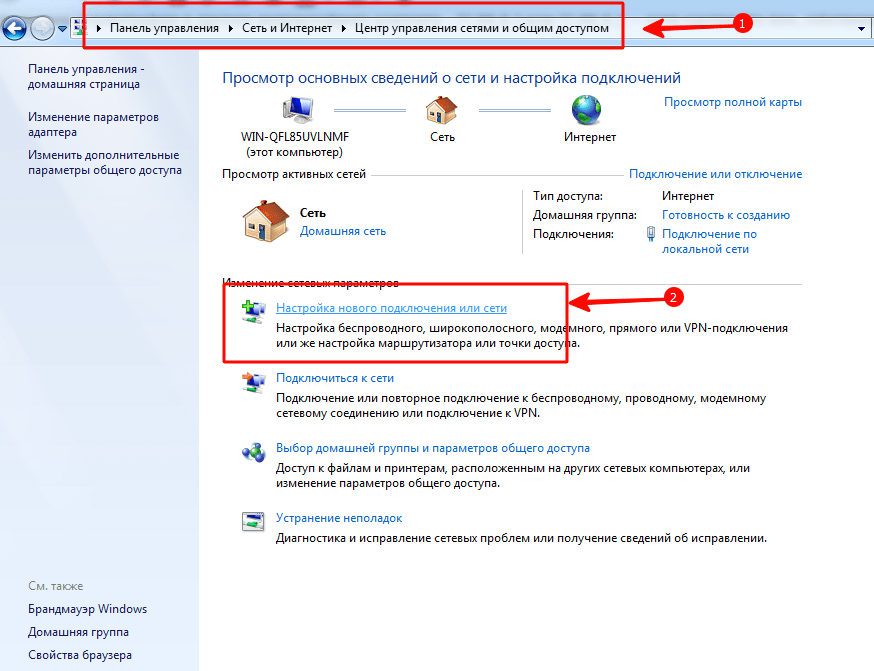
To do this, go to Windows control panel at the following address: Control Panel\Network and Internet\Network and Sharing Center
Then select the first masonry " Connecting to the Internet (Set up a broadband or dial-up Internet connection)» and click next.
Then select " High Speed (with PPPOE) (DSL or cable connection, requiring username and password)"(screenshot below).
Then you need to enter your login and password to access the Internet (this data must be in the agreement with the Internet provider) . By the way, please note that in this step you can immediately allow other users to use the Internet by checking just one checkbox.
Actually, all you have to do is wait for Windows to establish a connection and use the Internet.
P S
Finally, I’ll give you a simple piece of advice. If you are reinstalling Windows (especially not for yourself), do backup copy files and drivers - . At least, you will be protected from cases when there is not even an Internet connection to download or look for other drivers (you must admit, the situation is not pleasant).
For additions on the topic - a separate merci. That's all for now, good luck to everyone!
So, you have finally concluded an agreement with a new provider, and a cable with a plug has been installed in your apartment - a real window to the world. All you have to do is connect it to your computer - and the Internet is at your service. However, if it was enough to insert the plug into the socket, you would not need to read this article.
Let's look at how to connect the Internet to a computer via cable, in the simplest case. Let's say you have only one computer, and you will use it as a router (if you suddenly need it or a tablet). Or (alternatively) you are planning to do so later, so you turn off the router to make it easier remote access.
Let's say you have a network card on your computer (it doesn't matter whether it's separate or built into the motherboard), and you've just connected an Ethernet cable to its input. We assume that you enjoy the most current Windows 10. Although for correct settings Windows 8/8.1 or even 7, these instructions are also suitable: the principle is the same.
Of course, you can always call a specialist to do everything the right job for you. But specialists are not always free. In addition, you will not only save money on calls on your own, but also learn how to set up the Internet on your computer via cable. In our world, such knowledge can come in handy at any time.
Dynamics vs. Statics
Now check with your provider what kind of connection they offer on your tariff plan: dynamic or static.
With dynamic connection your IP address may change depending on your ISP settings (and if you intend to subsequently connect to your workplace remotely, this may interfere with you). But manipulations with entering parameters are reduced to a minimum: the provider sets the IP address, subnet mask and default gateway independently. In this case, just insert the cable into the computer and that’s it, you will have access to the Internet.
Static connection provides a static IP address assigned to your computer (or router, if you choose to connect through one). In this case, you will have to manually enter the IP address, subnet mask and default gateway in the connection settings. Usually all these incomprehensible numbers and letters are included in the access agreement or in an appendix to it. If necessary, you can clarify them with the technical support service by providing your details.
In some cases, access also requires a login and password (do not confuse Internet access as such with access to your personal account on the provider’s website - for personal account data is required).
How is the connection made?
Let's look at the procedure step by step.
- Insert the plug of the Ethernet cable brought into the apartment into the corresponding port of the computer. Even if you have never done this before, you will not be able to confuse this type of connector and plug with something else.

- Right-click on the “Start” button and find the “Control Panel - Network and Internet - Network and Sharing Center” section. In the left column, select the “change adapter settings” tab. A list of your adapters will appear in the main window (more precisely, in our case, one adapter “Connecting via local network"). Again, use the signature “right-click” technique and select “Properties”.
- A small pop-up window contains an entire column different lines with properties. Select the line “IP version 4 (TCP/IPv4)”. While it's selected, click the Properties button below the list box.
Now our instructions branch out. Have you checked with your provider what IP is provided to you? If not, check now.
- If dynamic, then trust the automatic selection in the IP address and DNS server settings.
- If it is static, you will have to enter the values manually. As a rule, you need to specify “IP address”, “Subnet mask”, “Default gateway” and “DNS server”. When you have completed entering your data, click OK to save your selection.
Important points:
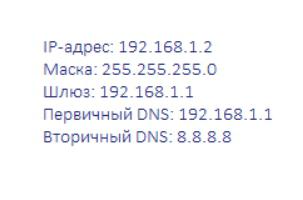
- If the connection requires a modem, enter its default address as the IP address; this is usually 192.168.1.1. If the modem has a different IP (which is rare), it is indicated on the bottom of the modem itself or in its instructions.
- Usually the ISP provides the DNS server details, but sometimes this is omitted. Then you can use the universal ones:
1) Public DNS from Google: 8.8.8.8 or 8.8.4.4 - universal solution generally suitable for all computers
2) OpenDNS – 208.67.220.220 and 208.67.222.222
3) Yandex DNS with its own anti-virus filter - 77.88.88.88 or 77.88.8.2 - if you trust Yandex’s anti-virus policy (although sometimes it may consider a completely decent site unreliable)
4) Yandex DNS with a filter for pornography and other obscene content - 77.88.8.7 or 77.88.8.3 - although it depends on what you actually need from the Internet, hehe.
- We repeat: if remote access is important to you, make sure that your provider’s support ensures that your IP will not change.
If your ISP offers L2TP access, this may require some additional steps on your part. Usually the provider provides instructions for setting up this specific type of connection, but it wouldn’t hurt to duplicate it on our part either.
So, to configure L2TP, you need:
- Go to the already known section “Network and Sharing Center” and select creating a new connection
- Unlike previous options, here you should go to “Connect to your workplace”
- When the system prompts you to create a new connection, select this item
- Select "Use my connection"
- Enter the server address provided by your provider. You should not select the immediate connection option. You can assign a name that you like.
- In the next window, enter the username and password provided to you. Don't forget to check the box next to "Remember password"
- Connect now when the system prompts you to do so
- Return to “Adapter Properties” (as discussed above) and select the “Security” section
- In the VPN Type drop-down options, select L2TP IPsec VPN. Below is the line “Data Encryption”, here you need to select “Optional”
- Under the "VPN Type" line, click the "Advanced Options" button
- Enter this same key in the “Key” field. You must have it from your provider.
- That’s it, you can click “OK” with peace of mind and use the connection.
This instruction works for Windows 7 and newer versions.
Why all this complexity? – you ask. This solution has advantages: for you - increased security connections (compared to a regular LAN), for the provider - simplification of the billing system.
Setting up PPPoE
Before setting up the Internet on your computer, check with your provider about the type of access it offers. Access via PPPoE requires not only correct settings, but also authorization using a login and password. You will need this connection method if you do not use a modem or router, but insert the cable from the provider directly into the connector on the computer, without intermediaries.
To do this, you again go to the “Network Control Center” and select there and use it to create a new connection.
In the wizard that launches, you select the first item - “Connect to the Internet” - and click “Next”. Then in the window that appears, you must select “High Speed (with PPPoE)”.
The final step remains. In the final window, you need to come up with a name for the connection and enter the login and password issued by the provider. If several people use your computer (for example, family members), each under their own account, and you want to give them all access, then check the box “Allow other accounts to use this connection.”
Now make sure your Internet connection is working. And if so, then hello world!
Welcome to the blog. Anyone who subscribed to the site's news probably noticed that a few weeks ago I wrote about what to do if there is no Internet on the computer and the icon appears. For many, this article has even helped them cope with most problems at least somehow related to access to the Internet.
But, here we will analyze this topic more thoroughly and consider all sorts of inconveniences due to which the Internet pumped through a cable does not work. We will learn how to correctly diagnose the problem and what can be done to fix it, and we will also figure out in which cases the problem is with the computer hardware, and in which software part systems.
Therefore, if you have connected the cable to the computer, but there is no Internet, then let’s not drag our feet and start looking for the cause of this malfunction.
The Internet does not work connected via cable or without Internet access
Every user who has ever worked on a computer knows that if a yellow triangle appears on the network icon, it means that there are some problems with the connection or it is completely absent. It so happens that users most often encounter this problem when surfing the Internet. So let's start with it.
1. Of course, the first thing I will advise you is the simplest solution to the problem - a simple reboot of the computer. This advice may seem strange and stupid to some, but this solution helps to cope with most problems related to the Internet and more.
2. Next, we try to pull the cable out of the network card, wait a few seconds and insert it back. The acquisition of a network address should begin, after which the computer will receive an IP and the Internet connection should be restored. If nothing works out, don't despair and just move on to the next point.

3. Now, having gone into network connections, we try to disable “ Ethernet" and turn it back on. Sometimes this is enough to get rid of the “” icon.

4. If your Internet does not work, connected via a cable that is connected to the other side Wi-Fi router, then in this case we perform the following steps. First, we remove the power (220V) from the router and after a couple of minutes we insert it back, so we will reboot the point Wi-Fi access. After this, be sure to restart your computer, everything should work.

I began to encounter a similar problem in my home network, I haven’t figured out the reason yet, but as a temporary solution I’m using the option that you just read about.
When I find the reason, I will definitely share it with you in this article as an addition.
5. The next thing to check is the settings for obtaining an IP address. Most providers today works with automatic receipt IP, respectively, the same settings should be set in your connection.
Let's go to " Network Sharing Center", click on network adapters and find the network connection there.

Opening properties, connections as shown below, double click go to the item “ Internet protocol IPv4».


There for normal operation, we need to set points on the parameter " Automatically obtaining an IP address" We do the same with DNS servers.

Don’t forget to save all changes by clicking on “ OK».
If before this the Internet did not work for you, which was connected via cable, then after installation required parameters everything should be fine.
But, on the other hand, there are quite a few providers who use dedicated IP addresses and static network settings. Usually, if this is practiced, the connected Internet wizard notifies the user about this and therefore, in theory, they are aware of all these matters.
So, if you are using this type of setup, then you should again go to Internet protocol IPv4 and instead of the machine indicate required addresses. IP, mask, gateway and other values can be obtained from the technical operator. your provider's support.

6. And finally, there may be problems on the part of the provider, so be sure to call them and make sure whether their equipment works in the house or not, and also whether everything is in order with access to the Internet.
This seems to be all you should check. If more than one point does not help you, then write to me with detailed description and we will try to find a solution to the problem together. Also, if I forgot something, I’ll be sure to write it here later, here’s another thing, if you share with us in the comments some other interesting solution to the problem of a non-working Internet connected via cable, then I’ll also insert it into this article, as one more point.
The Internet does not work, the network cable is not connected
Now let's figure out what to do if a red cross appears on the icon in the form of a screen responsible for the network with a message that the network cable is not connected.
1. Of course, based on the words of the message, the first thing we do is check whether the cable is tightly inserted into the computer or whether it is inserted at all or not.
If you are using a router, then check the connection on both sides. If everything " OK“, but the cross still hasn’t disappeared, then we move on.
2. The notification: “the network cable is not connected” may also appear because the network card is simply disabled. To enable it, follow these steps:

After this, the computer should start " Identification» network, and get an IP address.
3. After turning on the network card, I also recommend checking the status of “ Network connection " Since in a disabled state the Internet will not work, but only display all the same warning that the network cable is not connected.
4. So, if everything is turned on and connected, but the Internet still does not work, try to find another network cable and try connecting to the Internet using it. If the screen doesn't care, it will light up network cable is not connected, then most likely the problem is either in the network adapter of your PC, or the provider’s equipment installed in your home is not working.
5. Having tried all the tips given above, nothing helped you and the Internet connected via cable still does not work, then again I recommend calling the operator of the provider and consulting with him about the condition of their equipment. If the operator notifies you that there are no problems at the address, then you can certainly conclude that the Internet is not working precisely because of the network card.
6. Of course, I understand that not everyone can check the connection using another board, but if there is a chance that you can do this, be sure to check it, perhaps all the problems are due to it.
7. And finally, you also have the opportunity to call a specialist from the provider, who will come and tell you what the problem is and help you set up your computer if it was related to the network ( !!! Master network cards do not change!!! ), or if damaged cable will do for you new one and connect it where you need it...
Based on these recommendations, you can diagnose your computer and figure out why the Internet connected via cable is not working and easily restore it. I sincerely hope that all my advice will still be useful and will help you solve all your Internet-related problems.
⭐️⭐️⭐️⭐️⭐️ In this article I will analyze the situation when there is no Internet via WiiFi on Android. Those. The connection to the network itself is there, the Wi-Fi icon is active, but it is not possible to access the Internet and instant messengers (Telegram, Viber, Skype) and other applications (Instagram, VKontakte, etc.) do not connect.
In most cases, rebooting the smartphone or router that distributes the wireless network helps. Another reason could be software error Android is working and the router is configured incorrectly.
This article is suitable for all brands that produce phones on Android 9/8/7/6: Samsung, HTC, Lenovo, LG, Sony, ZTE, Huawei, Meizu, Fly, Alcatel, Xiaomi, Nokia and others. We are not responsible for your actions.
I'll notice! If you are using public WiFi network or private corporate, then there is a high probability that they will block some social networks and messengers. This is often practiced and you will have to come to terms with the situation.
Checking Internet access
Before using your smartphone or router, make sure that everything is ok with the Internet. What could be wrong with it:
- You didn't pay, so your provider suspended your Internet access. Make sure there is network access through the wire.
- In the router settings there are restrictions on visiting certain sites or a traffic limit (common practice for open networks in public places).
- There were problems on the provider's side.
After eliminating these factors, proceed to diagnostics, allowing you to understand in the operation of which device the cause of the problem is hidden.
The easiest way is to connect to the wireless network from another phone/tablet/laptop. If another device connects to the network, then the problem is in the phone, which cannot establish a correct connection.
Android glitches
Reboot mobile device. If the cause of the problem was minor system failure, restarting the system will fix it.
After restart If the error persists, forget the network and then reconnect to it.
Forgetting the network and reconnecting helps resolve the inconsistency Wi-Fi settings on your phone and router.
If deleting the network does not help, check the proxy server status on Android. It should be turned off:
- Go to the “Wi-Fi” section of the settings and select the network to connect to.
- Check the "Advanced" option.
- Make sure the Proxy Server field is set to No.
 Increase
 Another reason that the phone does not connect to the Internet may be the wrong date. To check and change it:
- Open settings.
- Select the "Date and Time" section.
- Set the time and date manually or check the “Network date and time” and “Network time zone” checkboxes.
 Increase
 After installation correct date connect to Wi-Fi. If the wireless network actually works, you will be able to access the Internet.
Checking and setting up the router
If, as a result of some kind of diagnostics, you find out that they occur on all devices that connect to the same wireless network, then look for the cause of the error in the router settings.
You are trying to connect to the Internet, and everything seemed to be going well... But suddenly you see that a yellow triangle with a yellow triangle appears next to the connection icon, and instead of any information about the connection, the inscription “Unidentified network” appears. Without access to the Internet." A reasonable question here arises: “Why is this even happening and how to fix the situation?”
We invite you to stop swearing for a minute and read this article, where you will find the answer to all your questions!
Try rebooting your router
This is an option for those who previously had a normal connection, everything worked, and then suddenly a seemingly familiar and “tested” connection says “Unidentified network.”
Perhaps some settings of the router itself have gone wrong. They may be restored again when you reconnect. To do this, simply unplug the router from the outlet and then plug it in again.
In addition, you need to check if there is a connection when direct connection via cable. There is a possibility that the roots of the problem are on the ISP side - the Internet service provider. Didn't help? Then let's move on.

Check your wireless connection settings on your computer
If you have already rebooted the router, but the message “Unidentified network. Without access to the Internet" has not disappeared, the reason may lie in incorrect settings wireless adapter or the network itself on the computer.
Problems with IP addresses often occur, for example, when the system is not able to obtain it automatically. If you entered them manually, then most likely specified address is incorrect, or the subnet has been changed.
In this case, you need to check the adapter settings in the Network and Sharing Center. In the window that appears, you need to select the connection you are using, right-click on its icon and select “Status”. The “Connection Status” window will appear on the screen. That's what we need. If the “IPv4 Address” item indicates an address in the format 169.254.X.X, then the system was unable to automatically obtain an IP address using the router’s DHCP server.
First of all, in this case, it makes sense to try to register it manually. On the bottom of the router, as a rule, there is a sticker indicating the model and brand of the device. On it you can see its IP address, as well as data for accessing the web interface (login and password).
Right-click on the icon again, but this time select “Properties”. Then you need to select the “Internet Protocol Version 4 (TCP/IPv4)” component and put a dot in the new window next to “Use...”.

Typical router settings
For most routers (with the exception of D-Link routers), the following settings should be suitable:
If no access appears when working with a D-Link router, use other settings:


Adjust your router settings
Many people, in order to set up a router, exactly duplicate the settings indicated as an example on the network. And often this is what leads to the computer subsequently displaying the message “Unidentified network. Without access to the Internet."
The examples exist only so that users can understand which item in which section of the device menu is responsible for what. You must specify your settings, and not those indicated in the example. It happens that the settings given as an example coincide with yours. If this is not the case, you may have difficulty gaining access to the network.
Double-check your username and password. If you missed a character, chose the wrong case or input language, there will be no Internet. Besides, unidentified network WiFi may appear due to an incorrectly selected connection type.
During this time, be sure to use your own settings, and not those suggested in other people’s examples, then everything will work out.
Update your drivers
Outdated or non-working drivers also often cause a computer or laptop to only receive limited access. The unidentified network will be able to be identified normally when you fix this problem.
Important! Not always the same drivers as the operating system Windows system installs independently, works adequately. A much more reliable option is to download the appropriate software directly from your router manufacturer's website.

Change MAC address
Have you done everything described above, but an unidentified network remains without access to the Internet, and you do not observe any signs of life from the connection?
The problem may be related to the device's MAC address being incorrect. However, this is only relevant in cases where all devices connected to the same network are working normally and have access to the Internet, and only one computer or laptop is experiencing problems.
The trick is that manufacturers often assign all boards the same MAC address. If you reinstalled the drivers from the disk that came with motherboard, two devices with the same MAC address may appear on the network. Is this your case? Then you should try to register it manually.
Press the Win+R key combination, and then in the “Run” window enter the command devmgmt.msc. So you open Windows. This must be done on behalf of a user with administrator rights. In the manager we need to find the “Network adapters” item. In the drop-down list you will see the name of the device with which the computer connects to the Internet. Double-click on the adapter icon and select “Advanced” in the window that appears. We need "Network Address" ( network address). Against empty field you should check the box, and then enter 12 digits in this field, click “OK” and restart the computer.

Check your firewall
Incorrect firewall settings - another one common reason Why does a computer or laptop display the error “Unidentified network. Without access to the Internet."
If the firewall is configured correctly, it will stop unauthorized attempts to penetrate the network from the outside and prevent malicious actions. However, sometimes it blocks all data flows altogether.
Check the IP addresses that the firewall does not allow access to the Internet; your device’s address should not be among them. It is better to register the entire list of IPs that should be blocked yourself; it takes a little time, but there will be no risk that your computer will accidentally be included in the list of prohibited devices.
Nothing helped?
Then, most likely, it is not possible to correct the situation without the intervention of specialists. Regardless of which version operating system you are using, be it 7 or Windows 8, the unidentified network will be recognized and will begin to work normally only after the wizard diagnoses all the equipment, repairs it if necessary (or recommends replacing it) and enters the necessary settings. As a rule, such problems are resolved within 20-30 minutes.
I hope this article helped you deal with all your problems.