How to open windows 8 boot menu
Hello dear admin, thank you for a really very useful, exclusive project, of which there are not many in RuNet. I spent 5 days studying the materials on your site, learned a lot of interesting things, but unfortunately, after this period of time, I was unable to fix my recently encountered problem on my laptop, so I would like to turn to you for help in the hope of figuring out my problem and finally then solve it. I apologize in advance that there will be a lot of “letters”).
I bought a laptop 2 years ago Acer Aspire v5-122p with pre-installed Windows 8 64-bit OS (I don’t remember the edition). Then after some time it was automatically updated to 8.1. The last 2 months there have been frequent freezes in the system, and I kept putting off restoring Windows systems. A week ago, the system once again froze badly and I had to urgently turn off the laptop by holding down the power button. After this, the following problem arose and is not resolved. After turning on the laptop, the acer logo appears and the loading icon spins for about 40 seconds and the message “There is a problem with your computer, you need to restart it” is displayed on a blue background. After this message, the computer reboots itself and “Preparing automatic recovery” starts, the loading icon spins for 30 seconds and then everything disappears, there is nothing, just a black background without any messages, but the laptop seems to continue to work, but does not respond to any What actions, other than an emergency shutdown of the laptop. And so all the time.
I didn’t bother to make a boot disk or flash drive from under the system in advance, when the system was still working normally. After studying the materials on your site, I tried the following. I downloaded images with Windows 8 and Windows 8.1 in English through mediacreationtool, in it I also made bootable flash drives separately with Windows 8 and Windows 8.1 in English, I also tried to make bootable flash drives through the WinSetupFromUSB_1-4_x64 and rufus programs with these images. I did it based on your materials, initially I tried using these programs to format it in FAT32 with the GPT scheme bootable USB flash drive for BIOS UEFI, but did not change anything in the BIOS, UEFI was enabled with secure boot, set the loading priority to the first USB HDD, and also specifically by pressing the f12 button I could select a bootable flash drive connected to the laptop, as a result, after these manipulations, the acer logo and the boot icon still appeared for a short time, and after that the black background glowed again without anything. I also tried disabling D2D RECOVERY, even then in the BIOS I wrote the path in the select an uefi file as trusted for executing in usb1 path to the BOOTX64.efi file, which is on the flash drive, but the result is the same.
Next, I decided to go differently. According to the article "How to disable Secure Boot on Acer laptop Aspire" I disabled secure boot to disabled by setting a password, then in boot mode switched UEFI to Legacy. I set boot priorities in the BIOS from usb hdd, then using the WinSetupFromUSB_1-4_x64 and rufus programs I formatted it to NTFS with MBR and made bootable flash drives. When connected this flash drive to the laptop in usb 2.0 and by pressing F12 I selected my bootable USB flash drive, the laptop rebooted, after a while the Windows 8 logo appeared with a blue background with a download icon, but it didn’t get to the points of installing Windows and restoring the system, again the black background covered the boot.
This black background that appears is the whole problem; for some reason I can’t fully launch bootable flash drives with Windows.
But two other facts are noteworthy: when I write all sorts of programs like eset.nod32, Victoria and some others onto a bootable flash drive Live programs CD, then everything is fine, they load from a flash drive and there is no black background, there are not even any freezes.
These days it got to the point that I even had to initially disassemble my laptop because of this problem, removed the RAM, hard drive. I disconnected the wires, the disk drive, cleaned the video card from dust, carefully applied new thermal paste, but unfortunately this did not have any effect on solving this problem. And I wondered if it was a hardware problem or a software one.
In the end I decided to launch without hard drive laptop with a bootable USB flash drive not from UEFI, it turned out interesting fact, the Windows 8 logo with a blue background, the download icon, and finally the options to install Windows and restore the system appeared, i.e. there were no black screens, at that moment I decided to put the hard drive back in, there was no black screen, but when I tried to restore or install the system there were such errors, the drive is locked, unlock it and reboot, also the blue background "Your PC needs to be repeired" file:boot/BCD.......
As a result, I spent 1 day experimenting with the Victoria program from under DOS, SMART seemed to give a status to the disk “GOOD”, I found 8 defective bad blocks during the test, ADVANCED REMAP seemed to correct them first, then when I went through it again about 6 times I found it at the same addresses, but the SMART status for the disk like “GOOD” remained.
Therefore, now I am puzzled and cannot understand whether the black screen is a trick of the hard drive due to some hardware problem or a software problem, but then what is this paradox with the black screen and how to get rid of it.
Those. V at the moment I can’t achieve anything so that I can fully launch a bootable USB flash drive with Windows without a black background with the connected hard drive, and as I said earlier, many other programs eset.nod.32, Victoria from LIVE CD with a connected hard drive run normally without a black background.
Thanks in advance for your answer.
Bootloader corruption is usually caused by incorrect installation second system. There are several ways to fix an error that prevents the system from loading normally using the built-in Windows tools and special software.
Recovery via installation disk
First let's see how to restore Windows 8 bootloader using installation disk. There are two options: automatic error correction and manual rewriting of the bootloader via the command line.
While in the BIOS, look at which drive was installed first in the “Boot” section. If two hard drives are connected to the computer, but booting starts from the one that does not have an operating system, then forget about restoring the bootloader and just put the desired hard drive in first place. If you still have problems with the boot record, then try to fix them automatically:

If the recovery wizard detects an error during diagnostics, it will notify you about it. Click the "Fix" button and wait until the problem is resolved, then try booting into Windows 8 again.
Manual recovery on the command line
If automatic recovery did not help fix the error, or the wizard did not find the problem, you will have to do the work manually by entering boot area rewrite commands in the console. To launch the console, in the “Advanced Options” subsection, click on the “Command Prompt” item. 
Typically, several commands are enough to restore the bootloader:

After rebooting the computer, the problem with starting Windows 8 should be eliminated. But in some, especially difficult cases, running the listed commands does not help. Then you may need to completely overwrite the entire boot area or even delete and re-create a system-reserved partition. To recreate the BCD store:

Executing the specified command will restore bootmgr and the boot store configuration files, which will allow the G8 to start normally. If this does not help, you will have to completely delete the partition. system reserved, and create it again.

The work is almost complete, all that remains is to create the boot files on the new hidden system partition. Enter the command “bcdboot D:\Windows”, where “D” is the letter of the newly created volume.
Using special software
If there is no Windows 8 installation disk, and you do not want to waste time downloading the distribution kit and burning it to media, then use the Paragon program to restore the bootloader Hard Disk Manager, which is distributed in the Hiren’s Boot CD utility package.
- Download and burn Hiren’s Boot CD to a disk or flash drive. Boot from the created media by changing the priority in the BIOS.
- Go to the "Launch" section DOS programs" Open the “Disk Partitioning” subsection and launch the Paragon Hard Disk Manager utility.
- Expand the Wizards menu and select Windows Boot Repair.
- In the wizard window, check “Search installed copies" and click "Next".
- Check the “Change partition boot entry” checkbox and click “Next”.
The program will rewrite the boot record, adding information about the installed operating system to it. After reboot Windows computer 8 will start without errors.
Recovering from another system
If the bootloader is damaged as a result Windows installations XP, and now XP starts, but G8 doesn’t, then try to fix the error using the EasyBCD utility. It is much easier to manage than typing commands into the console.
If it doesn't load for you operating system, then your main task is to identify the cause and, if possible, eliminate it. There are two possible scenarios: damage to the computer hardware and the need to replace a component, or simply a system failure, which can be solved by a simple rollback. Let's look at how to determine what caused the error, as well as how to fix the problem.
Attention!
All of the steps below are strongly recommended only if you fully understand everything stated, so as not to harm your computer.
If after turning on the computer nothing happens and you do not see the OS loading process, then most likely the problem is a malfunction of some components of the device. The first step is to check whether all computer components are connected. To do this, disconnect the computer from the network and turn off the power supply using the toggle switch on the back wall. Open the case.
Reason 1: Hard drive failure
If after performing the steps described above the problem does not go away, then proceed to checking the hard drive. Very often the cause of the problem is a media failure. You can check its functionality only by connecting the component to another computer. There are three possible scenarios here.

Option 1: HDD is detected by another computer and Windows boots
Everything is fine! Your hard drive is working fine and the problem is not there.
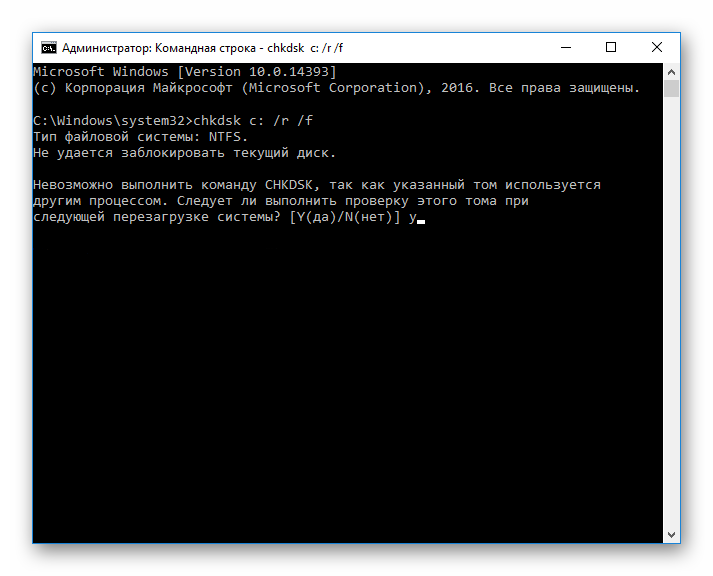
In this case, you need to check the disk for bad sectors. You can do this using special program. It is completely free and will help you spend a full diagnosis of hard disk. Run it and pay attention to points such as Remapped sectors, Unstable sectors, Uncorrectable sector errors. If at least one of these items is highlighted in yellow, then bad sectors there are and they need to be corrected.

To recover bad blocks, run "Command line" on behalf of the administrator. To do this, use the key combination Win + X open context menu and select the appropriate item.

Then enter the following command:
Click Enter. You will be prompted to perform a recovery after rebooting the system. Enter Y and press again Enter. After this, restart your computer.
Option 3: HDD is not detected by another computer
This is the worst option. In this case, you will have to purchase a new hard drive, since the old one most likely cannot be restored. But before you do anything, consult your service center. Perhaps your hard drive can still be returned to working condition. Otherwise, they will recommend you which drive is better to take and offer replacement services.
Reason 2: Some components are not connected
If your hard drive is working properly, then check the following components:
- Hard drive power cable;
- A cable that connects the hard drive and the motherboard;
- Are the memory modules seated tightly in the connectors?

Reason 3: Motherboard failure
If the actions taken above did not have any result, then the problem is not in the cables and the hard drive, but in motherboard. It is better to entrust this problem to specialists and take the computer to a service center.

The system tries to boot, but nothing happens
If you turn on your PC and see any signs that the system is trying to boot, then this is a great sign. In this case, you can avoid costs and solve the problem yourself.
Reason 1: Error starting explorer.exe
If the system boots, but you only see a black screen and a cursor, then the problem arose when the explorer.exe process was launched, which is responsible for loading graphical shell. Here you can either start the process manually or perform a system rollback - at your discretion.
Starting the operating system in safe mode is one of the most common ways to diagnose problems. Previously in safe mode It was possible to get there by clicking on boot, but this leads to the launch of automatic recovery. What if you need safe mode?It's still possible to boot into safe mode, but you'll have to dig into the settings to do so. Windows recovery 8. The key now starts automatic recovery, but if you press + instead during boot, you can manually select recovery options. However, it’s even easier to hold down and select the “Restart” command in Windows itself or on the login screen.
There are several ways to get into safe mode - it all depends on whether the system boots and whether you can enter it. Let's start with the simplest.
If the login screen is available

If the boot successfully reaches the login screen, you can hold down the key and select the “Reboot” option from the shutdown menu. The Diagnostic Tools screen will appear, allowing you to enter Safe Mode. How exactly - read below.
If the system does not boot, but there is a recovery disk

If you have another computer with the same Windows version, you can create a USB recovery drive and boot your faulty PC from it to access diagnostic tools, including safe mode (more details below).
If the login screen is not available
If the boot doesn't even get to the login screen, a recovery screen will usually appear automatically. If this does not happen, try holding down the key while loading and press until it boots new mode recovery. When the recovery screen appears, click the Advanced Options button.
The problem is that this screen does not always appear. Many computers, especially new ones, do not display it.

Using advanced options to boot into Safe Mode
Whichever of the described methods you use, on the recovery screen that appears, click the “Troubleshoot” button.

Now select Advanced Options.


Finally, click the Restart button.

After the reboot, by some miracle, the familiar boot options screen will appear, where you can select Safe Mode.

Launching Safe Mode directly from Windows 8
There is another way to get into safe mode, but it will only work if Windows is already loaded. Press the +[R] keys, enter the command “msconfig” (without quotes) in the window that appears and press .

In the window that opens, go to the “Boot” tab and check the “Safe Boot” checkbox.

You can also select options secure boot:
"Minimal"– normal safe mode.
"Alternate Shell"– safe mode with command line.
"Recovery Active Directory» (Active Directory repair)– safe mode for restoring a server that is a domain controller in local network.
"Network"– safe mode with network connection.
By selecting the desired option, click "OK" and restart your computer.

The system will automatically boot into safe mode.