How to move large applications or games to another drive. How to move a program, game or browser profile to another drive without reinstalling
While you're upgrading your computer's hardware, you don't have to delete your existing Steam and reinstall all your games from scratch. You can transfer your games to another computer using a few simple and not so simple methods.
Please make sure you have a Steam username and password before attempting this method. If you have any problems with your password, we recommend checking your account connection Steam entries with any of yours by email. Moreover, we also do not recommend that you install Steam on external hard disk as this may cause many problems in the future.
Step #1 Create a backup of game files
Before you transfer Steam to your new computer, you need to back up every game in your library. If something goes wrong during installation, you can always simply recover.
However, you need to keep in mind that many of the games use third party applications and installers for their work. If you have games of this type, then backup will definitely not work for them. This is especially true for MMO games, as they often only work with certain additional programs or launchers.
A backup created on Steam will not include your custom maps, saves, or configuration files. If you want to save everything described, then go to the directory C:\Program Files\Steam\SteamApps\common\<имя игры> and copy the contents of the following folders:
- /cfg/- configuration files
- /downloads/— possible location of files related to the multiplayer game
- /maps/— custom maps that are used for multiplayer mode
- /materials/— this folder can contain custom skins and textures
- /SAVE/- saves for single player
After you copy these files and make the necessary backups, you will need to return them to their original location.
- Open your Steam client and head to the Library tab. It will contain all your purchased games.
- Click on the game you want right-click and select “Create a backup copy...”.
- In the next window, select all the games that you want to save to backup.
- Next, you need to choose where this entire backup will be saved. Choose a location that will make it easiest for you to reach them.
- Steam will now ask you to choose between a CD or DVD copy. If you have external drive or USB storage, we recommend you use DVD.
- After the backup process is complete, go to the previously specified directory where the backup of your games should have been saved, and transfer it to external media.
Step #2 Moving Steam Files
Due to the fact that we have already backed up all the games you need, if something suddenly goes wrong, you can move on to the next step - moving Steam to another computer.
- Click on your keyboard Windows+R.
- Enter taskmgr and press Enter.
- In Task Manager, end all processes that will be associated Steam Client Bootstrapper.
- Once all processes are completed, go to the directory of your Steam client. By default it is located on partition C.
- Locate the following files and folders:
- SteamApps- folder
- Userdata- folder
- Steam.exe- executive file
- Remove everything from the Steam folder except what is listed above.
- Copy the remaining folders and files to external storage and move them to the new computer on which you will install Steam.
- Launch Steam using Administrator privileges and log into your account using your username and password.
What to do if an error appears?
You may encounter an error in Steam if you start moving some files around in it, which is associated with some technical difficulties. But you shouldn’t worry, because in this case too we have a list of actions that will help you get out of this situation. First of all, you need to completely uninstall your Steam so that we can reinstall it later. There are two ways to remove it: through the Control Panel and through the Windows Registry Editor.
Uninstalling Steam via Control Panel
- Quit all Steam client processes, as already shown in the previous paragraphs of the article.
- Go to the Steam directory.
- Move the folder SteamApps to your Desktop or any other location convenient for you, and then delete it from the Steam folder.
- Click on your keyboard Windows+R, enter control panel and press Enter.
- Go to Programs and Features.
- Find in the lists installed programs Steam and delete it.
Uninstalling Steam via Windows Registry Editor
When we deal with the Registry, we need to be very careful not to damage anything there. If this is done, the entire functionality of the entire system may be disrupted.
- First, delete all files from the Steam root folder.
- Click on your keyboard Windows+R enter regedit and press Enter.
- Go to the directory:
- HKEY_LOCAL_MACHINE\SOFTWARE\Valve\- for 32-bit systems.
- HKEY_LOCAL_MACHINE\SOFTWARE\Wow6432Node\Valve\- for 64-bit systems.
- Right click on Valve and select "Delete".
- Close Windows Registry Editor.
Step #3 Installing Steam
Since we've already uninstalled Steam again, it's time to start re-installing it. Steam installation. You shouldn't have any problems with this. If you backed up the games as indicated in the previous paragraphs of the article, then you can easily restore the games without downloading them.
- After installing the client on your computer, click on the Steam button in the upper left corner of the window.
- From context menu, select " Backup and restoration of games...".
- You will be presented with two choices. Select "Restore from backup".
- After this, Steam will ask you to specify the directory in which the game backups will be located. Once you do this, Steam will automatically find the game and begin the process. Also be aware that the client may download some small files or folders from the network during this process in order to complete the recovery process.
Found a typo? Select the text and press Ctrl + Enter
About popularity mobile games there is no point in talking, just look at your fellow students during the lecture, at your fellow travelers on the train, after all, dear reader, and it is no coincidence that you are now reading the topic of how to transfer a game from Android to Android. Therefore, we considered it correct to skip the empty ranting and immediately get to the essence of today's conversation.
The Android OS, with all its advantages, unfortunately, does not have a single data storage that allows you to transfer files from one device to another with a simple “copy-paste” manipulation. However, the problem is easily solved by using a special software. Now we will look at the most popular methods.
Through your account
However, this method cannot be called effective, and here's why:
We will transfer the game with progress from one Android device to another using file manager TapPouch Wi-Fi File Transfer. The application is distributed free of charge and is suitable for all versions of Android 2.2 and higher. Our steps will look like this:
We install the utility on both devices between which we plan to transfer files. We make sure that the gadgets are connected to the same Wi-Fi network.
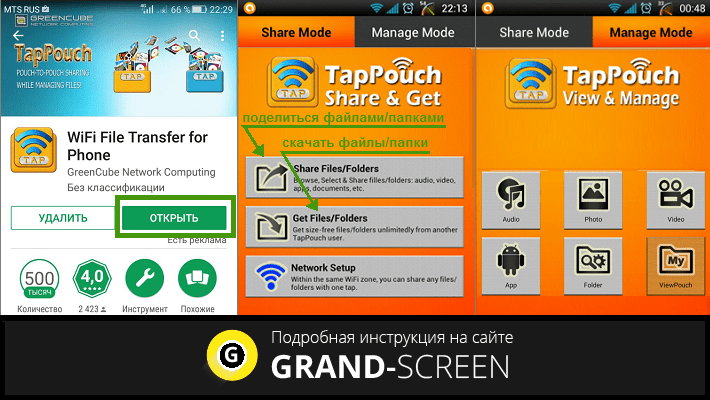
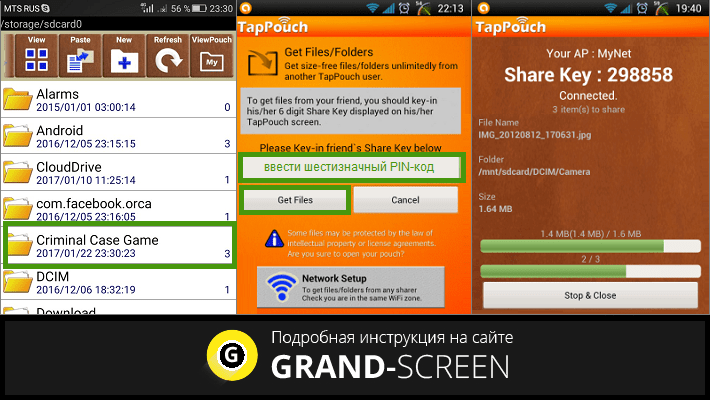
Select the folder with the game (in the screenshot “ Criminal Case Game") and click the "Submit" button. To start the transfer process on the receiving machine " pressGetfiles / folders"(download files/folders), after which a unique six-digit PIN code will be generated on the sender's device, which we will need to enter on the second gadget and press the button " Get Files"(get files). After authentication is completed, files will be transferred and saved on the memory card:
The application is easy and simple to use, and if you often have to resort to the procedure of transferring files, then it will be a good help. However, it is possible that this method for transferring the game from one Android smartphone on the other hand, it will be ineffective in your case.
Using Titanium Backup (ROOT)
The most popular app, with which you can transfer games between Android devices while saving data. For it to function, both gadgets must be rooted (how to get root access).
When you first start, you will receive a request from the system to grant Superuser rights - click the button " Provide" Then at the top of the display click on the “ Backups " In the list of applications that opens, we find the desired game (to speed up the search, you can click on the magnifying glass icon at the top and enter the name and click “ enter"). “Tap” on the line with the name of the game you are looking for, in the menu that appears, activate the button “ Save", after which all data will be packed into an archive:

Now we need the TitaniumBackup folder. We open it and transfer our files located here to the receiving smartphone via a Bluetooth connection, or copy them to an SD card and insert it into a second gadget, in the memory of which we create a folder with the same name “ TitaniumBackup».
Then we copy necessary files from the SD card (or from the “Bluetooth” folder and move them to the “ TitaniumBackup" We launch Titanium on the receiving device, find backup copies, open additional menu(button " Backups") and activate the list update:

Now we return to the list of applications, find the saved game, open the settings in it and press the button " Restore" After our efforts, the transferred game with all achievements will also be in the list installed applications on the second device.
Well, in conclusion, we suggest watching video instructions on how to transfer a game from Android to Android without root access:
There will come a time when, thanks to Steam games, you won't have any space left on your hard drive. Then you will need to either delete unnecessary ones, or simply transfer them to another HDD. But how to do this if they are tied to the created library? There are ways, including those offered by the service itself.
As you know, after you download Steam, it creates a library where all the toys are downloaded. This is quite convenient from a systematization point of view. However, it is then difficult for users to transfer the game to Steam to another drive: they have to delete it and download it again. After all, if you simply transfer the folder with the program to another location, the service will generate an error upon startup. Let's consider three methods that will allow you to avoid this error.
Powered by Steam
The service recently added an option that allows you to automatically transfer games to another directory or to another HDD. It is not performed automatically, but nevertheless almost always fails. You must first create another library, and then transfer it to a new section through the game properties.
- Click on the Steam button, which is located on the left top corner.
- Select “Settings” from the drop-down menu.

- In the settings window we find the “Downloads” section.
- Under the “Libraries” item there is a link “Steam Library Folders”. Click on it.

- In the list that opens, you can see a list of all directories and see how much space they take up. Click on the “Add Folder” button.

"Add Folder" on Steam
- Choose hard drive and its section, which will contain the new library.

- Exit the settings and go to the list of installed games.
- Right-click on the toy that you want to send to another location and select “Properties”.
- Open the “Local Files” tab.
- Click on the Move install folder button. By the way, it was not previously in the service.

"Move install folder" on Steam
- In the library selection window, select a new location for our game.
- Click Move folder.

"Move folder" on Steam
- The transfer process will start. If the game is large and the HDD or SSD is connected via USB, this may take some time.

- At the end they will tell us where we moved the game and how many files were transferred.
The main thing is not to turn off the computer while copying files. Otherwise, the transfer of games may be disrupted, and its data may be damaged.
The method appeared not so long ago, so some users may have difficulties with it. Plus, perhaps you haven’t updated Steam for a long time and for some reason you don’t want to do it. Then there are two more for you alternative methods, one of which will be slightly faster.
Steam Tool Library Manager
This special utility, which automates the process of creating a library and sending selected programs to it. Quite convenient, it takes up very little space and does everything relatively quickly. If you need to transfer many toys at once, it is better to use Tool Library Manager.

That's all, as you can see, here it happens even faster. Games then, as a rule, launch without any complaints.
You will need
- - tablet/phone to which you want to transfer your games or applications
- - computer
- - Internet access
Instructions
Turn on your phone or tablet to which you want to transfer applications from your previous device. Make sure your Google account is activated on your device. To do this, just go to the “Settings” section of your phone or tablet. “Settings” -> “Accounts” -> “Google”.
Connect the Internet on your device. To do this, in the “Settings” section, click the “Connections” tab. Select "Connect via Wi-Fi" because... if you use mobile internet, you risk using up your entire monthly Internet traffic limit, and possibly exceeding it, which can lead to a rather hefty bill for services mobile communications.
Open a browser on your computer and address bar enter the following address: https://play.google.com/store
Click on the “Login” button located in the upper right corner. Enter your username and password for your account Google posts.
To go to the list of applications that you want to transfer to another device, click on the “Applications” tab. The tab is located at the top left of the page. On the page that opens, click on the “My Applications” tab. Now you have access to a list of games and applications installed on your device. A noteworthy fact is that the list will contain not only those games that are installed on your device, but also those that you installed but deleted for some reason.
Select the application that you want to transfer to another device by clicking on its icon or name. On the application page, click the “Installed” button. In the pop-up window that appears, select the phone/tablet to which you want to transfer the games and click the “Install” button. You can now return to previous page to select other applications to transfer. And repeat the procedure.
Please note
This transfer method is only valid for those games and applications that you installed from PlayMarket. On applications installed from third party sources this method is not covered.
Be sure to make sure that all the applications you select are successfully installed on your phone or tablet. Otherwise, the phone will “try” to download them the first time it connects to the Internet, and if this fails WiFi connection, and mobile Internet, this may lead to additional financial costs.
Holders unlimited tariffs on the mobile Internet may ignore this advice.
It is the most popular gaming service. With its help you can conveniently purchase, download and install many computer games. And the prices of this service, especially during periods of sales and promotions, are so attractive that you will very quickly have several dozen games on your disk. The only trouble is that modern games take so much disk space that disk space begins to rapidly disappear. There is only one way out - move the games from the default folder to another location.
You won't be able to simply move the game folder, as this will most likely make the game inoperable. Therefore, to solve this problem there is a special utility called. In its work, the program uses the link creation function, available for file system NTFS, so your drives should use it. In principle, everything can be done manually, but using the utility is much easier and more convenient.

Actually, the mechanism of operation is simple and completely clear from the screenshot. After launch, the utility automatically finds your installed games and displays a list of them in the left panel. You select a new location for the game folders on the right and press the button Move to Storage. After some time, the data is moved to a new location while games remain fully functional, and you enjoy the free space on the disk.

Works in operating systems Windows 7/Vista and weighs 380 kb. You can download it.