How to install a new computer program. How to install the program on a computer
I bang criticism from myself and in relation to the topikstarter and in relation to the enemy)
1. Firewood - no comments here, they are needed. True, for starters (if possible), we update Windows through a Windows update (as for Windows 7 and everything above), a good half of the firewood gets up, or even that's it. What do you need to put firewood from the off site on and the latest is on the video card (otherwise you don’t mess up normally) and on the sound system (if it’s not built-in and you’re a dope sounder)))) There are, of course, cases that none of the methods given the author is not suitable for some crap (like USB controller 3.0 on a monoblock mother, and there is no pancake disk in the box, and firewood is on the current offsite on Win10 x64, and on a monoblock, at least get out of the ass 7 x86 should be, and without firewood, 2 usb ports do not work, DRPs "does not help and you have to look for the controller chip and slip a different driver in general, but the main thing is that everything works) But this is an exception.
2. Browser, then as someone likes (someone and ikplorer 5.0 surf and he's okay). I won’t say anything against Edg, but browser extensions like AdBlock and BrowSec are more fun with them.
3. Antivirus. A separate issue, of course. A regular user should not live without it. I completely agree that the built-in defender in Win8-10 is generally a clear thing, it catches everything with a bang, dr web, kaspersky, nod32 missed it, but the defender caught everything. Avira, Avast, Comodo and the like ( free version, paid did not test) trash is still the same, viruses were missed, and quite serious ones, after this I don’t install and don’t advise anyone to them. In general, in Windows 7 too (with latest updates) there is a built-in defender, but I can’t say anything about its work, so if you have Windows 7, XP, you need to install something like dr web, kaspersky, nod32.
4. Archiver. The built-in archiver... hmm... to be honest, I rarely see zip, but rar is more common, especially in a corporate environment. WinRar is paid, this is its main disadvantage, 7Zip is required to be installed, it simply reads a lot of archive formats, it is cool to use as a console archiver for Reserve copy, easy and most importantly free.
5. Codecs yes, definitely yes at home. Provided that you download movies somewhere and watch them on your computer. In the population, this type of viewing is becoming a thing of the past. No one has been downloading movies and series for a long time - they watch online, watch online on smart TV, watch online on a tablet, and so on and so forth. Codecs were relevant at the dawn of the development of peer-to-peer networks, when providers created their own local networks in cities / districts of the city and everyone hung in flylinkDC ++, pumped up pyrobytes of films for themselves (which, by the way, they never watched), the films were in the archive different formats. Well, you can stick a kanesh on a home computer, so just in case, definitely not on an office computer. No codecs.
6. PDF, somehow I used it with the distant version 4.0, in general it suited me with the interface and functionality, but in the latest versions it has become very heavy, it breaks all the time, it starts its services and positions itself in security reports as an information collector on a par with google, apple, etc., so I'm starting to abandon it. A good alternative to FoxitReader is light comfortable. Regarding djvu “and a lot of different formats”, I haven’t seen djvu for a long time (at the university, only books on mathematical analysis and linear algebra were in this format), if someone is directly interested in heaps of books scanned in poor quality, then you can throw off the djvu viewer without installation, but “masses of other formats”, as it were, don’t even come to mind what it could be and to whom it could come in handy.
7. Office Applications for anyone (well, when installing, we select Word and Excel, the rest is of course not needed at home), to a corporate computer plus PowerPoint and Outlook, by the way, you can also use the mailer at home, a convenient thing. And there are so many documents on the net in doc format and xls, so there is no way without an office and people often take work home, finish the sign there, some document, well, someone even a presentation. If you do everything according to feng shui (feng shui in the field of copyright), then put an open office - it will fit home with a head.
8. Disk images. Here is UltraIso (by the way, paid, if anything) is needed by admins, enikeys and others like them, and usually at work or for work purposes, it’s very good for her system images are collected (the necessary wim archive is thrown into the original msdn image), boot disks are recorded (and in vain the critic is shouting that disks like mammoth shit are already and we are all suckers here, a hot topic at enterprises, and in some places even necessary - where computers are categorized, who knows, he will understand), bootable flash drives etc. An ordinary user does not need UltraIso, especially since it needs to be additionally quacked. “Win10-8 works with images out of the box - you are all suckers” the question is more extensive than it might seem, on currently 7% - Windows XP market share, 50% - Windows 7 market share (MacOS - 9%, *nix - 2%) iso images, so at home DTLite will not be superfluous for me, I don’t need it at work.
9.Skype is a rather individual thing, if you communicate with relatives from another city, then yes (well, or at work you arrange something like a conference between branches). And now everyone is on the telegram and wats "up, there are even video calls and mobile phones (:-D even in the mail agent it is) and cellular became quite cheap.
10.Torrent. Well, at home, yes, everyone seems to use this thing, of course not at work. some other rocking chairs are incomprehensible - nafig are not needed, there are quite enough built-in browsers. All the same, we don’t download IE 4.0 via the dial-up channel (just don’t disconnect, just don’t disconnect!!! aaaaa!!! if anyone remembers Masyanya))))
12. Flash player. Well, if you are fond of watching "vidyashek" all sorts of shitty in the internet, then you can bet, definitely not at work.
13. Player. Yes, if you bet K-lite codecs, then the MPC player is installed with them ( media player classic), a great thing, IMHO you don’t need an extra hat on your computer, and the player built into Windows is also normal.
14. Well, burning discs ... again, Nero (I have nothing against an excellent program in its class) - it is paid (copyrights, feng shui and all that). Just burn a disc or a disc with music - Windows (starting with 7) and the built-in player do everything perfectly with this. If you really want something special, that is free analogue BurnAwareFree is a ok theme. There is also a freemake video converter - it burns discs, dvd can make menus and navigation.
15. Punto Switcher- well, it tastes good. I always put myself, though only at work, at home she didn’t fucking give up. If only someone prints a lot of something (well, that is, works at home). Generally a handy thing.
16. Remote access. Again teamviewer and ammy admin paid. If you want to work even harder helping everyone. This is if you have some outsourced office, then yes, these programs are needed (oh God, copyright infringement and feng shui). And at the enterprise there is RDP. In general, there are houses (if there is a white ip, of course), but I do not recommend allowing it at home.
Installing programs on a computer- this is one of the main procedures that the user should know. As the computer is mastered, a novice user sooner or later ceases to have enough preinstalled programs, available in Windows, or they do not suit him in terms of functionality. As a rule, third-party applications have more features than standard programs operating system. For example, application Photo Viewer in Windows 7 is rather primitive in its capabilities and usually more advanced users install another image viewer. The installation process is also called installation, from the English install, which in translation means “install”.
How to install the program on a computer
How to install the program on a computer- this is not such a difficult question as it might seem at first, especially since almost every Windows program has a so-called "installation wizard" (or "installer") in the form dialog boxes, which will step the user through until the process completes. All that is needed is to carefully read what the "installer" offers and press the appropriate buttons in the dialog boxes.
Let's look at the installation process using an example program fast stoneImageViewer. The application is designed not only for viewing photos, but also for editing them. It has Russian-language interface and distributed free of charge.
Programs are distributed in the form of a so-called distribution kit, where the components of the installed application are in an archived (compressed) form. The distribution has an installer called "Setup" or "Install" and has the extension .exe or .msi
First of all, you need to download the distribution kit of the program from the official website of the manufacturer where it is posted latest version programs.
Click on the button download and on next page you will be offered a choice of distribution type: in the form with the .exe extension, a file, and a portable version of the program that does not require installation. Select download.exe and click the button download to start uploading.

After the download is complete, open with the resulting distribution and find the file FSViewerSetup60. Here we see that the distribution package of the program has been received in the form of a single installer file, which has the word “Setup” in its name.

Double click on it with the left mouse button to launch it.
The process of installing the program on a computer

Now you can launch the application by clicking on its shortcut on the desktop or through the Main Menu and get acquainted with all its features.
We learned how to install a program, the distribution of which was downloaded from the Internet, from the manufacturer's website. Software distributions can also be distributed using CDs. In such cases, the setup wizard starts automatically when you insert the disc into the drive. All you need in this case, again, follow the instructions and prompts of the installation wizard.
Share.
If you have switched to this page, then you decided to reinstall Windows 7 and you need help with the installation. Below I will tell you in detail all the stages, starting with Windows boot to your computer and ending with Windows Activation and a short introductory video. And so let's get started. The first thing you need to do is download it yourself Windows image 7 there are two types of them 32x and 64x bit. As you understand what bit depth you need, it’s very simple in the properties of the computer there is information about your hardware, we are interested in the RAM line ( installed memory). If installed 4 GB or more you need 64 bit version, everything below is 32 bit.
When we have already decided on the bit depth, we proceed to download Windows image 7. Click on the green button "Download Windows 7 Ultimate" a torrent file called ru_windows_7_ultimate_with_sp1_x86.iso.torrent will be downloaded to your computer. We launch it to proceed to the download through the torrent program. If the file asks to open it through any program, then you do not have uTorrent installed. follow the link to download it.
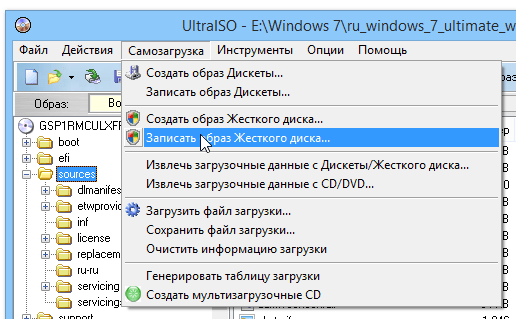
While Windows is in the process of downloading, we will download and install UltraISO program. With it, we will burn the image to a disk or flash drive.

After UltraISO has been installed and Windows has loaded, let's start writing to a disk or USB flash drive. We launch UltraISO and perform the actions as in the screenshot:

We open the image with the program and perform the recording.

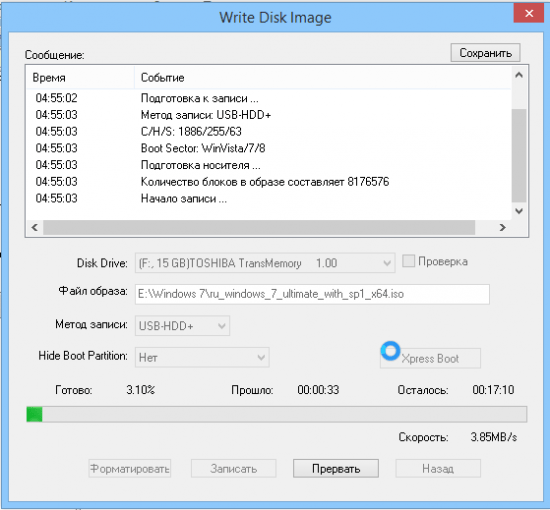
We are waiting for the process to complete and close the program window. Now your flash drive or disk is ready to start outside the system.
Well, now the most interesting thing is, we need to tell the computer to start from our media, for this we need to call the BOOT MENU. Usually these are the DEL or F8 keys, but there are exceptions, it all depends on the manufacturer of your motherboard- below are the buttons from which you can call the BOOTMENU from various motherboards.

If you did everything correctly, you will see such a menu with a choice of boot, control with the arrows and the ENTER key.

After selecting in the BOOTMENU, copying of the files "loading in Windows file" will begin to run Windows installation 7. In the first installation window, you must select a language and click Next.

In the next window, click Install.

Select the type of installation, click " Full installation(Extra options)

And here is the most important window, the selection of the partition on which the installation will be performed. For correct installation you have to format the system drive C where your old Windows. Ideally, it is better to delete it and another section where the MBR is stored, it usually weighs 100 MB. To do this, select the partition and click Delete. "Unallocated disk space" will appear. Click "Create" specify the size of the disk or leave it unchanged and click "Apply"

Now it's a matter of time, as soon as you click Next, copying the files to install Windows 7 will begin. You can remove the USB flash drive or disk after the first reboot and observe the installation process until the Select username window appears. Enter any desired name and click Next.

In the key entry window Windows product, uncheck "Automatically activate Windows when I connect to the Internet" and click Next.

That's the whole simple installation process, you will see the usual desktop - it means that Windows 7 Ultimate is installed.
Another important and mandatory process - Windows activation. On the desktop, find a shortcut called "Activator", run it and do everything as shown in the screenshots below.
Everything in our life happens for the first time. If you do not give in to difficulties, if you are not afraid of the unknown, everything will definitely work out, and you can become a real pro from an inexperienced user.
If you personally are tired of being stubbornly called a "teapot" because you do not yet have perfect computer skills, prove to everyone that you are ready to move forward not at a snail's pace, but by leaps and bounds, confidently mastering new knowledge.
Start by mastering the instructions on how to install the application on your computer so that you can later install any software you need yourself.
The installation is accompanied by a certain algorithm, which is identical for almost all varieties. If there are features, then they are completely insignificant, even a beginner can easily figure them out.
It is more important for you to initially fully understand the basics of how to install the downloaded program on your computer, and even more precisely, how to prepare for the installation process so that it goes smoothly and does not provoke any problems.
Downloading the boot file
If you need to install some utility, type its name into search string. Open sites that are ready to offer you an application for download.
Tune in to the fact that these sites may not have one link, but two at once. Of course, as a beginner, it is difficult for you to visually determine which link is right for you.
But it does not matter, pay attention to the information located next to the links. They indicate for which operating system the program is intended, and also focuses on the bit depth of the OS.
In order to understand which operating system and how many bits are installed on your computer, right-click on the "Computer" icon, and then go to the "Properties" line. In the window that opens, you will find the information you are interested in.
The download process is also different. Some browsers automatically download files to the Downloads folder, while other browsers ask for information where you would like to save boot file.
The Downloads folder is easy to find if the program was automatically saved to it. Open "Computer" left side you will see the desired folder "Downloads", click on it, after which it will immediately open.

When downloading the download file, pay attention to whether the program is free or paid, whether it is designed for permanent use or only for a short period of time (most often thirty days).
Of course, it is optimal to find a program that is both free and capable of working as long as you need it.
After downloading any download files from the Internet, it is useful to check them with an antivirus program. Most often, the antivirus is configured to automatically check any downloads, but it will not be superfluous to additional check. In this way, you simply protect your computer from unexpected infection.

Application installation rules
It is also important to understand for yourself that the download file can be in different formats, respectively, and the installation process of the desired program will be slightly different.
You can install the program if you have files with the extension "exe" or "msi", and also if you managed to download the archive. The name of the boot file can be completely different, so it is of no fundamental importance.
Installing programs from a boot file with the extension "exe" or "msi"
If you downloaded a boot file with an "exe" or "msi" extension, the installation algorithm will be identical. To start a self-installation, simply double-click on this file.
The installation process will be accompanied by additional tips and recommendations, so it is important to follow all the steps without haste.
Some programs may prompt you at the start of the installation as to which installation mode you prefer. Practical experience clearly demonstrates that there is normal mode and extended.
Considering that you are just learning how to install programs on a computer, refuse the advanced installation option, since there you need to have certain knowledge and have some practical skills. For the initial use of any program, the normal mode will be quite enough.
After that, the program will ask you to confirm your agreement with license terms use, after that it will ask you to specify the folder in which it is preferable to install the program.

In principle, during the installation process, the system will independently suggest a folder, just like its name, so you can agree with such suggestions.
The installation process will continue further. At some point, a request may again be asked to indicate the language in which you would like to use the program, as well as to clarify how important it is for you to install a shortcut on the desktop.
Some programs are installed with a little trick, in great collaboration with advertising, which, unfortunately, in some cases can turn out for you unpleasant surprises, filling the system with unnecessary "garbage".
If a window appears prompting you to install new search, change home page, download and prioritize new browser, you know, all this is real commerce, which has nothing to do with installing the program.
For this reason, if you find such offers, before clicking "Next", uncheck all the checkboxes that are automatically set next to all kinds of offers. Only then continue the process by clicking the "Next" button.
Installing programs from the archive
If you downloaded an archived file from the Internet, the installation process may be carried out a little differently.
It should be noted that if you did not first take care of downloading the archive, and you did not have it among the already existing programs, then you will have to initially install the archivers, and only then successfully use them, including when installing individual programs.

If the archiver is successfully installed, move the mouse over the boot file with the archived program, right-click on it. At this moment there will be context menu, in which find the line "Extract files" or "Extract files specifying a specific folder." You can use both the first offer and the second, after which the unzipping process will start.
When such a process is successfully completed, you will find a file with the extension "exe" or "msi" in the folder, which will allow you to act according to the algorithm that was described above.
So, the process of installing programs is simple, if you first study all the recommendations, follow the installation algorithm. All this will allow you to quickly cross the line of the "teapot", rise to a new level of PC ownership.
For those who have been using computers for a long time, this topic, may seem simple and uninteresting, because every user, in any case, has to do this (and learn along the way). Although, despite the seeming simplicity, not everyone installs correctly and even more so removes applications (games or programs).
And even more so for beginners, this topic will be very useful, if only for the reason that a huge part of computer problems (braking, freezing, etc.) occurs due to incorrect actions during the installation and removal of applications.
I have repeatedly mentioned in my mailing list that even after proper deletion, in Windows registry there are "tails" from those programs that we delete. And if, moreover, the removal process went wrong, then these very “tails” in the future can cause big trouble in the system.
Therefore, I want to tell beginners and remind more advanced users about these simple procedures in order to eliminate unnecessary computer crashes (through ignorance or stupidity).
Let's start, of course, with the installation (in the figures, this is the Light Alloy program).
The installation process is started using special installation programs, which are either loaded automatically (for example, after inserting a disk into the drive) or using manual start necessary files, which are usually called setup.exe or .
The process of installing most applications is simple and consists of the fact that you answer the questions of the installer and press the button Further. Usually during installation, the welcome window comes first, then the window with license agreement, and then select a location to install the program.
Here (based on my experience) lies the most common problem for a beginner. The fact is that by default the computer offers to install the application in the folder C:Program Files,
which can be used without problems (and even sometimes desirable), but not always.
For most users HDD split into several logical drives(C, D, etc.). In this case, the C drive does not always have enough space to accommodate all the programs that you want to install. Inexperienced user often does not pay attention to this, and installs everything in a row in this folder, which eventually leads to the C drive overflowing and, accordingly, to the computer slowing down (the system should always have free place on drive C) and the inability to install other programs.
The second undesirable consequence of installing some programs in the above folder is that in the case full reinstallation Windows, the C drive is completely cleared and, of course, all programs on it are deleted. All these programs, after reinstalling windows must be installed first. However, if they were, say, on drive D, then this would not have to be done.
This, it should be noted, does not apply to all programs, because some "serious" programs register themselves in the registry (on drive C) and they still need to be reinstalled. However, simple programs can be installed without problems, and even need to be installed on a disk that is not a system one.
To install the application on drive D (or any other), you just need to click the button Review(see figure) and choose another location for installation (or type it manually):
Thus, you will get rid of the overflow of the system logical drive, which will have a good effect on its performance.
But it's not very terrible problem. The main cause of computer failures due to incorrect installation is a pending installation.
This may happen during sudden shutdown power supply of the computer, or if you suddenly decide to interrupt the installation process in some extraordinary way. One of the reasons for the incomplete installation may also be the situation described on this page (see July 2008).
After an incomplete installation, “tails” remain on the hard disk, which can be removed in standard ways just impossible. Therefore, you should try to complete the installation without failures and interruptions. It is better to uninstall the application after regular ways than to interrupt the process of its installation!
Now let's talk about correct removal programs.
Many beginners think that by simply moving the folder from unnecessary application V shopping cart they removed it. This is the worst mistake! You can only delete programs that you installed on your hard drive in the same way, i.e. by the usual copying method (for example, from the disk to which the program was copied from a friend's computer). If you installed the application using the installer, then you must uninstall it using a program designed for uninstallation (removal).
Such a program (usually called or uninst) can be found in the same folder as the uninstalled application itself. If you don't remember where it is, you can right-click on the application icon and select Properties. In the window that appears, you will see the path to the folder with necessary program:

To quickly get to this folder, you just need to click the button Find object.... In this folder we find desired program(uninstall.exe) and clicking it will activate the process of uninstalling this application.
Often such a program is also located in the Start menu ( Start - All Programs - Application name - uninstall).
There are applications that do not include programs for uninstallation. In this case, the most the right way Removing such applications will launch a special program from the Windows system itself.
It is done like this: Start - Control Panel - Add or Remove Programs.
In the window that opens, find the application to be deleted, select it with a mouse click and press the button Delete:

After that, having agreed that you really want to remove the application with all its components, start the uninstallation process and wait for it to finish.
Those methods that are described in this lesson are the simplest (but perhaps the most reliable) ways to install and remove programs. By correctly installing and removing programs and occasionally cleaning the system of unnecessary leftovers applications (I described how to do this in a free mailing list), you will save yourself from most unnecessary Windows crashes.
It should be noted that there are special programs uninstallers that monitor the installation process (while retaining all data about each installed program) and during the removal of applications very effectively remove all "tails" (although not a fact). But for a beginner, these programs will not always be clear (especially if they are on English language), and they take up a lot of space. Incorrect handling of such programs, on the contrary, can “litter” the computer. Therefore, the expediency of their use and development, I leave to your discretion.