Startup programs in Mac OS - how to add and remove applications. Automatically launch programs in Mac OS X
Would you like some apps to automatically open when you boot your Mac? This will save time and eliminate the need to repeat the same steps every time you start macOS. There are several ways to configure startup applications. This is very easy to do and only requires a one-time setup.
Setting up startup on Mac using the Dock
If your favorite application is constantly on the Dock panel, or running in at the moment, right-click on its icon (or hold Ctrl + click left button mice). From the pop-up menu that appears, select Options and you will see a menu with three options. To enable the application to launch automatically, select “Open at login”.

Therefore, in order to remove an application or game from macOS startup, you must uncheck the box.
Selecting startup applications from the Users and Groups section in System Preferences
With this method, you can easily select multiple applications and edit their launch options for specific user profiles. Open System Settings and go to the Users and Groups section.

On the left, select the group or profile for which you want to install startup applications. On the right side of the section, a list of “Login Items” applications that are already scheduled to launch automatically will appear.
To add or remove some programs, click on the plus or minus sign, respectively. If you want to launch an application when your Mac boots, but have it hidden when you log in, check the Hide checkbox next to the application.

Based on materials from yablyk
Automatic start programs when you turn on the computer - convenient function, especially if the user knows exactly the list of applications that he uses regularly every day. When you turn on your Mac OS computer, be it a MacBook or desktop computer, you can configure a set of programs that will launch automatically. Some applications automatically offer to configure the function upon installation and first launch. automatic download, while others do not provide this feature by default.
In this article, we will look at how to add applications to startup on Mac OS when you turn on the computer, as well as how to remove them from there.
Table of contents: Please note: We recommend that you always monitor the number of programs that your computer automatically launches at startup. The more such applications, the more actively they consume computer resources. On computers with poor performance, it is recommended to keep the number of such applications to a minimum.How to add apps to startup on Mac OS via the Dock
The first method, which we will consider in this article, involves adding to startup those applications that are placed on the lower Dock panel. Typically, these are the most used programs.
To add new program in the Dock, you just need to move it from the list of all applications (Launchpad). After that, in the dock, right-click on the program whose startup you would like to set, select “Options” from the drop-down menu, and then select the “Open at login” option.

Important: After the “Open at login” option is checked, a check mark will be placed on it, which means that auto-loading has taken place this application. If you need to remove a program from startup, also right-click on it in the Dock and uncheck the “Open at login” option from the list of options.
How to add or remove an application from startup in Mac OS through settings
The method discussed above is not the only one in Mac OS. You can use the operating system settings to add or remove applications from startup. To do this:

If you need to remove one of the applications from the current startup list, you need to select it in the list of input objects and click on “Minus”. After this, the application will no longer start automatically when you turn on your Mac OS computer.

Please note that the list of login objects also has a “Hide” column in which you can set a checkbox. If you activate the checkbox for one program in this column, when it starts automatically, it will not open in full screen, but will remain running in background. For example, this can be useful for programs such as Skype, Telegram and other instant messengers. 
The process of launching applications in OS X is quite simple and does not require large quantity effort from the user, but there are still times when you want certain programs to run independently, without any action on your part. For example, you want to mail client opened when you logged in, or you have some specific application that you usually launch yourself on Fridays at 9 am. Or perhaps you would like some program to run when connected external drive. There are many options and most of them are quite easy to implement using OS X.
Login objects
The most common way to automatically open programs or documents in OS X is to set them to start when the user logs in. There are two ways to do this.

Login objects are often used to start background applications and additional menu items for third-party programs, but you can use them to run almost anything.
Folder Actions
The second way to automatically open programs and documents is through built-in folder actions. The principle of their operation is that when the contents of a particular folder change, the script you select is launched. Moreover, it is you who choose what changes and how you need to react.
To configure folder actions you need to run Script editor from the “Utilities” folder, and in the menu Script Editor - Settings - General, check the box next to the item “Display script menu”. 
As a result, you will see in the menu bar new element, opening which you need to select the “Configure Folder Actions” item in the “Folder Actions” submenu. In the window that opens, check the box to activate this function and add the folders you need by clicking on the “+” (plus) button under the left column. After that, click the "+" (plus) button under the right column to select the action you want to associate with it. For example, you can add a very convenient built-in script “add-new item alert”, which will notify you if new items appear in the folder. 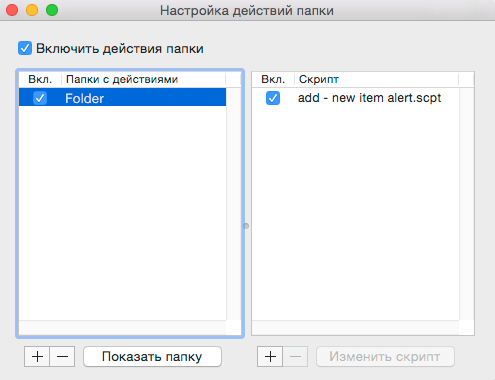
The same result can be achieved if you select the “Attach script to folder” item, specify the desired script, and then the folder to which you want to attach it. After this, you must select “Enable Folder Actions” in the script menu.
You can also use the script mentioned above to create your own that would launch a particular application, or even create a script from scratch using the Script Editor or Automator (by selecting “Folder Action” when creating a new project).
For example, you can make sure that when you add PDF files to a folder, they will automatically open in viewing.

After saving the project, all added to the folder you selected PDF files will automatically open in Viewing. By analogy, you can also configure the opening of other files and launch of other applications, as well as copy, move, delete, rename files and much, much more. The automation options in Mac OS X are limited mostly by your imagination.
Calendar
Another interesting way to automatically launch applications is to use reminders in Calendar.
- Create a new event in Calendar and set a reminder for him.
- In the “Warning” column, select “Customize”.
- Select the "Open file" reminder type.
- Specify a document, application, script or program created in Automator, which you would like to run.
- Specify the launch date and time.
As a result, the file or program you selected will open at the time you specify. Usage calendar very convenient, as it allows you to quickly and easily change the date of reminders and duplicate them if necessary.
Launch Agents Elements
The methods described above allow you to achieve the implementation of almost any scenario for automatically launching programs. However, there are times when you may need more control over how a particular process runs, especially if it is background and needs to run at regular intervals (as is the case with the script to check Time Machine) or under certain conditions (for example, when connecting an external drive).
In this case they can help special files, which are called Launch Agents. They allow you to pass instructions to the system service, which is responsible for launching processes, regarding the program you need. Creating these files can be quite complex, but this depends on the complexity of the tasks that are assigned to them. In addition, to simplify the process, there are special applications, such as which was used as the basis for writing this article, once again we say thanks to Christopher Kessler.
Every time you turn on or restart your MacBook or desktop computer running Mac OS, after loading the operating system itself, programs for which autorun is configured begin to load.
Over time, there are more and more such programs, and the computer boot speed, accordingly, becomes slower. You shouldn't run this thing, we recommend keeping your Mac clean and turning off everything Not necessary programs from autorun.
The opposite is also true, because there is probably some program that you launch manually every time you turn on your computer, so why not add it to your Mac’s startup? If you simply don’t know how to do it or think that it’s difficult, then you’re in vain, here you go simple instructions on adding and removing programs from Mac startup OS.
There are at least two ways to add an application to autorun or remove it from it.
Add or remove an app from startup via the Dock
If your program has a shortcut in the bottom panel (dock) of Mac OS, then just right-click (or touchpad) on it and select the tab in the pop-up window "Options", and then check the menu item "Open upon entry". If the checkbox is checked, the application will automatically launch along with operating system Mac OS, if not, the application is missing from autorun.

Unfortunately, not all programs have a shortcut in your Mac's Dock; some work in hidden mode or have only an icon in top panel. Thus, to fully configure startup, you need to go to settings.
Delete or add an application to startup in the OS settings
1. Open your Mac's settings by clicking the apple on the left side of the top bar, and open the menu item "System Settings".

2. In the computer settings window, find and open the item "Users and Groups".
3. In the window that opens, select the tab at the top "Login Objects", this simple name in Mac OS is used to name startup programs.
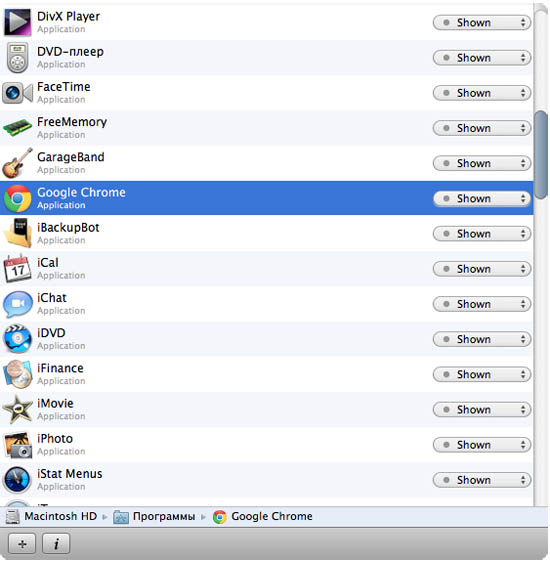
4. Now you see a list of all the programs that are loaded with your operating system every time. In order to add a program to autorun, just click "plus sign" under the list of programs and select the one you need from the list that opens. Now it will always boot with Mac OS. If you want remove a program from startup- select it in the list and click "minus"- the program will be removed from the list of downloaded ones automatically. 
5. You can also silently download some programs that you don't need to see immediately after logging in, but will run in the background. This option is useful, for example, for Skype. To do this, simply check the box next to the program name in the column "Hide".
The program for mac was developed by the studio "Gentle Bytes". Its main function is to expand the capabilities of working with startup in Mac OS X.
The company "Gentle Bytes" has an interesting motto - "Crafting Useful Software" (we create useful applications), perhaps this is true. Startupizer is included in the list of truly for mac. We are all, of course, familiar with standard system management startup in Mac OS X, but its capabilities are very limited. Therefore, today's application will be very useful for those who often turn off their computer.
With the help of the Startupizer program you will be able to manage startup in Mac OS X. The application allows you to create your own autorun profiles; here the user only adds a list necessary programs, which will be launched when the computer is turned on. When you first launch the program, you will need to create a list of applications for which you will configure startup. After creating the list, the next step in Startupizer is to configure options for launching your favorite programs. There are only three of them: depending on the date and time, hotkey and power supply (for MacBooks).

Launch options are very interesting feature. With its help, you can, for example, make sure that at the beginning of your working day from 9.00 to 18.00, when you turn on the computer, only the necessary programs are launched. When using hotkeys, Startupizer allows you to start/not start the program if pressed special key. Well, of course, combinations of options are available.

After setting up profiles, the user places category labels for each program. Also, in order to avoid overloading the system from a bunch of running applications when you turn on the computer, Startupizer has the ability to configure a time delay for selected programs.
The Startupizer application copes with its tasks very well and completely replaces standard means startup management. Of course, for those who usually keep their Mac in sleep mode, this program will be of little use, but for everyone else, the application can be very useful.
For those who are not sure about purchasing the program, it is available free Lite version.
General information about the program
Type: Utilities.
Devices: Mac.
Version: 1.2.2.
Developer: Gentle Bytes.
Price: 3,99$.
Requirements: Mac OS X 10.6 or higher.
Tested on MacBook Pro.