How to disable automatic application updates on Android - the easiest way. How to return to the old version of Android after updating your smartphone
Each operating system needs to be improved in order to: increase its performance and ease of use, correct shortcomings and errors.
Which is easy to do with updates. For the Android operating system, this can be done by updating its version, and this operation is called flashing.
What kind of problems appear after updating Android?
By and large, not scary at all. Very rarely, after modification, several shortcuts disappear from the desktop, and the programs themselves are the owners of these icons. Because they have long been outdated, there are many updates or replacements for these programs in the Play Store.
Along with flashing, new useful but uninteresting programs are installed that cannot be removed.
The worst thing is if you install the operating system not through settings and updates. Like this, on your own installed version Android will be unofficial software, and all service warranties for your device will be void.
How to return old version Android after update?
It may happen that you want to return the old version of Android if you do not like the update made. But such an opportunity, without harm to personal data and those already liked installed applications, does not exist.
Still, it’s better to get used to Android after the update. Install new applications, shortcuts on your desktop, and you will like the updated operating system.
The stubborn desire to return the old version of Android after the update does not leave, then this can be done.
Firstly, before returning the old version of Android, you need to rewrite all personal data from internal memory phone:
- contacts, phone numbers – to the SIM card;
- photographs, music, text files, SMS messages, mail letters - to a separate memory card.
Secondly, you will need to perform a factory reset. There are two options.
Reset to menu:
For different types and device models, the operation is different:
- on Android phones version 2.3 -
Settings > Privacy > - on Android phones version 4 –
Settings > Device storage > Factory reset
or Settings > Built-in memory > Factory reset. - on Android tablets version 4 –
Settings > Backup & reset > Reset settings.
Hard reset to return to the old version of Android:
You need to enter the “Android” menu system recovery" (). First you need to turn off the device, and then use the key combination that different manufacturers varies.
- For most phones and tablets, simultaneously press and hold the power and volume down buttons.
- Samsung – simultaneously press and hold the power and volume up buttons.
- Sony Ericsson - simultaneously press and hold the power, volume down and camera buttons.
- LG – simultaneously press and hold for more than 10 seconds the buttons: power, volume down, home screen (home). Release the power button after the LG logo appears, and hold the rest until the recovery screen appears.
- Huawei - simultaneously press and hold the buttons: power, volume down, volume up.
- HTC – press and hold the volume down button, then briefly press the power button. When the recovery menu appears on the screen, release the Volume Down key. Find the “Clear storage” item, select it by pressing the power button and confirm the action with the volume down button.
In the menu " Android system recovery" remember the key assignments: highlight – move through the menu; select – select a menu item. Move to the line “ wipe data / factory reset" and select this item. Next, in the new menu, go down to the action confirmation sub-item and select it.
In both reset options, a reboot will occur, and your device will turn on with factory settings - with applications and the old version of Android preinstalled by the manufacturer.
Surely you have heard about the Android operating system, unless you yourself are the owner of a device running this shell. This platform has appealed to a good portion of gadget owners and is the most common OS among mobile devices. Since 2009, when the first version of the “robot” was released, the developers have not stopped improving and modifying their brainchild. New versions and updates are released regularly. But do you always need to update your device and how to return the old version of Android after updating? We will talk about this in this publication.
Why are updates needed?
First of all, for the proper operation of the system. Developers optimize performance, improve the interface, correct lags, because it is almost impossible to release a perfect system right away, and minor faults will only be noticeable during its implementation. active use. In most cases, you can find out about the availability of an update using a regular message that appears in the notification line. You can upgrade by going to the update center, downloading and installing the new version.
Why might gadget owners be unhappy with the update?
In most cases, after the update procedure, the device should work faster, and all shortcomings should become a thing of the past. All that users can complain about are some changes in the interface or, for example, the disappearance of shortcuts from the desktop (accordingly, the applications themselves disappear). This happens because installed programs are already outdated and simply do not correspond to the new firmware.
New versions of applications or their analogues can still be found on the Play Market, and trying to return previous version OS due to the loss of old applications is a rather stupid idea. What else can irritate owners in the new firmware version is the appearance of some programs that cannot be removed. For example, these could be new services from Google. And then all users begin to think about whether it is possible to return the old version of Android. But most of all those who want to return to old firmware among those who tried to reflash their device themselves. Here, a huge variety of problems may appear, to the point that your gadget may turn into a “brick,” that is, stop showing signs of life altogether.

So before performing such manipulations, make sure that you have enough knowledge and experience, and best of all, contact a professional. Reflash the device only in extreme cases, when you cannot do without it, because such a procedure completely voids your warranty. But return previous version It's still possible.

How to return to the old version of Android after updating?
First, come to terms with the fact that standard system resources do not provide a system rollback option, such as in the Windows OS. Accordingly, when you return to the old version, all installed programs and personal files will be deleted. Therefore, immediately before the procedure for returning the old version, do backups all important documents, files, phone numbers and so on. Be prepared to say goodbye to user settings, saved accounts or applications, they will be erased, everything except the built-in ones.
Next, you will have to perform a factory reset yourself. How to do this depends only on your version of the operating system, but most often this item is found if you go to “Settings” and “Recovery and reset”. This parameter can also be found in “Confidentiality”. In any case, finding a factory reset will be easy. Next, you will need to perform a series of actions that are a little more complicated, that is, enter recovery. And how to return the old version of Android using it - read on.
Login to recovery
"Recovery" is a special boot mode on Android, with which you can reset settings or flash the system. If you buy gadgets in trusted certified stores and with an already installed OS, then they should have the stock “recovery” mode. How to enter recovery depends only on your device model. The most common combination is the power button and the volume down key.
For example, if you don’t know how to return the old version of Android to Lenovo, then this combination will work for most of their devices. I would like to note that before entering recovery, you need to turn off the phone. If you are looking for how to return the old version of Android Sony Xperia, then here you need to press three buttons: those that we have already named, and the camera button. More detailed instructions for various models you can easily find in the open spaces world wide web. But what to do after entering boot mode?

How to return the old version of Android after updating through recovery mode?
You can navigate the menu using the " key" highlight", and to select a specific item you need to press "select". this mode there is no need, if you understand it well, it becomes clear that there is nothing complicated. Now look for the line with " wipe data / and select it. A new menu will open in which you will have to confirm the action. Afterwards, wait for the reboot and the OS will return to factory settings.
Charge your smartphone
What is worth noting first is that before starting this procedure you need to charge the device well. It doesn’t matter how long it takes to roll back the system and how long the gadget will reboot after that.
If during such manipulations in the “recovery” mode the device does not have enough charge and is unable to complete its task, then, most likely, problems with its further use cannot be avoided.
The same goes for self-flashing phone. For some users, certain system functions disappeared or did not work, even the touchpad became inoperable. In some cases, the firmware did not install at all and it was simply impossible to enter the OS. But even then recovery helped again. If you cannot enter this mode or it simply does not exist, there are a number of simple utilities for flashing this mode directly through the operating system. Sometimes you may need a PC for this task.

We told you about how to return the old version of Android after updating. Treat your gadget with care and it will serve you for a long time.
At turning on Wi-Fi On most Android devices, software and game updates are starting to download. The process is useful, but sometimes updating on Android causes the application to start working incorrectly. In this case, Android device users begin to wonder how to remove updates and return programs to a working state.
Uninstalling updates
You can only remove updates from built-in Android applications - Google Chrome, Play Market. If you are looking for how to uninstall an update third party program on Android, you will be disappointed. The only working way is to uninstall the application itself, and then find and install its old version.
You can search for old versions on sites like 4pda - there you can find any popular program for Android. Download from other portals installation files more dangerous, but still possible, especially if the site has been verified by other users. To remote application after installation it was not updated immediately, you need to configure the order of downloading updates on Android.
If you don't like how one of the standard applications Android (for example, Play Market), then you can quickly roll back it to its original state:
- Open settings, go to "Applications".
- Find in the list the program whose updates you want to remove. Click on it to open a page with additional settings.
- Tap on the “Uninstall updates” button.

Deleted updates may be downloaded back when connected to Wi-Fi. To prevent this from happening, follow the recommendations for setting up app updates on Android.
Setting up Android update
By default, programs start updating when Wi-Fi is turned on. On mobile traffic updates are not downloaded because it has a limit - a specific number of gigabytes per month. Majority Android users I’m happy with this approach: I turned on Wi-Fi, the application was updated, and you don’t have to worry about the relevance of the programs. But if you want full control over how the latest update will be downloaded, you need to additional settings systems.
The first thing you can do is set a limit background processes. It will help fix the situation when the system freezes due to the simultaneous updating of several applications.
- Open the settings, section "For Developers".
- Scroll down to the Background Process Limit option. Click on it to change.
- Set the value that suits you - for example, no more than 2 processes at a time.

If you want to disable auto-updates altogether, the easiest way to do this is to use the Play Market settings:
- Launch Play Market. Call up the control menu and go to settings.
- Click on "Auto update" and select "Never".

Some applications update without Help Play Market, so following the above steps will not be enough to complete shutdown auto-updates. To fix this flaw:
- Open your phone settings, go to the “About device” section.
- Select "Software Update".
- Uncheck the "Auto-update" option.

How to disable automatic update applications on Android and what is it for? These are questions that arise for many users of modern information technology. When a new smartphone appears on the market, it operating system(OS) (in our case, Android) often has shortcomings. It may be buggy, vulnerable, or missing useful features. To fix this, the OS manufacturer makes utilities to fix the flaws.
For the convenience of users, the developers have provided the ability to automatically update. However, this often consumes a lot of traffic and uses a large amount of RAM. The question arises, how to disable this function on Android? There are several ways to do this.
The appearance of updates is the desire of manufacturers to improve the created product. When releasing it into life, the programmer does not always notice any shortcomings. Having subsequently discovered them, the software creator develops a new version of it. The name of the next product is different digital format: 5.0, 4.4 and so on.
It is clear that the average user will not want to “demolish” a software version that has become outdated in a week and install a new one. Therefore, complementary versions are created that add new things and clear out unnecessary ones.
To save time, software stores include a feature to automatically download such products. For example, it may be included in the Play Market. However, there is not always a desire to change something in software that is already familiar and quite satisfactory with its functional set.
Moreover, not everyone wants this to happen without their knowledge and at the expense of their traffic. In this case:
- Turn on the gadget, establish a connection to the Internet, tap on the Play Market icon.

- The program has started. We look for the “Settings” icon and open them.

- The next task is the “Auto-update applications” section. We will work with him.

- Open this tab and see three methods of autoloading:
- Always;
- Only via Wi-Fi.
The third option is convenient in that it makes it possible to update without using up traffic, but does not protect against the possible accumulation of junk information that ends up on the gadget.
- To turn off auto-update, select the “Never” column and put a dot in the desired circle.

- You can also choose to upgrade via Wi-Fi.

- If updates are completely disabled, it is recommended that you do not disable the item that notifies you of their availability. On Samsung it looks like this:

Now the update is only possible in manual mode. You can “go” home.
Disabling OS updates through settings
Sometimes it becomes necessary to stop the automatic update of the operating system itself. You can do this in your phone settings.
- Let's open them.

- Go to the “About the device” section. When working with Lenovo or HTC tablets, the tab may be called “About tablet”, “About tablet PC”.

- So, open the named page and find the “Software Update” or “System Update” item in the menu.
On some devices, “Software Update” is not hidden in the “About Device” tab, but is located directly in the phone settings. Like, for example, on a Samsung Galaxy with Android version 6.0.1

- Next, we disable automatic actions. To do this, you need to uncheck the corresponding box.

It is important to remember that if you refuse this option, you may miss a really important update. Therefore, it is recommended to check for new versions manually.
Disable notifications
To avoid being bothered by constant messages that there is a new update that is ready to download to your device, you can simply turn off notifications.
- In the settings, look for the “Notifications” page or, if there is none, “Applications”.

- If it is possible to select the first option, then by clicking on the inscription, we get a page with a list of all Android software.

- Next, we disable either all at once (arrow 1), or those that do not suit us (arrow 2). When you have to act through the “Applications” tab, select the one you need:

- Open “Notifications”.

- Let's turn them off.

Now messages will not bother you.
How to update manually
To keep up with the times and latest versions Android sometimes does a good job of updating the OS manually.
- To do this, follow the path described above and pay attention to “Manual loading”.

- We tap on this column and wait for the system’s proposals.

In our case, everything is at the last level. Otherwise, select the update option.
By the way, don’t forget before the procedure manual control connect to the network.
How to prevent auto-update of a specific application
If the user considers updating certain applications mandatory, but wants to deprive others of the ability to change automatically, it is quite possible to prohibit auto-update only for them.
- We go to Google Play and click on its menu.

- Next, go to “My applications and games”.

- From the list of software that, according to the green rectangles, can be updated, select the one for which you want to install or disable automatic improvement.

- IN in this case Viber is selected. Find the three dots icon and click on them.
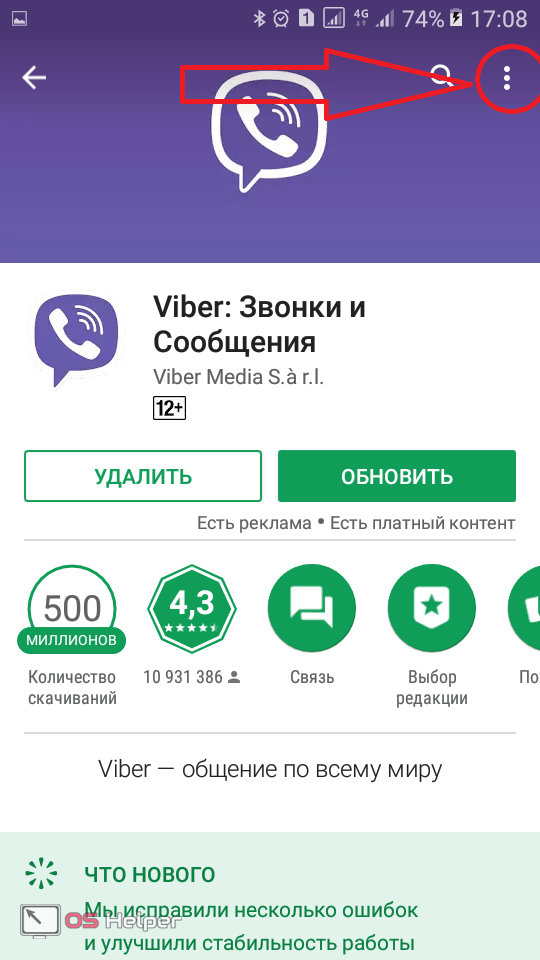
- Check or uncheck the box next to auto-update and get the desired result.

This can be done with any application. But it’s worth saying that the security of your device still requires periodic software improvements. Therefore, if you decide to block it, you need to control it at least manually.
- To do this, click on the corresponding rectangle.

By the way, if you happen to be nearby free wifi, and you decide to cancel the ban on updates, you can upgrade all applications at once. To do this, click the green button that says “Update all”.
Removing unnecessary things from Android
Installing updates helps individual applications run optimally. However, sometimes it turns out that the downloaded new product suddenly changes the operation of the phone and not for the better. Then you need to remove from the gadget what is preventing it from working.
- To delete bad version, perform the following steps. Open the “Settings” of the phone and look for the “Application Manager” or “Applications” tab.

- On the screen is a list of all Android software. We select the one whose update turned out to be problematic. For example, we chose Samsung Note.

- We open the page and see all the information. On some devices, along with on-screen buttons“Stop” and “Uninstall” the “Uninstall update” button is visible. In other gadgets, for it to appear, you need to tap on three dots.

- Press the key, remove the updates and install the original version.

After this, you can see that the newest version has been replaced by the one that was previously on the phone. For example, from 5.1.1 to 4.2.2. In our case, version 1.3.01-3 rolled back to version 1. 3.00-41.
Results
It is quite possible to update and remove the downloaded firmware yourself, following the simple tips in this article.
Video
The main thing is to decide for yourself the question: do you need to update applications on Android? The following video may help with this.
There is constant talk online that smartphones have become smarter, more interesting and much more practical for many users, but everyone forgets about some of the “disadvantages” of operating systems, both in the case of iOS and Android. Almost every smartphone today running any of these operating systems requires constant access to the Internet: built-in Google services, checking system updates and each separate application, weather updates, GPS with maps, mail and so on.
Internet access is one problem that brings with it another – battery charge. With a bunch of all sorts of updates (many don’t even need them at all) it’s several times faster! The question arises - how to disable updates on Android to save both traffic and battery power?
Why do you need to disable updates?
Is it worth turning it off at all? this function, you ask? After all, if you left updated version OS or programs, it needs to be downloaded, right? In fact, everything is not as simple as it might seem at first glance, and here are some compelling arguments:
- Not every " new version"The application works better than before. As a rule, in the most latest updates They find a lot of errors, bugs and shortcomings, and only then fix them in the next firmware.
- For many applications, you don’t have to download updates because the list of innovations and fixes is too small. To prevent the system from constantly downloading unnecessary content, you need to disable automatic download updates and check the list of added features in each program, and only then decide whether to download them or not.
- Not all smartphones can “painlessly” boot into background updates. This is an additional load on the processor, especially if you already have a huge number of different services, games and programs installed on your phone. Very often there are situations when something is loading in the background once again, and the user receives a message or incoming call, which, unfortunately, he cannot answer due to the workload of the device!
Therefore, before disabling the update on Android, weigh the pros and cons, evaluate the capabilities of your smartphone and the tasks you set for it. Almost everything Android versions, if you take at least 2.2, they have it in the settings special items in the menu to manage updates.
Disabling app updates on Google Play
All installed programs and games can be automatically updated only through the Market! You can disable updates there.
- Go to Google Play.
- Select "Settings". You must have the “Notifications” item activated so that at any time you can receive a notification containing information about new versions for a particular program.
- Next is the item “Auto-update applications”. If you want to completely disable this option, then select the “Never” tab. If you want to download only when available Wi-Fi connections, then select the “Wi-Fi Only” tab.
- That's it.
In some cases, it is necessary to disable updates only for some specific programs. In this case, again go to the Market, go to the page of the selected program and at the bottom of the screen uncheck the “Auto-update” item. These steps must be followed for each program!
Disabling Android system updates
Your operating system constantly requests information about new versions, and if there are any, it automatically downloads them to your device.
To disable this option:
- Go to the “Settings” of the device.
- Select "About phone".
- Next, go to the “Software Update” tab.
- You will need to enable the “Ask before downloading” option.
Now, every time an update for Android appears, the system will ask for permission to download files and install.
Disable automatic sync
Almost everything online services Android automatically requests updates at certain intervals. That's why you constantly receive notifications about new letters, messages in social networks, notifications about weather changes in your city, etc.
To disable synchronization you will need to do the following:
- Go to the “Settings” item.
- Select the Accounts and Sync tab.
- You will have a checkmark next to the “Background Mode” item. Turn it off!
Don't worry, all applications will work the same as before, but Internet traffic will be consumed several times less, and the battery charge will last longer.
As a rule, all services work only if there is access to the network. Today, 3G, 4G, and Wi-Fi technologies are widespread, allowing you to quickly browse pages, listen to music, and download applications in a few seconds. Additionally, we advise you to disable these features so that your phone cannot update in the background. You can activate them at any time, both through the settings menu and using the quick access panel.
All the techniques described work for almost everyone. Android devices, regardless of version and manufacturer.
Especially for gurus and Android OS lovers there is one more unusual way disabling updates. Let's look:
We have already talked about it, and this method is closely related to this material. You can use programs and root rights to remove services that are required for automatic synchronization and application updates. If you make a copy of the apk file, you can download it back at any time. But you carry out all actions only at your own risk!
- "AccuWeatherDaemonService.apk"- Only needed to update the weather. If you remove it, the system will not update weather data.
- "AccountAndSyncSettings.apk"- Used to synchronize with everyone standard services in Android OS. Sometimes deletion pauses the operation of some programs, for example, mail does not arrive or information about inboxes is not updated even in manual mode.
On the Internet you can find for your model full list apk files responsible for updates and delete them.