How to change the color of an element in Photoshop. Three ways to quickly change the color of an image in Photoshop
In this tutorial, we'll introduce a color replacement program and learn how it can quickly change the color of objects in a photo.
We will show you not the most professional, but the easiest and fastest way to change the color in an image. This method doesn't always give the desired result, but it usually works well for simple tasks. It's a simple tool and worth trying before moving on to more complex and time-consuming methods.

Color Replacement Tool
The Color Replacement Tool was first introduced in Photoshop CS, and if you're working in Photoshop CS or CS2, you can find it grouped with the Healing Brush tool.
If you have Photoshop CS3 or CS4, CS5 or CS6, click on the Brush tool icon and hold it until a drop-down list of other tools in the group appears, select “Color Replacement”.

Once you select the Color Replacement tool, your mouse cursor will turn into a circle with a small cross in the center.

You can adjust the size of the circle using hotkeys - brackets [ or ]. The left bracket reduces the size, the right one increases it. To adjust the hardness of the brush, add a Shift keystroke (Shift+left square bracket makes the edges soft, Shift+right square bracket makes the brush harder).
How the Color Replacement tool works:
When you drag the Color Replacement tool on an image, Photoshop continuously scans a color swatch located in at the moment under the cursor cross. This is the color that will be replaced with the current foreground color. Any other pixels that surround round cursor, also change color as it moves across the object.
For example, if you position the cursor at blue in the photo, and the foreground color is red, then in the cursor's area of action, the color below it will change to red. There are several options for customizing the tools in top panel, but we'll look at that later.
In the Tools palette you can see the current color settings. The default color is black:
To change the foreground color, click on the top square (color swatch) and select any new color from the color palette. Choose green. Click OK and close the color picker.

Look at the tool palette. The foreground color pattern has changed. Now the foreground color is green. Now, if we paint on the image with the Color Replacement tool, the original color will be replaced with green:
Let's take an example of a photograph of a girl with balloons:

She looks happy with a blue balloon in her hand, but maybe she would like to have a green balloon. Let's see what we can do for her. Using the “Color Replacement” tool, clicking on the ball with the cursor will begin moving inside it. Photoshop begins to replace the blue color with green.

To change the color of the rest of the ball to green, you just need to keep the mouse button pressed.

If you accidentally go beyond the boundaries of the ball and hit the yellow wall behind it, Photoshop will begin to change the color from yellow to green:

Tolerance
Everything is simple and hassle-free until you reach the edges of the ball. If you look closely, you will notice that the edges of the ball are not completely closed, a blue stripe is noticeable.

We've already mentioned that the Color Replacement tool has several options that you can customize in the Control Panel. One of these parameters is “tolerance”. “Tolerance” determines the sensitivity to the color being replaced. The default tolerance is 30%, which is a good starting point. But this is not enough for our case. We increase the tolerance to 50%, which will allow the Color Replacement tool to affect a wider range of colors:
We have established greater tolerance. Now, let's undo the last step and try finishing the edges again.

We finish processing in the remaining areas and our blue ball magically turns into green, thanks to the “Color Replacement” tool:

Use color from image
In the example above, we randomly selected a new ball color from the color picker in Photoshop. You can just as easily select a color directly from the photo itself. To do this, with the Color Replacement Tool active, press the Alt key and your cursor turns into an Eyedropper Tool.
Click on the area of the photo that contains the color you want to use. Photoshop will make this color the main background color. In the Foreground and Background color icon, the top square changes to the color you selected.
Let's take the color of the girl's blouse:

If you look at the Foreground color swatch in the Tools panel, you'll see that the color you clicked on has become the foreground color:
We can paint the ball with this color again using the Color Replacement tool:

Blend Modes
Blend Modes
The reason the Color Replacement tool preserves volume and texture is because it uses blend modes to blend new colors.
The new color interacts with the previous color and this effect is obtained. You can see blending modes in the top settings menu. There are four of them: hue, saturation, color and brightness (Hue, Saturation, Color, and Luminosity). The default mode is Color.
If you've ever studied color theory, you've probably heard that color is made up of hue, saturation, and brightness. You can choose any blending mode depending on which of these three aspects of the original color you want to affect.
Hue: When you apply Hue mode, only the base color will change. Will not change the saturation and brightness of the original color. This mode is useful for images where the colors are not very intense and it usually produces very little change.
Saturation: The “Saturation” mode only changes the saturation of the original color. Hue and brightness are not affected. This mode is useful for reducing the intensity of a color, or removing color completely.
Color: Color mode is the default and changes hue and saturation. The brightness will remain unchanged. This is the blending mode you will use most often.
Luminosity: Finally, Luminosity mode changes the brightness of the original color to the brightness of the new color. Hue and saturation remain unchanged.
Let's take another photo with balls:

One way to make one balloon stand out is to reduce the color saturation of the other balloons. We will not change the actual color of the balls, but only the intensity of the colors. In the Blending Modes tab, I'll select the Saturation mode.
If we wanted to completely decolorize the balloons, we would set the base color to black, white or gray, but since we want a more subtle effect, we'll just go with one of the less rich colors from the image. While holding down my Alt (Win) / Option (Mac) key, we temporarily switch to the Eyedropper Tool, and click on the color we want to use. We will choose a less saturated yellow color. The color itself doesn't have any meaning since the blend mode won't change the original color. The mode will only affect the saturation:

Select the “Color Replacement” tool and paint on those balls on which we want to reduce the saturation level, making them paler. Brush size can be adjusted square brackets. If necessary, adjust the tolerance level. In the example below you can see how different the original shade of the ball is from the changed one.

Paint over the other balls. Their saturation decreases. This is what the result looks like:

Brightness Issues
Unfortunately, there are situations in which using the Replace Color tool causes difficulties.
These are cases when there is big difference between the brightness of the original color and its replacement. For example, we want to change the hue of the top orange ball to purple another ball. It seems easy to do, but...
First, let's return all the colors of the balls to original condition. To do this, go to the menu File - Revert. Then we take a color sample from the purple ball by clicking on it with the Alt key to switch to the eyedropper.

Set the blending mode to Color. This is the default value. Then we start painting over the orange ball to change its color to dark purple. Here's the result:

Hm. It's definitely purple, but it doesn't quite look like other purple balls, does it? The problem is that our orange ball is much brighter than the purple balls. Set mode mixing does not affect brightness. It only affects color. Let's change the blending mode to “Brightness”/”Luminosity”:
Let's cancel all previous actions and return the ball orange, and then set the blending mode to “Brightness”/”Luminosity”. Now we paint the ball dark purple.

It's safe to say that the result is bad. In the “Brightness”/”Luminosity” mode, the ball became brighter, but it remained orange and lost its structure.
The problem is that there is too much difference in the brightness of objects. The Color Replacement tool is great for simple tasks where you just need to change the hue or saturation of a color, but if there are too many differences between the brightness of two elements in an image, you'll need to choose other color replacement methods.
Let's take another look at the “Color Replacement Tool”.
In the top menu we see three icons depicting pipettes. Each of these icons represents an option for selecting a color sample to work with (Sampling). We look from left to right: test - continuously “Continuous” - set by default; sample - once “Once”; sample - sample background “Background Swatch”. To switch from one option to another, you simply need to activate the selected icon.
Let's consider the options.
Test - continuously “Continuous”. In this option, the color selection will be made by the tool continuously while you hold down the mouse button and move the cursor over the image. This option can be used when you need numerous and complex color changes in an object.
With the “Once” test, Photoshop respects the color you clicked on, no matter how long you hover over the image. This option is best for replacing large areas of uniform color.
Sample background “Background Swatch”. You probably won't use this option very often. Here the background color replaces the original color. Only those pixels in the image that match the background color will be replaced. To do this, you need to select a shade from the color palette that best matches the color of the image. This can be done by clicking on the bottom square of the color icon. Adjust the tolerance value if the shade does not suit you.
“Restrictions”/ “Limits”
The next option for the Color Replacement tool controls the location of the pixels to be replaced and is called “Limits”. There are three color detection options: Contiguous, Discontinuous, and Find Edges.
Most often you will use the first two.
The default constraint type is “Contiguous”/ “Contiguous”. In this version, the “Color Replacement Tool” recolors the pixels that are under the cross within the cursor. The tool will have no effect on pixels that match the selected color but are separated from the cursor by an area of a different color. At least until the cursor is in these zones.
The “Discontinuous” constraint type replaces all pixels within the cursor.
The final type of edge highlighting, “Find Edges,” replaces color in areas that have a tint of the selected color, preserving the outline of the object's edges.
Let's consider last option in the top menu of the “Smoothing”/”Anti-aliasing” tool settings. Use this option if you need to smooth the edges of an object's precise outline. If you don't need anti-aliasing, uncheck the box.
Good luck with your processing ;-))
There are dozens of ways to change color in the program Adobe Photoshop. The easiest and fastest way is to use a special command Replace color or “Replace color”. This function is convenient to use when working with any object in a photograph. This command is also useful when replacing the color of several small details scattered chaotically throughout the image. This article describes in detail step by step instructions to complete this simple task.
Open the image in Photoshop. Create a duplicate of the main layer. To do this, go to the “Layer” tab in the top menu and select “Duplicate Layer” or press Ctrl+J. Go to the “Image” tab. Select “Adjustments” – “Replace Color”. A dialog box will appear. At the top of it, check the box next to Localized Color Clusters . Below there are 3 pipettes. With the first one selected, click on the area of the object where you want to change the color. It will appear in the top square of the dialog box.


Hello, dear readers. Replacing colors in a picture is quite an interesting and addictive activity. Personally, I can spend quite a lot of time doing this entertainment. There are several tools that will help with this work and each of them is suitable for its own case.
Today I will tell you how to change the color of a picture in Photoshop and which method to use in each certain case. You will like it, I assure you.

It should be noted that I use Photoshop CC, but we won’t do anything specific, so feel free to start reading even if you have more simple version this program. Not online service, of course, it is weak and non-functional, but in cases with CS3, 5 or 6 you will not notice the discrepancies.
Shall we get started?
Simple color correction
Equipment for high-quality photography is quite expensive, and it doesn’t matter if you don’t have it. Receive nice pictures This can be done using editing programs such as Photoshop. To be honest, I use this opportunity for almost every photo I post on my blog. I like the colors brighter than what is usually posted on the Internet.
By the way, if you are interested, read the article already published in Start-Luck. I’ll take a pre-prepared picture to start talking about simple color correction and get to work.

I open the “Image” tab in the top menu, and then the “Correction” category. Take the time to have your own experience understand what “Brightness/Contrast”, “Richness”, “Hue/Saturation” and other options that you will find in this tab are.
You won’t spoil or break anything, and you can always return to the original version by simply refusing to save changes when closing the picture. Just look at how certain tools behave. As they say, what you come to on your own is always remembered better than when everything is explained to you on your own.

For example, open “Color Tone” and pull the various sliders, you will immediately see how the picture changes colors and will be able to build a logical chain between your actions and the result. Don't forget to check the "View" box.

Color balance changes colors more strongly, the settings are more subtle and interesting.

If you want to work with certain element, enough , I have more than once simple and in clear language talked about how to do this with more than 8 tools and methods. I won’t repeat myself, it’s not difficult to find the publication, just follow the link just above.
Now I will use the most in a simple way- “With a magic wand.” I just click on the object and the desired fragment is highlighted. Using the tolerance setting, I set the variation in color.
As you know, there are many shades of white, blue and any other color. The higher the tolerance number, the more shades from the spectrum the program will determine and highlight using a wand.


Change the direction of the curve and the color becomes different.

By the way, if you want to work with the background in this way, that is, the area that is outside the selection, then you need to first select it, and then in the “Selection” tab top menu select the “Inversion” position.

You can remove running ants using the keyboard shortcut Ctrl+D.
Replacement by contrast
I talked about this method in great detail in the article. « » . Now we will quickly run through the main functions. I'll give you a little instructions, which will be enough.
This tool is ideal for replacing a bright, stand-out color in a picture. For example, a yellow apple on a white background, a red car in a green forest, or, as now, a bright girl in a dark room.

I return to the “Adjustments” section and select the “Color Replacement” tool here. Using the Eyedropper tool, which appears automatically, I select the shade that will change. IN in this case I click on the curtain. Then I move the Scatter slider so that the girl becomes almost black, and all other objects have outlines ( I wrote a whole article about how to draw a black background).

Please note that the curtain and the wall still need to have outlines; simply setting the spread to 200 will not work. Otherwise, the program will not take into account shades and will paint everything unattractively with a single color. Now I click on the color plate at the very bottom of the window, under it it says “Result”.

I click through the spectrum and different shades until I achieve the perfect result.
Ready. Without repainting the photo, we got an excellent result. In just a few seconds. Now let's talk a little about the disadvantages. As I said above, it is convenient to use this method if the image has contrast. To repaint a particular girl's dress in a different shade, you will have to highlight it. I can offer another interesting one, in which much attention is paid complex objects, for example, hair.
I’ll use the Magnetic Lasso tool myself.

Now I'm transferring the dress to new layer by pressing Ctrl+J at the same time. ? Read the post that I recently prepared for beginners about them in detail.
We return to “Color Replacement” in the “Correction” section. In this case, you will have to change the hue using the “Hue”, “Saturation”, “Brightness” sliders. If I click on the “Result” box, it turns out extremely disgusting and implausible.

In my opinion, the shade of the young lady’s dress is still far from ideal, and therefore I want to blur it a little. I open the “Filter” tab and select everyone’s favorite “Gaussian Blur”.

The robe became less clear, but the shade evened out somewhat.

As I already said, this method works best if there are contrasts, so I’ll be satisfied with this, and I’ll tell you about the last tool for today.
A quick tool for complex cases and dramatic changes
I like the Color Replacement brush better than other tools for a similar task. You can find out about it in the article « » , in which I turn the most ordinary girl into a red-haired Smurf woman with blue skin.
Finding a brush is not difficult; to do this, you need to right-click on a regular brush. Will open additional menu, in which you can select the desired tool.

I choose a color. Everything is as usual. Window on the right. In this case, black, and then I paint over part of the girl’s hair. Please note that all shades are preserved.

You can put green.

To change the brush size, use the keys.

I can also offer a training video on this topic.
Well, if you want to understand the program more professionally and understand exactly how this or that function works in the Photoshop program, then I offer a very useful course “ Photoshop for beginners in video format ».

Maximum useful information about tools. That's basically all. Don't forget to subscribe to the newsletter to stay up to date with the latest, useful and simple information.
See you again and good luck.
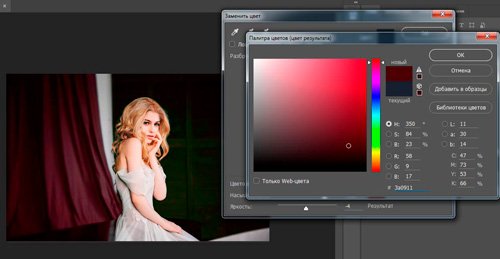
Today we will talk about another way to replace color on an object, namely the command “ Replace color"((Replace color), Image - Correction - Replace color).
Let's look at the dialog box.
At the top " Selection" there is a tab from the "Color range".

Using an eyedropper, a sample of the color that needs to be changed is marked on the picture sample. The plus pipette adds an area, the minus pipette subtracts.
Setting the parameter " Scatter"(Fuzziness).
Using the slider, you determine the boundaries within which the color shades will change. With maximum variation, the replacement will include almost all shades of the selected color present in the image. With minimal scatter, only those pixels that exactly match the sample will be replaced.
Appeared on PS4 additional option LocalizedColorClusters, designed to define areas of the same color. Its use allows you to more accurately highlight the color in the image.
At the bottom " Replacement" of the "Replace Color" dialog box, there is a tab from " Hue/Saturation", with the help of which, based on the name, the color and shade for replacement are selected.

Let's look at color replacement using a specific example.
Step 1. Open the image in Photoshop. We immediately create a duplicate of the main layer.

Step 2. Let's go to Image - Correction - Replace Color. I want to change the color of my T-shirt.
Step 3. If you have CS4, then immediately check the box next to LocalizedColorClusters. I increase Scatter to maximum value. Using an eyedropper, mark an area on the image. Next, I choose the color I want to change to. I click on the colored square labeled “Result” and select the shade I need.

It can be seen that in the shadow area the color is not highlighted enough. I choose Pipette "+" and click on the image in the fold area of the T-shirt.

The T-shirt was completely dyed, but at the same time, unnecessary areas, for example, the face, were dyed. I choose Pipette "-" and click on her face.

As you can see in the image itself, the lips and ears are still painted; this defect can be corrected with the help of an eraser.

Most successful this method Color changes work on contrasting images. Also in images where there are few related shades to the color being changed.

And finally, one more piece of advice. If the image still contains several areas of the same color, and only one of them needs to be changed, for example, then before using the command Replace color, you should highlight the area that requires color replacement. Any selection tool can help you with this.
,When editing images in Photoshop, there is often a need to change the color of an object or part of it, and to do this in such a way that it exactly retains its texture, shadow, transition effects and other attributes. For obvious reasons, simple repainting with a brush is not applicable here; this method is only permissible when working with monochromatic objects.
When replacing the color of textured or non-uniform objects, you cannot do without using additional tools. So, how to replace the color of an object in Photoshop.
Replacing colors with changing layer blending modes
The easiest way to replace a color in Photoshop is to use a blend mode. We will not now analyze how exactly the interaction of colors works when used. different modes, better let's get down to business right away. In our example, we will change the color of the inner circle of the drawn gear. Now it has a blue color, but we want it to become red and at the same time retain all its gradients and effects.
Open the images in Photoshop, create a new layer and change its Blend Mode to .

Select the desired color from the palette and start painting with a regular brush directly on top of the object. Isn't it too simple?

Yes, if the areas adjacent to the edited object are black, white or gray (of any gradation) color. In all other cases, the area to be repainted will need to be selected first with a lasso, with a magic wand or using a mask.
Changing colors using color correction
This method is more suitable for replacing the color of objects that have a more or less uniform tone, for example, clothing, a flower, a car body, etc. Open the image in Photoshop and select from the menu Image -> Correction -> .

In the window that opens, take the eyedropper and click on the color that is supposed to be replaced, after which it will immediately appear at the top of the window.

Then click on the color square (Result) at the bottom of the dialog box and select the desired color in the palette that opens.

Changes can be viewed in real time. For more precise definition object to be repainted, you can use the scatter and eyedropper options «+» And «-» , allowing you to add and remove adjacent areas.
Changing colors using a special brush
In recent versions of Photoshop There is a special brush that allows you to replace the selected color, including neutral, with any other. It is located in the same group of tools as a regular brush. The essence of its work is to replace the color of adjacent pixels, the error of which is determined by the user himself. Yes, upon admission 1 percent only one will be replaced specific color, which will be the focus of the brush.

Upon admission 30 percent the brush will replace the color of not only those pixels that are in its focus, but also adjacent ones that have a similar color shade. At 100 percent All colors will be replaced if permitted. The main difficulty when working with a brush "Color Replacement" The point is that the user has to select the tolerance empirically. In our opinion, 14-17 percent for a start it will be enough; if necessary, this threshold can always be raised.
Also, when working with this tool, you should make sure that the drawing mode is set to "Chroma", not "Color Tone", otherwise the color application will be uneven. When repainting, you should be careful not to accidentally climb onto the adjacent area; you should move the brush gently without stopping.

If possible, it is better to select the area to be repainted with a lasso or other tool.