How to change the network from public to home. What is the difference between public and private networks
In version 10 Windows home the network began to be called private, and the public network became public. At the same time, they differ in the same way as before, i.e. access parameters shared files and folders, the ability to use a shared printer.
Sometimes it becomes necessary to change one type of network to another in order to perform some actions. We will tell you how to do this in this article. To find out what type of connection is currently being used, go to network control center and shared access and find out the parameters of the required connection.
Changing your network connection
In some OS versions, the available version is quite simple and quick way change connection type. All you have to do to do this is go to " Options", then go to the section " Network and Internet", and here you can change the properties of the active connection. 
After selection, the required property will be installed and nothing else needs to be done. If the OS version does not support this method, then you will have to use one of the other recommendations.
Changing network settings
There is another option available for those whose device is connected using twisted pair cable. To use this method, you should right-click on the current connection, and then go to network parameters.
In the next menu you need to go to tabEthernet, then click on the name active connection. A window will then open with the option to make the device discoverable. To do this, you need to enable this option by moving the corresponding slider. 
Change when connected wirelessly
The algorithm of actions in this case does not differ much from the previous paragraph. First of all, you need to get into connection parameters. This can be done by right-clicking on the Wi-Fi icon and selecting the desired item.
In the menu that opens, you should also select Wi-Fi, and then click on the active connection. 
In the window that appears, you can make the connection private, or, conversely, make it available to all users. 
Using Home Groups
This method will only help those users who need to change the type of their network from public to private; the reverse conversion will be impossible in this way.
To configure, you need to open the item Home group, which can be found in the Control Panel. This will open the HomeGroups panel, which will tell you that it can only include computers with a private connection. To convert, click "". 
After which, the system will ask for confirmation of this action, and then carry out the conversion process itself.
Resetting network settings
As a rule, the connection type is selected the first time the computer connects to the local network, after which it can only be changed using the above methods. But you can also pretend that the computer is connecting for the first time. For this you will have to reset settings.
To do this, you will need to go back to Settings - Network and Internet. Then you need to go to the status tab, which is located on the left. Will be available here reset parameters.
After selecting the appropriate item, the operating system will request confirmation of the action. Usually, immediately after the process is completed, a reboot occurs, but if it did not happen, then you should do it yourself.
After restarting, the device will make a new connection and you can select the desired settings.
It is worth saying that using a private network makes sense only if you have a router through which the main data exchange with the Internet occurs. In this case, all computers in the room can be combined. If the PC is connected directly, via the provider’s cable, then you need to choose a publicly accessible one, since it uses more secure protocols exchange.
Sometimes a user, even a completely inexperienced one, needs to change the type Windows network.
Why and how to do this correctly so that everything works correctly?
What is network type
Read also: How to set up a local network on Windows? The simplest ways
The network can be home (private) or public.
TO public network other users can connect, but the home one is limited to you personally, your environment and is a reliable means of protecting your computer or laptop from intrusion.
Each of them has its own advantages and disadvantages.
For the first time when connecting new network Windows will ask the user for permission to automatic connection public network.
That is, a network that will not allow other users to find your PC or laptop when you are in a public place.
This is especially useful for a laptop. Essentially, no one will be able to connect to you, view your data, organize a group without your permission, and in general, this is a very reliable means of protecting your hardware.
But if you are a user personal computer, system unit from which, unlike the same laptop, you don’t want to drag it anywhere, then a home network will be more useful.
It gives access to all devices in your home and those to whom you allow it, but at the same time hides the computer itself from other users and allows you to easily share files and data within your home network.
Essentially, both are beneficial in their own way, each having benefits that are needed at one time or another. But at the same time, you can choose only one of them as “working”.
How to do this if at the moment Is the one installed by default not the one you need?
How to change network type in Windows 7
Read also: Unidentified network without Internet access: How to fix?

The permission to automatically select a network has already been mentioned above. Windows literally forces the user to choose whether he wants the computer to be visible on the network or not.
If the user answers “Yes,” then the network becomes private, connecting devices. If “No”, then it is closed from other public devices.
Moreover, it happens that when you first connect, the system itself selects the type of network, and this is fraught.
The user will most often end up having to change it. And this is where the question arises of how to do this.
On Windows 7, changing the network is much easier than on others, since, for example, even on the G8, these functions are hidden much deeper, and the ability to switch the network is almost tightly hidden.
And if you have Windows 7, no matter whether it’s home, professional or any other, you can change the network type to home and vice versa in a few clicks:
- At the bottom we find the network connection icon. It's located on the taskbar, on the right, and looks either like steps in profile or like a computer monitor with a cord.
- Click on it, opening the menu.
- And in this very menu, select the item: “Network and Sharing Center”. After this, a window with connection settings should appear.
- To avoid problems, it is better not to touch anything unnecessary, but very carefully click on the inscription “ Home network" or " Public network" One wrong click in this menu can completely disrupt your network connection.
- And finally, in the window that appears, change the network to the one that is needed at the moment.
As you can see, in Windows 7, working with the network is quite simple, but the eighth version becomes a little more complicated in this regard.
Read also: 5 Tips for Configuring the Windows Page File (7/8/10)

The difficulties begin with the fact that the “Home Network” is now not “Home” at all, but “Private”, and along with the changed name came some changes in the operation of these same networks.
For example, “Public Network” now not only restricts the computer from illegal intrusion or legal but unwanted connection, but also restricts the user from working with the network - transferring data becomes much more difficult.
Well, in " Private network»Advanced functions for connecting to printers and other devices have appeared.
Windows 8 also has a network setup prompt, asking the user if they want to automatically connect to devices.
This determines the type of network and its functions. For example, to connect a TV, tablet or any other device that needs the Internet, the type of network does not play a special role, but when exchanging files, data, or creating home group, “Private” must be selected.
Yes, in Windows 7 you could change the network in a few clicks, but here you will have to suffer longer:
- The first thing you need to do is open sidebar. No, not even that. The first thing you need to do is find it. If you succeeded, great, if not, then the Win + I key combination will help.
- Just below the icons and icons there is a menu with the name "Change computer settings", which is what you need to click on.
- Then you need to select “Network”, and then “Connections”.
All that remains is to select the icon with the name of the desired network and click on it. It would seem that the hardest part is already behind us, but no.
Consider that you are a knight who has reached the castle, but still must find the princess. And this very princess is located under the inscription “Search for devices and content”, in the form of a small switch.
If you select “On”, then the network will be private, and if “Off”, then it will be public. Difficult? Yes. But there is another way.
Changing the network through local policies
Read also: TOP 15 Best free antiviruses for Windows | Rating 2019

This is not to say that this method is much simpler, but to some it may seem like an easier option for changing the network.
And in the end it's a little faster:
- First of all, you need to open local security policies. You can do this by going to Start, and then "Administration", where you will need to select the appropriate item.
This can be done much faster if you hold down the Win+R keys, then enter secpol.msc in the line that opens and press Enter. Then the desired window will open instantly
.- In the window that opens, in the list of folders on the left, we find.
- And then on the right we look for the name of the network that you want to make working - private or public.
- Right mouse button on the desired name, select “Properties”.
- Need to open a tab "Network Location".

And finally, Windows 8 and Windows 8.1 have a third, albeit very unusual for the average user, method.
In addition, it is not very secure, but it is a little easier than the previous two methods for changing the network.

You need to find the key in the registry HKLM\SOFTWARE\Microsoft\WindowsNT\CurrentVersion\NetworkList\Profiles.
Each such key corresponds to one network, which is displayed in "Network Control Center".
Find out which key is associated with the right network, you can use the “ProfileName” parameter.
If in "Network Control Center" your network is called “Network 1” then you need to look for a key that contains the “ProfileName” parameter equal to the value “Network 1”.
In the required key, you need to change the value of the “Category” parameter. This parameter defines the profile network settings, which will be used for the network.
The values of the “Category” parameter can be the following:
- 0 - “Public network”.
- 1 - “Private network”.
Change the “Category” parameter to one of these values and close the editor. If immediately after this the network type does not change in "Network Control Center" then restart Windows.
If everything was done correctly, the network you need will immediately appear in the menu.
It seems very difficult, right? But it's not that hard if you try, although of course compared to Windows 7 it looks like a real puzzle.
And if everything is so complicated with the “eight”, then what can we expect from the “ten”?
This article will describe three ways to change the network type (network location) on Windows 8.
In operating rooms Windows systems, starting from Vista versions, different network profiles are used to provide greater network security. Windows 7 had Public Network and Home Network profiles. In Windows 8, the Home Network profile was renamed to Private Network.
The Public Network profile imposes more restrictions on data transmission over the network. For example, you cannot create a homegroup on a public network. The Home Network (Private Network) profile has fewer of these restrictions.
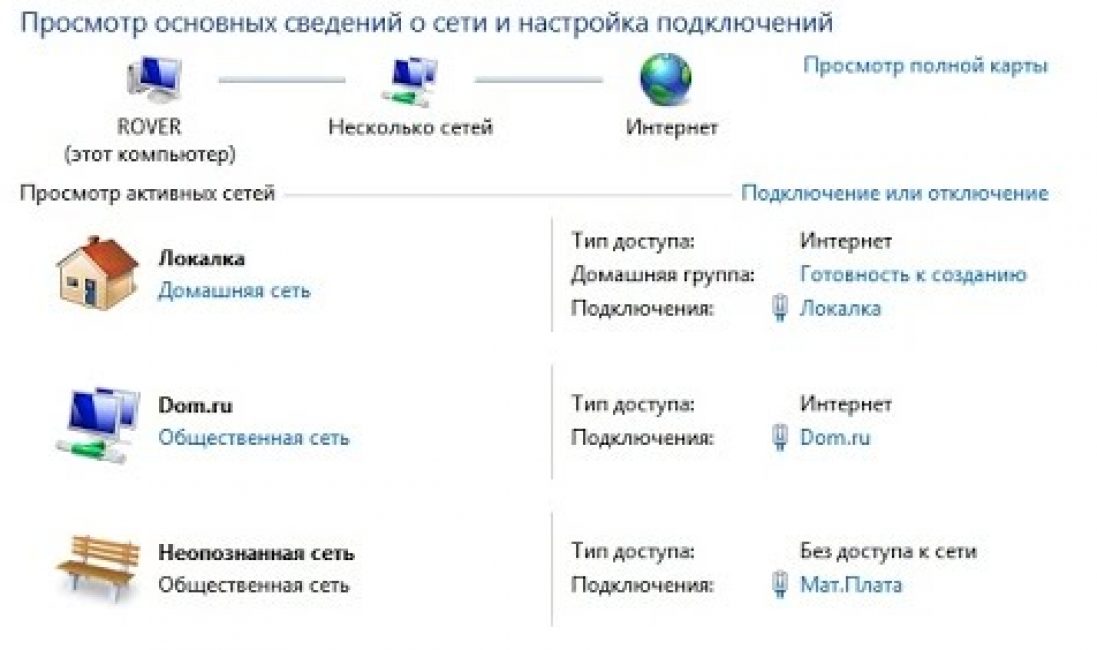
Open "Network Center" (right button on the network tray icon) and you will see there:

In these illustrations, the network name is highlighted ( Net) and its type - public and private. In Microsoft terminology, the network type is called "network location". That is, everywhere in Windows interface signatures such as "network location Public" or "network location Private".
By default, when you create a new network, Windows assigns it the "Public Network" profile.
When you connect to any network, Windows 8 issues this request:

If you click the "Yes" button, the network will be assigned the "Private" type. But if you click "No" or ignore this request, then Windows 8 will assign this network type to "Public".
If only the Internet passes through the network, then it makes no difference what type of network.
However, when connecting computers in local network the type already matters. It may be necessary to change the network type (profile) from “Public” to “Private” (Home) to reduce data transfer restrictions on this network. Data transfer means transferring files between computers, sharing shared resources, such as a printer.
In Windows 7, you could change the network type directly in the Network Center, but in Windows 8 this option is not available. If you need to change the network type under Windows 8, this must be done in other places.
There are several options.
Change network to private through Windows 8 settings
A rather cumbersome, but "official" way, it is to use standard capabilities in Windows settings 8. Now, unlike Windows 7, the network type setting is hidden deeply. To get there, you need to open the sidebar (for example, using the Win + I keys) and there click on “Change computer settings”:

Then click on "Network":

Then click on “Connections” and in the right panel click on the icon with the name of the desired network:

After this, a screen will open in which you need to enable the network type switch:


Position " On"changes the network type to " Private". Position " Off"changes the network type to " Public".
Change the network to private through local policies
Another way. Open local security policies:
- Or through the Control Panel - Administration.
- Or Windows + R on your keyboard, then secpol.msc and Enter.
There you need to open a policy that has the same name as the network you need (the very first screenshot of this article):

Then, in the properties of this policy, open the “Network Location” tab and specify the location type and user permission there:

Important! The user permission must be set exactly as indicated in the screenshot - “The user cannot change.” With other options, the setting will not work.
Change network type in Windows 8 through the registry
The easiest and fastest way is to edit Windows registry. But at the same time this is the most unsafe way. If you do not know how to handle the registry, then read the article to the end and use safer methods.
You need to find the key in the registry HKLM\SOFTWARE\Microsoft\Windows NT\CurrentVersion\NetworkList\Profiles.

This key must contain at least one key with a type name (84464.....E00). Each such key corresponds to one network, which is displayed in the Network Control Center. You can match the key with the desired network using the parameter " ProfileName". This setting contains the name of the network that appears in the Network and Sharing Center.
If you have several profiles in the Network and Control Center, then according to the parameter ProfileName"find the right key and, in this key, change the value of the parameter " Category".
Parameter values " Category" may be the following:
- 0 - "Public network".
- 1 - "Private network".
- 2 - Domain network.
Change the "Category" parameter to one of these values and close the editor. If immediately after this the network type does not change in the Network and Sharing Center, then restart Windows.
Ivan Sukhov, 2014, 2016
If you found this article useful or simply liked it, then do not hesitate to financially support the author. This is easy to do by throwing money at Yandex Wallet No. 410011416229354. Or on the phone +7 918-16-26-331 .
Even a small amount can help write new articles :)
When you first set up and connect to a network, Windows stores this information as a network profile and gives it a generic name, such as Network, Network 1. You may see this name when you click the network icon on the taskbar or when you open Network and Sharing Center in Control Panel. Although the default network name is not big problem and it doesn’t affect anything, but if you have several network profiles, this can be useful so as not to get confused, and it looks decent. If you are Windows user Home, then you won't have local politics security, see how to change the network name below using the registry.
Changing the Network Profile Name Local Security Policy Method
The easiest way to change the network profile name in Windows is to change the local security policy settings. Local Security Policy is included in the editor group policy. Unlike Group Policy Editor, where you can configure settings for all computers and users in your domain, Local Security Policy is used to set and change settings for your specific local computer.
- Click Win+R and enter secpol.msc.
- 1. Go to " Security Settings" > "Network List Manager Policy".
- 2. Click on the right twice on " Net".
- 3. Set any name for your network.
Note: Do not use special characters in the name.

That's it. This is an instant change and you will see the new name when you click the network icon on the taskbar.

The new network profile name is also reflected in Network Center and public access. If you don't see any changes, reboot your system.

Changing the network profile name using the registry method
As a subgroup of the Group Policy Editor, you will not have access to local security policy if you use Windows version Home. Therefore, we will use the Registry Editor to change the network name in Windows.
- Click the buttons Win+R and enter regedit.

- In Registry Editor, navigate to the following location:
HKEY_LOCAL_MACHINE\SOFTWARE\Microsoft\Windows NT\CurrentVersion\NetworkList\Profiles
- Expand the section Profiles and you will see a key of the form (38034ABF.... If you have several such keys there, then look for which DWORD parameter with the name is located ProfileName. Double-click this option and change the "Value" field to the network profile name that best suits your needs.
Restart your computer and enjoy your changed network name.

Data security is a priority for any computer network. Windows developers understand this very well, so they have created special profiles for network connections. The profile selection appears the first time you connect to the network. But what to do if you accidentally selected the wrong item or did not know what needed to be indicated. The solution is quite simple - you need to manually change the network profile. This and other useful things will be discussed further.
The importance and necessity of changing privacy settings
In Windows, you can distinguish between private and public networks. Fundamental differences lies in the restrictions imposed. In private networks they are minimal, because it is assumed that access from the outside is limited, and accordingly, the security of your data is not threatened. Public networks have more restrictions to improve security.
A private network should be installed if you have complete control over it. This will allow you to take full advantage of all the advantages of the network:
- sharing files between nodes;
- using a shared printer;
- creation of a multimedia DNLA server.
If data security is a priority, or you, for example, connect to Wi-Fi in an office, institute or any other public place, then use only a public network profile. This will allow the built-in firewall to protect your personal data from possible attacks by other users on the network.
Please note that when connecting to an Internet provider directly without using a router, it is recommended to set the “Public Network” profile. Other network participants could theoretically gain access to your computer, although your ISP must provide high level security. This profile makes the computer "invisible", making it more difficult for malicious software to penetrate the system.
For these reasons, it is extremely important to set the correct network profile. Incorrect settings can either limit functionality or expose your computer to the risk of hacking and loss of personal data.
How can you change the network profile in Windows 10
"Ten" boasts sufficient flexibility in settings, so it allows you to change the network connection profile in several ways. For ordinary users, we recommend using standard settings Windows using the OS interface. In rare cases, problems arise, so there are a number of alternative techniques, for example, some use the registry or Windows Shell. We will talk about these and other methods further.
Using standard settings
The network connections interface allows you to change the network profile in virtually one minute. We will look at modification options for local Ethernet and Wi-Fi connections. The procedure is general. Here the differences are only in the windows that open.
When connecting to Ethernet
If your PC or laptop is connected via a wired (Ethernet) connection, then to change the network profile you need to do the following:
As you can see, the process is simplified as much as possible, but does not present any difficulties. Changing the profile occurs instantly, so there is no need to restart the computer.
For Wi-Fi connection
The user needs to perform the following instructions when connected to the Internet via wireless point Wi-Fi access:

When using Wi-Fi at train stations, cafes or offices, be sure to set your profile to public. This action will not take more than a minute, and you will ensure increased security your system.
Through setting up home groups
If the above methods for some reason do not produce results, we recommend that you try changing your profile through the homegroup settings. This section allows you to significantly simplify the process of providing users with shared access to resources. The function can configure network connection, open folders for public viewing and much more. This section in the OS can also be used to change the network type from “private” to “public”, and, if necessary, back again.
To do this, users need to follow the following instructions:

Be sure to apply the settings for the changes to take effect. This alternative method, how to change profile.
Resetting network settings
As many have already understood, the request to select a profile type appears only once, i.e. when you first connect. Afterwards the profile is set according to the selected answer. It can only be changed through the settings, as described earlier. However, you can call the pop-up menu with profile selection again. To do this, you need to reset the settings. This procedure is completely safe and will not affect any user data. To do this, follow these steps:

For the procedure to succeed, you need to restart your computer. Afterwards, the system will detect a new connection and prompt you to select a profile again.
Through local security policy
Another alternative way, which involves using the local security policy section. To configure, you should:

Setting user permission is necessary to ensure that the settings are active and not reset.
Via Windows PowerShell
Windows has special remedy for process automation, which is command line with an interface. The tool will help you change your privacy settings, but this method Suitable only for advanced users, as it assumes working with PowerShell. In the console you just need to enter the command
to install "Private Network". To change your profile to public, replace the word "Private" with "Public".