How to split an image into parts. How to make an Instagram banner. Place a large picture on your profile
This lesson is devoted to the question of a visitor to our site: how to split an image into several parts using the help of placing it in a menu on the site?
In principle, there are several options for solving this problem; we present, in our opinion, the simplest and most obvious way. As an example, we used the photo shown in the figure on the left. This photo has dimensions of 400 by 400 pixels. We will try to divide it into 4 squares, respectively measuring 20 by 200 pixels. As you will see later in the lesson, you can divide the drawing not necessarily into four parts and not necessarily into a square shape.
So, first, let's open the photo in the Paint.NET graphic editor and create a new transparent layer over the photo. On this layer we need to draw a grid that will divide the photo into the number of parts we need. We will draw the grid on a separate layer so as not to spoil the photo itself. Basically, to draw a mesh, you can use Paint.NET's "line or curve" tool and draw that mesh with it. However, there is an easier way. To draw the grid, we use an additional external one, a description of which can be found on our website.

In the figure on the right we have provided a screenshot of the settings we used. We set the width and height of the grid cells to 200 pixels. If you need to make a different grid size, or make a rectangular grid rather than a square one, doing so is a simple matter of simply changing these parameters. For the color of the grid lines, we used the main color white for greater clarity. However, the choice of color is not of fundamental importance. As a result, we got the mesh shown in the figure below.

Now to create frames, we use the Paint.NET “magic wand” tool to select the desired area on the mesh layer. To do this, just click the tool " wand" to any place in the desired cell on the layer with the grid. Then make the layer with the photo active and copy the selected area. The copied fragment can now be saved as a separate image, for example, for posting on a website, or do as we did in the figure below.

Of course, Photoshop successfully copes with the function of cutting photos, but it is much easier to do this in online editors. Especially if you need to split the image into some amount equal parts. Today I will tell you about some services where you can easily do this.
ImageSplitter - upload a photo to the mini-editor, go to the Split Image tab. Here, indicate the number of parts into which you want to divide the photo, namely (the number of rows - vertical parts and columns - horizontal parts). Now select the output file format and click “split image”. Download a zip archive with photo pieces.

Online Image Splitter. Here it is good to take a photo into parts if this photo will be used in the future in website design (see also), since the service, in addition to the cropping function, generates html code. Upload the photo to the online “cropper”, choose how many parts will be cut into photo horizontally and vertically. Some additional features: Enable links - include links to parts of the photo in the html code, Mouse-over effect - hover effect, Preview borders - display the division border on the preview, Convert to - convert to ... (select the format of the photo pieces), Number of colors - number of colors on photo.

Picslice. Here you can not only cut the image, but also crop the photo and resize it. Upload a photo, select the “Slice picture” function, select the number of vertical and horizontal parts. Next is the “Generate” button. Now you can save each piece individually by hovering over it, right-clicking and selecting “Save Image”. You can save parts by downloading the archive from
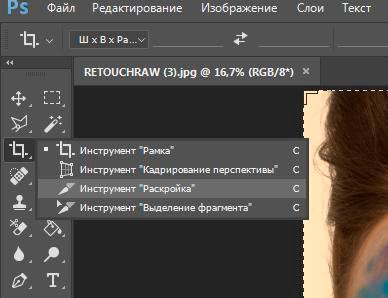
Today I will tell you how to cut a photo into equal parts using Photoshop. First, open the photo and select the “Cutting” tool, which is located in the same group as the “Frame” tool.
The next step is to right-click on our photo and select “Split fragment” from the drop-down menu.

A new window with settings opens. There are 2 settings: Split Horizontal and Split Vertical.

Let's go in order. Check the "Split horizontally by" option. It, in turn, has two more settings: division into equal fragments, as well as division indicating a specific fragment size. By setting the number in the first setting, we tell Photoshop how many equal pieces to divide the photo horizontally into.

If we use the second setting, then we will tell how many pixels the fragment should be, and the program itself will determine the number of fragments that should be obtained with this fragment size.

The "Split Vertical By" setting does the same thing, but in vertical orientation.
Let's, for example, check both boxes and select the first setting in both places, indicating the number of fragments into which the photo should be divided, in the amount of 7 pieces. On the photograph we now have markings according to which our image will be cut. At the end, just click “Ok”.

The second point that I would like to discuss is the name of the fragments. Very often problems arise with it, therefore, to set a name for fragments or remove it, right-click on one of the fragments and select “Edit fragment parameters”. A new window opens in which we either add or remove a name from the “Name” field.


A new window will open. Select the image format, for me it is *.jpg, and the quality is 100. Click the “Save” button.

Next, select the folder in which we will save the received fragments. At the next step, you just need to wait until the photo is cut into pieces and each piece is saved as separate file. After saving it will appear on your computer new folder images, which will contain your image, which is divided into equal parts. We can use each part of the image separately.

Video tutorial:
Hello, dear readers. In my trilogy of articles about, I have already described the technique that will be discussed today.
Just a few years ago, dividing pictures into parts was very popular, but this skill is still useful today. For example, if you want to create a modular painting yourself, consisting of several parts. They are very popular and look really impressive in the interior, which means they can make the interface of any website more attractive.
Today we will talk about how to cut a picture into pieces in Photoshop. The lesson is very simple. In addition to a description of how to use the program, you will receive video instructions and a good alternative if today’s task is of one-time use for you and will not be useful in the future.
Let's get started?
Photoshop
There's nothing easier than splitting an image into parts in Photoshop. Opens an illustration. To do this, drag it from the folder to the work field or use the “File” category in top panel controls, and then the “Open” button.

Then select the “Cutting” tool. He may be hiding under the Frame. To open it, you need to right-click on the icon with this tool or briefly hold down the left button of the same mouse.
Now go to the photo itself, and right-click to bring up additional menu, in which we select the “Split fragment” item.

Appears additional window, in which you can choose how many equal parts the photo will be divided into. You just need to check the boxes next to “vertically” or “horizontally” if you are going to divide.

This is the result I got.

Please note that you can determine the number of fragments not only based on their number, but also relative to pixels, by size. I should note that in this case you need to clearly calculate the size of the picture, otherwise some parts will be smaller and there will not be enough pixels.
All that remains is to click “Ok”. I'll go back to the original version.

If you are too lazy to search, then just use the keyboard shortcut Ctrl+Shift+Alt+C. I use it often, I’ll explain why a little later. Initially, the fingers did not obey, a slightly clumsy position had to be accepted, but over time everything became much easier. It's a matter of habit.

Look, in the upper right part, next to the picture, you can select the format (jpg, and so on) and level. I also often find it useful to be able to change the proportions of the picture right here in the “” section. An indispensable tool for editing images and publishing them on the site. Everything is much faster than fooling around with standard tools.

Select a folder and you're done.

Now, having opened the folder in which you saved your result, you will see several files that will contain several fragments of a single photo. Use it to your heart's content.

Video instructions
I understand the desire of many to learn from video, and therefore I am attaching a good lesson in which you can find a similar version of the work described in this publication.
If you like this format, then I can also recommend an excellent course that contains a lot of useful lessons By professional work with photoshop for beginners " Photoshop for beginners in video format " You can sometimes go into this program and wait until you have interesting idea, but it will be more interesting to study the tools and use them based on your needs.

You need something and you yourself have a rough idea of how to do it. Imagine that Photoshop is a car. It’s one thing to urgently call a friend shouting “How does this thing stop” or look for a suitable lesson on YouTube, and quite another if you already have all the necessary knowledge.
Another interesting thing that I would like to present to you " Photoshop. Mastery Lessons " Surely sooner or later an idea came to you either professionally. This is all great, but ideas are a sudden thing, but here they came up with everything for you and told you in detail about retouching, designing cards and calendars, creating interesting effects, collaging and much more.

Simple option for one-time use - online
I understand that not everyone is ready to work with Photoshop and become a design master.
So why even open this program for such a basic task as dividing a picture into parts? Moreover, I don’t see the point in this case to download heavy Photoshop if you don’t want to make money in the future from this program and the ability to work with it.
Unfortunately, online version This program will not cope with photo cutting. No suitable tool. But you can go to the site Imgonline.com.ua and cut the photo here.
Just select a file from your computer, set your parameters (how many parts we will divide into and in what format we will download the final version), and then click “OK”.

Done, all you have to do is download and all the fragments are at your fingertips.

The job didn't take even a minute.
That's basically all, don't forget to subscribe to the newsletter to receive the best useful tips, quick ways solutions to your problems, as well. See you again and good luck. For you it can start right here and now.
Most often used for cutting images graphic editors like , or . There are also special software solutions for these purposes. But what if the photo needs to be cut as quickly as possible, but the necessary tool is not at hand, and there is no time to download it. In this case, one of the web services available on the Internet will help you. This article will discuss how to cut a picture into pieces online.
Despite the fact that the process of dividing a picture into a number of fragments is not something very complicated, there are quite a few online services that allow you to do this. But the ones that are available now get the job done quickly and are easy to use. Next, we will look at the best of these solutions.
Method 1: IMGonline
A powerful Russian-language service for cutting photos that allows you to divide any image into parts. The number of fragments obtained as a result of the operation of the tool can be up to 900 units. Images with extensions such as JPEG, PNG, BMP, GIF and TIFF are supported.
In addition, IMGonline can cut images directly for publication in , linking the division to a specific area of the picture.

Thus, with using IMGonline In just a couple of clicks you can cut an image into parts. At the same time, the processing process itself takes very little time - from 0.5 to 30 seconds.
Method 2: ImageSplitter
This tool is in terms of functionality identical to the previous one, but the work in it seems more visual. For example, by specifying the necessary cutting parameters, you can immediately see how the image will be divided in the end. In addition, it makes sense to use ImageSpliter if you need to cut an ico file into fragments.

You don't need to do anything else. After a few seconds, your browser will automatically start downloading an archive with numbered fragments of the original image.
Method 3: Online Image Splitter
If you need to do quick slicing to create an HTML image map, this online service — ideal option. In Online Image Splitter you can not only cut a photo into a certain number of fragments, but also generate a code with written links, as well as a color changing effect when hovering the cursor.
The tool supports images in JPG formats, PNG and GIF.

As a result of the service, an archive will be downloaded to your computer with a list of images, numbered indicating the corresponding rows and columns in big picture. There you will also find a file that is an HTML interpretation of the image map.
Method 4: The Rasterbator
Well, to cut photos for later combining them into a poster, you can use the online service The Rasterbator. The tool works in a step-by-step format and allows you to cut an image, taking into account actual size final poster and sheet format used.

After completing these steps, a PDF file will be automatically downloaded to your computer, in which each fragment original photo takes up one page. This way, you can later print these pictures and combine them into one large poster.