How to remove “Red Eyes” from a photo. How to remove red eyes in Photoshop? Removing an unnecessary effect from a photo
Hello reader! Today we will look at how to remove red eye. Nowadays, most cameras are already equipped with appropriate filters, but not all. When shooting with flash, red spots appear on the photo, which spoil everything, especially if it is a portrait.
Portraits should be taken when good light and without a flash, but what to do if most cheap cameras do not yet know how to deal with the laws of refraction and reflection of light, and most people prefer to take a lot of photographs day and night? So, today we will have a couple of examples, along the way we will tell you how you can remove the effect by working with color channels.
Agree that in the portrait shown here, red eyes don’t look very good. There are several ways to remove this effect. We'll talk about them. Let's look at removing the effect using the example of a Photoshop program installed on a computer and online.
Removing red eyes in Photoshop 2015-2018
Let's start with the fact that in modern versions The program already has a special tool called “Red Eye”. Load the photo (don't forget to make a copy of the layer!) and open this tool.

The cursor changed to a cross with a pupil. Just click on the red spot on the eye and it will disappear.

If you don’t like easy ways, you can also use the “Hue – Saturation” command from top menu“Image” – “Correction”.

We start by using the lasso tool to select the pupils.

First we edit one eye, then the second. If, while holding down the Shift key, you circle first one eye and then the second, both will be selected. After selection, go to “Image” – “Correction” – “Hue/Saturation”.
In the window that appears, move the sliders in this way until we achieve the desired result. Essentially we just adjusted the color in the right place.

And another essentially similar option for professionals is to edit color using channels. In the program, this is the name of the mode with which you can adjust colors. To make a color photograph, three primary colors are “mixed” - red, blue, green. This has been the case since the development of color photography, when three layers were applied to paper, each of which was sensitive to one of the three primary colors.
What makes Photoshop unique is that you can adjust this color model in the desired combination using color channels. We start by selecting both eyes in the same way (while holding down the Shift key). Open the “Channels” tab, where we turn off everything except the blue color. After all, the eyes in the photo should be blue.

We leave this channel highlighted - active and copy it. Next, turn off the blue channel, go to the red channel, activate it and use the CTRL + V command to paste what you copied.

As a result, a highlight appeared on the red channel. We do the same on the green channel, after which we turn on the visibility of all channels. And we get the result:

It's very simple. Of course, you need to practice and then you will get the idea. We took blue and copied it to other channels and made a replacement. And we got the desired result.
Removing red eye effect in Photoshop online
The online version is designed for quick and easy image processing. The set of tools and functions in it is somewhat simplified. Here we will look at red eye removal for those who like to use an online editor. When you open the editor, you are prompted to upload a photo, which we do.

Next, on the side of the toolbar we find an icon with an eye, which is a tool for removing the red eye effect. Select this tool. IN top panel We find the “Tolerance” tool setting. Even here this word. The default value here is 50.

This setting is for selecting required parameters. After you have set the desired value (you can leave it as is), click on the red spot. It will disappear. If this did not happen or did not turn out as expected, then cancel the action and change the settings in the “tolerance” parameters. We get the result:

As you can see, there is nothing complicated. I hope this small instruction will help you in correcting your photos and gaining skills in working with the program. If I'm doing something wrong, write in the comments. I love studying. Good luck!
Today we will look at several ways to help you remove red eyes in Photoshop.
In some cases, the eyes appear red in the photo, and this is a small problem. To fix it you can use Photoshop. Photoshop quickly and easily copes with the task of how to remove red eyes.
For example, we will use the photo of the girl below:
1) Method - use the Red Eye Tool (Red Eyes)
This method very fast and easy. Tool Red Eye Tool in the Photoshop kit is standard. He does his job effectively.
First you need to select it in the toolbar:

This is how we managed to remove red eyes with the Red Eye Tool.

2) Method of working with Hue/Saturation (Hue/Saturation)
1. Using Lasso Tool (Lasso) Select the desired eye area in the photo.

2. Apply the function Image + Adjustments + Hue/Saturation (Image + Correction + Hue/Saturation)/

3. Color background - 0, Saturation - -66, Brightness - -32.

4. The result is a photo like this:

3) Method - using channels (Channels)
Also is in a good way to remove red eyes.
1. First select the eyes or pupils and then open Channels. Leave only the blue channel, disable all others. Copy the selected pupils CTRL+C.

2. Click on the red channel and paste what you copied - CTRL+V.

3. Click on the green channel and paste what you copied - CTRL+V.

4. Turn on all channels + RGB.

5. Finished result:

Try any method that you like best and is comfortable. Now you know how to quickly remove red eyes in Photoshop, good luck to you!
How to remove red eyes in Photoshop - video
Removing Red Eye in Adobe Photoshop
Sofia Skrylina, teacher information technology, St. Petersburg
When there is insufficient lighting at the time of shooting, you often have to use the flash. If the subjects of photography are people or animals, then in the dark their pupils dilate and reflect the camera flash. The resulting reflection is called the red-eye effect. Moreover, in addition to red, green, blue or white highlights may occur. When correcting this effect, you must remember the following: the glare that appears reflects the pupil of the eye, and the pupil should be black or dark in color. Therefore, during correction it is necessary to replace the light pixels of the highlight (red, green, blue or white) with dark or black pixels of the pupil. In this article we will look at various tools Photoshop programs to remove red eye depending on the color of the glare.
The first Photoshop tools that come to mind that you can use for correction are: Pencil(Pencil) and Brush(Brush). They can simply paint over the highlights. But they are not very suitable for eliminating the effect of red eyes, because they make a rather crude replacement - the pupil appears drawn and unnatural. It's better to use other tools.
Removing red highlights
To remove the red highlight, use the tool Red eyes(Red Eye), which is activated by the “J” key or by pressing the combination repeatedly Shift keys+J when selecting another instrument from the group.
The properties panel of this tool contains only two parameters:
- Pupil size(Pupil Size) - determines the size of the area that the tool will process;
- in the text field Shade amount(Darken Amount) adjusts the darkening level of the red spot.
To use the tool, you just need to click on the spot. If you cannot achieve the desired effect, you need to cancel the correction and click with other settings. In Fig. Figure 1 shows the result of using this tool with the following settings:
- Pupil size(Pupil Size) - 80%;
- Shade amount(Darken Amount) - 30%.
Removing blue or green highlights
If the color of the flash reflection is other than red, the tool Red eyes(Red Eye) won't work. Tools must be used instead Sponge(Sponge) and Dimmer(Burn), which are in the same group and are called by the “O” key. To switch between them, use the key combination Shift+O. The first tool decolorizes the highlight, and the second one darkens it.
These tools work on the same principle: the more the tool is used, that is, the more often you release and press the mouse button, the stronger its effect is expressed. If you do not achieve the desired result with one click of the mouse, go through this place again.
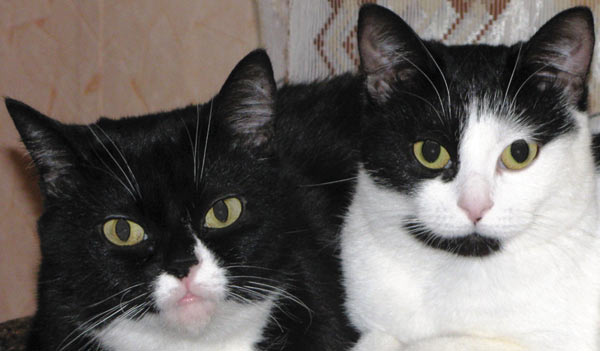
To desaturate a colored highlight in the tool settings Sponge(Sponge) mode must be set Reduce Saturation(Desaturate). The intensity of the tool action, specified by the parameter Pressure(Flow), you can leave it at the default 100%. It is better to process the pupil at an enlarged scale, having previously set the brush size. In Fig. 2 A This is the original image of a cat taken with flash. As you can see, the highlight turned out to be green.
 a
a  b
b  c
c
Rice. 2. Image of a cat: a - original, with green highlights in the eyes; b - after using the Sponge tool, c - after using the Darkening tool
In Fig. 2 b shows the result of processing the pupils with the tool Sponge(Sponge), double processing was performed.
Due to the fact that the pupils turned out gray, in the tool settings Dimmer(Burn) it is necessary to specify the scope of the tool Midtones(Midtones) by selecting this item from the list Range(Range) in the tool properties panel. The remaining parameters can be left as default. In Fig. 2 V The result of three-time processing of pupils with this tool is presented.
Removing white or very bright highlights
To remove white glare, you need to reduce its brightness. Tool Dimmer(Burn) in in this case will not help - the brightness value is very high for it. Use the dialog box Hue/Saturation(Hue/Saturation), which is called by the combination Ctrl keys+U (in Mac OS - Command+U).
Note. This window is a universal tool for removing red eye. It can be used to remove both red, green and white highlights.
In Fig. 3 A An example of an image of cats with very bright yellow pupils is given.
 a
a
 b
b
Before using the above window, you need to highlight the pupils. To do this, you can use, for example, a straight lasso. To soften the boundaries of the selection area, you should feather them in the feathering window by at least 1 pixel. This window is called by the key combination Shift+F6. But in this case, after darkening, a light border will appear along the contour of the pupil. Therefore, before using the color correction tool, the selection area must also be increased by 1 pixel by running the command Selection(Select) -> Modification(Modify) -> Expand(Extract). The result is shown in Fig. 3 b.
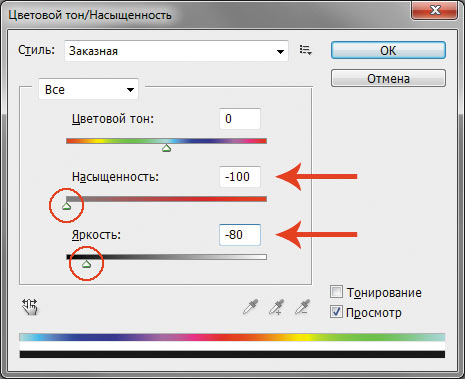
In the dialog box Hue/Saturation(Hue/Saturation) you need to move two sliders to the left - Saturation(Saturation) and Brightness(Lightness). For the first parameter, you should set the minimum value by moving the slider to the extreme left position, and the value of the second parameter is determined empirically (Fig. 4). For example, the pupils of the cat on the left were set to -80, and the cat on the right was set to -70 (Fig. 5 A).
In the case of the cat on the right, the glare was so bright that the reflection from the flash went beyond the pupil and onto top part iris. This defect can be easily removed with a stamp or repair brush. The final image is shown in Fig. 5 b.
 a
a
 b
b
Don't forget that in addition to Photoshop tools you can configure the camera to automatic removal red eye effect at the time of shooting. In this case, there will be much less colored reflections, which will save you from correcting a significant part of the images you create.
Good day to you. Have you ever encountered in your life a stupid photographer, a bad camera, or worse, red eyes not only in photographs, but also in life? You can, of course, buy lenses, turn away during the flash, or simply not take pictures. But, I dare to tell you that this is not a solution. As always, in such difficult situations someone will come to our aid... no, you guessed right, it’s not Superman. This is our beloved Photoshop. In Photoshop, a tool was specially created for this problem, under the name, which is far removed from the essence of our problem, “Red Eye”. It's strange, I don't understand why they called it that. But today we will look at not only this subject, but also how to deal with this problem without this tool. So, let's go.
The red eye tool is located in, you guessed it, our toolbar. We've already covered the topic of red eye in previous lessons, so you should already know that this tool is in the same slot as the Spot Healing Brush, Healing Brush, and Patch tools. They are discussed in this lesson.
This tool is very easy to use. You just need to point at the red pupil and click on it with the left mouse button. The Red Eye tool has only two settings. These are "Pupil Size" and "Shade Amount". These settings are not important since the tool is well automated, but still experiment with them.

Now let’s proceed to the first method of getting rid of red eyes, so to speak, using improvised methods, without using the “Red Eye” tool. Selecting the “Brush” tool, select its size to match the size of your pupil. Having previously created new layer in the Layers window. If you do not have this window, then you can open it in the “Window” item, which is located at the very top. There you should check the box next to the word “Window”. Creating a new layer is simple. In the “Layers” window, you need to click on the small square that is located below and to the right in this window and which is called “Create a new layer”. Let me remind you that you can learn a little more about the button if you hover the mouse cursor over it and hold it for a while without pressing anything.

So, on a new layer we draw two circles in place of the pupils in black.

After which we should change the style of this layer to “Saturation” in the “Layers” window; this window is located at the top left.

Then we will connect the layers for help useful combination keys "Ctrl + E". Hooray! We learned the first method.
The second method is simpler than the first. We should highlight the red pupils using any of the methods known to you. We went through many selection methods in previous lessons.

After successful selection, we must select the “Image” item in the top menu - it is third from the left. In the “Image” item, select the “Correction” item - it is second from the top. And in the “Correction” item we find and click “Desaturate” - this is the tenth action from the top.

Or, instead of going through all these steps after selecting, you can simply press the simple key combination “Shift + Ctrl + U”. After successfully changing the color of your lovely eyes, you should remove the selection using the “Ctrl + D” combination. All! The second method is over.
Well, the third method is simpler than all of the above. We will need the “Dimmer” tool; like all tools, it is located on the toolbar. But he does not live alone in his cell. The Burner tool shares its slot with its friends Dodge and Sponge.

This tool has only two settings: Range and Exposure. The “Range” setting indicates which areas the tool should work on: dark “Shadows”, all “Mid Tones”, or light “Highlights”. A The “Exposure” setting affects how hard the tool is pressed. That is: the higher the “Exposure”, the more our tool darkens. I'll say a little about the Dodge tool. The “Dodge” settings are not at all different from the “Dimmer” settings. Only for this tool reverse action, it does not darken, but brightens, this is clear from the name. And the stronger its Exposure setting, the more it brightens rather than darkens. That's all, we've sorted out the settings, let's get back, as they say, closer to the point. After we select the Burn tool, we simply move it over the pupils with the left mouse button held down, and our pupils gradually turn from red to black.

We are really great today, today we learned three ways to get rid of red eyes, and in addition to all this, we learned two tools. So we, with a sense of our own dignity, can go “goof around” today. Good luck and see you again!
Every photographer knows that photographing a person with a built-in flash and not getting red-eye is beyond fantasy. But why exhaust both yourself and the model with countless attempts to get rid of such a problem, if with the help software You can fix everything in literally 5 minutes. You will learn how to remove red eyes in Photoshop later in the article.
Overexposed photo
It often happens that the photographer paid attention only to red eyes when editing. But this is not the most important thing. In order for the final result to be excellent, you need to look to see if there are any other defects in the image. For example, a blurry frame or overexposed face is almost impossible to correct. It's best not to waste time correcting red eye in an image like this.
"Photoshop" copes well with shortcomings, and it can be done in different ways very quickly. Most often, along with red eyes, an unnatural and unsightly shine appears. It is these problems that are best dealt with first.
How to remove red eyes in Photoshop
Adobe developers have long figured out how to solve the problem with one tool. It's called Red Eye Tool or "Red Eyes". The brush is included in the standard package, so there is no need to search for it and download it. You can act in two ways:
- To begin, select the brush with the eye icon from the toolbar. After this, you need to click on the problem area - and ideally the problem will disappear. But, of course, this does not always happen. If the face has a pink tint or there are objects of a similar color nearby, this method will not work.
- To remove red eye as much as possible, you need to zoom in on the photo so that you can clearly see the border of the pupil. The next step is to use the same brush to highlight the problem area so that other objects of a similar shade do not enter it. This is how you can remove red eyes in Photoshop.
Of course, it is impossible to say that the image turned out completely natural. After all, you want your eyes to be not black, but a natural shade. Therefore, you can use other methods to remove red eyes in Photoshop as best as possible.
Color tone and saturation of the photo

This method is suitable for returning the eyes to their original color. But before you start changing, you need to define the area so as not to change other colors. Using the Lasso tool, you need to select the pupils in the photo. If the red eyes extend beyond this area, then it is necessary to outline along it. After this, you need to select the “Images” menu, find the “Correction” item and then click on “Hue” and “Saturation”.
It is worth noting that this is a creative work, so there is no need to repeat everything exactly. The parameters shown are just an example.
First you need to bleach your eyes. To do this, the color tone is reduced to 0 and the brightness is also reduced to zero. If you still need to add a color tint, then, for example, for blue, select the following parameters:
- Hue: -145;
- Saturation: -64;
- Brightness: -2.
These are the parameters that are relevant for the image posted in the article. Each photo should be approached individually. That's all, the second way to remove red eyes in Photoshop is as simple as the previous one.
Method using channels

This option is also perfect for those photographers who need to change their eye color to natural in a photo. The difference is in complexity, and this is the most detailed way to remove red eyes in Photoshop CS6.
First you need to create a duplicate layer and open Channels. With all layers turned off, you need to go to blue and copy it. This can be done using the hotkeys ctrl+c. Now, going to the Red channel, you need to insert the previous object. You can also use the hotkeys ctrl+v. Exactly the same operation must be performed instead of the Green Channel. Now that the previous step has been completed, you can include the entire chain of colors. This way you can remove red eyes from photos in Photoshop. But the whole frame will change along with it.
To return the original appearance, a “Layer Mask” is created. It is located on the bottom panel in the thumbnail library. Now the white layer is filled with black paint. Using a white soft brush, we draw only over the red pupil. Thus the photo is ready for further editing.
Adding richness to the eyes

Removing red eye in Photoshop is quite simple. But after any editing they become dull, but you want them to “catch” the viewer. To add expressiveness to the eyes, you need to duplicate the layer and use the Lighten brush.
First of all, set a small diameter and an opacity of about 20%. Using this brush, the iris is highlighted. And by reducing the opacity to 10%, you can also drag over the protein.
Now you need to take the “Darken” brush and set it to an even smaller diameter and opacity of about 25%. Carefully outline the iris and paint over the pupil.
Now, you need to reduce the photo to 100% and see if the created effect looks natural. If not, then the opacity of the entire layer is reduced to the desired parameters.
It is necessary to pay attention to the fact that specified settings suitable for a particular photograph. Each photo is unique and requires an individual approach.