How to remove a second Windows 10. How to remove, remove a second unnecessary Windows operating system from a computer, laptop: instructions
In this article we will look at how to install two operating systems, Windows Seven and Xp, on one computer with a single hard drive.
Installation three systems on one computer hard drive, or installing two systems, one of which is Linux, will not be considered here.
At the beginning I will say that in order to correctly install two operating systems on one computer, laptop with one hard drive, we need to create two logical partitions, which need to be thought about in advance. In order to avoid data loss (and subsequent recovery of information in Minsk), we will have to copy valuable files and folders to another drive: flash drive, external hard drive, DVD disc.
Why is this necessary to do? installing two operating systems on one hard drive? During the installation process, a failure may occur, or something may go wrong; perhaps you make a mistake - the information will be irretrievably lost.
Let's begin.
So, we have an empty hard drive, or the first partition on a partially filled hard drive with sufficient free disk space.
There are distribution kits of windows Xp and windows 7.
Install two operating systems on one computer can be done in two ways:
The beginning is standard: there is Windows 7. We are preparing a partition for Windows XP with a size of at least 15 Gb. This can be done either during the installation process, if the hard drive has no information, or if there is information, then special program to create and edit partitions - Acronis DiskDirector.
After that we install it on the created windows partition XP - everything is standard.
After we install Windows XP on our computer, Windows 7 will stop loading - this is normal. In order for the system to see the Windows 7 bootloader again, you need to install the MultiBoot program from under Windows XP.
MultiBoot - graphical (GUI) shell for working with system files BootSect, BcdEdit and BcdBoot, which allows you to restore the Windows 7 bootloader that was erased during the installation of Windows XP. And with this program we can restore the Windows 7 bootloader (it’s not difficult to understand the program), and at the very beginning of loading Windows we will have the choice to load Windows 7 or XP.
That's it!
But with this option (Se7en is the first, XP is the second system) certain problems may arise. The fact is that Windows 7 creates an additional boot partition System Reserved at the beginning of the disk space. This section is a feature of the operating system, but this feature can create additional difficulties when working under Windows XP when used together.
The problem may be that the System Reserved partition, the size of which does not exceed 150Mb, is not visible when working under Windows 7, and therefore is not used by us or the system (practically). But as soon as we install Windows XP as a second system on one hard drive, this partition at the beginning of the disk space becomes visible disk C:\, and this is already a problem. Why? Because many programs (drivers and others) will try to either install by default on the C:\ drive, or use it to store temporary files during the installation process, and since the size of our “lame” C drive is very small, we will constantly receive errors during the installation process. This can be avoided if you initially correctly prepared partitions on your hard drive for installing Windows 7 without hidden section System Reserved, or installed Windows XP and 7 according to the first option described above.
In this article I would like to consider installing two OS (operating systems) on one computer, that is, without removing the Windows system that is already installed on our computer. The article describes Windows installation 7 on a computer with already installed Windows 8.1
To begin with, we need an empty local disk on which we will install Window 7 OS, in my case it is " New volume(E:\)" it is advisable to allocate at least 30 GB for installing the system. If you do not have empty disk and you don't want to delete anything from others local disks, you can simply partition any of your local disks. How to do this, see the article Partitioning a local disk using Acronis Disk Director or How to partition a hard drive using Windows tools.
So, you have decided on the disk, now we insert the disk or flash drive with Windows and boot from it.


Click "Install".


Choose full installation


And after the installation is completed, when the computer boots, we will be given a choice of operating system. But in most cases at this stage Only Windows 7 loads without giving us a choice of which system it will boot from, because the installation overwrites the bootloader of the system that we had first, in our case it is Windows 8.1. To solve this problem, read the article to the end.

As we can see in the picture below, the local drive that had the letter (E:\) now has the letter (C:\). But this is only in Windows 7. And when we boot into Windows 8.1, the drive letter will again become (E:\).

To fix the boot problem we will need a program called EasyBSD. You can download it from the link http://www.softportal.com/get-41415-easybcd.html.

After downloading, run the program installer Next.

Leave the checkboxes Next.

Click Install.

The program is installed, run it ( must be on behalf of the administrator) and select the language Russian.

So we see that there is only Windows 7 in the bootloader, our task is to add Windows 8.1

At point "edit boot menu" also only Windows 7 is visible. To add to Windows boot loader 8.1 click on the item " Add entry".

In the drop-down list in the type item: select Windows Vista/7/8/10, write any name below, this name will be displayed at boot, then select the drive on which our system is located, in my case it is the drive (D:\) and click add.

In the boot menu we see that it has been added new entry, which will be displayed on the initial system boot screen and we can select the one we need. You can also choose operating system which will load (by default) at the end of a 30 second delay, simply by checking the box next to it. Press the button save.


Now, when loading the system, we can choose which one to boot from.

ABOUTGive your opinion about this article, and of course, ask your questions if something suddenly goes wrong for you.
Thank you for your attention!
Good day everyone!
Most modern laptops come with Windows 10 (8) pre-installed. But from experience I can say that many users (still) like and feel comfortable working in Windows 7 (some people don’t run the old software in Windows 10, others don’t like the design of the new OS, others have problems with fonts, drivers, etc.).
But in order to run Windows 7 on a laptop, it is not necessary to format the disk, delete everything on it, etc. You can do it differently - install Windows 7 as a second OS to the existing Windows 10 (for example). This is done quite simply, although many have difficulties. In this article I will show with an example how to install a second Windows 7 OS to Windows 10 on a laptop with GPT disk(under UEFI). So, let's start to figure it out in order...
How to make two from one disk partition (we make a partition for installing a second Windows)
In most cases (I don’t know why), all new laptops (and computers) come with one partition - on which Windows is installed. Firstly, this partitioning method is not very convenient (especially in emergency cases when you need to change the OS); secondly, if you want to install a second OS, there will be nowhere to do it...
The task in this subsection of the article is simple: without deleting data on the partition with pre-installed Windows 10 (8), make another partition of 40-50GB (for example) from the free space for installing Windows 7 on it.
In principle, there is nothing complicated here, especially since you can get by with built-in Windows utilities. Let's consider all the actions in order.
1) Open the utility “ Disk management" - it is in any Windows versions: 7, 8, 10. The easiest way to do this is to press the buttons Win+R and enter the command, press ENTER.

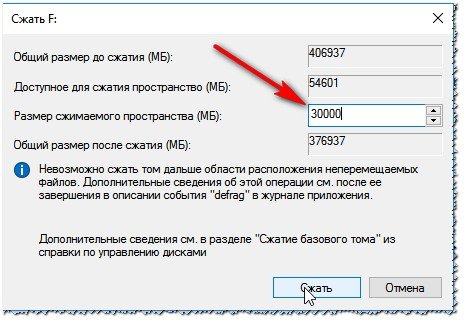
2) Select your disk partition that contains free space(in the screenshot below I have 2 sections; on a new laptop there will most likely be 1). So, select this section, right-click on it and in context menu click "" (i.e. we will reduce it due to the free space on it).

3) Next, enter the size of the compressed space in MB (for Windows 7 I recommend a partition of 30-50GB minimum, i.e. at least 30,000 MB, see screenshot below). Those. In essence, we are now entering the size of the disk on which we will subsequently install Windows.
4) Actually, after a couple of minutes you will see that the free space (the size of which we indicated) was separated from the disk and became unmarked (in disk management - such areas are marked in black).
Now right-click on this unallocated area and create a simple volume there.

5) Next you will need to specify file system(choose NTFS) and specify the drive letter (you can specify any one that is not yet on the system). I think it’s not worth illustrating all these steps here; just click the “next” button a couple of times.
Then your disk will be ready and you can write other files to it, including installing another OS.
Important! Also for splitting one hard section disk into 2-3 parts, you can use special utilities. Be careful, not all of them break hard drive without damaging files! I talked about one of the programs (which does not format the disk and does not delete your data on it during such an operation) in this article:
Creating a bootable UEFI USB flash drive with Windows 7
By the way, you can find out what partitioning is on your disk (MBR or GPT) in this article: . The settings you need to set when creating bootable media depend on the layout of your disk!
For this matter, I suggest using one of the most convenient and simple recording utilities bootable flash drives. We are talking about the Rufus utility.
![]()
A very small (by the way, free) utility for creating bootable media. Using it is extremely simple: just download, run, specify the image and set the settings. Next - she will do everything herself! Just ideal and good example for utilities of this kind...
Let's move on to the recording settings (in order):
- device: enter the flash drive here. to which the file will be written ISO image with Windows 7 (a flash drive will need a minimum of 4 GB, preferably 8 GB);
- Partition scheme: GPT for computers with UEFI interface(This important setting, otherwise the installation will not be able to start!);
- File system: FAT32;
- further indicate boot image file with Windows 7 OS (check the settings so that they are not reset. Some parameters may change after specifying the ISO image);
- Press the start button and wait for the recording process to finish.

Setting up the laptop BIOS (disabling Secure Boot)
The fact is that if you plan to install Windows 7 on a second system, this cannot be done unless you disable Secure boot in Laptop BIOS.
Secure boot is a UEFI feature that prevents unauthorized OSes and software from starting when the computer is turned on and running. Those. roughly speaking, it protects against everything unfamiliar, for example, viruses...
IN different laptops Secure Boot turns off in different ways (there are laptops where it cannot be turned off at all!). Let's consider the issue in more detail.
1) First you need to enter the BIOS. For this, the following keys are most often used: F2, F10, Delete. Every laptop manufacturer (and even laptops from the same model range), the buttons are different! The login button must be pressed several times immediately after turning on the device.
Remark! Buttons to enter BIOS for different PCs, laptops:
2) When you enter the BIOS, look for BOOT section. In it you need to do the following (using the example of a Dell laptop):
- Boot List Option - UEFI;
- Secure Boot - Disabled (disabled! Without this, you won’t be able to install Windows 7);
- Load Legacy Option Rom - Enabled (support for loading older OS);
- The rest can be left as is, by default;
- Pressing the F10 button (Save and Exit) means saving and exiting (at the bottom of the screen you will see the buttons you need to press).

Secure Boot is disabled.
Remark! You can read more about disabling Secure Boot in this article (several different laptops are discussed there):
Starting the Windows 7 installation
If the flash drive is recorded and inserted into the USB 2.0 port ( USB port 3.0 is marked in blue, be careful), the BIOS is configured, then you can start installing Windows 7...
1) Reboot (turn on) the laptop and press the boot media selection button (Call Boot Menu). These buttons are different on different laptops. For example, on HP laptops you can press ESC (or F10) to Dell laptops- F12. In general, there is nothing complicated here, you can even experimentally find the most common buttons: ESC, F2, F10, F12...
Remark! Hotkeys for call Boot Menu in laptops from different manufacturers:
By the way, choose bootable media You can also do it in the BIOS (see the previous part of the article) by setting the queue correctly.
The screenshot below shows what such a menu looks like. When it appears, select the created one bootable USB flash drive(see screenshot below).

2) Next launch normal installation Windows 7: welcome window, license window (need to confirm), select installation type (select for experienced users) and finally a window will appear asking you to select the disk on which to install the OS. In principle, there should be no errors at this step - you need to select the disk partition that we prepared in advance and click “next”.

Where to install Windows 7.
Remark! If there are errors like “This partition cannot be installed because... it’s MBR…” - I recommend reading this article:
3) Then all that remains is to wait until the files are copied to the laptop’s hard drive, prepared, updated, etc.

4) By the way, if after the files are copied (screen above) and the laptop is rebooted, you will see the error “File: \Windows\System32\Winload.efi”, etc. (screenshot below) - it means you haven’t turned off Secure Boot and Windows cannot continue the installation...
After disabling Secure Boot (see how this is done, see above in the article) there will be no such error and Windows will continue installation as normal.

Error related to Secure Boot - not disabled!
Selecting the default system, setting the timeout
After installing the second Windows system - when you turn on the computer, you will see a boot manager that will display all the available OSes on the computer to let you choose what to boot (screenshot below).
In principle, this could be the end of the article - but the default parameters are too inconvenient. Firstly, this screen appears for 30 seconds each time. (5 are enough to choose!), secondly, as a rule, each user wants to designate which system to boot by default. Actually, that’s what we’ll do now...

To set the time and select the default system, go to the panel Windows management at: Control Panel/System and Security/System(I set these parameters in Windows 7, but in Windows 8/10 - this is done in the same way!).
When the “System” window opens, there will be a link on the left side “ Additional options systems"- it needs to be opened (screenshot below).

Control Panel/System and Security/System/Add. parameters

Next, you can select the operating system that boots by default, as well as whether to display the list of OSes, and how long to display it. (screenshot below). In general, you set the parameters for yourself, save them and restart the laptop.

PS
This concludes the modest mission of this article. Results: the laptop has 2 OS installed, both work, when you turn it on you have 6 seconds to choose what to load. Windows 7 is used for a couple of old applications that refused to work in Windows 10 (although it could be done with virtual machines:)), and Windows 10 for everything else. Both operating systems see all disks in the system, you can work with the same files, etc.
Installing a new operating system is an exciting, but sometimes difficult and nerve-wracking process. Setting up your device to dual boot two operating systems can be even more frustrating. Dual booting is the process of installing two separate operating systems on the same machine, with the ability to select a boot device.
Whether you choose to dual boot because you're unhappy with the upgrade, or simply because you like aspects of each operating system, the process is the same. Windows 10 is a big upgrade from Windows 7, but both operating systems have their own advantages. Luckily, the process of dual booting between the two is quite simple.
Which operating system should I install first?
It may not seem important, but the order in which you install each operating system is important. Although you can install in any order, it is recommended that you install Windows 7 before Windows 10. The reason for this is due to Windows Boot Manager.
Dispatcher Windows boot is a program that runs before Windows and allows you to choose which operating system to boot. Windows 7 has more than old version of this program, and installing it on a computer with Windows 10 already installed will also install an older version of Windows Boot Manager.
This old version does not recognize future versions of Windows, such as Windows 10, and boots into Windows 7 by default. To install Windows 7 after Windows 10, you will need to reinstall updated version Windows Boot Manager to resolve this issue before dual booting.
What you need to prepare for work
- First point: prepare two in advance installation disk, with the required operating systems.
- For practical and convenient work With two operating systems, you need to create three partitions on your hard drive. The first is for Windows 7, the second is for Windows 10, the third is for user files(films, music, photos, etc.).
Installing Windows 7
To install Windows 7 you will need the following items:
- Valid Windows 7
- DVD Key Windows product 7
- PC that responds minimum requirements for Windows 7
To install Windows 7
Place Windows DVD 7 to your computer and restart.
When prompted, press any key to boot from DVD.
- Follow the onscreen instructions and click on your settings.
- Accept the license terms.
- Click Custom Install.
- Windows will then ask where you want to install Windows 7. Click the partition you created earlier.
- Follow the onscreen instructions and enter your settings and product key.
Once Windows 7 installation is complete, you must activate your copy within 30 days
To activate your copy
First you must be connected to the Internet
- Click Start and right-click Computer.
- Next is “Properties” in the list.
- The last one is “Activate Windows Now”.
You may be prompted to enter an administrator password. Enter it if necessary. Enter your product key, click Next, and follow the onscreen instructions.
Installing Windows 10
To install Windows 10 you will need the following items:
- Valid Windows 10 CD
- Windows 10 Product Key
- A PC that meets the minimum requirements for Windows 10
Regardless of whether you have another OS installed, " Clean installation Windows 10” The Windows 10 installation process is the same. However, you should take into account that installing Windows 10 will overwrite any other OS on the hard drive you install it on.
To install Windows 10:
- Place the Windows 10 CD on your computer and restart.
- Press Spacebar when prompted to boot from Windows 10 CD.
- Follow the onscreen instructions and accept License Agreement Windows 10
- Click on the hard drive where you want to install the OS. This will delete any data or OS installed on the hard drive.
- Click "Enter" and select "Partition Space".
- Press Enter again to format this space to NTFS, which is the file system used by Windows 10.
- Once your hard drive is formatted, Windows 10 will restart and present you with several options. Select the region and language options that apply to you.
- Enter your name and other information to personalize your installation.
- Enter the product key on the back of the CD case. This verifies that you have a legal copy of Windows.
- Follow the onscreen instructions and enter the appropriate information. Time and date, usernames, passwords, etc.
- Windows 10 will restart again and begin the last step.
At the last stage of installation, continue to follow the instructions on the screen, then set up your Internet connection. This is done by connecting a cable from a router or modem, as well as entering information about wireless network. Windows will ask you if you are ready to activate. By selecting yes, you will authenticate your copy with Microsoft to prove that it is a legitimate version.
How to install two windows
Sometimes one operating system may not be enough to work on a computer, and then there is a need to install another, additional Windows.
What is the advantage of installing a second system on a computer? In fact, there are quite a lot of advantages. For example, if your main OS is loaded with a huge number of programs, utilities and drivers, then no matter how productive your PC is, it will still work slower than with a new Windows on which several programs and the most necessary drivers are installed.
Therefore, you can install two Windows on your computer, one of which will be intended for work, and the second for games and entertainment.
Installing a second operating system
So, we have already installed the first OS and we need to install the second. First of all, you should remember that it is not recommended to install two or more operating systems on the same local disk, as this may cause incorrect operation both windows. Therefore, we will install the new Windows on a local disk on which there are no other OSes.
Insert the disk with the OS, reboot the computer and . At the very first stage, the installation program will ask you whether you want to restore your existing copy of windows, here we simply press ESC and go to the local disk selection window. Select a local disk that is free from other operating systems and press ENTER. Next, a window will open in which you need to select an option to format the disk. If on local disk In which you are installing windows, there is the information you need, then select the option “Leave the current file system unchanged,” otherwise all data on the disk will be destroyed. After this, the OS installation process will begin.
After Windows is installed, you need to configure the boot sector, since without this setting, only the new OS will be available for boot, and you will not be able to start the old one.
To do this, go to Control Panel->System in the window that opens, go to the ADDITIONAL tab and click SETTINGS in the Boot and Recovery item:
And click on the EDIT button:

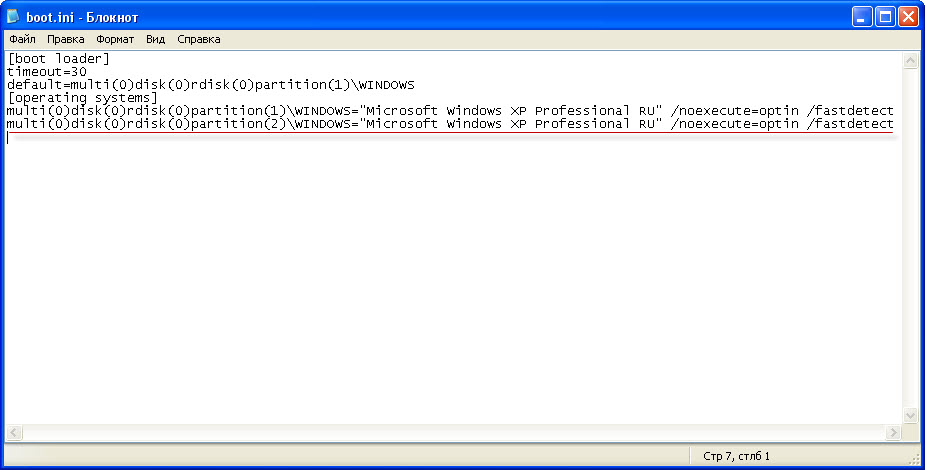
You will have a text document with the following parameters (Click to enlarge):

We add parameters for loading another OS into it. Ultimately, the document should look like (Click to enlarge):
After this, save the document and restart the PC. You should have a choice of OS:

One of them will be new, and the second will be old. If, for example, the first OS you have by default will be the new OS, and you want the old one to be first, then you just need to change it here.