How to make a bootable dvd. Create a Windows installation disk with useful features
There are many programs that have the function of creating bootable disks with operating systems, media information, games or other software. What program can offer users the optimal solution to this problem, combining simplicity and high speed of operation? IN this review will be considered UltraIso program and the ability to create an image in it boot disk with Windows XP from an image in .iso format.
Advantages of UltraIso
The advantages are huge functionality:
- UltraIso can create disk images for further use;
- can be simulated already existing images, create bootable disks with various information and much more. In addition, the program supports more than thirty various formats disk images.

Problems installing Windows XP on netbooks
Many owners of netbooks or any other personal computers without CD/DWD drives often wonder how to change the pre-installed operating system to a newer, more advanced or reliable one. Perhaps someone needs to restore the system using a boot disk.
The reasons for this may be different:
- The CR-ROM in your computer has broken down along with operating system, and there is no way to restore it.
- You can solve the problem by purchasing external device for reading disks. This option also has its advantages, since there are no problems with creating boot device in this case it should not occur at all.
However, the purchase additional device equals additional unnecessary waste of money and time. In addition, you are unlikely to find a store or market with external drives for disks in small towns or villages.
Benefits of Using USB to Create a Bootable Disk
That is why every user has the opportunity to install any operating system on their personal computer using the smallest of all possible media - using a USB flash drive. Of course, ordinary PC users may encounter certain difficulties when creating a boot disk on USB media. But, firstly, everyone (or almost everyone) has a flash drive in their house, and secondly, there are no real difficulties in creating a bootable USB disk if you use the UltraIso program.
Creating a boot disk from an .iso image in UltraIso
Actually, the UltraIso program has gained popularity due to its ability to create bootable USB media. The developers offer the easiest way to create such a disk. This radically distinguishes it from similar programs with similar functionality, such as Alcohol or Daemon Tools. Let's take a closer look at how to create a boot disk using UltraIso.
This article will describe in detail how to create a boot disk with an image of the Windows Xp operating system, since the algorithm for Windows 7 or Vista is similar, and to create a disk with Linux systems or Mac Os, there are other, special and more convenient programs.
Instructions for CD/DWD disks
You need to download the Windows XP image you need in .iso format from some resource, usually there are a lot of them on popular torrent trackers.
- First of all, you need to install the program on your PC (trial version, which loses its functionality 30 days after the first installation). Then you need to insert empty disk into the CD drive and run the program.
- After starting the program, you need to go to the “Tools” menu and select the “Burn CD image” option. Then you select the required drive (which contains the disc) and the .iso file containing the downloaded (or purchased) Windows XP image. It is recommended to set the value for the recording speed to the minimum, since it is at this speed that the disc will be written in the best way, and you will not have any problems when installing Windows XP, although if you do not have extra time, you can risk writing to high speed, most likely no problems will arise.

- Then you need to click on “Record” and wait, after which you can proceed directly to the process Windows installations XP on your personal computer.
- Restart your computer and select BIOS menu as a priority CD-ROM boot drive/
Instructions for USB media
First, you need to insert the USB flash drive into the computer and run UltraIso. In the program window that opens, you need to open the .iso image file (File - Open) with Windows XP.

After this, you need to select the “Bootboot” item in the main menu, and then “Burn image of a tough disk."

- In the window that opens, you need to select the drive in in this case This is the flash drive on which recording will be made (Disc Driver). Then you select the recording method, to do this you need to press USB-HDD+. Next, you click the “Record” button and wait for the recording process to complete.

In order to use the created bootable USB flash drive and install Windows XP, you need to select (after restarting the PC) as the priority disk USB-HDD boot(or a similar item with the name of your flash drive).
The need to install or reinstall an operating system on a computer may arise at any time. In this case, having a bootable flash drive or disk on hand will be very helpful. The site already has an article on how to create a bootable USB flash drive. But you need to keep in mind that you may need to reformat it to record other data, or you will simply lose it.
If your computer or laptop has a DWD-RW drive, then it would be an excellent option to have a boot disk with the required operating system at home, just in case. In this article we will look at how to create a bootable Windows disk using various programs.
To create it, you will need a computer with a working operating system, the blank itself, the volume of which should be larger than the files you have that you are going to copy. You will also need a recording utility and an image of the operating system you want to record. A suitable program can be downloaded from the Internet, preferably from official sites. The system image can be downloaded via torrent, most likely it will be a file with the extension .iso.
Using the Astroburn Lite utility
So let's make a bootable Windows disk using Astroburn Lite. You can read about the Astroburn Lite program and its installation on your computer by clicking on the link. Insert the disc into the drive and launch Astroburn Lite by clicking on the corresponding shortcut on the desktop.
In the main window, go to the “Image” tab and opposite the “Image” field, click on the “Browse” magnifying glass.
Through Explorer, find the folder on your computer in which you have the appropriate ISO file stored, click on it and click “Open”.

In the Speed field, select the recording speed. Here it is better to select the minimum value from the list.
I don't have an empty disk, so the window below looks like this. It will look a little different for you. Check the "Check" box. In this case, immediately after recording, the program will check for errors.
Click "Start Recording" and wait for the process to complete.

This is how we burned a bootable Windows disc from an ISO image using the Astroburn Lite utility.
Using UltraISO
Now let's make a boot disk with using UltraISO. Download and install it on your computer.
After launching UltraISO, the following window will appear. Click on the button there "Trial period".

Go to the "File" tab and select "Open" from the menu.

Locate the ISO file of the operating system you want to burn on your computer and click Open.

In the menu at the top, click "Burn CD image".

Check that the correct drive and file for recording are selected, select minimum speed records. There is no need to change anything in the “Record Method” field. Click "Burn".
Wait a little and everything will be ready.

I will end here. I think now you understand how to make a boot disk from an ISO image with an operating system Windows system using one of the programs described in the article.
Rate this article: (3
ratings, average: 5,00
out of 5)
Webmaster. Higher education with a degree in Information Security. Author of most articles and computer literacy lessons
- First, we need to download the necessary material.

- Launch Xboot and drag the Windows XP image file into the program window.
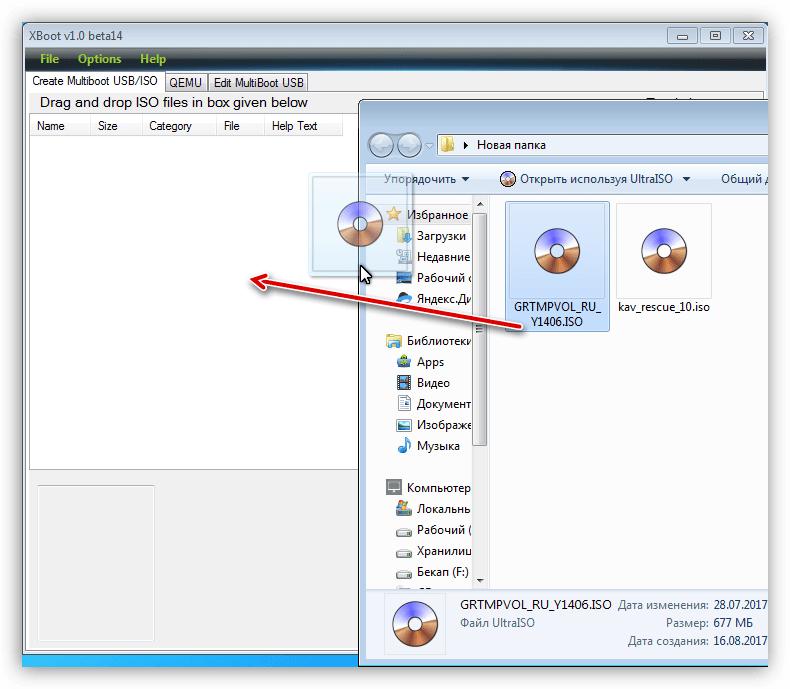
- Next you will be asked to select a bootloader for the image. Suitable for us "Grub4dos ISO image Emulation". You can find it in the drop-down list shown in the screenshot. After selecting, click "Add this file".

- In the same way we add the disk with Kaspersky. In this case, selecting a bootloader may not be necessary.

- To create an image, click the button "Create ISO" and give the new image a name, choosing a place to save it. Click OK.

- We are waiting for the program to cope with the task.

- Next, Xboot will offer to launch QEMU to check the image. It makes sense to agree to make sure it works.

- Will open boot menu with a list of distributions. You can check each one by selecting the appropriate item using the arrows and pressing ENTER.

- The finished image can be written to a disc using the same UltraISO. This disc can be used both as an installation and as a “therapeutic” one.
Before installing the operating system, you need create a boot disk with Windows 7, from which the installation will be carried out. On the Internet you can find and download a wide variety of Windows versions 7. However, I repeat that it is best to install original versions of operating systems, not assemblies. We will assume that you already have an image of the operating system on your local disk. As a rule, this is a file with the extension “ISO” - for example, “Windows7.iso”. This is what we need to burn onto a DVD in a certain way.
Why on DVD? I'll explain. The average size of an operating system image is about 3 Gigabytes, so regular CDs simply cannot accommodate a file of this size. Both DVD-R and DVD-RW discs can be used. The only difference between them is that “RW” (ReWritable) has the property of rewriting. That is, such a disc can be erased and recorded many times. And the “R” (Recordable) disc can only be recorded once. To create bootable DVD You will also need a disc burning program in Windows 7.
Currently, there are many different programs, but I recommend “Nero Burning ROM”, which has long proven itself as professional program for recording all types of discs. One of the most stable versions this program for the Windows XP operating system - “Nero Burning ROM 6.6.0.16”. Nero will be more than enough for you. For the 64-bit Windows 7 operating system, it is better to install a version no lower than version 10, or better yet version 12. For example, "Nero Burning ROM 12.0.20000". At the end of the article I will post a link to this program so that you can download it to your local disk, and then install. Using this particular version of the program as an example, I will show you how to create a bootable Windows 7 disk.
Having launched the “Nero Burning ROM” program, the following window should appear in front of you, in which you need to left-click on the “Open” button. 
Next, in the window that appears, you need to select the image itself that you want to burn to disk. To do this, you must know where exactly this file is located on your hard drive. Click on the required file twice with the left mouse button or once with the left mouse button, first on the file and then on the “Open” button. It will look approximately as shown in the picture. 
The disc burning settings window will appear. Make sure to the left top corner DVD was chosen. Also check if the “Record”, “Finalize disc” and “Check recorded data” checkboxes are checked. “Record” means recording a disc, everything is clear here. “Finalize a disc” means to “close” the disc after writing so that subsequent writes to it are impossible. “Check recorded data” - after recording, all recorded files are checked for readability. Choose the recording speed at your discretion. You can choose maximum speed. But I personally have had cases where, after recording at maximum speed, some files from the disk flatly refused to be read. Perhaps they were just low-quality discs. But I still always choose the “golden” mean. And I don’t always set the maximum speed. So, click the “Burn” button. 
A window like this should appear, where the following main indicators are located: write speed, loading of the read-executive buffer, and a write progress indicator. 
After the recording is completed, checking the recorded data will automatically begin - “Data Verification”, upon completion of which, if everything went well, the window shown below in the picture will appear, and the tray of your drive with the still warm disc will open. Click the “OK” button and close the program. The disk is ready for installation. 
If during “Data Verification” (disk check) messages such as those shown in the picture below appear, it means that the data was recorded incorrectly. In this case, reading occurs with errors. It is not recommended to install the Windows operating system from such a disk. Click the “Cancel” button, and in the window that appears next, the “OK” button. 
If you burned a Windows 7 image to DVD-R disc, then it is better to take a new blank disk and do all the above operations to create a Windows 7 boot disk again. If you used DVD-RW disc, erase it by clicking on the “Erase rewritable disc” button in the “Recorder” menu tab, as indicated in the picture below. 
In the window that appears, leave all the settings unchanged, that is, Erase method – Quickly erase RW disk, Erase speed – Maximum. And click the "Erase" button. 
After this, a window will appear showing the progress of the erase operation. 
Once the disc is erased, this small window will disappear and the drive tray will open with a now blank disc. You will need to follow all the steps described above to create a bootable Windows 7 disk. And you will need to start with the “Open” button, where in the window that appears you select the desired image with Windows 7 operating system. 
If no errors are found after checking the disk, the creation of the Windows 7 boot disk has been completed successfully. The disk is now ready to install the operating system. I wish you success!
I tried to explain this to the readers of my site. Explain it the way I understand it. Now it's time to tell you how this disk is created. I will tell you using the example of the Windows 7 distribution.
You can download the Windows 7 image on the Internet in *.iso format. As you know, information about the boot sector is stored in this format, which means burning a disk or flash drive from this image will not be difficult. This can be done with any disc burning program. Fortunately, the Internet is full of them, both free and not so free.
So let's get started. The first thing you need to do is download the Windows 7 distribution and unpack it into a folder (see Fig. 1). By the way, this can be done with a regular WINRAR or 7-zip archiver. There are also archivers on the Internet. 7-zip is generally free. As a result, you should get something like this (Fig. 2):

As I already said, you can use a ready-made image downloaded from the Internet, but our task is to learn how to create a boot disk ( better image disk) yourself. What is this for? Let's say you made some changes to the distribution and now you need to make sure that the resulting disk is also bootable, like the original one. For example, you deleted the ei.cfg file from the distribution. By deleting this file, you will be able to install not only Windows 7 Ultimate, but also Started, Professional, etc., depending on which assemblies the install.wim distribution file includes.
But let's return to “our sheep”. Let's say all the changes have been made to the distribution and it (the distribution) looks like in Figure 2. I will create the image in the Nero Burning ROM program. It’s more convenient for me, I’m used to it. If you understand the principle, you can repeat the same thing in any other program. Having launched it, we see the following window (Fig. 3):

Click on the “New” button, as shown by the red arrow in Fig. 3. This means creating a new project. A window will open as in Figure 4. Let’s take a closer look here:

The first thing to do is select the DVD disc type in the upper left corner of the window (Figure 4). Then, on the left side of the window, click on DVD-ROM (Boot), thereby selecting to create a boot disk. After this we get to the "Download" tab of our project. Here, using the "Browse" button, open the boot folder in the place where we copied the Windows 7 distribution. In it, select the file etfsboot.com (underlined with a red stripe) in the picture. This file is an image of the boot sectors of our disk.
Select the emulation type "No emulation". “Load message” and “Sector loading segment (hex!)” are left as in the picture. We set the number of boot sectors to 8. Now I will explain why this is so. To do this, we need to open the boot folder with this file of our distribution (Fig. 5):

The fact is that the number of sectors depends on the size of the etfsboot.com file. A standard sector takes up 512 bytes or 0.5 KB. As can be seen from Fig. 5 the etfsboot.com file is 4 KB in size. It is easy to calculate that the entire file will occupy 8 sectors (4/0.5=8). This is the arithmetic. Let's return to Fig. 4. As we can see, there are other tabs here. In principle, you can leave everything as is, if you want, then on the “Sticker” tab you can set the disk name. After all the settings have been made, click on the “New” button (Fig. 4, the window Fig. will open. 6:

First you need to select a recording device, i.e. your writer DVD drive, or, in my case, Image Recorder. By selecting it, I will hang the image not on physical disk, but creating a *.iso file, you agree, it’s more practical. There will always be time to burn it to disk.
Next, open your folder with Windows distribution. In my case, this is folder 555 on drive D. As shown in the figure, select all the files and drag them into the project window with the mouse. By the way, my disk is called Windows 7. I wrote down this name in the “Sticker” tab in Fig. 4. Once the files are added to the project, below you can see the total size of the disk or image, as in our case. Don't forget to select the type DVD disc(lower right corner of the picture).

When all the settings are made, all that remains is to click on the “Record” button. Click and you will be taken to the next window (Fig. 7). Here you need to check that the “Record” checkbox is checked and press the “Burn” button. Since we are creating an image, a window will open where you will need to select the type of image file and come up with a name for it (Fig. 8).

Figure 8 shows the file type selection with an arrow. You need to select ISO (let me remind you, this is due to the fact that this format stores information about the boot sectors of the DVD disc. Selecting any other format will destroy this information.), come up with a name for this image and click the “Save” button. After this, the process of creating a disk image will begin. Now all that remains is to wait for this process to complete, after which the following window will appear (Fig. 9):

Everything, creation Windows image 7 is finished, on which I congratulate you.
And finally... If you liked this article and learned something new from it, you can always express your gratitude in monetary terms. The amount can be any. This does not oblige you to anything, everything is voluntary. If you still decide to support my site, then click on the “Thank” button, which you can see below. You will be redirected to a page on my website where you can transfer any amount of money to my wallet. In this case, a gift awaits you. After a successful money transfer, you will be able to download it.
Often, when we buy a ready-made computer with a pre-installed operating system, we do not receive a distribution disk. In order to be able to restore, reinstall or deploy the system on another computer, we will need bootable media.
The entire process of creating a bootable XP disc comes down to burning finished image operating system onto an empty CD. The image most often has ISO extension and already contains everything necessary files for download and installation.
Boot disks are created not only to install or reinstall the system, but also to check the HDD for viruses, work with file system, reset password account. There are multiboot media for this. We will also talk about them below.
Method 1: disk from image
We will create a disk from a Windows XP image downloaded online using the program. On the question of where to get the image. Because official support XP has ended, then you can download the system only from third-party sites or torrents. When choosing, you need to pay attention to the fact that the image is original (MSDN), since various assemblies may not work correctly and contain a lot of unnecessary, most often outdated, updates and programs.


The disk is ready, now you can boot from it and use all the functions.
Method 2: disk of files
If for some reason you have only a folder with files instead of a disk image, then you can also write them to a disc and make it bootable. Also this method will work if a duplicate installation disk is created. Please note that you can use another option to copy a disc - create an image from it and burn it to CD-R.
In order to be able to boot from the created disk, we need boot file for Windows XP. Unfortunately, it cannot be obtained from official sources for the same reason that support has ceased, so again you will have to use a search engine. The file may have a name xpboot.bin specifically for XP or nt5boot.bin for all NT systems (universal). Search query should look like this: "xpboot.bin download" without quotes.

Multiboot disk
Multiboot disks differ from regular disks in that they can, in addition installation image operating system, contain various utilities for working with Windows without starting it. Let's look at an example with Kaspersky Rescue Disk from the laboratory.
Conclusion
Today we learned how to create bootable media with the Windows XP operating system. These skills will help you if you need to reinstall or restore, as well as in cases of virus infection and other problems with the OS.