How to change a specific color in Photoshop. Adobe Photoshop CS5 Basics
How to change the color of an object in Photoshop?
Probably every girl has thought about changing her hair color at least once in her life. But not everyone decided to do this. After all, a new color can either decorate or ruin the whole image. But how can you check this before painting? It's very simple, you just need to use a photo editor Adobe Photoshop.
So, open your photo using the File > Open command or the combination Ctrl keys+ O. Select the hair using the " tool Wand"(W key).
To do this: set the tolerance, and select the desired part of the photo, alternating the “Add to selected area” (1) and “Subtract from selected area” (2) buttons. If the Magic Wand has selected too large an area, you need to reduce the tolerance.
In the Image menu, select Correction and the “Color Balance...” sub-item or press Ctrl + B. In the window that opens, you can change the color of the selected part of the photo (in in this case hair) by adjusting the sliders in one direction or another.


When you get the color you want, click OK. If the hair color turns out to be too dull, or, conversely, too bright, in the Correction item, select the “Brightness/Contrast...” sub-item.

Move the sliders left or right to set the desired contrast and brightness.

Now save the image in a new file, compare it with the old one, and draw a conclusion: do you need to change your hair color? :)

Of course, in Photoshop you can change not only hair color. It could be the color of a dress, a car, the sky... In general, whatever your heart desires!
One way to focus the viewer's attention on this particular balloon is to reduce the saturation of the other balloons below it. I don't want to change the actual color of the balls, just the intensity. To do this with the Color Replacement Tool, I'll change the Blend Mode in the Options Bar to Saturation:
If I wanted to completely desaturate the balloons, removing their color completely, I would set the Foreground color to black, white, or any of the shades of gray, but since I want a more subtle effect, I'll just use one of the subdued colors from images. To do this, I'll hold down the key to temporarily switch to Eyedropper Tool mode and click on the desired color. I'll choose a low saturated yellow color. The color itself doesn't matter, since the Saturation blend mode doesn't change any of the original colors. It will only affect the intensity:

So, my foreground color is set to low-saturated yellow, the blending mode is “Saturation”. Now I'll just paint over the balloons by adjusting my brush size using the left and right keys square brackets and change the tolerance value in the Options Bar as needed. The picture below shows how I paint a bright orange balloon from top to bottom:


Disadvantages of the tool: problem with the brightness of changed objects
As I wrote at the very beginning, the Color Replacement Tool cannot be used for all cases. Now I will show you this with an example.
First I'll restore initial state my photo with balls by pressing the F12 key. Now let's say I want to change the color of the top individual orange ball to dark purple, like some balls in the group:

To select a replacement color, I hold down Alt and click on the purple ball:

I set the Blending Mode in the Options Bar to Color and start painting over the orange ball to change it to a dark purple. Here's the result:

Hm. The ball turned out to be purple, of course, but this color is quite similar to the colors of other purple balls, isn’t it? The problem is that this color is much brighter than the other purple balls, and this is because the original color of the ball was much brighter than the dark purple that I used as a replacement sample. The "Color" blend mode in this case does not affect the brightness of the object in any way.
Well, then let's try to apply the blending mode that affects the brightness. Of the four available blending modes, this is “Brightness” (Luminosity). I'll restore the photo to its original state by pressing F12, selecting this mode in the options bar, and again trying to paint the ball dark purple. Result:

Well, looking at the result, we can say with confidence that the result was complete nonsense. The Brightness blend mode definitely made the ball darker, but it's still orange, not purple, and besides, the texture detail is almost gone, the ball looks like a flat blob.
This is the drawback of the Color Replacement tool. It's great for simple tasks where you only need to change the hue and/or saturation of a color, but if there are too many differences in brightness values between the original and new colors, this tool probably won't work.
Sampling for replacement
In the Options Bar, directly to the right of the blending mode option, there are three small icons. Each of these icons represents a different selection of pixels to replace with the Color Replacement Tool, and they work in exactly the same way as the Background Eraser Tool. From left to right: Continuous, this option is enabled by default, the next is Once, and the last is Background Swatch. To switch between selection modes, simply click on the desired icon:

These settings control how Photoshop selects pixels to replace colors in an image. If the first option, Continuous, is selected, Photoshop continually determines new colors to replace. The sample is located under the moving cursor, exactly under the crosshairs. If, when moving the cursor, another color falls under the crosshairs, it becomes the target color for replacement. All pixels of that color within the cursor circle are replaced. This sampling option is used most often and works best when there is a lot of color variation within a site.
The "Once" option takes as a sample the color that you initially selected and the sample does not change depending on how many colors you further drag the cursor crosshair through. This option is best if you need to replace a large area of solid color. You can also try this option if you find that with the Continuous option, the color being replaced bleeds into nearby areas and the Tolerance option does not help.
The last option, Background Pattern, is used very rarely, if at all. This option replaces any color in the image that matches the background color in the color palette. This option may only be useful if neither of the first two options works.
Limits
This setting determines the location of the pixels to be replaced and works in exactly the same way as the Background Eraser. The option has three options: “All pixels” (Contiguous), “Adjacent pixels” (Discontiguous) and “Find Edges”. Of these three, you will really only use the first two:

The "Adjacent pixels" option (set by default) means that only those pixels that are directly adjacent to the cursor crosshair will be replaced. Pixels separated from pixels under the crosshairs by some other color will not be replaced, even if they are within the cursor circle and exactly match the color.
An alternative is "All pixels". With this option, all pixels matching in color and located within the cursor boundaries will be replaced.
Anti-Alias
This option is enabled by default and serves to smooth the edge around replacement areas. I recommend keeping it turned on at all times.
Changing colors
Team Replace Color creates a temporary mask around specified colors and then replaces them with other colors. The principle of a team is in many ways similar to a team Color Range. Let's see the action of this command using an example. Open graphic file(Fig. 3.29).
Rice. 3.29. Original image
Select a team Image | Adjustments | Replace Color. In the window that appears as a result of executing the command, select the switch Selection to see the mask in the preview window. Check the box Preview to see how the color adjustment will be reflected in the image. Tool Pipette Click on the darkest part of the background. Part of the background has been highlighted. If you click not the background, but the flower, then the color of the flower will not be replaced, but the color of the flower will be replaced - fig. 3.30.

Rice. 3.30. Example of replacing object color
Select the middle pipette Add to Sample and click it on an adjacent area of the background several times until almost the entire background turns white. Increase the slider value Fuzziness. If after this there are still unselected areas, click on them with the eyedropper with the plus sign. Changing the position of the sliders Hue, Saturation And Lightness you can change the background color in a wide range of colors.
Hello again, my dear readers. Today I would like to tell you how to replace a color in Photoshop with another one by separate area and even throughout the whole picture. After all, you probably have often had the desire to repaint something just to see how it would look. But in order not to make a mistake, it is better to first do this on some kind of layout or photograph. Then you will already know how and what it looks like. Let's see how to change the color of an object to a specific one using the example of repainting the car in the picture.
First way. Color replacement
Let's look at the simplest case, when our background is completely different from the object itself, i.e. cars.
- So, upload a photo, picture or drawing into our editor and now go to the familiar “Image” menu. Next, select “Correction”, and then “Replace Color”.

- A color replacement window opened in front of us. What are we doing here? First, let's make sure that the active tool in this window is a regular eyedropper (without signs). Now just left-click somewhere on the hood of the car.

- As you can see, we have a small drawing in the window. What is colored light shows us which area will undergo a color change. Now start dragging the Hue slider. Do you see? Some of the color starts to change as you move that tone. Don't be upset that not the whole car is painted over. We'll fix it.

- To begin, press and hold left button mouse on the Scatter slider and drag it to big side. Just try to make sure that the car is painted over as much as possible, while the background remains untouched. In this case, there are no yellow tints in the background, which allows me to set the maximum spread to 200.
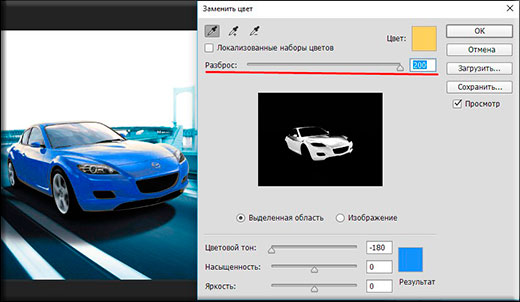
- Has the desired object changed almost all its color, but not completely? Again, no problem. Activate the internal tool “Pipette+” and left-click on those areas of the car where there are unpainted areas in the picture.

- Voila!) As you can see, everything worked out and even our background was not damaged. And by the way, you can also move the “Hue”, “Saturation”, “Brightness” sliders to achieve the desired shade.

Look. It looks like it should be. And this function can be used in different areas, for example, to replace the color of clothes, or to give an unusual but specific shade to vegetables or fruits. In! Try making a blue watermelon. I assure you. It's easy, very interesting and useful for consolidation.

Correcting Misunderstandings
Let's look at a slightly more complicated case. Let’s say I again want to change the color of the car, but this time it’s different. As you can see, the color of the car is the same as in the background. Well then? Let's do everything the same as above and see what we get.

But we’re doing a bad job, the background is so similar to the color of the car that neither the “Pipette-” nor reducing the spread helps. If we want ours to be purple, then our mountains will also be similar. What to do?

In such difficult situations, you will have to do a little manual work. There's really nothing wrong with this. You'll just have to use the one you know. Yes, yes. We erase unsuccessfully painted objects or backgrounds with pens, thereby leaving only the object itself with a certain color, i.e. in our case a car.

Even better, before you start changing the color, duplicate the layer and perform all the actions on the created copy. And unnecessary details can be erased with regular . This will be better if you suddenly want to change the color later.
Second way. Blend Mode
Well, since we’re talking about repainting a car in Photoshop, I can’t help but mention another good way to carry out this action. True, here you will also have to work with your hands, since you will have to change and paint over everything. But we can easily replace the color in Photoshop with any other.
Let me load the same car as above.
- We take and how we would like to paint this car. Well, let's say I want to see it green, then this specific color I will choose.
- Now create new layer by pressing the key combination SHIFT+CTRL+N. And then take a look at the Layers panel. Do you see any blending modes there? The default is normal, but open the drop-down list and select “Color” (By the way, the “Color Tone” mode is also suitable, so you can select that too). Great. Well done.

- Now choose the size, shape and hardness of the brush, and go ahead! We paint the car. Just be careful not to touch too much. Well, if you hit it, then use an eraser to correct it, no big deal.

- And now, if you want to change the color that you sculpted, you need to go to our again familiar “Image” menu and select “Correction” there - "Hue/Saturation". But I advise you to immediately use a simple key combination CTRL+U.

- Well, in the newly opened window, you can also move the hue, saturation and brightness sliders to change the hue. It's simple.

Well, how do you like the lesson? Was everything clear and interesting? I hope so. Personally, when I learned about changing the color of an object in Adobe Photoshop, I was simply delighted. If, of course, something is unclear, you can always clarify or ask. I will be glad to help as much as possible.
I would also advise you to look cool video course on photoshop. The video lessons are simply awesome, the course goes from easy to complex, everything is told in human language, nothing is missed and at the same time there is no unnecessary “water”. Everything is spot on. So be sure to check it out.
Well, I say goodbye to you today. I will be glad to see you in my other articles. Well, in order not to get lost, be sure to subscribe to my blog updates. I won’t spam - everything is just to the point, honestly. Well, you practice. See you in other lessons. Bye bye!
Best regards, Dmitry Kostin.
11.02.2015 27.01.2018
In this lesson I will tell you in detail about ways to change colors in Photoshop. I will describe all the steps in detail, accompany them with pictures to make it clear and clearly explain where and what function can be used.
1 way
The first way to replace a color is to use the ready-made function in Photoshop “Replace Color” or Replace Color in English.
I will show you with a simple example, a simple picture. Let's take the icon and open it in Photoshop.
Trowel on a yellow icon. We will replace yellow with any other color that interests us. To do this, go to the menu Image – Correction – Replace Color (Image – Adjustments – Replace Color)
.png)
The Color Replacement Function dialog box appears. Now we must indicate what color we will change; to do this, activate the Eyedropper tool (see arrow) and click on the trowel with it. You'll see this color appear in the dialog box at the top, which is labeled Highlight.
.png)
At the bottom is the Replacement heading - there you can change the selected color. But first, you can set the Scatter in the selection parameter. The larger the parameter, the more colors it will capture. In this case, you can set it to maximum. It will capture all the yellow in the image.
Configure the Color Replacement settings - with the color you want to see instead of the one being replaced. I made it green by setting the Hue, Saturation and Brightness parameters.
.png)
When you're ready to change the color, click OK.
So we changed one color to another.
Method 2
The second method in terms of operation can be said to be identical to the first. But we will look at it in a more difficult image.
For example, I chose a photo with a car. Now I will show you how to replace the color of a car in Photoshop.
.jpg)
As always, we need to indicate what color we will replace. To do this, you can create a selection using the color range function. In other words, select an image by color.
To do this, go to the menu Selection – Color Range (Select – Color Range)
.jpg)
Next, all you have to do is click on the red color of the car and we will see the function that defined it - coloring it white in the preview window. White shows which part of the image is highlighted. The spread in this case can be adjusted to the maximum value. Click OK.
.jpg)
After you click OK, you will see the selection created:
.jpg)
Now you can change the color of the selected image. To do this, use the function – Image – Correction – Hue/Saturation (Image – Adjustments – Hue/Saturation)
.jpg)
A dialog box will appear.
Immediately check the Toning option (bottom right). Now using the Hue, Saturation and Brightness parameters you can adjust the color. I adjusted the color blue.
.jpg)
All. The color has changed.
.jpg)
It was - it became:
.jpg)