Photoshop cs6 training for beginners. Photoshop CS6 lessons in Russian
Photoshop has long been synonymous with a graphics editor. Even novice users resort to this wonderful photo editing program. Anyone can perform simple tasks, but if you want to use Photoshop professionally, you can take this tutorial. After you study the lessons provided in this book, you will be able to quickly perform various photo manipulations. The book is written for beginners in simple language. Lots of visual pictures will help you understand the lessons better. The first pages will introduce you to the basic tools and shortcut keys. Although it takes a lot of time to study Photoshop in depth, this book will allow you to take the first steps that will help in the future.


This book is in Russian with a clear description of the main Photoshop capabilities CS6. Book in popular PDF format. It is important to note that this book will also be useful already experienced users Photoshop because it contains a lot useful information and personal recommendations of the author.
Download the book: Photoshop Lessons CS6 in Russian
Here is a series of lessons that teach you how to use the Photoshop graphic editor - an incredibly popular and indispensable tool in web design, with the help of which not only buttons, banners and logos, but even entire layouts are created for the site. The design of almost any website you visited was originally drawn in Photoshop, so knowledge of this program will definitely be useful for the webmaster, although the skills of image processing and creating your own drawings to a simple user PCs won't be harmed either. Digitizing photographs, retouching old photographs, creating postcards and collages - this is only the beginning of a long list of useful actions that the editor allows you to perform, and a series of lessons will help you get used to it.
Add this page to your bookmarks so you don’t lose the table of contents and consistently study article after article, learning more and more new techniques for working in Photoshop.
But what will you learn in these lessons?
- 1 Getting started in Photoshop - quick selection and fill
Here you will get acquainted with the program interface, find out what the main interface elements are for, learn how to create documents and save them, and master selecting areas on the canvas. Also from the lesson you will understand how to fill areas with color, you will understand the principles of working with the program. After mastering the information, you will learn to perform simple steps and you can independently explore other editor tools.
- 2 Layers and text
All Photoshop images are built on layers. This is why editing in the program is so convenient. The lesson will tell you what layers are, why they are needed and how to work with them. In addition, it describes techniques for creating and processing inscriptions, as well as moving objects located on the canvas. After completing this lesson, processing multilayer documents will not be a problem for you.
- 3 Filters
You will get acquainted with a huge library of picture-changing scripts. The editor's filters can not only give the finished image a particular effect, but even create new objects and frame the photo.
- 4 Working with images
The article provides the basics for processing existing graphic files. Editing several images at once, moving objects from one picture to another, changing sizes and removing unnecessary parts - this is just an incomplete list of lesson topics.
- 5 Transformation
The lesson will teach you how to scale image elements, change proportions, tilt, distort and deform them
- 6 Drawing - brush and pencil
The first in a series of articles talking about tools for creating your own masterpieces. For a long time now computer technology have evolved to the point that they can simulate drawing on paper. You will learn to create using a virtual pencil and brush - sketches and watercolor paintings can now be easily drawn and shared on electronic media, making an unlimited number of copies and without worrying about the safety of your work.
- 7 Drawing - shapes
Creating objects by hand is one thing, but accuracy and speed are sometimes paramount. The lesson talks about tools with which you can create perfectly smooth images in just a few clicks. geometric shapes given dimensions. From simple square to an ellipse, a star and even a musical note - the article covers everything.
- 8 Drawing - outlines and bitmaps
You will remember once and for all how a vector differs from a raster, what the pros and cons of both approaches are, and you will also learn why shape contours are needed in Photoshop and what the pixel mode does.
- 9 Drawing - Pen tool
Continuing to work with contours, we study the tools of the Pen group. Purpose, method of application, description of parameters, and as a result you will learn to draw atypical contours and create complex geometric objects.
- 10 Drawing - Magnetic pen tool
The Magnetic mode of the Freehand tool has become so popular that it is called the Magnetic Pen, although there is no such separate tool in Photoshop. What this function allows you to do, why users love it so much and how it will help you personally - read the article.
- 11 Image Retouching Tools
To use these editor functions for the Internet, you don’t need to be a layout designer, a designer, a webmaster, or anyone at all. It is enough to be an active user social networks. How to make your face more beautiful, remove moles and freckles? How to process an old scanned photo so that the colors become brighter, and scratches, stains and specks of dust are not so noticeable? How to carefully cut an object, move it or clone it? Where is the tool that will help you remove the red-eye effect from a photograph in just a couple of minutes? Find answers to these and other questions in the article.
- 12 Image correction tools
You already know so much that learning new tools is not a problem. All I had to do was make a review describing the possibilities to improve the quality of pictures - lighten where it is too dark, darken where it is overexposed, blur and add sharpness, mix and smear colors. All in all, additional information How else to make an image better is waiting for you in the lesson.
The pinnacle of creativity for the web is drawing website templates. When you have mastered most of the tools and have enough skills to draw dividers with shapes, buttons for menus, logos, and beautiful inscriptions, nothing prevents you from creating a good, complex layout. The article explains what it consists of standard template, describes the principle of creation, and also teaches how to cut the layout using tools previously unfamiliar to you.
By paying attention to each of the lessons, analyzing practical examples and experimenting on your own, as you master the course, you will go from beginner to advanced user of Photoshop and will be able to go deeper into it yourself, moving to a new level of mastery, and a strong and reliable foundation will help you in this, laid down in the series of our articles.
Good day, dear readers. Do you seriously want to learn how to work in Photoshop and hope that you will succeed? Hundreds of people every day, inspired by video miracles in three-minute videos, open this program and forget about it a week later.
“At school they teach and teach, but here, in adult life, they pile on!” - a quote from a Soviet cartoon appears in my head. After a week, everything is forgotten, the person begins to think that he already knows how to do everything and how much further, you still won’t be able to apply it anywhere.
As a rule, all this knowledge remains unfulfilled by useless talents No. 7463. Why do you think that you will succeed? Well, at least you still haven't stopped reading this article and that's good. This means you are partly a realist, this is wonderful, which means we have something to talk about. Then, let's find out how to work with Photoshop, or rather, from which side it is better to approach it, so as not to give up everything halfway.
How not to stop there
Motivation is the most important thing in life, especially for beginners in learning anything. You can start writing a book and quit after a month, leave cross-stitching after a week, as a rule, people forget about the work of creating websites after about six months. Why is this happening? Initially, the wrong approach to the matter.
You must constantly work on your own motivation. How to do this? First of all, let's find out what you want from Photoshop?
Play and edit a couple of your own photos?
Don't even bother with training. Find tutorials on YouTube for dummies or dig into Photoshop yourself, at random. These are the kind of interesting designs you can get when working with just a few buttons.

Which ones exactly? "Image" in top panel tools. Pay special attention to correction. There are a lot of gizmos here that can surprise your friends and diversify your leisure time.
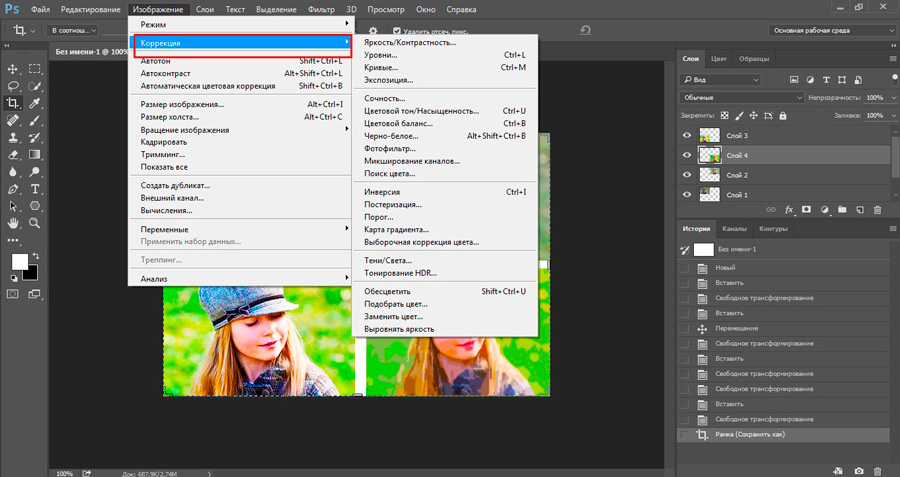
Some of the most interesting tools here, in my opinion, are “Curves” and “Richness”.

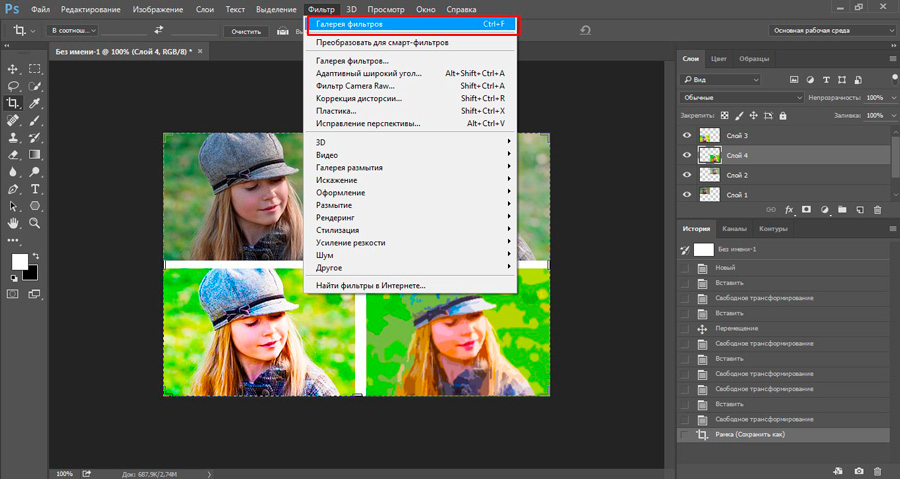
You will also definitely like the “Filter Gallery”.
You don't even have to download the program itself and spend money on it. There is a wonderful online service with a program in Russian ( https://editor.0lik.ru ), it is less functional when it comes to work, but is ideal as a toy. In addition, you can work with it for free. Create.
You tried it, got interested and want to move on
Wait. It’s too early to work with layers and other advanced functions. First, decide why you need it, otherwise you’ll just waste time.
If you don’t mind the days, weeks, months, that’s good, but when you start one thing, don’t finish it, take on a second or third, then in the end you get nothing.
How many more roads do you have to go to make real money from your hobby? Don't you really need this? Many people take on something stupid and create something incredible, earning millions from the project. And in the end, you will remain the person who knows a little more than others in each area.
How can you make money through Photoshop?
- Sell cool photos own production through photo banks.
- Create your own page and offer photo processing services.
- Create illustrations for books, of which there are about a million now in print.
- Make logos for companies.
- Web design.
Don't believe that someone will actually pay for this? Pfft, no doubt about it. You can find a bunch of offers on the Weblancer website ( https://weblancer.net ).

Don't worry that you don't have enough strength or experience. Take more time to complete the project and less money so that the complaints against you are not too serious. You can always justify your own actions later: “What did you want for 1,000 rubles? If you don’t like it, don’t take it, I completed the work on time, and it’s up to you to decide whether to refuse or take the results.”
You're a newbie and that's great. Keep your ambitions to yourself as long as possible. For corporate identity professionals can take at least 5,000 rubles. Don't think about big money while studying while you gain experience. Over time, good orders will come and then you will be able to set your own prices with full responsibility. In the meantime, set yourself tasks and solve them through educational articles and videos, of which there are a million on the Internet.
Start creating projects as early as possible. Make them for yourself, create projects for any money. No one will know how much you were paid, but you will have an excellent portfolio. Over time, you will learn to cope with tasks faster, which means you will be able to complete more orders.
Ambition is very strong and you want to earn a lot of money
If you are observed to be hardworking and have an impressive capacity for work, then you need to make money from it and start doing it as soon as possible. There is a lot of money in design. They can pay about 80,000 for a good website project, 30,000 for a corporate identity, 1,000 for a cool illustration. But to get that kind of money and find clients you have to really try.
Of course, you can’t get by with training videos, articles, or the random method. It will take the real thing vocational training. You will need to understand the intricacies of art, quickly learn the wisdom of business, see how specialists work, what they use when creating, study, so to speak, the business to the maximum and do it quickly.

Talent alone is not enough; experience is also needed. No matter what industry you start working in, you need to grow into a professional. We don't have time for this yet! If you are very hardworking, that means you are ambitious, and if the earnings don’t come, you, again, will abandon what you started without completing it. You need to do everything to ensure that others, and especially customers, like the work you do.
I recommend you the course of Zinaida Lukyanova ( https://photoshop-master.org/disc15 ). It costs about two and a half thousand rubles and provides everything you need for work. All knowledge in 18 hours. Not a day will pass before you reach good level. Of course, you will have to improve it, but at least you will know the basics. Then it’s a matter of technique; all that remains is to look for your options. No one will tell you where to put this or that element, but you will know how this can be done and will not waste time on the technical side. It’s not difficult to figure it out; if you’ve already seen how a master uses this or that tool, you’ll be able to pick up a lot of useful tricks.
You will know specifically what can be done in Photoshop and what you can do, and therefore you will be able to find quick ways creation. Why spend an hour perfectly highlighting a shape if you can quickly and easily insert it into another object?
Which Photoshop to choose
Naturally, in this case it will not be enough online versions. It is only interesting as a toy. On your own you can install your own gradients, brushes, stamps, fonts. By the way, the last time I managed to download as many as 4,000 options. Take a look at some of them. Can you imagine how they simplify the life of a designer?

Naturally, you can install them on any version. By the way, let's talk about software. First came Photoshop CS5, this version is slightly less functional compared to the latest version CS6.
And the coolest one is CC 2015. I have it. Of course, it is better for a designer to choose this one. There are a bunch of additional features that you probably won't need. For example, support for 3D printing. But what does she do to you? Does it make you feel bad? There is and there is. But in addition to this, you benefit from smart sharpening, perspective deformation, and improved layer correction. CC just can’t dance!
Don't think that you won't understand such a cool version or that it will be more difficult. All Photoshops are basically the same. It's just there somewhere additional features and buttons that you are not required to use. But what are the options? latest versions perform a little better. For example, they add glow or sharpness.

Learn one Photoshop - you will understand all the others. The main thing is to understand the logic of the developers, and understanding further will not be difficult at all.
Finally, I’ll leave you with a motivational video, where would you be without them? It's cool, they turn a girl into a robot. Great, by the way, if you remove the acceleration, I think it took him from two to eight hours to work. Agree, not so much. Just a day, and this is the result:
If you liked this article, subscribe to the newsletter and receive more useful and necessary information which will help you do right choice and earn more money on the Internet, even if you don’t know how to do anything yet.
Adobe is known to all users who have even a vague understanding of working with images and photographs. This is due to the fact that this company is the creator legendary program Photoshop. Today, this application is the de facto standard in the world of professional designers and artists.
The capabilities of the person who works in it are limited only by his own skill. However, not all users are real luminaries: how to work in Photoshop CS6? There are special video tutorials for beginners, but not everyone has time to watch them. Well, let's try to shed some light on this issue.
Let us immediately warn you that it is simply impossible to squeeze into this article even a couple of percent of the amount of information that would be appropriate in in this case. Therefore, we will limit ourselves to only the most superficial introduction to the topic and will reveal the basic concepts that will be useful to you when mastering the Photoshop CS6 program.
Layers
Layer is the main constant you'll have to deal with. By the way, what is this? In this case, a layer is understood as a separate image that has its own boundaries, clearly delineated from other parts of the picture.
Why are such layers needed? This is very important question. The fact is that it is thanks to them that it is possible to carry out operations on almost every part of the image, without affecting the entire picture as a whole. In fact, an image in Photoshop can be represented as a giant mosaic, for each puzzle in which transparency, color, and other parameters are separately set.
Since it is impossible to work in Photoshop CS6 (for beginners the program may seem very complicated, but in reality everything is not so scary) without the mentioned tool, we recommend that you master the basics and consolidate the acquired knowledge in practice. Taking the first steps in this matter is very simple. To do this, open any image, go to the “Layer” tab, select “Create a new layer”.
Change something in the image. Then follow the above path again, creating a second layer. Also draw something on it. Then go to the same tab again, select the “Merge Layers” command. This is roughly how all the main work in the program is done.

As for the interface, “Photoshop CS6” in Russian appeared not so long ago. If you are looking for tips on working on the Internet, they often offer instructions on English. Keep this in mind!
“Hot keys”, or Hotkeys
At constant using Photoshop It is very important to remember the most frequently used hotkey combinations. It’s almost impossible to keep all of them in your head all the time, but the most commonly used combinations are essential to know. The fact is that the combinations practically do not change in different versions program, so it will take much less time to master the new release.
So let's look at the most simple options. When you press CTRL+N, it opens new document. It is much easier to press a hotkey than to use the main menu with a mouse. In addition, it will be useful to use the CTRL+O combination, as it allows you to open a dialog box with a choice of files to open. The CTRL+K keys are useful, they open the main program settings. Surely many users know that the combination CTRL+Z cancels last action. This works in Photoshop too.
Layer Keys
But in this program, working with layers is much more important, so you should remember at least some of the hotkeys associated with this term. So, to create a new level, press SHIFT+CTRL+N. After this, a dialog box with the settings of the newly created layer will immediately open. The F7 button is also important, as it opens the palette settings. To quickly move up a layer, press ALT+]. To move one layer down, use SHIFT+ALT+].

If you want to go to the lowest level, then you need to use the combination SHIFT+ALT+ [. If you need to set the current layer as the main one, press SHIFT+CTRL+]. Merging layers (which we talked about at the very beginning) is done using the CTRL + E buttons. As you can see, hotkeys are extremely important because they save a lot of time.
Using hotkeys when working with filters
Working with filters is quite complicated and time-consuming. Therefore, using hotkeys in this process is also important. Moreover, there are not so many basic combinations. So, if you want to repeat the last used filter with its default settings, press CTRL+F. If you need the same filter, but with open settings, use the keys CTRL+ALT+F.
Not sure how to reset all dialog box settings? Just press ALT together with ESC key. The beauty of this combination is that it works in exactly the same way across all settings dialogs.
Choosing brushes!

None of the masters or novice users of Photoshop can fully work without the most common tool, the Brush. Today we will try to choose it for work, learning about ways to adjust the parameters. Using one or another option, you can create a shape that is ideal for your work, dynamically change the size, select dispersion, texture, as well as the degree of pressure and transparency.
First you need to activate the “Brushes” tool for “Photoshop CS6” by pressing the “B” key. Click on the icon we need, where you can adjust all the parameters. You need to press the F5 key on your keyboard or use the “Window” menu, where you can go to the “Brushes” item. It must be said that the menu has enough settings, the main ones of which we will consider.
Before choosing a suitable tool, you need to choose the shape of its imprint. It all depends on the type of work you do. The same can be said about the diameter. There are a lot of options! However, when training, it is recommended to choose simple shapes brush and the average diameter of its print. It should be noted that you can quickly change the last parameter using the “[” (decrease the diameter) or “]” (increase it) keys.
Using the slider called “Hardness” you can adjust the center of stiffness of the tool. To put it simply, with the selected indicator “0” you will get a soft brush. The Opacity tab, as you might guess from the name, helps you set a parameter that is often used when retouching photos.

What else should you pay attention to before working in Photoshop CS6? For beginners, it would be a good idea to look at the work of experienced artists and photographers: you can clearly see how and under what conditions it is best to use basic techniques, such as retouching or aging a photograph.
Often when choosing a brush important role its color plays. There is a button on the toolbar (at the very bottom) that allows you to adjust this parameter. It should be noted that when selecting, the active color is the one in which the top square is painted.
Other principles for choosing a brush
However, the choice of brush for Photoshop CS6 is not limited to these parameters. For example, quite often there is a need to change the angle of inclination, which is achieved by adjusting the settings in the dialog box of the same name (if you remember, it is called up by pressing the F5 key). Here you can increase the size of the tool and also change its inclination.
It should be noted that when choosing brushes of an unusual shape (butterfly, star, leaves), it is necessary to set a sufficient interval, since otherwise the image may turn into a graphic “porridge”. By experimenting with different parameters, you will eventually learn to set the optimal ones for each type of work, using hundreds of parameters available in the program.

Naturally, you won’t be able to master Photoshop right away, in one sitting. Program in Russian - best option for beginners, since you can always read help by pressing F1.
Plugins
Plugins (also called external modules) are additional filters that plug into Photoshop. However, this can also be called some additional software modules, expanding the functionality of the application. At their core, plugins for Photoshop CS6 are small additional programs, running inside the main software package.
In Photoshop, they are most often used for advanced imitation of drawing methods; they are often used to reduce noise and improve sharpness; with their help, you can automatically set the focus on some object located in the photograph.
Plugins are most often developed only for a specific Photoshop version, which often creates a lot of difficulties when migrating to a new release. However, they are very good in that each user will be able to create a unique set of tools suitable specifically for their purposes. In general, Photoshop CS6 is the most suitable for beginners suitable option, as it is more visual and contains more tools by default.
Thus, it is better to focus on the “advanced filters” option. They are also capable of changing the processed image, they can distort it or remove noise and adjust the sharpness correctly.
To install the plugin, you need to download its file from the Internet and then move it to the “Photoshop/Plug-Ins” directory. However, some “serious” applications often have own file installations. In this case, their installation is extremely simplified: you just need to start the process and follow the instructions. When the installation is complete, the new filters will appear in the program (you may need to restart it).
So, we looked at how to work in Photoshop CS6. For beginners, the information presented is still enough; you need to consolidate your knowledge in practice, and then comprehend all the intricacies of the process.
Some plugins for Photoshop
Let's take a closer look at the purpose of some "helpers" for Adobe Photoshop. For example, the very popular ICOFormat add-on is specially created for saving especially small images up to 200x200 px using the standard .ico extension.

Genuine Fractals Pro can enlarge an image without losing quality. The Blow Up and AKVIS Magnifier add-ons can be used for the same purpose.
The AKVIS Chameleon plugin is ideal for: It allows you to automatically adjust inserted fragments to the color of the main image. In addition, it somewhat blurs the sharp edges, making the collages more “alive”.
In conclusion...
It should be noted that plugins can be distributed not only separately, but also in the form of large thematic packages. Most processes can be significantly accelerated with their help. However, you need to remember that success in using plugins will only come to those who understand the principle of their operation and can do all these operations manually!
These are the short lessons of Photoshop CS6. Master the program in practice, by trial and error - this is the best option.
Today we will consider the question: “How to use Photoshop?” After all, it is this graphic editor that allows you to solve the most complex problems associated with images. It should be said right away that precise instructions will not be provided here, but only recommendations that allow you to study on your own. So, next you will learn how to use Photoshop.
Preparation
First, let's look at the program itself. The most latest version this editor: Adobe Photoshop CS6. But you don't have to download latest update. The program interface and most of the tools have remained virtually unchanged since the release of the first version. Of course, the first update goes a long way back from CS6. But on initial stage Any version of this program is suitable for learning. By the way, the interface of this editor contains 27 different languages. There is also a Russian translation.

Basic Tools
To answer the question: “How to use Photoshop CS6,” you must first consider the main tools of the program. Since without them you will not be able to carry out even the simplest operations. In total, 4 groups of instruments can be distinguished. Below we will briefly look at each of them.
- Selection tools. A huge number of operations carried out in Photoshop program, occur precisely with the help of this group of means. Selection can be done in different ways. For example, in any way using the lasso tool ( hotkey L) A small area can be separated. For more precise selections, it is recommended to use the “pen” (P). The choice of tools should be made depending on the situation.
- Drawing tools. You've probably already come across similar tools in other graphic editors. To draw a picture in any way, you can use a “pencil” or “brush”. Here it is possible to adjust the size and precision of the tools. If you made a little mistake or just want to erase a fragment you don’t need, you can use the eraser. To restore a lost background image, use the “archive brush”.
- Tools for correction. This group includes various tools for blurring, sharpening, reducing brightness, etc. These tools allow you to perform a wide variety of operations and effects.
- Additional tools. This category can include tools for filling, spot restoration, color selection, typing, etc.

More information
To understand how to learn to use Photoshop, you first need to familiarize yourself with all the tools. As you've probably already noticed, there are plenty of tools for image editing. But don’t think that it will take you to become familiar with all the tools. large number time. This process is always fun and fast.
Conclusion
The question “How to use Photoshop?” very often asked on specialized forums. And sometimes it remains without due attention, since it is impossible to explain to every beginner the basic things associated with this editor every time. It is recommended that you first try experimenting with the tools, filters, and other tools yourself. And after that, approach this issue more seriously. And after some time, you yourself will be able to advise others on how to use Photoshop.