We solve the problem with the inability to connect to a remote PC. An authentication error occurred. The specified function is not supported
In this article, we will look at basic techniques for diagnosing a problem with an RDP connection to a remote desktop. For example, when you try to establish a connection to the desktop of a remote server using the standard client mstsc.exe (Remote Desktop Connection), the line “Initialization remote connection..." and then the user gets the error:
Remote Desktop could not find computer %PCName%." This may mean that %PCName% does not belong to the specified network. Check the name and domain of the computer you are connecting to.
Remote Desktop Can’t Find the computer %PCName%. This might mean that %PCName% does not belong to the specified network. Verify the computer name and domain that you are trying to connect to.
In most cases, this error indicates that there are problems with your DNS server om, due to which your computer cannot resolve the specified name.
First of all, make sure that you have correctly specified the name of the remote RDP host in the RDP client in the Computer field.
Try connecting to the RDP server using an IP address instead of a DNS name.
Then try to see if your DNS server knows the FQDN name of the RDP server you are connecting to (%rdpserver%). Open a command prompt with administrator rights and run the command:
Nslookup rdpserver
Make sure the command returns the server's IP address, for example:
Address: 192.168.22.21

If the command returned an incorrect entry, try resetting the DNS cache on the client (ipconfig /flushdns) and resolving the name of your RDP server using again.
If the Nslookup command still returns an incorrect entry, open hosts file team:
Notepad C:\Windows\System32\drivers\etc\hosts
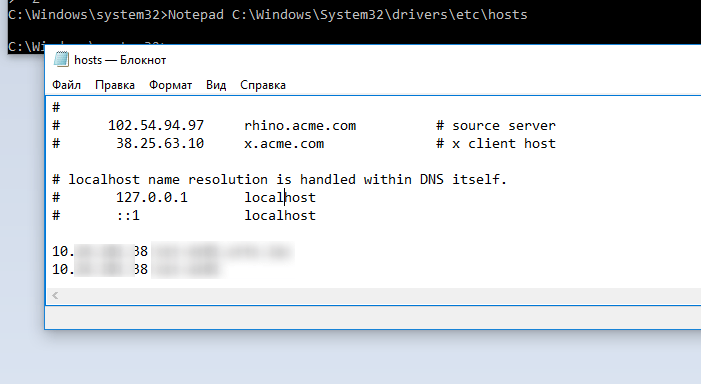
If the file does not contain static records for your RDP server (this is generally correct), you can try adding them manually (this way you can bypass the incorrect records that your DNS server returns). You need to add a format line:
192.168.22.21 rdpserver.site
If the problem is resolved, your DNS server is to blame; you need to check the records on it, or report the problem to the DNS administrator.
Check the availability of the RDP server using the ping command:
ping rdpserver.site
Then you should check that RDP port 3389 is accessible from the client to the server (this is the default port for RDP connections). The easiest way to check port availability is with using PowerShell commands:
Test-NetConnection rdpserver -port 3389

If the Test-NetConnection command returned TcpTestSucceeded: False, this means that the RDP service on the remote computer is not enabled, or the connection is blocked by a firewall on the client, server, or firewalls or routers between them.
A few tips to check if you are unable to connect to a remote RDP host:
- Try updating the version of your RDP client (this is especially true if you are using Windows XP, Windows 7 or 8.1).
- Try using an alternative rdp client - Remote Desktop Manager.
- Temporarily disable the antivirus and firewall on the client and server sides and check the RDP connection.
- If you are connecting with Windows client XP, and on the server side the NLA (Network Level Authentication) function is enabled network level authentication), then on the XP client side you can enable NLA support only through the registry.
- Remote RDP connection is not possible if account The user you are connecting under does not have a password set.
If the error “Remote Desktop could not find the computer” occurs when making a remote RDP connection from the RD Web Access page, try manually specifying correct address RD Gateway server (connection via RDWebAccess is not performed via standard port 3389, and via HTTPS port 443) and try to connect. If the connection is established successfully, then your RDWebAccess server is not configured correctly. 
To fix the problem, open the IIS console on the RD Web Access server. Go to section Sites –> Default Web Site -> RDWeb -> Pages. Open section Application Settings and in the parameter specify external DNS name your RD Gateway server, under which it should be accessible to external clients. 
Registering a computer on the network...
Error: 720:Cannot connect to remote computer. May need modification network settings connections. Click the "Advanced" button or contact the support center for assistance, indicating the error number.
Description of error 720:
Error 720 means that there are no PPP management protocols configured.
Reasons for error 720:
Error 720 Occurs when PPP control protocols are missing, incorrectly configured, or corrupted.
Most users who have encountered error 720 have noticed that error 720 in many cases appears after incorrect removal of the Avast antivirus program! (not confirmed).
Possible solutions:
Method one:
Recovery operating system on that date ( control point recovery) when connection error 720 was not detected in the system. In order to perform a rollback, you need to press the key combination WIN+R and enter in the window that appears rstrui.exe and press Enter.
The operating system recovery program will launch.  Next, follow the prompts, select a date and select a restore point.
 The system will roll back for the specified time and reboot. This method is not always effective and in most cases error 720 appears again. If this method did not help get rid of error 720, go to the next step.
Advertising
Attention! The following items require some skill and knowledge of the operating room. Windows systems. If you are not confident in your abilities, ask for help from more experienced users or contact a specialist.
Method two:
This method is to restore the Winsock configuration. To do this, press the key combination WIN+R and in the window that opens, enter cmd and press Enter. In the window that opens command line enter
and press Enter.
After running this command, restart your computer.
Usage netsh commands winsock reset may cause some programs that use the Internet or control network connections, will work incorrectly or will not start at all. Such programs will need to be restored or reinstalled (in the uninstallers of some programs, in addition to the uninstall option, there is a Repair item).
Method three:
If the first two methods are ineffective, try the following: press the WIN+R key combination and enter the command regedit and press Enter. In the left part of the Registry Editor window that opens, find and delete the following registry keys responsible for Winsock:
- HKEY_LOCAL_MACHINE\System\CurrentControlSet\Services\Winsock
- HKEY_LOCAL_MACHINE\System\CurrentControlSet\Services\Winsock2
Then restart your computer. The operating system will recreate the deleted partitions upon startup.
Reinstall the TCP/IP protocol. To do this, open Control Panel and find in it Network and Sharing Center. In the window that opens, click on the link “Local Area Network Connection.” In the window that opens, click the button <Свойства> .
Note: On Windows XP, simply open the Network Connections folder. Right click network connection and select the Properties command.
Click the button <Установить> .

Select Protocol and click the button<Добавить>.
Click the Have Disk button. 
Enter C:\Windows\inf\nettcpip.inf and press the button<ОК>.
In the list of protocols, select Internet Protocol (TCP/IP) and click the button<ОК>.

Method four:
If all of the above options do not help, try reinstalling the operating system.
Remember! Incorrect handling of the operating system + your inexperience or negligence = failure of the PC or operating system.
Modern technologies allow you to remotely control your computer; you just need to establish a connection to it via the required protocol. Sometimes it happens that you cannot connect to a remote computer. Here's how to solve this problem.
Causes of the problem
The remote computer connection error started in 2014. Then a Windows update came out with code name KB2992611, which tightens OS security settings.
Sometimes the problem is associated with installed third-party data encryption programs such as CryptoPRO and VipNet. In this case, you should try connecting without using them.
The logs recording the error record the following text:

Solution options
The problem is eliminated based on the reasons that caused it.
Update fix
You must download a separate version of the KB2992611 package and install it manually on the computer you want to connect to.

After that, run and install the update.
Changing the encryption level
Not the best safe way system settings, but as a temporary solution it is quite suitable.

After this, try connecting again.
Using TeamViewer
Sometimes use alternative application may fix the problem. The most common program for remote administration- TeamViewer.
Pay attention! The program must be running on both computers to establish a connection.

After this, you need to confirm the connection on the remote PC.
Advice! TeamViewer can be configured so that the connection occurs without confirming a password.
Conclusions
If you cannot connect to the remote computer, you will need to reinstall the package Windows updates KB2992611 from the official website, lower the system encryption level or disable third party programs with this functionality.