Creating a bootable USB flash drive using the WinSetupFromUSB program. Instructions for using WinSetupFromUSB - Full description
Everyone knows that it is possible to reinstall operating system or replacing it with another distribution. But many don't know how to do this. And this is done through a bootable USB flash drive. The article will talk about the WinSetupFromUSB program: how to use it and what functions it has. It is this program that will help us create that same bootable USB flash drive, which we subsequently need to use to install a new operating system.
Where to download the program
Before we talk about WinSetupFromUSB and how to use it, it’s worth talking about where to download this program. Indeed, despite all the awareness about the correct downloading of applications from the Internet, the user often makes serious mistakes. Now let’s figure out exactly how and where to download the program.
By entering a search request for this program into the search engine, you will be given a bunch of links to choose from where you can download it to your computer, but this does not mean that you need to do this from the first resource you come across. Firstly, most likely, on such a site you will be confused which Download button to press. Before you download WinSetupFromUSB, you can download a bunch unnecessary programs. Secondly, the program itself may contain some kind of malware, and a bunch of useless ones will be installed along with it.

To prevent this from happening, it is recommended to download from the official developer website - www.winsetupfromusb.com/download. At the moment, latest version- WinSetupFromUSB 1.6, dated 11/28/2015. This is exactly what we will consider.
Installation and launch
While talking about WinSetupFromUSB (how to use the program), you also need to tell us how to install it. The fact is that this process is slightly different from the more usual one using the installer. Now let's take a closer look.
By downloading the file from the official website, an archive containing program files will be downloaded to your computer. Once you launch it, a window will appear in which you can select a folder for unpacking, start the process, or cancel all actions. Everything is simple here. In the Extract to line, specify the path to download the files. In order not to enter it manually, you can use the "..." button, which is located to the right.
Once you have selected a folder, you can safely click on the Extract button. After this, the unpacking process will begin. It won't last long. After that, by going to the folder you specified, you should find a new one named WinSetupFromUSB-1-6. Enter it. The WinSetupFromUSB program is launched by opening one of the files attached to this folder. If you have a 64-bit system, then run the one with this number after the name; if you have a 32-bit, then without the marking.
Creating a bootable USB flash drive
We have already explained where to download the program from and how to install it. Continuing the conversation about WinSetupFromUSB, instructions for creating bootable flash drive will be provided right away.
To get started, you will need to have only two things with you - the flash card itself and an image of the downloaded operating system from the Internet. Make sure the extension is ISO. If you have this, then we can get started.

- First of all, insert the flash card into the computer. In the program window, select its name. If the flash drive is not found, try updating the information by clicking the Refresh button.
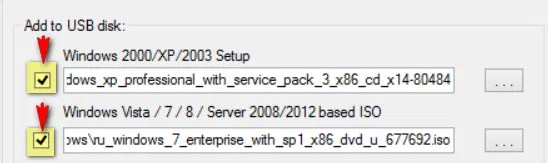
- Now we need to determine the operating system that will be written to this flash drive. To do this, check the box next to the appropriate version of the distribution and, by clicking the "..." button, specify the path to the downloaded ISO image.
- All that remains is to press the GO button to start recording the WinSetupFromUSB bootable flash drive.
We figured out how to burn a flash drive, now let’s move on to the special function that this program provides.
Creating a multiboot flash drive
We continue to talk about WinSetupFromUSB. You already know how to use this program, but I would like to tell you about some of its features and functions. We'll start by creating a multiboot flash drive. Let's describe the process itself and tell you what it is.
As you may have already noticed, in the Add to USB disk column, there are several checkboxes that can be checked; accordingly, it is possible to select several operating system images at once. This function is quite functional and involves creating a multiboot flash drive. After recording it, when installing the OS, you will be given a choice of which OS you will work with in the future.
Working with various distributions
I would also like to talk about the choice of items in this menu. There are five options. Now let's talk about each one separately.
- Windows 2000/XP/2003 Setup. In WinSetupFromUSB Windows can be written starting from version 2000. To do this, you need to specify the folder in which the Windows distribution itself is located. But since most often on the Internet you can only find ISO image system, then you can use some trick. Using the program Daemon Tools mount the image and indicate its letter. Or use an archiver to extract all files from the ISO image.
- Windows Vista/7/8/10/Server 2008/2012 based ISO. Everything is simple here. This item must be selected if you want to record one of the listed Windows versions. To do this, you need to specify the path to the downloaded ISO image of one of the distributions.
- UBCD4Win/WinBuilder/Windows FLPC/Bart PE. This item is intended for boot disks based on WinPE. In this case, you will need to specify the path to the folder where the folder called I386 is located.
- LinuxISO/Other Grub4dos compatible ISO. This item is needed if you want to install Linux distributions. In addition, by selecting it, you can burn a number of programs such as Kaspersky Rescue Disk, RBCD, Hiren's Boot. To start recording, you need to specify the path to the ISO file.
- SysLinux bootsector/Linux distribution using SysLinux/IsoLinux. Also necessary for recording Linux distributions, but for those that are installed using the syslinux bootloader. To start recording, you need to specify the path to the folder, which contains a folder called SYSLINUX.
Having dealt with all the components of this category, you can safely select distributions and start recording them on a flash drive.
Additional options
You might also notice three options just below: Advanced options, Test in QEMU and Show Log. Let's also talk about them in a little more detail.

- Advanced options. The most extensive option. Its essence is to make some adjustments to the process of writing to a flash drive. By checking the box next to it, a window will appear in which you can mark a number of adjustments to be made. So, Custom menu names for Vista/7/8/Server Source will make sure that all OS menu item names are standard. And Prepare Windows 2000/XP/2003 to be installed on USB to properly prepare the selected distributions for recording.
- Test in QEMU. Everything is simple here. By checking this box, after finishing recording the flash drive, the program will check it for errors.
- Show Log. It's even easier here. A window will appear summarizing all your actions within the program after opening it.
As you can see, these three options can be very useful, so don't hesitate to use them.
The process of formatting a flash drive into a USB Flash Drive
Now let's talk about how to format a flash drive in the WinSetupFromUSB program. Instructions included.

- In the program window, in the USB disk selection and format tools column, click on the FBinst Tool button.
- In the window that appears, click on the Boot tab top panel. Select Format option from the menu.
- Now, in the window that appears, check the boxes next to zip and force. Then click the Format button.
- As you can see, a file called PartitionTable.pt will appear. You need to enter the program folder in Explorer and go to files folder. Find the grub4dos file there. Use the mouse to drag it into the program window where PartitionTable.pt is located.
- Now on the top panel, click Fbinst Menu. You should see three lines: 1st - "default 0", 2nd - "timeout 0" and 3rd - "menu F1 grldr "grldr"". If this is not the case, then enter them manually.
- Press Ctrl+S to save changes.
That's all, you now know how to format a USB flash drive Flash Drive using the WinSetupFromUSB program.
Format conversion process
Now we will figure out how to convert the flash drive format to MBR. This operation should be done if the flash drive is very old. The fact is that in this case its format will be GPT, which will cause conflicts when installing the OS.

So, to carry out the conversion, you will need to click on the Bootice button, which is located next to the FBinst Tool. After clicking, a window will open. In it you need to go to the Physical Disk tab. On it you should see a number of buttons, among which should be Process MBR. By the way, if your flash drive already has this format, it will not be highlighted. As you might guess, to convert your flash drive to MBR, you will need to press this very button.
In the window that appears, select which MBR type you want and click the Current MBR Type button. That's it, your flash drive has now been transformed.
RMPrepUSB program
You may have found the RMPrep USB button next to the previous two buttons. If you are wondering why it is needed, then you will find out below in the text. But the list of its functions is so large that it will take an inordinate amount of time to explain each of them, so we won’t go into detail.

By clicking on the button, a window will open in front of you. Please note that of the entire program, only this is in Russian. If this is not the case, you can change it in the upper right corner.
This program provides the following tools:
- recovering deleted data from a flash drive;
- changing or creating a new file system (you can select all known file systems that currently exist);
- unzipping files directly to a flash drive;
- creating ISO images;
- testing;
- cleaning the flash card;
- copying system files.
And this is not the entire list of this utility, so if you advanced user, then be sure to check it out.
Where can I get the Russian version?
We have looked at almost all the functions of the program, now let's step aside a little and talk about the Russification of WinSetupFromUSB. There is no Russian version. It’s worth pointing this out right away, because that’s how it is. Of course, you can find pages on the Internet where they will claim the opposite, but most likely this is a hoax, and by downloading such a program, you will introduce a virus to your computer. Moreover, at the very beginning of the article it was said that the program must be downloaded from the official website of the developer, but as you can see, this site is on English, and you can’t switch it to Russian. Accordingly, all versions of the programs will also be in English.
When entering in a search engine: WinSetupFromUSB RUS, do not believe sites that offer you to download a program in Russian or use a Russian language. In general there is no need. After all, this article described all the processes of this program. Simply following them, you can burn a bootable USB flash drive. And over time, you will hone your skills to such an extent that you won’t even need instructions.
WinSetupFromUSB is a utility for creating a bootable flash drive / external USB drive, followed by installation (launch) on the computer of various operating systems and LiveCD, with the ability to select several options for loading them. To do this, you just need to specify in WinSetupFromUSB the path to the folder with the unpacked image, or to the virtual drive with the distribution kit, and the program will automate this entire process and create a bootable USB flash drive with any Windows distribution or with your set of different OS / LiveCD.
System Requirements:
Windows XP, Vista, 7, 8, 10
Torrent Creating a bootable USB flash drive - WinSetupFromUSB 1.8 Final details:
You must format your flash card from which you want to install Windows.
1. Naturally, you must first make sure that all your installation Windows files will be able to sign up for it - just compare the size of the flash drive with the size of the files.
2.Run WinSetupFromUSB.
3.The flash card needs to be formatted in the RMPrepUSB utility - just press the corresponding button.
4.When the utility starts, select your flash card from the list above (of course, at this time the flash card must be connected to the computer).
5.Select file NTFS system, in which the flash card will be formatted.
6.If you are going to install Windows XP, then enable the Boot as HDD (2PTNS) checkbox and select XP bootable. If you are installing Windows Vista, 7 or 8, then select WinPE/Vista v2 bootable.
7.Click the Prepare Drive button.
8.During the formatting process, the utility will show you information windows, you just need to confirm them and wait for the formatting to finish.
9.When the formatting process is complete, you can close the utility.
Creating a bootable flash card:
At this stage, you will write (of course, using this program) your specially modified Windows installation files onto your prepared flash card.
1.Run WinSetupFromUSB.
2.Select Windows image. There are two options here:
If you are installing Windows XP: click the Browse button next to the Windows 2000/XP/2003 Source field.
If you are installing Windows Vista, Windows 7 or Windows 8: check the box next to the Vista/7/8 setup/PE/Recovery ISO field and, by clicking on the button on the right, specify the path to the image.
3.Select your flash card from USB list Disk Selection.
4.Click big button GO. The automatic process of processing your installation files will start and then write them to your flash card.
Running Windows installation from your bootable flash drive:
1.Insert your bootable flash card into USB connector your netbook.
2.Turn on your netbook (if it was turned on before, you must first turn it off).
3.In POST time(eng. Power On Self Test- self-test after switching on) press the F12 button (or F10, depending on the BIOS version).
4.In the list that appears boot devices select your flash card.
5.When a list of operating systems to install appears, click .
6.To start the text mode of Windows installation (changing disk partitions and then formatting them, copying installation files to disk), select First part of setup (the inscription should be highlighted in yellow) and click .
7.If you have already completed the text installation mode, select Second part of setup (the inscription should be highlighted in yellow) and press.
Changes:
fixed issue with Windows 10 and recovery option not shown
fixed issue with persistence file size not set correctly and tooltip for using persistence
updated some of the tools to their latest version- RMPrepUSB, BootIce, ImDisk, WimLib
To create a multiboot USB media using the WinSetupFromUSB utility you need:
- computer with Microsoft operating system installed
- iso images of operating systems that are necessary for multiboot USB drive, for example, MS Windows XP, 7, 10, Acronis Disk Director 11, Kaspersky Rescue Disk 10.
- WinSetupFromUSB utility
- a blank USB drive with a capacity of at least 8 GB for the above ISO images
Program WinSetupFromUSB designed to create a bootable or multiboot USB drive. Download this program you can from the official website.
Fig.1 Utility download page WinSetupFromUSB
Supported systems:
- operating systems Microsoft Windows XP/2000/2003/7/8/8.1/2008/2012/10
- operating rooms Linux systems/ *BSD / *nix
- Ubuntu – 13.04 (32 and 64 bits) / 13.10 Server / 12.04.03 Server LTS
- Debian 7.1 Netinst i386, AMD64/7.2/7.6
- Linux Mint– 15 cinnamon dvd 32bit
- Mageia – 3 Dual CD
- CentOS – 6.4 LiveCD i386
- Fedora – Live Desktop 19 x86_64
- OpenSuse – 12.3 GNOME Live i686
- PCLinuxOS – KDE MiNime 2013.10
- SlackWare – 14.0 x86 DVD ISO
- OpenBSD – 5.3 Minimal, 5.3 Full
- m0n0wall – 1.34 CD-ROM
- ArchLinux – 2013.10.01-Dual
- Beini – 1.2.1, 1.2.5
- CloneZilla – 2.1.2-43-i686-pae
- DamnSmallLinux (DSL) – 4.4.10, 4.11.rc2
- Elementary OS – stable-amd64.20130810
- Gentoo – x86-minimal-20131022 , amd64-minimal-20140313
- GParted – gparted-live-0.18.0-2-i486
- Inquisitor – v3.1-beta2 Live CD (x86), 3.1-beta2 Live CD (x86_64)
- Knoppix – 7.2.0 CD EN, Adriane 7.2.0F EN
- Manjaro – openbox-0.8.7.1-i686
- Ophcrack – xp-livecd-3.6.0
- Antivirus systems:
- Avast Rescue Disk
- Sophos Bootable Anti-Virus
- Other:
- Acronis True Image
- Acronis Disk Director
- HDD Regenerator 2011
- Memtest86+ – v5.01
- MS-DOS – 7.1
- Paragon Hard Disk/Partition Manager
- UltimateBootCD – 5.20, 5.26
1. Download the utility WinSetupFromUSB
2. Download iso images of operating systems that are required for a multiboot USB drive
3. Unpack the archive with the utility WinSetupFromUSB
4. Launch the program WinSetupFromUSB
5. In the window that opens WinSetupFromUSB select from the drop-down list required USB storage device

Fig.2 Selecting a USB drive in the program WinSetupFromUSB
6. Check the checkbox AutoFormat it with FBinst to automatically format a USB drive.

Fig.3 Setting up automatic formatting of a USB drive in the program WinSetupFromUSB
If you have previously used this program to create a multiboot flash drive of this drive and there was a need to add a few more operating system images, check the checkbox AutoFormat it with FBinst no need to install.
7. Select the required file system.
8. To add an operating system Microsoft Windows XP, you must first unpack the iso image of the system or mount it in virtual drive, check the checkbox Windows 2000/ XP/2003 Setup and indicate the path to the folder or drive in which the folder is located I386 .
9. To add an operating system Microsoft Windows 7 (or others) you need to check the checkbox Windows Vista/7/8/ Server 2008/2012 based ISO and specify the path to the iso image of the desired operating system.
10. To add an operating system Ubuntu(or other Linux operating system) you need to check the checkbox Linux ISO / Other Grub4 dos compatible ISO and indicate the path to iso image of the required operating system.
11. After completing the process of adding the required distributions, you must click the button Go.
12. Upon completion of creating a multiboot USB drive, in the Done pop-up window, click the button OK.
13. To exit the program, press the button EXIT.
14. To add distributions to the created multiboot drive the next time you start the program WinSetupFromUSB must be specified the required drive, do not check the checkbox AutoFormat it with FBinst and indicate the path to them.
Found a typo? Press Ctrl + Enter
This photo shows the finished result of a bootable flash drive. An 8 GB one was used.
As you can see in the flash drive menu there are 6 functions (you can do less or more - it all depends on your imagination).
Now everything is in order.
0 is loading a Live CD. If Windows crashes, you can save important contents from disks.
There are many other possibilities. Checking disks for errors, viruses, etc.
1 - Installing Windows XP SP3
2 - Installing Windows 7 Ultimate 32/62 bit
3 - Booting the computer from drive C (should be the last one, but it turned out like this)
4 - Acronis BOOT CD 2012 - with Acronis Disk Director and Acronis True Image
5 - Acronis BOOT CD 2013 - it’s just newer in case the old one doesn’t see the hard drive.
I edited the menu labels to make it clearer to me.
Now about the procedure itself. You need the program itself - WinSetupFromUSB 1.3
You can download
The archive contains two files for launching - for 32 and 64-bit Windows.
You also need disk (disk) images in iso format or bootable CD/DVD discs themselves. From them, if necessary, you can create an image, for example using Ultra ISO.
Here is an example of creating a bootable USB flash drive with Windows 7

Select the NTFS file system, agree that all data on the flash drive will be deleted. The formatting process will begin. After this, the image download process will begin. If FAT32 is selected, the program will refuse to write images larger than 4 GB. FAT32 does not “know” about such files - outdated system. But it will offer to format it to NTFS. True in English. You can simply format it without recording the image. And the next step, without formatting, is to record the image.
Wait for this message: 
That's it, the flash drive is ready to install Windows 7 on a netbook.
Then you can download additional disk images to this flash drive in the same sequence. You can also download a Windows 8 image, but I haven’t tried Ten.
But do not check the Format box.
There are loading features installation Windows XP:
You must first unpack the contents of the XP image (files, folders) into any created empty folder. In the program, use the top window (strip) accordingly:
Windows 2000/XP/2003 Setup

To write an Acronis Boot CD image to a flash drive- select the program option:
Linux ISO/Other Grub4dos compatible ISO
Accordingly, put a tick in this window and specify the ISO image of Acronis Boot CD
And the GO button. I don’t take a screenshot, I think everything is clear.
For Live CD recording used another method:
I unpacked the Live CD image (I had a Win7 Live CD x86x64 by Xemom1) into the created empty folder; the image contained a single folder named XMPE.
Then I copied it to the root of the flash drive, and in the menu.lst file, which is located on the flash drive, I added the following lines:
Title Win7 Live CD x86&x64 by Xemom1
At the same time, I also edited the menu lines that are displayed on the screen when the flash drive starts.
Each line begins with the word title, then a space, and then write whatever is more convenient for you.
Leave everything else alone. True, I changed the waiting time from 10 seconds to 30.
and save the menu file - menu.lst opens as a regular text file.
This is what I got - this is the text of my menu.lst file
Of course, it will be different for you - depending on what images you choose for this.
Color black/cyan yellow/cyan
timeout 30
#graphicsmode 0x6A
graphicsmode -1 640 480:800 24:32 || graphicsmode -1
## Menu AutoNumber
write 0x8274 0x2001
#graphicsmode -1 800:640 -1 24:32 || graphicsmode -1
#font/unifont.hex.gz
#clear mappings and set root in case we return from bootmgr
map --unmap=0:0xff
map --unhook
map --rehook
ls /usbdrive.tag > nul || find --set-root --devices=hf /usbdrive.tag > nul
ls /default > nul && default /default
Title Win7 Live CD x86x64 by Xemom1
chainloader /XMPE/WinPE/bootmgr
Title Setup Windows XP SP3 2013 by Chip
map --unmap=0:0xff
map --unhook && map --rehook
savedefault
ls /usbdrive.tag > nul || find --set-root --devices=hf /usbdrive.tag
configfile/winsetup.lst
Title Setup Windows 7 Ultimate 32x64 bit by Gorskiy
map --unhook
savedefault +1
ls /shifthd.bat >
/shifthd.bat
root(hd%RDSK%,0)
chainloader /BOOTMGR
Title Boot first internal disk (boot disk C or Your Windows)
map --unhook
map --unmap=0:0xff && map --rehook
savedefault
ls /shifthd.bat > nul || find --set-root --devices=hf /shifthd.bat
/shifthd.bat
if "%RDSK%"=="" pause Fatal error while swaping hard disk order, cannot continue! && configfile /menu.lst
pause --wait=1 Booting MBR on hd0 ...
chainloader(hd0)+1
Title Acronis BOOT CD 2012
map --unmap=0:0xff
map --unhook && map --rehook
cat --hex --locate=PoLPu@ (md)0x3D0+0x130 >
set /a dev=*0x8280&0xff
root (%dev%,0)
set ISO=/ISO/AcronisMedia.iso
ls %ISO% >
ls %ISO% >
set /a dev=*0x82a0&0xff
debug 1
debug off
set check=%check:~-5.4%
map --hook
root (0xff)
chainloader (0xff)
Title Acronis BootCD WinPE-Based 2013
map --unmap=0:0xff
map --unhook && map --rehook
cat --hex --locate=PoLPu@ (md)0x3D0+0x130 > nul && echo Cannot continue if PLoP is active, please start this entry without loading PLoP first && echo && pause Press any key to return to the main menu && configfile /menu.lst
set /a dev=*0x8280&0xff
root (%dev%,0)
set ISO=/ISO/AcronisBootCDWinPE-Based.iso
ls %ISO% > nul || find --set-root --devices=hf /usbdrive.tag|| echo Error! Could not find usbdrive.tag && echo && pause Press any key to return to the main menu && configfile /menu.lst
ls %ISO% > nul || find --set-root --devices=hf %ISO% || echo Error! Could not find %ISO% && echo && pause Press any key to return to the main menu && configfile /menu.lst
map %ISO% (0xff) || map --heads=0 --sectors-per-track=0 %ISO% (0xff) || echo FATAL ERROR mapping %ISO%, please check if file is present and defragmented && pause Press any key to return to main menu && configfile /menu.lst
#http://reboot.pro/topic/9916-grub4dos-isohybrided/page-2#entry88531
#http://www.rmprepusb.com/tutorials/tails
set /a dev=*0x82a0&0xff
debug 1
parttype (%dev%,3) | set check=
debug off
set check=%check:~-5.4%
if "%check%"=="0x00" partnew (%dev%,3) 0 0 0 && partnew (%dev%,3) 0x00 %ISO%
if not "%check%"=="0x00" echo WARNING: PARTITION TABLE 4 IN BIOS DEVICE %dev% IS ALREADY IN USE! && echo && echo To prevent possible data loss will not continue further && pause && configfile /menu.lst
map --hook
root (0xff)
chainloader (0xff)