Ubuntu cannot be installed from a flash drive. Installing Ubuntu LINUX from a flash drive - instructions
Owners of old laptops, in an attempt to “speed up” the device, express a desire to install Linux. The easiest way to do this is from a flash drive, especially if the gadget is not equipped with an optical drive. However, before you get started, you should learn more about this process.
Features of installing Linux from a flash drive
Linux and Windows user experiences may be similar in some situations. But their internal processes are very different. So the installation was not without its peculiarities:
- By launching Linux from a flash drive, the user environment and main programs can be tested without necessarily installing it on hard drive. Therefore, almost all distributions of this OS are called “Live-CD/DVD”.
- Installing Linux from a flash drive or disk can be done either as the only system on a PC or next to another OS.
- To record the distribution, you should use working USB drives, since low-quality media can overheat and turn off during installation.
- It is not recommended to install using a USB flash drive via USB hubs. Especially if, in addition to the storage with the installer, other equipment is connected to it. This can cause a lot of problems.
Programs for installing Linux from a flash drive
There is a huge list of software for burning operating system distributions onto USB drives. But the most versatile and proven is Unetbootin, as it works on both Windows and Linux.
How to burn an image using Unetbootin:
- Download the program from the link
- Run it, specifying that the target will be a disk image.

- By clicking the button with three dots, specify the distribution image.

- Select the type “USB Device”.

- Specify the carrier letter. If the media is connected in a single copy, the program detects it automatically.

- Click "Ok". The data on the media will be lost.

Everything is ready to start installing Linux from a flash drive to a laptop. You can close the program.

How to install Linux from a flash drive
The variety of Linux distributions does not allow us to talk about all types of installers at once. However, the most common among users are Debian builds, which include Ubuntu, Fedora, Zorin OS, ALTLinux, etc. And their installers give a complete picture of the ways and how Linux can be installed. First, you need to boot from a flash drive. You need to get into the BIOS.
BIOS setup
Attention! On most laptops, you can get into the BIOS by holding or constantly pressing the F2 key when turning on the device.
However, depending on the manufacturer and model, the keys and their combinations may vary.
- MSI laptops – Del key, F2.
- Dell – Del, F1, Insert or
- Acer – F1, F2, Delete, Ctrl+Alt+Escape.
- Packard Bell – Del, F2.
- Hewlett Packard – F2, F11, Del.
Also available from some manufacturers Boot Menu, from which you can immediately select a device to bypass boot BIOS settings. It is usually accessible by pressing the keys – F10, F11 or F12.
If the Boot Menu is missing, but you managed to get into the BIOS, then the setting for most laptop models looks like this:

Installing Linux using Fedora as an example
Attention! Manual marking for installation operating system creates more favorable conditions for its further use.
- After booting from the flash drive, the user will be greeted with the following window, in which you need to select the “Start Fedora-Workstation” item and press “Enter”.

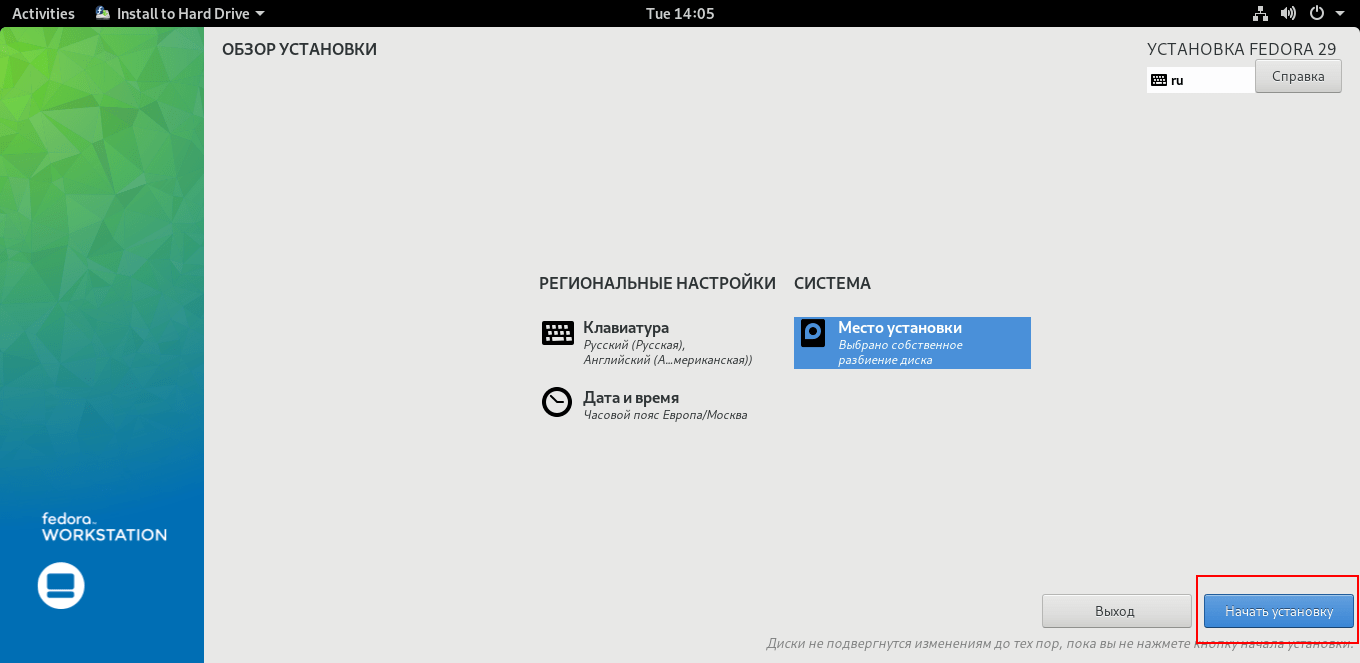
- will appear home page installer The “Install to Hard Drive” button starts the installation.

- Next you need to select your language and region.

- Click on the Installation Location button.

- Select the hard drive on which Linux will be unpacked.

- Set the device configuration to the “In your own way” mode and click “Finish”.

- Next, change the partition scheme to “Standard partition”.

- Click on the “+” button to begin partitioning the disk.


- Click the “Done” button.

- Then start the process by clicking on the “Start installation” button.
- The unpacking process will begin.

- When Fedora notifies you that the unpacking process is complete, click Exit.

- Then, in the control menu, restart your PC and remove the USB drive.


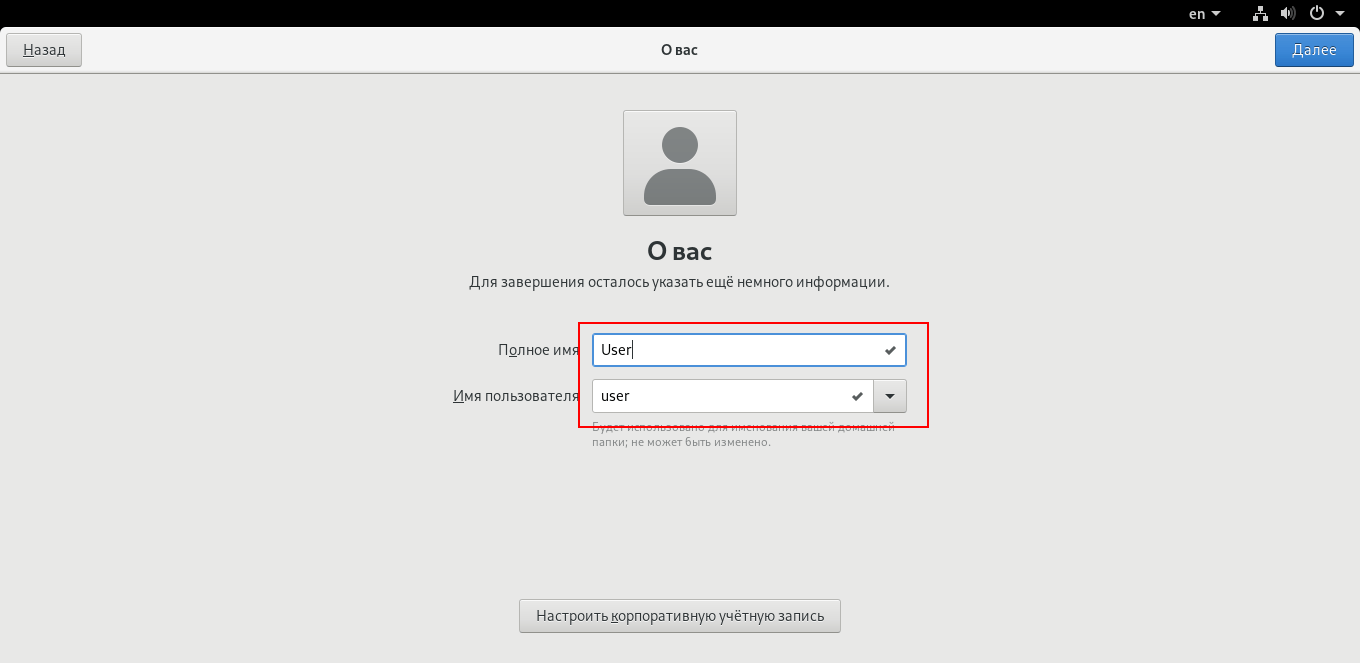
- The first time you launch Fedora, you'll be presented with a welcome screen, where the last screen will be to enter your username and password.

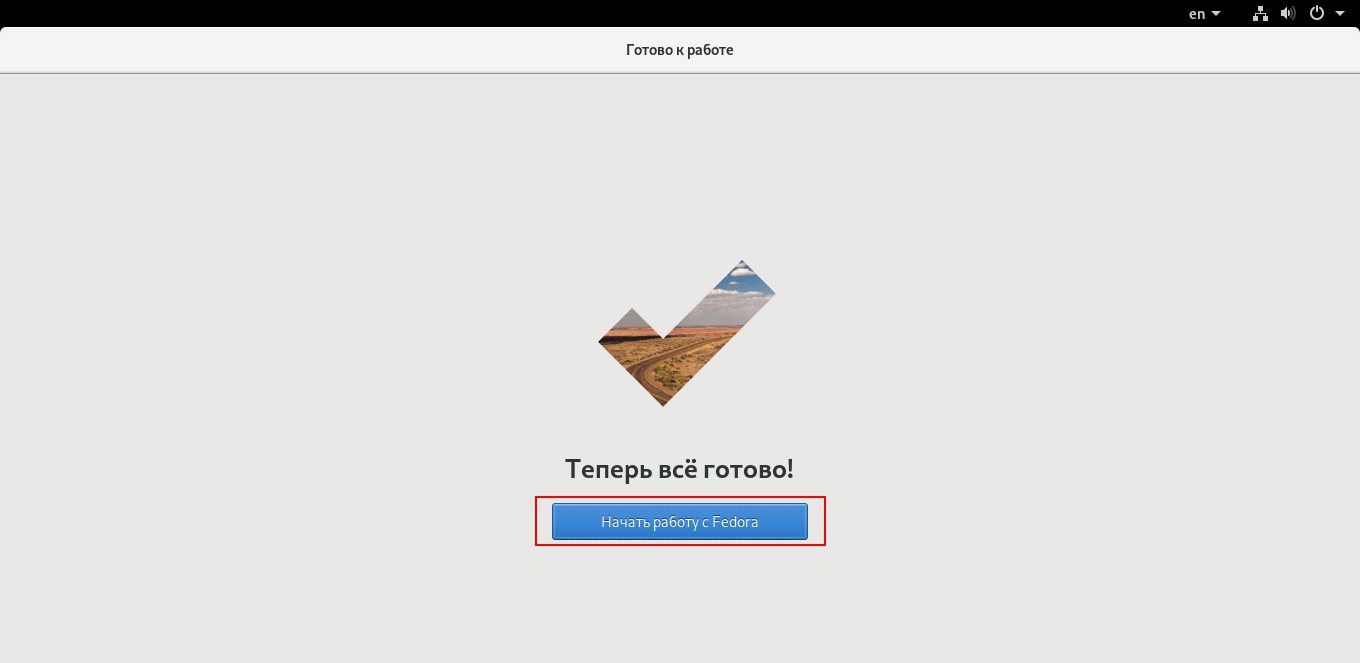
- At the end of the setup, click on the “Get Started” button, and that’s it Fedora installation from the flash drive is completed.
Installation from a Zorin OS flash drive occurs through a standard installer for Debian-like builds and has minimal differences from this process in Linux Fedora. Namely:


Installation from a flash drive of ALTLinux and most other operating systems based on this kernel, such as Ubuntu, Elementary, Deepin and others, is the same, only the interfaces differ.
If Linux cannot be installed from a flash drive: common errors
Despite the apparent ease of installation, no one is immune from problems with it. If Linux cannot be installed from a flash drive, most likely:
- The BIOS settings have disappeared or were not installed correctly. Check your settings and save them again. If the situation does not change, try replacing the battery with motherboard laptop, it is responsible for saving settings, date and time on the device.
- If there is more than one on the computer hard drive After installing the Linux OS, go to the BIOS and use the first boot device to select the hard drive on which the distribution was unpacked.
- Broken image or poor quality recording. This can usually be verified using MD5 sums, but not all distributions come with them. So the most reliable option would be to re-download the Linux image from the official website (without parallel downloads of anything), and then write it to a USB drive without any extraneous running processes.
- Incorrectly marked hard drive. When the root section is smaller than recommended in system requirements specific assembly.
- The bootloader was installed on the wrong disk.
Conclusion
Recently, Linux has ceased to be a product intended exclusively for computer professionals. Thanks to this, anyone who reads this article will be able to independently install Linux from a flash drive.
operating room Linux system Ubuntu can be installed either from a CD or from a flash drive. In the latter case, the installation is quite comfortable: all the information on the flash drive will remain safe and sound, and in addition, it will be installed on the computer faster than from a disk. So, below is the entire process of installing Linux Ubuntu on a computer using a flash drive.
First, you need to download the image of the desired version of the system to your computer via the official website. After which a bootable flash drive is created - copying the image to the flash drive will not be enough to install the system. Further steps for creating a bootable USB flash drive vary depending on the user's operating system. Below are the creation procedures via Windows and Linux. To create a bootable USB flash drive via Windows, just download the program. After connecting the flash drive, run it. The procedure is quite simple: indicate the desired distribution at the top (in in this case Linux) – if you plan to download a system image using a program; or below in the Diskimage item - if the image has already been downloaded. Then you should select a flash drive as a container, and then start the process of creating a bootable flash drive. If necessary, you can specify additional space for storing personal data (Spase used to preserve files across reboots). In case it is intended to create bootable USB flash drive via Linux, you can use the built-in usb-creator-gtk program. This utility can be launched by pressing the ALT+F2 key combination, or by searching through the application menu and using the “Create a boot disk” request.


After restarting the computer, the Linux installation will start from the bootable USB flash drive. Further actions of the installer are determined by the user; the flash drive must be connected to the computer before the installation process is fully completed.
I advise many people to use the so-called Live CD and Live USB with an alternative operating system, Ubuntu. But oddly enough, there is no well-written manual for creating a bootable USB flash drive with Ubuntu even on the manufacturers’ website.
In principle, if you have average knowledge of the English language, this is not a problem, but with entry level something as simple as creating a bootable USB flash drive with Ubuntu It's just going to be a nightmare.
Why do I use a flash drive as a basis? The answer is quite simple - I have three of them and almost never have blank CDs or DVDs on hand, but a flash drive - please! The second reason for this post was the breakdown of the hard drive on my netbook, which without such a flash drive is just a stand for a cup of tea at the moment.
This manual can be used not only for creating Ubuntu Live Flash, but it will also work with others Linux distributions, except for very specific ones.
Create a bootable USB flash drive with Ubuntu
1. The first thing we need for installation is the system distribution. It is better to download it in advance, since the installation program will download it much more slowly (apparently it is configured to download from the USA, and not the nearest server). 
At this stage you need to be patient and download ISO image with Ubuntu on your PC. An important aspect for creating a bootable USB flash drive with Ubuntu is You can't change the name of the ISO image!Most likely this is an overlooked glitch in the installer, but I’m seriously telling you: “The installer will not see the ISO image if you change the file name.”
2. Step two involves downloading the utility to create the bootable flash drive itself. You can download it from me - or latest version on the manufacturer's website. There is no need to install it, we can say that this is a portable version :)
3. Step three. You have a disk image with Ubuntu and a utility, as well as a flash drive with two gigabytes of memory on board.
We do the following:
- format the flash drive (preferably Fat32, default cluster, fast). The utility also provides formatting, but I had difficulties loading from a flash drive, so I advise formatting using Windows tools
- we launch the utility, it is important that the flash drive is already connected to the PC, otherwise it will not see it.
- select the specified distribution in it - the names must match, remember? (usually this is ubuntu №№...iso)
- select the address of the flash card (if you suddenly connected 3 pieces) and click Create

Now all that remains is to wait for the miracle of completing the utility and the flash drive is ready for use.
Booting from USB Live Flash Stick
Now you can try our new flash drive in action, but to do this you need to make changes in the BIOS of your PC, laptop or netbook.
Typically, you can enter the BIOS using the DEL or F2 keys while the PC is booting. You need to find the item Boot or Boot Priority (there may be combinations with the word Setup) and put the flash drive as the first boot location or, better yet, the only one.
I’ll show you using an ill-fated netbook as an example:

What to do if Ubuntu does not boot from the flash drive?
Additional information provided by Arthur from St. Petersburg, the story can be seen in the comments. There were problems installing UbuntuStudio on a netbook.
So, if the flash drive is not detected as boot device you need to “deceive the system” and present it as a hard drive. To do this, we need another specific utility - RMprepUSB.
The screenshot below shows step-by-step setup utilities:

Now in more detail:
- We will need ISO image file and a flash drive with 2 or more gigabytes of memory.
- Download the RMprepUSB utility (it is usually the first in the list Install_RMPrepUSB_2.1.628Full.zip, but the number may vary).
- Install the utility on your PC and run it.
- Configuring program parameters:
- select “Boot sector” - Syslinux
- file system FAT32 + Boot as HDD (or USB-Zip)
- check the box “Copy system files”
- agree with unpacking ISO and point the way to our Ubuntu distribution or what have you.
Upon completion of the utility, you will have a ready-made bootable flash drive, which will be detected in the system as a hard drive.
What can you do with a bootable USB flash drive from Ubuntu?
First of all, this is already the whole system, which will allow you to view, erase or write files to your (or someone else’s) PC. At the same time, it is not necessary to know the Windows password (except for the system drive). The system boot speed will depend directly on the PC parameters and the speed of the flash card.
Also, your PC will be able to connect to the Internet and allow you to work online without any significant loss in speed. Wi-Fi also works and you can find my articles about it, and also try to solve your problems.
You can also save your files to system disk, if Windows has given a long life.
Using this program you can format or repartition a disk or other flash drive.
That's basically all I wanted to write on this issue. Clarifications - in the comments!
At your request, we are publishing an article about installing Linux OS from a bootable USB flash drive. This article will be useful for those who want to have a bootable USB flash drive with Linux OS and for those who want to install Linux on a computer but do not have a drive. (for example netbook)
First we need the flash drive itself. The size is taken into account based on the disk you select. If you want to upload a DVD to it, then you will need a medium with a capacity of at least 8 GB, and for the CD version of Linux 4 GB will be enough. As a tool for creating a bootable USB flash drive from Windows OS, I highly recommend using Linux Live USB Creator. The software can create a bootable USB flash drive both from a disk available in your computer’s CD drive, and from a disk image (ISO, IMG, ZIP archive). In addition, she can download images from the Internet... Having received the treasured disk, downloaded and installed the program, we begin creating. The program has a user-friendly interface and divides the process into 5 stages.
1. Selecting installation media. Everything is simple here - select the flash drive on which the image will be uploaded.
2. Selecting a source. As I already said, this can be an image or a real disk in your drive. If not, download through the same program or any other way.
3. Settings file. After Linux Live usb creator will scan the image you have chosen and you will select a flash drive to upload, then you can reserve space for the files you create and installation of programs. Everything that will be created and installed by you during your work directly from the flash drive itself will be stored here.
4. Settings. There are only three of them: a) Hide created files (hides the presence of flooded Linux image). It can be useful if you want to use a flash drive not only as a boot drive, but also for regular file transfer. Hidden files will not be an eyesore; b) Formatting USB to FAT32 ( the data on the disk will be destroyed!!!) ;With) Allow LinuxLive-USB to run on Windows (Internet connection required).
When the program checks the correct implementation of all points, the “traffic lights” will turn green and you can safely press the “Create” lightning button. When the bootable USB flash drive is ready, restart your computer and boot from the flash drive. When the download is successful, start the installation or use the Linux OS directly on the removable media.
2015-12-12T14:38:03+00:00 admin Where to start? Articles Live CD, InstallationAt your request, we are publishing an article about installing Linux OS from a bootable USB flash drive. This article will be useful for those who want to have a bootable USB flash drive with Linux OS and for those who want to install Linux on a computer but do not have a drive. (for example, a netbook) First, we need the flash drive itself. The size is taken into account based on the chosen...
[email protected] Administrator LINUX TutorialDear friends, the topic of today's discussion is installing Ubuntu from a flash drive. Naturally, before installation itself you still need to get a number necessary information, which will help you get the job done efficiently and without problems. So, what will we learn today:
- preparatory work;
- how to create a bootable USB flash drive for further use;
- actually, how to install Ubuntu from a flash drive.
As the name of the block implies, we are now considering the preparatory stage. First, we need the flash drive itself, onto which we will write the image a little later. It must have a volume of at least eight gigabytes, as well as the NFTS format. If the last words don’t mean anything to you, don’t worry: the format can be changed anyway, so, in principle, there’s no need to focus too much on this point. If the drive is not new, be sure to format it and check for viruses using antivirus programs and only then take action.
For Ubuntu installation from a flash drive to be successful, you also need to download the OS image. Otherwise, nothing will work. If you have ever reinstalled the operating system on your own before personal computer, then you should know that it all starts with downloading the necessary system image. Fortunately, they are available for download on the website http://ubuntu.ru/get. Only after this stage will it be possible to move on to the next ones. Please note that downloading may take time. for a long time: It all depends on the speed of your Internet connection. That is, if it is high, then the download will go quickly and vice versa.
Creating a bootable Ubuntu USB flash drive
Before you begin, you will need to install additional software on your computer. software. Therefore, the device must have active connection to the Internet. The program is called WinSetupFromUSB and it is available for free download follow the link http://www.winsetupfromusb.com/downloads/. Its installation is similar to the installation process of any other application for a computer or laptop. It is also worth noting that everything further actions are discussed using the example of the Windows operating system.

Operating system installation
Preparation
You can proceed to the last stage, which almost all users are afraid of: how to install Ubuntu from a flash drive. In fact, the worst is already behind us. It will be easier further, as you will see for yourself. To begin with, we recommend that you look in the instructions or on the website of the manufacturer of your device to see how the BIOS is called up on a PC. Most often this is one of the F or Delete keys. But to avoid getting into trouble, it is better to find out this information in advance.
Installation steps
Only after this we proceed to the next steps.
- We connect the flash drive prepared at the last stage to the computer and turn it off.
- Press the power button to turn it back on and quickly press the key to call up the BIOS menu.
- Here you will need to change the priority to booting from a flash drive. To do this, go to the Boot tab, then open the item Boot Device Priority and using the navigation keys indicated at the bottom of the page, we put our drive in first place. If you don't know English language, then use a translator. BIOS menu This is different on every computer, so there is no one general instruction for changing the boot priority.
- When you install the prepared drive in the first place, exit the menu with saving data. Wait while the PC downloads the data.
- If you have completed the previous steps correctly, you will see the installation welcome window. In the left block you can select the language, and on the right the installation type: this could be a simple launch of Ubuntu for testing (the system will not be installed, you can just get acquainted with it, for example) and, in fact, full installation. Click on the second option.

- Set the required parameters in the next window and click “Continue”.
- Now you will need to select the installation type. As stated in the description, the system can be installed either next to an existing one or instead of it. If you need Windows, you can take the first option. If you only want Ubuntu, then choose the second type. Click “Continue”.

- In the next window, the user is asked to allocate disk space for the system and files. To do this, move the separator to set the necessary parameters. When you have distributed everything, click “Install now”, and in the dialog box that appears, click “Continue”, knowingly reading the information provided.

- After some time, you will see a window called “Who are you?” Write down all the data as you wish (name, password, etc.), then click “Continue”.

- Wait for the process to complete. After the computer restarts, the Ubuntu operating system interface will be presented. If you left Windows in the seventh step, then after the reboot you will have to select a system to start. And this will happen every time you turn on the PC.
Now you can customize the OS to suit your needs: install drivers, write programs, and so on. And also the OS may warn you about the need to download some files for correct operation. These steps are mandatory for proper operation systems.
Conclusion
Dear readers, we hope that the installation of Ubuntu from the USB flash drive was successful. Summarizing what was said earlier, we can highlight the main stages of our joint work:
- Preparing the flash drive for use.
- Create a bootable USB flash drive
- Reboot the computer with the drive set as the first boot priority in the BIOS.
- Installing the system in ten steps.
We remind you that all actions are performed at your own peril and risk. Read all messages on your computer carefully to avoid unpleasant situations. Tell us in the comments: did you manage to install Ubuntu on your PC?