How to connect a hard drive to power. How to connect a second SATA or IDE hard drive to a computer
Co desktop computer the situation is much easier than with a laptop, so let's start with it. So, you already know what characteristics to rely on when purchasing, so we’ll leave this topic outside the scope of today’s article.
- First of all, even before purchasing, you should have figured out what free drive connectors are available on your system board- old IDE or one of the varieties of SATA (I, II or III).
- And secondly, what free power connectors are available on the .
Modern hard drives, motherboards and power supplies work with connectors SATA type. However, if they are all already occupied on the power supply, then also take care of purchasing a Molex-SATA adapter to connect your second drive to Molex-type power.
If you want to use a second old hard drive connected to motherboard type “IDE”, and the last one you have is new and no longer has such an input, then we buy an adapter from IDE to SATA.
Another option is to connect hard drive To a computer that does not have a corresponding connector for it, use a special IDE-SATA PCI controller. The advantage of it is that with it you can connect an old IDE drive to new board, and a new SATA drive to the old motherboard. It looks like an expansion card that is inserted into PCI slot on the motherboard and adds support for working with IDE devices. Let me remind you that you can connect two disks or drives to a standard cable at once.

Let's say you have already found out all your nuances, purchased second hard disk and, if necessary, adapters, and now you need to install it in the case and connect it to the motherboard and power supply. First, we secure the hard drive in a special basket in the case, or insert it along the guides and secure it with special fasteners or ordinary screws, depending on the type.

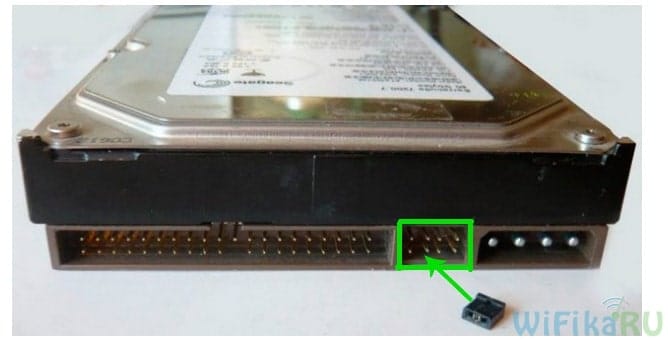
After that, we connect the “small” SATA to the corresponding connectors on the back of the drive and on the motherboard, and into the larger SATA socket (for power) we insert either an adapter connected to the cable from the power supply, or directly the power supply cable with a SATA plug. We do this carefully so as not to break the socket on the hard drive, since there is no limiter at the bottom and you can easily break off a piece of the board with the contacts of this connector.
In the screenshot below, green arrows indicate wide SATA arrows that connect the second hard drive to the power supply, and red arrows indicate narrow ones that go to the motherboard.

Yes, do not forget that all connections must be made with the power supply disconnected from the outlet, or with the power switch turned off, if there is one on it. As you can see, there is nothing complicated.
How to install a second hard drive in a laptop?
Is this really possible? Yes, today you can also increase the amount of space not only on a desktop PC, but also on a laptop. And for this it is not at all necessary to replace the standard hard drive that is already in the laptop, and therefore you will not have to face all the associated problems, such as transferring files and reinstalling Windows and all programs on the new hard drive.
The second hard drive in the laptop (remember, 2.5 inches in size) is connected using a special adapter, which is installed instead of the laptop one DVD drive And - you must admit, now almost no one uses this device. And if you need to view discs, you can always use an external one connected via USB.
This is what this adapter, invented (or copied?) by the Chinese, looks like:

In online stores it can be found under the name “2nd SSD HDD HD Hard Disk Driver Caddy SATA for 12.7mm CD / DVD-ROM Optical Bay". Inside and outside of this adapter there is a connector for connecting a disk and for connecting the adapter itself to the laptop board.
So, we insert the hard drive into the adapter. You may also have to screw the mount yourself to the back of the adapter, through which it will be screwed to the laptop body.


And in its place we insert the adapter and secure it with the same screw. After this, the “Computer” menu will appear new hard a disk that can be fully used after formatting.
How to install a small hard drive in a computer?
Talking about connecting hard drive, we cannot but touch upon the problem that users sometimes encounter when there is a need to install a hard drive or 2.5″ SSD into a computer whose case only has fasteners for standard wheels 3.5″ in size. For this case, there are also special adapters in which such a hard drive can be secured and inserted into a regular place under disks of larger diameter.

BIOS does not recognize the second hard drive
Another common problem that you may encounter when you have 2 hard drives installed is that the computer simply does not see one of them. First of all, if you are using an adapter, then this may be the problem. Use known-good adapters.
If you haven’t used it or your adapter is working, then the whole point is in the BIOS settings, namely the controller’s operating mode is set incorrectly hard drives.
We reboot the computer, go into the BIOS and look for the “SATA Controller” item (or SATA ATA/IDE/Raid Config, Mass Storage Controll or something else like that to set the mode HDD operation). If you connected a drive from to the motherboard SATA cable and at the same time a modern operating system is installed on the computer ( Windows Vista, 7, 8 and above), then the AHCI, IDE, Native or Enchansed position can be activated in this item. At the same time
only in AHCI mode will be achieved maximum speed transferring data from disk.
If more old Windows, or if the hard drive was connected, then only IDE, Native or Enchansed.
The disk controllers themselves must also be enabled. Here are a couple of screenshots from different BIOSes with these settings:

If your computer has 2 hard drives (or a disk + DVD drive) and both of them are connected via IDE cables, then the problem may be that they are not configured correctly with each other. If you have just such a connection and in the BIOS you see the following picture:

then this is your case. In this configuration (when both are connected via IDE), one disk should be Master, that is, the main one, the one on which Windows is located, and the other Slave, that is, secondary.
This priority is configured using a special jumper installed on the contacts on the back of the case.
All possible positions of this jumper and their modes are usually described on a sticker on the disk body. U different manufacturers they may differ.

From our table we see that if Windows is installed on the disk and it will be the main one (Master), or if it is used alone, then we put a jumper on the first 2 vertical contacts. If it is secondary (Slave), then remove the jumper altogether.
We do this with our hard drives and go into the BIOS again. Now they will be automatically detected by the motherboard and the following picture should be drawn:

Good day everyone.
A fairly typical task: throw large number files from hard drive computer to the laptop hard drive (or, in general, it just remained old disk from a PC and want to use it for storage different files, so that laptop HDD, as a rule, less capacity in volume).
In both cases, you will need to connect the hard drive to the laptop. This article is just about this; let’s look at one of the simplest and most versatile options.
Question No. 1: how to remove a hard drive from a computer (IDE and SATA)
It is logical that before connecting the disk to another device, it must be removed from system unit PC ( The fact is that depending on the interface for connecting your drive (IDE or SATA), the boxes that will be required for connection will differ. More on this later in the article...).
Rice. 1. Hard drive 2.0 TB, WD Green.
Therefore, in order not to guess what kind of disk you have, it is best to first remove it from the system unit and look at its interface.
As a rule, there are no problems with extracting large ones:
- First, turn off the computer completely, including unplugging the plug;
- open the side cover of the system unit;
- remove from the hard drive all the plugs that are connected to it;
- unscrew the fastening screws and remove the disk (as a rule, it goes on a slide).
The process itself is quite easy and fast. Then take a close look at the connection interface (see Figure 2). Nowadays, most modern drives are connected via SATA (a modern interface that provides high speed data transfer). If your drive is old, it is quite possible that it will have an IDE interface.
Another important point...
Computers usually have “large” 3.5-inch disks (see Fig. 2.1), but laptops have smaller disks - 2.5 inches (1 inch is 2.54 cm). The numbers 2.5 and 3.5 are used to denote form factors and indicate the width of the HDD case in inches.
The height of all modern 3.5 hard drives is 25 mm; this is called "half-height" compared to much older drives. Manufacturers use this height to accommodate between one and five wafers. B 2.5 hard drives everything is different: the original height of 12.5 mm was replaced by 9.5 mm, which includes up to three plates (there are also more thin disks). The 9.5mm height has actually become the standard for most laptops, however, some companies sometimes still produce 12.5mm hard drives based on three platters.
Rice. 2.1. Form factor. 2.5-inch drive - top (laptops, netbooks); 3.5 inches - bottom (PC).
Connecting the drive to the laptop
For direct connection you will need a special BOX (box, or translated from English as “box”). These boxes can be varied:
- 3.5 IDE -> USB 2.0 - means that this box is for a 3.5-inch drive (and these are the ones found in PCs) with IDE interface, to connect to USB port 2.0 (transfer speed (actual) no more than 20-35 Mb/s);
- 3.5 IDE -> USB 3.0 - the same, only the transfer speed will be higher;
- 3.5 SATA -> USB 2.0 (similar, the difference is in the interface);
- 3.5 SATA -> USB 3.0, etc.
This box is a rectangular box, slightly larger size the disk itself. This box usually opens from the back and the HDD is inserted directly into it (see Fig. 3).
Actually, after this you need to connect power (adapter) to this box and connect it via USB cable to your laptop (or to a TV, for example, see Fig. 4).
If the disk and box are working, then in “ my computer"you will have another disk that you can work with as usual hard disk (format, copy, delete, etc.)
If suddenly the disk is not visible in my computer...
In this case, 2 steps may be required.
1) Check if there are drivers for your box. As a rule, Windows installs them itself, but if the box is not standard, then there may be problems...
To get started, run device Manager and see if there are drivers for your device, if there are any yellow exclamation marks anywhere ( as in fig. 5). I also recommend that you check your computer with one of the utilities for auto-updating drivers: .
Rice. 5. Problem with the driver... (To open the device manager, go to the panel Windows management and use the search).
2) Go to disk management on Windows ( to go there, in Windows 10 just right-click on START) and check if there is connected HDD. If it is, then most likely for it to become visible - it needs to change the letter and format it. By the way, I have a separate article on this subject: (I recommend reading it).
Rice. 6. Disk management. Even those drives that are not visible in Explorer and “My Computer” are visible here.
Good day everyone, my dear friends. Today I want to tell you about how to connect a hard drive via USB to a computer or laptop. Personally, I had this question when I replaced it on my laptop, after which the old “hard” remained restless, although fully functional. Therefore, I hasten to please you. If you have such a device, then you can make a great one out of it mobile storage data.
There is, however, one small condition. These methods are only suitable for more or less modern hard drives with an interface of at least SATA.
Cam Box - This is (as you understand) a certain box (plastic or metal), inside of which there is a special slot for a particular disk. Naturally, it is worth noting that there are boxes for both large HDDs (3.5) and small ones (2.5), which go under laptops.
The HDD is simply inserted into the box, and after assembly it will be no different from the usual one external hard disk. After that, you just need to insert into it USB cable and connect to your computer. This way you get double benefits:
- You bring an old device back to life and use it;
- You practically get an external HDD for free
On such media you can store any backup and archival copies, or use it in everyday life.
All the fun will cost you an average of 300-500 rubles.
Adapter (SATA-USB)
The easiest and least expensive way is to purchase a special SATA-USB adapter. The adapter itself is a cable, at one end of which there is a connector for connecting a disk, and at the other end there is a USB port.

Well, I think you guessed what needs to be done in this case. Yes, it's simple. Connect the hard drive to the connector, and insert the other end into the USB port of your computer or laptop.
But it’s just worth considering that regular HDD(3.5) One USB cable may not be powerful enough, so purchase a cable with two connectors and use them simultaneously.

Depending on the company and the quality of the product, such cables will cost you approximately 200-600 rubles.
Docking station
The most expensive, but very effective option is to purchase a docking station. These devices are somewhat reminiscent of old consoles like Dendy or Sega. The similarity is that instead of connectors for cartridges, there are connectors for HDDs. All you have to do is simply insert the hard drive into this station, and then connect it via USB to the computer.

There are such devices different types, and in many cases you will be able to work not only with one disk, but with several at once, even of different form factors (2.5 and 3.5).
The cheapest options with one device will cost you no less than 1000 rubles, or even more. More powerful stations cost 3 and 4 thousand rubles each.
As you can see, there are enough ways to connect a hard drive via USB to a computer, for every taste and color. So you no longer have to leave all your devices unattended.
Well, this is where I end my article. I hope you liked it, so don't forget to subscribe to my blog updates and also share blog articles on social networks. Good luck to you. Bye bye!
Best regards, Dmitry Kostin
Additional;
Select which hard drive will be the main one, that is, the active one from which the operating system will boot. Determine the order by installing small jumpers in the appropriate positions according to the diagrams shown directly on each hard drive.
Turn on your computer and go to BIOS settings. If the hard drives are not detected automatically, identify them manually with the appropriate command. Then save the changes and exit the BIOS.
Video on the topic
Sources:
- how to install a second hard drive
- How to connect a second hard drive
To connect to computer as second hard disk external device, designed to work via a USB port, you just need to insert the connecting wire into the corresponding connectors on the bodies of both devices. The process of installing a stationary hard disk as the second main drive in the system unit of your computer. The sequence of actions for this option is described below.
Instructions
Finish work operating system, turn off the computer and unplug it network cable. Position the system unit in such a way that you have free access to both of its side surfaces.
Remove both side panels. As a rule, to do this, it is enough to unscrew two screws connecting them to rear panel, and then move it 5 centimeters back and put it somewhere not very far.
Install the new hard drive into one of the free slots in the case. Do this carefully so as not to accidentally disconnect the wires, of which there are plenty inside the case. The connectors for connecting power should be on the motherboard side, and the hard drive is secured with four screws - two on each side of the system unit case. Use an already installed hard drive as a sample for placement and fastening.
Connect the power cable and data cable (“cable”) between the new hard drive and the motherboard. These wires differ depending on the type of hard drive being installed (IDE or SATA), but in any case, their connectors are asymmetrical in shape and the connectors can only be inserted in one way, so you cannot make a mistake. This will help you find the right slots on the motherboard. installed hard disk - the connectors you are looking for should be located next to those used to connect it. On hard drive cases that use the IDE bus, there are jumpers that are used to establish a hierarchy of disks installed in the computer - one of them must be designated as primary, and all the rest as secondary. However, in most cases there is no need to use them, since the BIOS is able to figure out the device configuration itself with the jumpers set by default.
Make sure that you have not damaged anything inside the system case during the installation process or forgotten any tools in it. Do not rush to close the case - you should first check the result of the operation performed. Connect all the necessary wires, the last of which should be the network cable. Then turn on your computer and go into the BIOS settings to make sure it can recognize the new device. After this, turn off the computer and replace the side surfaces of the system unit.
Sources:
- how to connect a drive to a computer in 2019
The quality of content is increasing inexorably, which means that file sizes are also increasing. In this regard, you may need additional space on your computer to ensure reliable storage of your extensive library of audio and video files, heavy programs and much more. In order not to change the current hard drive, it is enough to connect an additional one to it, which will act as an auxiliary source of space.
So, you have a system unit and a clear decision to install a second hard drive. This procedure is not so complicated that you need to contact service center, and, in principle, even a novice user can cope on his own.
Connecting a second hard drive to your computer
Connecting an additional hard drive will differ depending on which interface connector you have on your computer: SATA or IDE. SATA is a modern interface, so in almost 100% of cases it is found in more or less new computers. IDE, on the contrary, is outdated, it can be found in older computers, but, fortunately, hard drives with an IDE interface can still be found on sale.
If you do not know what interface your computer is equipped with, before purchasing, you will need to look under the system unit case to obtain the necessary information.
Opening the system unit case
1. The structure of the system unit cases may be different. For example, in one case it is enough to unscrew (snap) and remove the side cover, in some cases you will need to unscrew 4 screws from reverse side housing and tighten the housing.

2. Hard drives are installed in specially designated cells, which can be located differently in different variations of computers: they can be located at the bottom, central or side. The picture below shows what they roughly look like.

3. It is not difficult to distinguish between SATA and IDE connectors: since IDE is old interface, it has wide ports and fairly large cables. It looks like this:

SATA, on the contrary, modern solution, which means it has a narrow port and a small cable.

Knowing what interface you have, you can purchase a hard drive and then connect it.
Connecting a hard drive to SATA
Let's start by analyzing the connection more modern interface, since it occurs in most cases.
Before you begin, be sure to turn off your computer and disconnect it from the outlet.
1. Insert the hard drive into the free slot and secure it with screws.
2. Now you should connect the SATA cable that comes with the hard drive. To do this, connect one end to the hard drive on either side, and connect the other end to the motherboard.

3. All that remains is to connect the hard drive to the power supply. To do this, as a rule, a coupler comes from the power supply, which must be connected to the hard drive. If the power supply does not have free cables, you will need to buy a splitter that turns one connector into two.

4. Build your computer and then connect it to the network. This completes the connection of the second hard drive.
Connecting a hard drive to IDE
Connecting a hard drive to a legacy interface is not much different, but the procedure is still slightly different.
1. First of all, you will need to set the jumper on the contacts of the connected hard drive to one of the positions: Master or Slave. As a rule, Master mode is the main one when work hard disk and, most often, it is used for hard drives from which the operating system is loaded. Slave is additional mode, used for auxiliary hard drives that will store, for example, media files. Most often, a second hard drive is connected for this very purpose, so set the jumper to Slave mode.

2. The IDE cable, unlike SATA, has not two, but three plugs for connection. The blue plug located at one end indicates that it needs to be connected to the motherboard. At the other end, as a rule, there is a black plug, which belongs to the Master mode, and a white one, located approximately in the middle of the cable, is responsible for the Slave mode.

3. Insert the hard drive into the bay, and then secure it with screws.
4. You will need to connect the free plug from the power supply to the hard drive, thereby providing it with power.
5. Insert the required cable connector into the hard drive, depending on the hard drive mode you have chosen. The blue end of the hard drive is connected to the motherboard.
This completes the connection of the hard drive to the IDE interface.
Actually, in self-connection there is nothing complicated about the hard drive. And having completed this procedure, after turning on, your computer will detect the hard drive and you can fill it with the necessary information.