How to insert a SIM card into a smart watch. How to make a SIM card that will fit a new smartphone
Having purchased this smartphone, the user can spend hours unsuccessfully trying to remove back cover device, trying to insert a SIM card into it. But in reality the situation is much simpler. Exactly how to insert a SIM card into Xiaomi Redmi Note 4X is what we will talk about in this article. At the same time, the issue of integration and memory cards will be considered. Let's get started.
So, in order to insert a SIM card, you will first have to remove the tray. It is located on the left side of the device, and can be opened using a paper clip, which is included in the kit.
- Find your box and open it.

- Next, remove the metal clip from the package that is marked in the photo. It is with its help that our phone will open.

Attention! Before moving on to the next step, be sure to turn off the gadget.
- Place your phone on something soft to avoid scratching the display. Also make sure it doesn't fall. Find the hole we have marked in the photo below. This is what is needed to remove the tray.

- Gently press the paperclip without pressing extra effort, and the tray should appear a little.

- Now remove the paperclip and put it back - until you no longer need it. Gently grasp the tray with two fingers and pull it out.
Installing a SIM card
Now that we have removed the card slot, we need to install them. This is done in different variations. Here they are:
- one SIM card installed;
- SIM card and memory card;
- 2 SIM cards.
How to combine your slot is a purely personal matter. In our case, one SIM will be used along with a memory card. In order to install it, do the following:
- Carefully place the Micro SIM card into the tray as shown in the screenshot. The chip has one cut corner, make sure that it fits exactly into the groove, which is provided here specifically for this purpose.

- Turn the phone face down (again, try not to scratch it) and insert the tray with the chip facing up. Carefully push it in until it is completely hidden in the housing.

That's all. You can include our Xiaomi Redmi Note 4X and use the connection.
Install a memory card or second SIM
Let's also figure out how to install a memory card in the device. This is done quite simply, the only difference is that along with the SIM card, you need to place it in the tray and drive.
Micro SD also has special cutouts that will prevent it from being placed incorrectly. Make sure they line up exactly. It all looks something like this:

The instructions are suitable for version 3/32 and for 4/64 GB.
Results and comments
That's it. As you can see, it’s very simple, especially since you definitely won’t have to do the procedure every day. You only need to change your card or SIM card when switching to another operator or upgrading your Android memory.
If you still have any questions, feel free to write them in the comments, and we will try to help each of our readers solve their difficulties.
Video
For greater clarity, you can also view a review that shows the process of SIM integration into an Android Xiaomi smartphone Redmi Note 4X.
The design features of Apple gadgets distinguish these devices from devices of other brands. The design of iPhones is focused on minimal owner intervention in the design of the phone and user safety, which is not typical for economy-class smartphones. Therefore, when they first get acquainted with the iPhone, newly minted Apple users often do not know how to insert a SIM card and start working with the device. Further instructions relevant to the length of the ruler iPhone smartphones 5 - iPhone X.
Preparing for the initial launch of your iPhone involves unboxing and visual inspection gadget. After unpacking the box, make sure that it contains all the kit components declared by the manufacturer, namely:
- smartphone packaged in a protective plastic form;
- sync cable and power adapter;
- an envelope made of thick white paper with a needle for opening the SIM card slot;
- Apple Airpods headphones;
- decorative elements;
- headphone adapter.
Before starting, pay attention to the gadget's controls. On models “5” and “SE”, the button responsible for locking the phone screen and turning it on/off is located on the top edge of the device. On the “six” and newer models, the lock button is located on the right side of the smartphone.

On the left side panel there are volume controls and a selector quick transition to silent mode.

The Home button is the main one when working with the device; located at the bottom of the front part of the gadget; allows you to switch between tasks, go to the main menu, call voice assistant Siri.

On models of the “5”, “6”, “SE” families it is installed standard input for 3.5 type headphones. Starting from the “seven” there is no such connector - the headphones are adapted to the battery socket, that is, you can insert old Airpods or third-party headphones only using the original adapter from the kit.
Now that you have completed an educational program on the controls, you can move on to tips for installing a SIM card.
Features of the SIM card format used
Starting from model “5”, iPhones are equipped with SIM card Nano-SIM– the smallest available from telecom operators. The basic size SIM card is compatible with Apple smartphones of the first two generations - iPhone 3G and 4s were equipped with Micro-SIM slots.
Nano-SIM format specification:
- length: 12.3 mm;
- width: 8.8 mm;
- thickness 0.67 mm.
You can adapt a standard subscriber module to the Micro-SIM format by cutting off part of the plastic case. Regular SIM card cannot be inserted into new iPhones, even if you cut out the plastic part as much as possible - in Nano-SIM the chip itself has smaller dimensions. Therefore, in some cases, subscribers are forced to change SIM cards in order to start using Apple products. In communication shops it is changed on the day of contact; subscriber number remains the same.

Where and how is it inserted?
The design of most smartphones involves installing a SIM card into a slot located under battery. The smartphone device does not require the owner to remove the battery. The subscriber module is installed in a special hatch in the device body. Moreover, the card is not pressed against the reading board, but is first placed in a retractable slide.

On the first Apple devices, the connector for installing the subscriber module is located at the top of the smartphone, above the head speaker. From model “5” the SIM card slot “moved” to the right sidebar, where it remains to this day.
Access to the tray is limited by the designers: to remove the SIM slide, you need to open it using the proprietary key included in the package (by default it is in an oblong white envelope).

Installation process
The general algorithm is shown in the example Apple iPhone 5S, but also relevant for newer models):
- We take the device out of the case.

- We take out the SIM card connector key from the envelope - it has a large oval eye and is similar to a paper clip.

- We find the SIM slot on the right side panel of the iPhone or the top edge (the outline and lock cylinder are clearly visible).
- We insert the key into the hole, press lightly - access is open. On most devices, the holder with the SIM card pops out of the connector on its own. On used phones, the slide may be difficult to move due to wear or contamination.

- We take out the slot and place it on a flat surface. The SIM card is simply inserted into the slot from above. Please note that it is placed on top and not below. Make sure that the position of the SIM card matches the hole in the tray.

- you need to place the card in your smartphone. It’s more convenient to do this this way: turn the phone with the right side towards you and hold it with one hand in this position. With your other hand, insert the mount with the SIM installed in the working position, simultaneously holding the card with your index finger.

- We insert the slides into the hole, push them all the way so that they do not stick out from the body. Installation is complete.
Important!!! In Apple gadgets, the subscriber module mount is completely removed from the device. Therefore, be prepared that it may fall out of the case. Another important point: the correct position of the SIM card does not have technological markers, except for matching the contour, i.e. There are no additional latches or fasteners.
All the described manipulations are easier to carry out with the gadget turned on. If the device does not have a SIM card, then the diagnostic message “SIM card not inserted” will be displayed on the notification screen, and the network indicator will be absent (instead, the message “No network” will appear).

If all the above manipulations are performed correctly, then after a minute the message will disappear and the name will appear on the display mobile operator and signal strength indicator.

What to do if the kit does not include a paperclip to open the tray
A common problem for Yabloko. Usually the factory key is lost during use. Most relevant for those who purchase a used, incomplete iPhone: the key is missing.
In this case, you need to use a homemade analogue of a standard tool. This may include:
- thin needle;
- paper clip.
Before use, the paper clip must be straightened and when installing the module, work with the sharp end. In this case, the diameter of the paper clip should fit into the tray cylinder. It's the same with the needle. At the same time, a handicraft tool should not be brittle, because a metal fragment stuck in the hole of the tray can lead to an expensive call to a specialized service.

There is no need to abuse such substitutes - their use over time leads to breakage of the tray hole.
Possible problems with reading the SIM card and ways to solve them
When the SIM card is detected and read without errors, the device displays the name cellular network, signal strength, available type wireless connection to the Internet. If instead “SIM card not inserted” or “No network” is displayed, the subscriber module is inserted incorrectly or there is a technical fault.
Incorrect installation
In this case, the position of the tray with the SIM card is incorrect: there is a misalignment or the SIM is fixed in the wrong position. There are precedents when the SIM card is improperly fixed in the mount (installed with the chip facing up or the current position does not coincide with the technological hole of the tray). To troubleshoot problems, correct the position of the SIM card.
Technical problems
It is possible that the SIM is not detected by the device even if the subscriber module is in the correct position. This card is defective and will not work on smartphones from other manufacturers. The defect occurs after the owner of the gadget tries to cut the card to fit the “nano” format using a makeshift method. Also possible physical wear and tear cards - kinks, kinks, etc.
Results and comments
Apple's key priority is the security of the device and user data. The design features described above make it difficult for malicious users to gain access to phone components. This technology gives developers hope that installing/removing a SIM card from a device will be under the control of the owner.
With such a locking mechanism, the SIM card does not fall out of the gadget and is not lost, even if the phone falls or receives other mechanical damage. In the case of iPhones, this tray arrangement was a distinctive feature of the company. No one has done this before.
Video instructions
You can look detailed video instructions about how to insert a SIM card into an iPhone. The video will help users better understand how to perform all the proposed actions. To avoid problems, strictly follow the sequence of operations demonstrated in the video.
Mobile Samsung phones Galaxy S7 and Galaxy S7 Edge work with Nano SIM cards. Therefore, if you bought this device to replace an outdated mobile phone, you will most likely need to change the SIM card at a customer service point or give the card yourself required format. Many users choose the second option, since contacting a service center may be associated with certain difficulties. Let's look at how to cut and install a SIM in a Samsung Galaxy S7.
Procedure for cutting SIM cards for Galaxy S7
NanoSIM is a relatively new format for SIM cards. It first appeared in the iPhone 5 and is still used in all Apple devices. A little later, smartphones from the line began to be equipped with Nano-type card holders Samsung Galaxy. This approach made it possible to reduce the size mobile devices and make them more convenient to use.
If your previous gadget worked on a Mini- or Micro-SIM, then before inserting such a SIM card into the Samsung Galaxy S7, it must be cut correctly. To perform the upcoming work, prepare the following tools and materials:
- cutting template (you can download it from the Internet and print it on a printer);
- thin scissors or stationery knife;
- scotch;
- thick rags or fine-grained sandpaper.
The procedure for cutting a SIM card to Nano format is as follows:
The NanoSIM card is ready for further use.
Installing a SIM card in Samsung Galaxy S7
Installing a SIM card in the Galaxy S7 is done in the following sequence:

If you cut a SIM card yourself, there is a small chance of damage to its microcircuit. Therefore, if your smartphone does not want to accept the card, replace it with a new one at your operator’s subscriber service center.
Experienced consultants at communication stores still remember the time when customers were perplexed by the fact that there were no SIM cards. standard size. Nowadays, having several types of SIM cards is commonplace. Manufacturers are giving preference to increasingly smaller cards, because this saves space inside the device body. Standard-sized SIM cards, bulky by modern standards, are about to “sink into oblivion.”
In this article we will tell you about all types of SIM and teach you how to turn a large card into a small one.
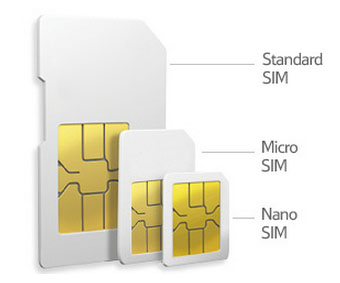
In terms of size, SIM cards are classified into 3 types:
Mini-SIM
Mini-SIM- that’s what it’s called “scientifically” standard sim card. Its dimensions are 25x15 millimeters.
If the phone was released before 2011 (inclusive), you can be sure that exactly what is inserted into it Mini-SIM. For modern smartphones such a map is too large, but this does not mean that Mini-SIM– anachronism. Standard SIM cards are used in simple dialers, in phones with big buttons for the elderly, in secure phones for fishing enthusiasts and factory workers. The listed devices cannot boast of an abundance of functions, so there is plenty of space inside their cases - in some models, manufacturers even allow you to install 3-4 Mini-SIM.
Micro-SIM
First card Micro-SIM began to use Apple company– in iPhone 4 devices. Dimensions Micro-SIM– 15x12 millimeters.

Nowadays, the vast majority of smartphones are installed with Micro-SIM. The “baton” was taken over from Apple by Nokia, which equipped its Lumia devices with slots for Micro, followed by HTC, Samsung, and BlackBerry.
Nano-SIM
Nano-SIM– the newest and smallest card for the phone. Its dimensions are only 12x5 millimeters. Visually, the card is a chip with a minimum of plastic edging.

Apple is again the innovator. Exactly Nano-SIM users had to insert the 5th modification into the iPhone. Later, other well-known manufacturers began to produce devices with Nano-SIM slots - for example, Samsung And Meizu.
The following illustration will help you understand the differences between the three types of SIM cards:
How to change the SIM card size for your phone?
Most obvious way changing the SIM card size is replace it in the operator's cabin. This procedure is completely free, takes only a couple of minutes, and the phone number does not change subsequently. However, this method still has a number of disadvantages:
- On new SIM card there will be no numbers saved in the old memory. Of course, a similar problem easy to solve: in the article “How to transfer contacts from iPhone to computer” we talk about several export methods at once telephone numbers. But, alas, many users consider their time too valuable to spend it on mastering third party software and methods for creating backup copies.
- You have the right to replace your SIM card in the office only its designer and only according to the passport. If the card was given to the user, for example, by his parents, he himself will not be able to replace it. Sometimes this becomes a real problem.
If a consultant changes a SIM card to a person who is not its issuer, this is fraud! For such an operation, the consultant will, at a minimum, be deprived of his bonus, and at maximum, he will be fired in disgrace. Therefore, demanding to “make an exception” is meaningless; no one wants to find themselves unemployed with unflattering wording in their work book.
There are several ways to change the dimensions of a SIM card without resorting to replacement. For example, a user can purchase adapter(aka - adapter). The adapters look like this:

Order adapters for SIM is better on Chinese sites - there they cost a mere trifle. For example, a set of adapters from Noosy along with a needle for iPhone will cost only 17 rubles. When purchasing in a salon, the user may be charged up to 250 rubles - the difference is more than noticeable!
The set usually includes adapters of 3 types: Nano-SIM to SIM, Micro-SIM to SIM And Nano-SIM to Micro-SIM. Since SIM cards of reduced sizes continue to be associated with Apple, manufacturers do not forget to include needles in the kits to remove the SIM card slot. Adapters are easy to use: a small SIM card is inserted into a suitable adapter, then the adapter itself with the card inside is placed in the slot of the mobile device.
Adapters help when you need to increase the size of a SIM card, but what should the user do if, on the contrary, the card needs to be reduced? The owner of the gadget should think about the fact that such a need may arise even at the stage of purchasing a SIM card - and insist on issuing him a so-called Combi-SIM. Combi-SIM is a standard-sized card from which you can make a micro-SIM card in a split second.

Inside a SIM card, standard in size, Micro-Sim is already cut along the contour, so it is easy for the user to press with a finger and break off a piece of plastic.

There is no need to rush to throw away the frame– she is still capable of doing a good service. If you need to reinsert the card into the slot under Mini-SIM the frame can be used as an adapter.
Usage Combi-SIM- one of the ways to change the size of the SIM card downwards. Cards Combi are provided to users mobile communications for free- of course, if they are available in the operator’s office.
If the user is already the owner of a standard SIM card and wants to turn it into Micro, without losing contacts, he has no other choice but to cut the SIM card. Pruning is usually carried out using a special device called stapler for Sim(aka - Sim cutter, it’s the same - Sim-Cutter).

Make from a standard card Micro-SIM If you have such a stapler, it’s a second procedure. However, expect that the sales office or workshop will carry out this procedure for free, not worth it. The salon employees will demand 149 rubles for trimming and will even knock out a check for providing a paid service. Repair shops will also ask for money - or even send the user to deal with the operator.
Cutting a SIM card is associated with some risk - if the person performing the procedure is in a hurry or is inattentive, he will damage the chip and, as a result, the SIM card will not function. Hence the high cost of pruning services - no one wants to take risks “for nothing.”
How to cut a SIM card with your own hands?
Not in all salons cellular communication There are staplers for SIM - some consultants continue to cut cards with their own hands and regular scissors. The reader may be surprised to learn that no one trains consultants to do this. They hone this skill on their own, and many are able to successfully cut a SIM card right the first time.

No wonder - in fact, the procedure is extremely primitive! Usually the main difficulty is finding a template. Consultants usually have their whole table covered with SIM cards. various sizes, working and having served their time - they use them as models. The average user can only dream of such abundance - however, if he still managed to borrow a SIM card the right size acting as a template, he can safely try trimming with his own hands. If not, he should resort to using a printer and a template print(here is the relevant link).
To cut a SIM card, you don’t need felt-tip pens, rulers or pencils - if you follow these instructions:
- Take the large SIM in your hand with the chip facing up.
- Place the sample card on top so that it completely covers the chip, press it tightly with your thumb and do not let go. If desired, the template can be attached to a large SIM using double-sided tape, but experts do not recommend doing this - you can damage the chip.
- Carefully trim the sides of the plastic. Try not to have too much, otherwise the SIM card in the slot will “dangle” and the signal will be lost.
- Cut the card according to the template across. Here you can act less scrupulously; The main thing is not to touch the chip.
- Remove the corner and slightly round the edges - otherwise the SIM card will not fit into the slot.
Next, put the template aside and try to install the cut card into the phone to check its functionality. If the SIM card does not fit into the slot, carefully trim the plastic and try again. If the card slot is just the right size and can be read by the phone, rejoice - you just cut a SIM card with your own hands!
note that not just any card can be “cut” to the desired size. Easiest to redo Mini-SIM V Micro SIM – Such pruning should not cause any difficulties for the user at all. Trim under Nano-SIM always more difficult; plastic around the chip on the card Nano almost none, so the risk of snagging the chip with the blades of the scissors is quite high.
Old-style SIM cards with large chips are still in use:

Cutting such SIMs is a real nightmare! With some luck, from such a card you can make Micro-SIM, but turn it into Nano It definitely won't work.
Conclusion
The fact that smartphone manufacturers have begun to produce gadgets that support SIM cards different types, salon sellers have become quite rich. Of course, not all paid services pass through the cash register - in many cases, the money for trimming is sent to the consultants' pockets. Cutting SIM cards for sellers is a “bread and butter” business, which means free there is nothing to count on for help from consultants.
Therefore, a user who does not want to “feed” salon employees is better off mastering pruning skills himself. This procedure is quite simple and does not require “surgical precision”.
Some tablet models are equipped with a SIM card slot, which allows the owner not only to connect to the Internet via 3G/4G technologies, but also to call landline/mobile phones. If you do not know how to install a SIM card correctly, then read the information published below. The article will also provide solutions to some problems associated with the use of a SIM card.
How to install a SIM card?
First of all, you need to carefully study the instructions for the tablet and find an item describing the type of SIM card that supports this device. Some models can only install microSIM cards, while others support standard SIM cards.
General algorithm for installing a SIM card:
- Turn off the power to the device.
- Open the SIM card slot (by pressing or using a special paper clip) and pull out the tray.
- Install the SIM card so that the operator logo faces up and the contacts face toward the back of the device.
- Place the tray in place and turn on the tablet.
If everything is done correctly, the device should connect to the network and you can go online or make calls.
Important! Some models may have a connector on the back of the tablet instead of a tray, for example, as in Lenovo Yoga Tab 8, so installing the SIM card in this case will be done differently.
How to make microSim?
In order to turn a standard SIM card into a microSim, you simply need to cut it exactly to the size of 15x12 mm.
You can make a smaller version of a SIM card yourself, but if you are not confident in your abilities, then it is better to buy it from service center mobile operator.
The tablet does not see the SIM card
If, after installing the Sim card, the Lenovo tablet does not detect it, then the problem is either with it or with the device. Here is a list of the main problems:
- SIM card is not active. You need to try installing another SIM card, if it is read normally, then you need to replace the old SIM card.
- The contacts on the tablet are damaged. In this case, the device will not be able to read information and will need to be taken in for repair.
- Some models have default carriers and the tablet will not work with others. You must manually set the operator. You may need to reflash the device.
Conclusion:
Installing a SIM card into a tablet is quite simple, but you need to act carefully. If the tablet does not see the SIM card, then you can try to solve the problem yourself, based on the recommendations given in the article or, if necessary, use the services of a service center.