Configuring BIOS version 0801. Important points in configuring AMI BIOS
Good day.
You work at your computer, you work, and then ... bam 😢, and you need to reinstall the system, or enable function keys, or disable USB ports, etc. You can't do without BIOS setup...
I often touch on the BIOS topic on the blog (since a number of tasks simply cannot be solved without setting it up at all!), but there is no generalizing topic in which all the main terms and parameters would be analyzed.
So this article was born...
Note: BIOS settings are shown in an example Lenovo laptop B70.
A lot of parameters, names of sections and tabs will be similar to other brands and models of laptops. I think that to collect all the variety of brands and all kinds of versions in one article (or even a section of the site) is simply unrealistic...
How to enter the BIOS
I believe that the first thing to start this article with is the question of entering the BIOS (otherwise there will be nothing to configure).
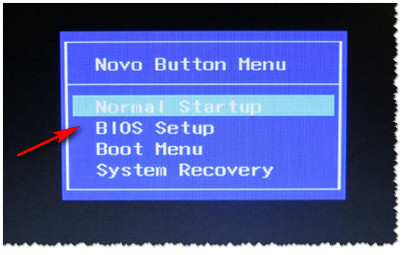
In most PC / laptop models, you need to press the button to enter the BIOS F2 or Del(sometimes F1 or Esc) immediately after turning on the device. Some laptops (Lenovo for example) have a dedicated button Recovery(which is pressed instead of the power button). After that, usually, a plate appears (as in the photo below) - to configure the BIOS, select the item.
Control buttons
In the BIOS, all settings have to be set using the keyboard (which is somewhat scary for novice users who are used to doing everything in Windows with the mouse). It is also worth noting that all settings are set in English (however, most of the settings are easy enough to understand what they mean, even for those who did not learn English). So, about the buttons...
I draw your attention to the fact that in almost every BIOS version at the bottom of the screen (or on the right) all the most basic control buttons are written, with which it is configured.
Control buttons at the bottom of the window // Dell laptop Inspiron
Generally speaking, the buttons are as follows:
- arrows →↓← - used to move the cursor (change parameters);
- Enter - the main key for entering sections (as well as for selecting certain parameters, switching items);
- Esc - exit BIOS without saving settings (or exit from a specific section);
- +/PgUp or -/PgDn - increase/decrease the numerical value of a certain parameter, or switch it;
- F1 - quick help (only for settings pages);
- F2 - hint on the selected item (not in all BIOS versions);
- F5 / F6 - change the parameters of the selected item (in some BIOS versions they can also be used to restore changed settings);
- - save all changes in the BIOS and exit.
Important! In some laptops, in order for the function keys (F1, F2 ... F12) to work, you must press the Fn + F1, Fn + F2 ... Fn + F12 button combination. Usually this information is always indicated at the bottom (right) of the window.
Sections and tabs
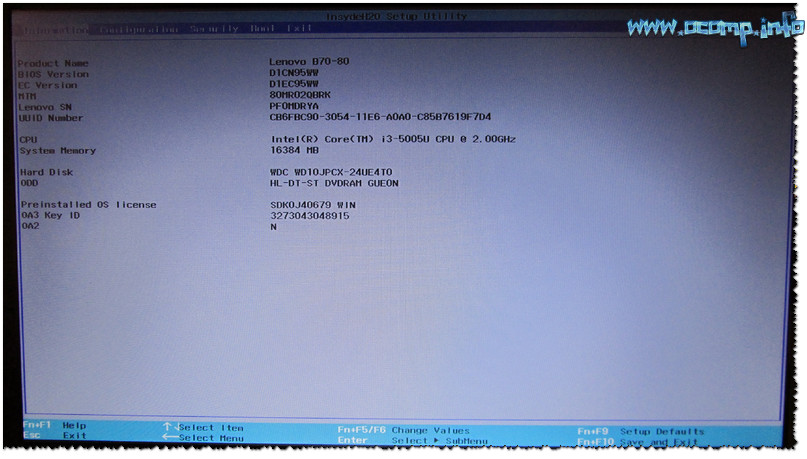
Main tab in laptop BIOS which you see when you enter. Allows you to get basic information about the laptop:
- its brand and model (see photo below: Product Name Lenovo B70-80). This information is extremely necessary, for example, when searching for drivers;
- BIOS version(if you want to upgrade BIOS information very useful)
- the serial number of your device (not available everywhere, and the information is almost useless);
- processor model (CPU - Intel Core i3-5005U 2.00GHz);
- hard disk model;
- CD/DVD drive model and other information.
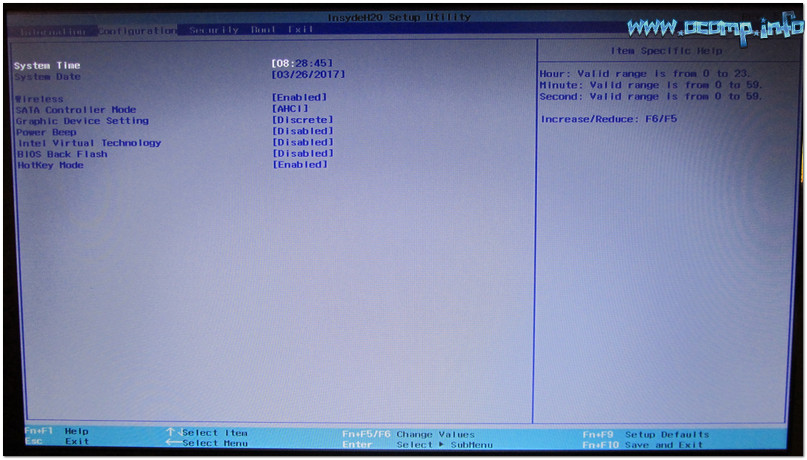
One of the main tabs for setting many parameters. IN different laptops tab contains different settings, the main parameters are:
- System Time/Date- setting the date and time (often in windows time gets lost, and sometimes it cannot be installed at all until the corresponding tab in the BIOS is configured);
- Wireless - wifi adapter, here you can turn it off ( note : Enabled - enabled, Disabled - disabled). If you do not work with Wi-Fi networks, it is recommended to disable the adapter, as it consumes a lot of battery power (even when you are not connected to a Wi-Fi network);
- Sata Controller Mode- hard drive mode. This is a pretty broad topic. Here I will say that the operation of your hard disk (for example, its speed) significantly depends on the selected parameter. If you do not know what to set - then leave everything by default;
- Graphic Device Settings- a parameter that allows you to configure the operation of video cards (in laptops that have two video cards: integrated and discrete). In some cases (for example, when working with Windows XP, or when you want to save battery power as much as possible), you can turn off here discrete graphics card (note: there will definitely be performance degradation in games);
- power beep- enable / disable the speaker-tweeter. In my opinion, for a modern laptop in everyday use, this is a useless thing (it was relevant earlier, about 10 years ago);
- Intel Virtual Technology - hardware virtualization, which allows you to run on one physical computer multiple instances of operating systems (guest OS). In general, not for novice users;
- BIOS back flash - if you want to update your old BIOS to a new version (i.e. flash) - enable this option;
- Hot Key Mode- operating mode function keys. If the option is enabled: instead of the usual, say, F1-F12 to refresh the page in the browser or get help, you can use multimedia features - add or turn off sound, brightness, etc. To use the usual F1-F12 values, you need to press them together with the key fn.
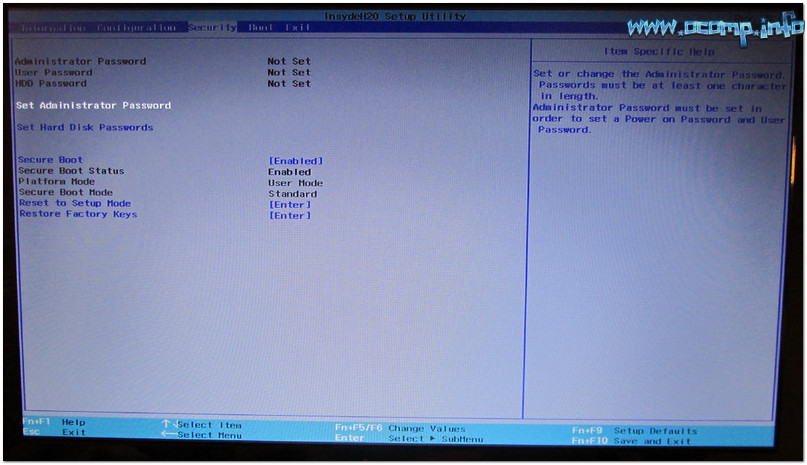
Tab for setting security (for some users - one of the main ones). Here you can set an administrator password to access BIOS settings or to access hard drive.
The main settings of this section:
- Set Administrator Password - set administrator password;
- Set Hard Dick Password - set a password to access the hard drive;
- secure boot - secure boot(On Off). By the way, Secure Boot is only displayed if you have UEFI boot mode set.
Boot
Download section. Also, one of the most frequently used partitions, it is almost always necessary for editing when installing Windows.
The boot mode is also set here: UEFI (the new standard is for Windows 8/10), or old method downloads (Legacy, for OS Windows 7, XP). New items for editing the download queue will appear after saving the settings and entering this menu again!
Note: if support for the old mode is enabled, then it is possible (even necessary!) to change the boot priority from devices (for example, first check USB devices, then try to boot from CD / DVD, then from HDD).
Basic settings in this menu:
- boot mode : boot mode, UEFI or Legacy (described the difference above);
- fast boot: mode fast loading(the logo will not be shown, only built-in devices will be supported during boot: keyboard, display, etc.). Works only with Boot Mode: UEFI.
- USB Boot: Allow/Prohibit booting from USB devices.
- PXE Boot to LAN: option enables booting the computer over the network (initially, an attempt will be made to boot the operating system from the server using local network. In my opinion, for most users, a useless feature).

Note: It is worth noting that, in new version UEFI has stopped working the ability to raise menu items using the F6 button, but it remains possible to lower another item with the F5 button.
exit
I think everyone knows this word - it is translated from English as exit. Also, this section is used in almost all laptops (and PCs) to reset the settings to optimal (or safe).
Main points:
- Exit Saving Changes- exit and save the changed settings in the BIOS;
- Exit Discarding Changes- exit the BIOS without saving the settings;
- Discard Changes- cancel all settings changes made during the current session;
- Save Changes- save settings changes;
- Load Default Changes- load the default BIOS settings (as they were when you bought your laptop). Usually used in case unstable work device, or in cases where the user has changed something and no longer remembers ...
- OS Optimized Defaults- settings optimized for specific operating systems (not all laptops have this option. It somewhat simplifies and speeds up BIOS setup).

How to choose which device to boot a laptop from (Boot Menu)
In order not to climb into the BIOS settings and not select (not set) the boot queue, it is very convenient to use the boot menu, calling it only when you need to boot from a USB flash drive (for example). Here is a reference article on this topic (link below).
Hot keys to enter BIOS menu, boot menu, recovery from hidden section -
By calling the Boot Menu, you will see the usual list of devices from which you can boot. Most often in this list there is (example in the photo below):
- HDD;
- USB flash drive, disk;
- the ability to boot over the network (LAN).

To select a device to boot, use the arrows and the Enter key. In general, as in the usual BIOS setup.
This concludes the article.
In the last article, we talked about . And now I will tell you how to set up Computer BIOS For Windows installation from a disk or flash drive.
1. What is BIOS and UEFI
Each motherboard has special program to boot your computer and configure settings for various devices. This program is flashed (programmed) into a special chip on motherboard and therefore is called firmware.
Previously, all motherboards had a firmware called the BIOS, which had a simple GUI with white letters on a blue background and was limited in functionality. For example, in the BIOS it was impossible to use a mouse, select a language, and there were no graphic elements (pictures) due to the limited size of the microcircuit BIOS memory. Also, motherboards with BIOS did not support disks larger than 2 TB due to limitations. old system disk layout (MBR).
Now many motherboards have new type firmware, called UEFI, which features an improved graphical interface using beautiful background, hand-drawn buttons, the ability to select a language (including Russian) and some improvements. For example, support for a new type of disk partitions (GPT), which allows you to use hard disks over 2 TB.
You can find out what type of firmware your motherboard has in its manual, on the website of the motherboard or laptop manufacturer, and also visually when entering the Setup program. The Setup program is also programmed into the motherboard and is used to change the BIOS or UEFI settings.
2. How to enter BIOS Setup
To enter the Setup program, immediately after turning on the computer, hold down the "Delete" button on the keyboard. On some motherboards and laptops, the F2, F10, or Esc keys are used for this. Which button to press can be read in the messages that appear immediately after turning on the computer.
In text form

Graphically

If you do not have time to read, then press the "Pause" button on your keyboard to pause the download. You can continue downloading by pressing any key. If you press the key assigned to enter Setup, you will immediately be taken to the motherboard setup program.
Classic BIOS

UEFI Interface

3. Basics of work in Setup
3.1. Control keys
The Setup program is a set of various parameters grouped on separate tabs, depending on the purpose. On the right or at the bottom there will be a description of the keys with which all actions are performed.

To navigate between tabs, the right and left arrows on the keyboard are usually used. To navigate between lines within one tab, use the "down", "up" arrows.

To change the values, use the arrows to navigate to the required field, press the "Enter" key, and then use the arrows to select a new value from the drop-down menu. The "+", "-" or "Page Up", "Page Down" keys can also be used for this.
To return one level up or to previous page press the "Esc" key. The "Esc" key on one of the main tabs will mean exiting the BIOS without saving the settings, which will need to be confirmed or refused to exit.
In the UEFI Setup program, you can perform all actions using the mouse.
3.2. Saving settings
This is a very important point. After making all the necessary settings, go to the “Exit” tab, select the “Exit and Save Changes” item with the arrows (“Exit and Save Changes”, the word order may be different), press “Enter” and confirm saving the settings by selecting the “OK” arrows or "Yes" and again "Enter".
You can save the settings much easier and faster by pressing the "F10" key on the keyboard and confirming your decision. This key works in many versions of BIOS, UEFI and is often indicated in tooltips (bottom or right).
3.3. Cancel settings
If you accidentally changed something or are not sure about the correctness of the settings made, then go to the "Exit" tab and select "Exit and Discard Changes" ("Exit and Discard Changes") or press the "Esc" key until the message about exiting without change the settings and confirm the action ("OK" or "Yes").
3.4. Restore settings
To restore all settings to optimal defaults, go to the Exit tab and select Load Setup Default. After that, you can immediately change other settings or simply exit the BIOS while saving the settings ("Exit and Save Changes" or "F10").
4. Download options
Insert the boot disk or flash drive into the computer where you plan to install Windows. Now, in order to start installing Windows, you need to configure the BIOS (or UEFI) using the Setup program to boot from a disk or flash drive. You can also use a special boot menu motherboard (Boot Menu). The latter option is simpler and more convenient, but we will consider both methods.
5. BIOS setup
5.1. Change download priority
Click the "Boot" or "Download" tab.

Install your DVD drive or flash drive first in boot device order.

If you will install Windows from a disk, then the first item is to select a device such as "ATAPI CD-ROM", a name indicating the manufacturer or model of the drive. For example, "CDROM:PM-HL-DT-STDVD-RAM GH22NP" (this is an "LG" DVD drive).
If you plan to install Windows from a flash drive, then first choose something like "Removable Dev." or the name of the flash drive with the manufacturer. For example, "USB: Patriot Memory" (this is a "PATRIOT" flash drive).
Transcend JetFlash 790 8Gb
The second should be the hard drive, which is indicated as " hard drive”, “HDD” or the interface to which it is connected, the manufacturer and model of the disk. For example, "SATA:3M-SAMSUNG HD502HJ" (this is a 500 GB Samsung hard drive with a SATA interface).
Please note that in the "Boot" section there may be other items responsible for boot priority, such as "Hard Disk Drives" or "Removable Device Priority".

They also need to check that the DVD drive or flash drive is in the first place.

If you have two hard drives, then the one on which you are installing the system should be higher. But in this case, I recommend disconnecting one of the disks in order to avoid confusion and possible errors in system installation. It can be connected after installation.
In the Setup program with the UEFI interface, everything is done in the same way. Look for the "Boot" or "Download" section, find your DVD drive or USB flash drive there and raise it to the very top of the boot priority. Plus, you can use the mouse for this, which is easier and more convenient.

5.2. SATA controller mode
In principle, this is not so important, but many people are interested in this issue, so I decided to clarify it a bit. SATA drives can work in compatibility mode with older IDE drives and in the more modern AHCI mode. AHCI gives a small performance boost to a hard drive with multiple simultaneous accesses to it. This mode of disk operation occurs mainly on servers and for normal home computer practically useless.
When setting up the BIOS, it is possible to select the operating mode SATA controller.

These settings may be in different places and slightly different in names, but the principle is the same everywhere. You are offered IDE compatibility mode or new mode AHCI.

In general, IDE compatibility mode is recommended for Windows XP, because it does not natively have SATA drivers and simply will not see the hard drive, which will not allow you to install Windows. Drivers can be built into installation distribution Windows, but this does not make sense, since it will not affect the speed of work, but it can add problems.
There is a simpler and convenient way booting from a DVD or flash drive for both BIOS and UEFI - booting using the "Boot Menu" ("Boot Menu").
The boot menu can be accessed using the F8, F10, F11, F12, or Esc keys. You can often see them in the tooltips on the computer's initial boot screen. You can also find this information from the instructions, on the website of the manufacturer of the motherboard or laptop, by searching the Internet or by typing.

Immediately after turning on the computer, hold down the "Boot Menu" call key until the boot device selection menu appears.

Use the up and down arrows to navigate to the DVD drive or flash drive and press Enter.
Sandisk Cruzer
The advantages of this method are obvious - you don’t need to dig into the BIOS, you don’t need to return the BIOS settings later (although this is not always necessary), and it’s enough to call this menu only once, since after starting Windows installation it will no longer be required. Also, using the "Boot Menu" does not change the BIOS or UEFI settings.
7. Download problems
Friends, due to the fact that many had problems with loading when installing Windows and some wrote about it in the comments, I decided to make a separate section where I collected the methods I knew to solve these problems.
- If the computer stops loading at the very beginning and asks you to press F1, after which it enters the BIOS, then you most likely either have a dead battery on the motherboard (time may be lost), problems with CPU cooler(out of order, not connected there) or hard drive(errors in SMART).
- If the message “Reboot and Select proper Boot device or Insert Boot Media in selected Boot device and press a key" this means that the boot area on the disk or flash drive is not found or is damaged. Try to boot from installation disk or a flash drive using the Boot Menu (section 6 of the article), if it doesn’t help, do bootable media again using the Windows USB/DVD Download Tool.
- If, after restarting the computer, the installation of Windows starts from the beginning, then remove the boot disk or USB flash drive and restart the computer, the installation should continue from the hard drive.
- Disconnect all unnecessary USB devices from the computer (flash drive, 3G modem, smartphone, printer). You only need to leave the mouse, keyboard, DVD or USB flash drive from which you are installing Windows.
- If you have several hard drives, then disconnect all disks from the motherboard, except for the one on which Windows will be installed.
- Reset BIOS settings to default (described in this article).
- If the installer does not see the disk or the error 0x0000007B appears at the end, change to BIOS mode SATA controller from AHCI to IDE or vice versa.
- If at each boot the computer or laptop itself enters the BIOS or opens the boot menu, then set to BIOS option Boot Pop Menu to Disable state (if any).
- Disable Fast Boot in the Advanced section of the BIOS, and in the Boot section, set the Launch CSM option to Enable (if any).
- In the Boot section in the BIOS, change the boot mode from EFI (UEFI) to Legacy (if available).
- Set the Secure Boot option in the BIOS to Disable (if available).
- Select the version of Windows you are installing in the BIOS (if available).
- If you have a laptop, one Windows version is installed, but the other is not, and the advice on setting up the BIOS did not help you, then contact support or the manufacturer's forum. A BIOS update can also help, after which it may appear additional options(p.8-12).
- If possible, from a DVD, as there are many different problems with flash drives.
- Make from .
- Insert the flash drive into the USB 2.0 connector on the back of the computer (motherboard) or the USB 2.0 connector of the laptop. Booting from USB 3.0 does not always work.
- Try to use the Boot Menu, as described in paragraph 6 of this article. This method is simpler, more reliable than setting the boot priority in the BIOS and you can determine whether the computer sees your USB flash drive.
- An underscore on a black screen indicates that the computer freezes when accessing a flash drive or hard drive. If no flash drive loading in progress further, then the matter is precisely in it.
- If the computer does not see the flash drive or does not want to boot from it, use a DVD or other flash drive to install.
- If this is not possible, then change the type of flash drive from " removable media to a "hard drive" using the "BootIt Next Generation" utility, format it with the "HP USB Disk Storage format tool and make it bootable again with the "Windows USB/DVD Download Tool". You can download all these utilities below in the "Links" section.
- If the problem occurs after selecting the Windows installation partition, then use the advice on setting up the BIOS (p. 7-12). Remove old partitions from the disk during installation, or do it with boot disk Acronis Disk Director.
- If the installer reports that it cannot install Windows to disk, then try to execute or vice versa.
I remind you that the F10 key is used to exit the BIOS while saving the settings.
8. Links
In the following articles, we will look at how to install , and .
Sandisk Cruzer
Transcend JetFlash 790 8Gb
Sandisk Cruzer
If you want to open the AMI BIOS settings menu, you need to access it. To do this, during the start of the system boot, press the corresponding key. Depending on the motherboard manufacturer, this will be F2, F10 or DEL. It is recommended to press several times to be sure of the result.
Main section
Consideration of work with AMI BIOS will be based on version 02.61. In general, then only the interface changed, and the possibilities remained the same. Below is appearance main section.

Here you can make some minimum settings. This includes setting the date and time, as well as some other points.
Hard disk settings
To be able to start setting your preferences, you need to change the “Type” parameter to User (by default it is Auto). When this is done, opportunities for adjustments open up.

Under Type are other parameters whose values can be changed. You should not do this because it significantly reduces the speed of data exchange with the hard drive or other indicators.
System Information
A visit to this section will allow you to get acquainted with exactly what indicators it has this device. The volume is indicated random access memory, processor frequency and type, as well as information about the BIOS version itself. There are the following items:
- storage configuration. Here the installation of the disk subsystem is carried out. The most important is the ability to ensure compatibility with older versions of Windows (95 and 98).
- Configure SATA as. Installation available for two IDE modes and AHCI. Setting the second option will allow you to use new technologies for computer technology.
- Hard Disk Write Protect. Sets the ability to write to the hard disk or does not allow such actions.
- SATA Detect Time out. Provides the ability to reduce the time required to complete the download operating system. Do not set too low a value, otherwise you will encounter failures.
Advanced settings
The layout of this section is shown below.

Jumper Free Configuration
Switching to JumperFree Configuration will allow you to access the parameters that set some important settings BIOS AMI. This includes automatic or manual overclocking of the processor (AI Overclocking), setting the memory bus frequency (DRAM Frequency), as well as changing the supply voltage (Memory Voltage and NB Voltage parameters).
CPU Configuration
Here are all those parameters that are responsible for changing the settings for the CPU. Additionally, you can specify information about the device used.
Onboard Device Configuration
The parameters of the presented section are responsible for the functioning of ports, as well as controllers.
USB Configuration
Here are the means to change the work USB connectors devices. For example, you can disable them.
power
BIOS settings are available here, which provide for setting the supply voltage parameters for various elements of the device. 
When visiting Hardware Monitor available various information. They relate to the current temperature of the CA, as well as the number of revolutions of the cooling fan. It is possible to get acquainted with the indicators of other sensors. It is planned to set new power values, but this must be done very carefully. Below is a screenshot of the screen with the main parameters of the computer.

Boot
This section provides for setting the features of the device loading.

It becomes possible to set the sequence of the specified actions.
Boot Setting Configuration
Among all the available sections, this one deserves the most attention. There are ample opportunities to speed up the OS boot process. Here you can adjust the following parameters:
- Quick Boot. If you activate, then when the OS boots, the RAM will be tested. Such events allow us to say that some acceleration has been achieved.
- Full Screen Logo. Allows you to display a picture with information about the characteristics of the device. It will appear during every boot.
- Add On ROM Display Mode. Gives information regarding other connected devices for which their own BIOS is available.
- Bootup Num Lock. Specifies the state in which the key of the same name will be located when the device is started.
- security setting. This is where the security settings are set.
- Supervisor Password. Allows you to make changes to the process for entering an administrator access code to enter the BIOS.
The main parameters are listed, and their complete list is somewhat larger.
Tools
In this section, two options are available, and its appearance is shown in the screenshot.

- ASUS EZ Flash. Allows you to use BIOS from external drives.
- A.I.NET. Gives information about the cable connected to network controller.
exit
There are several items here that determine how to exit the BIOS.

- Exit & Save Changes. The exit will occur, and the adjustments will be saved.
- Exit & Discard Changes. An exit will occur, and the adjustments will be discarded.
- Discard Changes. The adjustments are discarded.
- Load Setup Defaults. The parameters are reset to the state set by the manufacturer.
The BIOS (Input/Output System) is an important piece of system software, implemented as a series of firmware bundled into common interface. The main purpose of the BIOS is to provide the operating system with access to the PC hardware and connected devices.
Given the importance of this system, it is not surprising that users are wondering how to properly configure BIOS. This topic is extensive and partially covered in our other articles, but today we will try to summarize the disparate information a little, creating a whole picture of BIOS settings.
General information
The main task of the BIOS is to check the operability of the hardware component of the computer and connected devices and start them with certain parameters.
So if, for example, you decide to connect sound card, then you will first have to disable the built-in audio controller in BIOS in order for the equipment to work correctly. There are many examples of working with the BIOS. If you want to set a password on your computer, use BIOS. If you want to install Windows XP from a flash drive, change the boot priority in the I / O system.
Versions of this software a lot, but we will focus on the BIOS AMI. If you understand the meaning of interacting with one version, then you will quickly understand the other interface.
Working with BIOS
Immediately after turning on the computer, it is not the operating system that starts loading, but the BIOS, which begins to check the performance of all detected devices.
To enter the BIOS, press the F10 or Delete key immediately after turning on the computer (in other versions, they may be different). To be sure, press the button several times in a row so as not to miss the launch moment.
If the login was successful, the following window will appear on the screen. This is your BIOS. 
Main
In this BIOS section, you can set the system date and time, as well as work with the parameters of connected drives.
All available drives are listed under "SATA 1-4". If a disk is not connected to the channel, it has the value "Not detected".
Use the keyboard arrows to navigate to desired disk and press Enter to go to the parameters of its operation. All available options are set by default so that the computer shows maximum performance and speed. Therefore, if you do not know exactly what can be changed, it is better not to touch the hard disk configuration and leave the "Auto" value for all settings. 
On the “Main” tab there is also a section of system information, which is called “System Information”. Here you can view the BIOS version, production date, and read important processor and memory information. 
The last section on the Main tab is called Storage Configuration. It is responsible for configuring the disk subsystem and allows you, in particular, to set the Windows 95/98 compatibility mode.
To set compatibility with Windows 98/95/Me, set "Compatible" to "SATA Configuration".
Here you can also set the time that the system spends checking the disk. The default value is 35 seconds, but you should not reduce this parameter too much, otherwise the check will be performed incorrectly.
Advanced
On the Advanced tab, the first four sections allow you to configure the processor settings, as well as the built-in ports and controllers.
In the "Onboard Devices Configuration" section, you can disable the built-in network adapter if it interferes with the operation of the built-in board. To do this, you need to set the "Onboard LAN" parameter to "Disabled".
The "USB Configuration" section may also be of interest, where you can configure all available USB connectors or disable them completely. 
power
In this section, you can configure the power saving function, as well as set the order for turning on / off the computer.
On the Power tab, it's best to leave all the settings at their defaults, unless you know for sure what needs to be changed to make the computer work better.
There is a useful "Hardware Monitor" section here, when you open it, you will see all the information about the processor temperature, fan speed, etc. 
Boot
The Boot tab allows you to configure boot options.
IN boot partition Device Priority you can set the boot priority, which you talk about all the time in articles about installing Windows.
You need to click on the “1st Boot Device” item with the Enter button and in the window that appears, select which media will boot first. The default is a hard drive, but you can install an optical disc or a USB drive. 
The next section is "Hard Disc Drivers". It will be useful if you have two hard drives connected, since it sets which hard drive the operating system will boot from. 
Another useful simple user section - "Security". There you can set two types of passwords:

If you set a password, then each time you enter the BIOS, a window will appear where you will need to specify it in order to gain access to the basic input / output system.
Tools
The "Tools" section is designed to update the BIOS from a disk, floppy disk or flash drive. Another option here is "AI NET". Allows you to get information about the cable connected to the network controller. 
exit
The last BIOS section, where you can choose the options for exiting the I / O system:

The last item allows you to fix some errors when starting the computer that prevent Windows from loading normally.
Conclusion
Most of the described BIOS parameters are unlikely to be needed ordinary user. However, some points, such as changing the boot priority, are a must-know. In addition, understanding the meaning of work basic system, you will be able to resolve some emerging issues with the security of your computer and the compatibility of connected devices.
Remember: BIOS settings can be reset if necessary. To do this, you need to disassemble the system unit and pull out for a while a small battery, which is located on the motherboard.
Therefore, even if you make a mistake in the settings of the base system, you can quickly correct the mistake and roll back the configuration to its original state.
A computer is a collection of complex devices combined into one. For correct operation all computer devices require a program that will interrogate them and run them in a certain sequence. This software tool called the BIOS. Below you will learn how to work in the BIOS and not harm your computer.
What is a BIOS?
Bios is a program that is located on a separate chip on the motherboard. It manages the initial stage of booting the computer. Device startup settings are located in the volatile memory of the BIOS. However, after turning off the system unit, the settings do not go astray, since there is an independent source - the battery on the motherboard.
When turned on system block The BIOS checks the functionality of the components ( hard drive, RAM, etc.), if everything is in order, then it starts devices with certain settings and transfers control to the operating system.
Settings menu
Some settings can be changed by the user in special menu. To enter the settings menu, the computer owner must press a certain key or combination. Most motherboard manufacturers use the Del key, but there may be options, such as F1 or F2, and some companies set combinations - Ctrl + Alt + Esc. If the combination is unknown, you can look for it in the instructions for the motherboard.
You need to press the keys immediately after starting the system unit, at the stage of checking devices. The BIOS settings menu that opens will most likely be on English language but that shouldn't scare you.
BIOS Keys
The menu item is selected using the arrows on the keyboard. Actions are confirmed with the Enter key. The transition to the previous menu and exit from the settings occurs by pressing the Esc key. Before you exit, a dialog box will appear asking you to save your changes. To save, you need to press Y and Enter, to reset the last changes, press N and Enter.
Changing some parameters, for example, the boot sequence from media, can be done using the PageUp, PageDown or F5, F6 keys. You can apply and save changes with a subsequent reboot by pressing F10.
So that the user does not get confused in the multitude of parameters, a hint is displayed for each of them: short description functions and keys for control.
Modern motherboards have a more advanced settings management menu. Instead of a text menu - a graphical interface, and all control is carried out with the mouse.
BIOS setup structure
All manufacturers have the following sections:
- CMOS settings,
- basic bios settings,
- performance management,
- operation of peripheral devices,
- order of loading from media and their modes of operation.
There may also be options for additional sections.
Security in BIOS
Manufacturers also thought about security in BIOS. You can set a password to protect settings from being changed. After that, only the owner of the password can change the parameters. Each time you enter the BIOS, you will need to enter a combination of numbers.
However, this method will not work if the system unit runs out of battery. The parameter chip will no longer receive power and reset all settings to default. 
BIOS update
On older computers, updating the BIOS firmware was possible only by removing and flashing the microcircuit in third party device. Today, most microcircuits are flashed from the operating system or through the BIOS menu.
Updating the BIOS program is a complex and dangerous process. If the user makes the slightest mistake, the entire computer can suffer. You can update the firmware only in extreme cases.
For users, working with the BIOS at first will seem complicated, but studying the instructions for the motherboard should help to find answers to all questions. Try not to experiment and touch unfamiliar parameters. If the computer stops booting, then you should try resetting the settings to default. There is such a menu item in any BIOS.
Video instruction - how to work in BIOS