Difference between ide and ahci. Hard drive operating modes: AHCI vs IDE
Quite often there are questions that arise in connection with connection and configuration hard drives various types. Especially often - during installation operating system to an SSD drive.
Mostly, the difficulty of users arises when choosing an operating mode hard drive- AHCI, RAID or IDE. Since the RAID option is for regular user is not interesting, since it involves the creation of a software or physical array of disks and is intended mainly for servers, we will not consider it, but will limit ourselves to the parameters AHCI mode or IDE mode.
First of all, you need to remember that AHCI mode, can not be enabled on all motherboards and not with all disks. Therefore, before connecting, you must carefully study the operating instructions for the corresponding devices.
IDE MODE
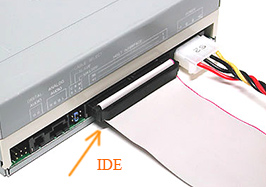
IDE mode is almost always enabled by default and provides compatibility with all types of " computer hardware" This is one of the oldest ways of communicating any type of drive with motherboard- at least drive optical disks, at least hard. The IDE bus connection is made using an 80-core flat cable. The big advantage of using the IDE interface is the ability parallel connection two devices on one interface, for example, a hard drive and a CD or DVD ROM. In this case, a 4-pin molex connector is used to power the device.
Important: when using an IDE disk or IDE cable (via an adapter) when connecting a hard drive, AHCI mode will not work! Trying to switch will result in an error and a “screen of death”!
AHCI MODE
AHCI mode is intended to work only with hard drives connected using the SATA interface, regardless of its implementation. This type of connection is designed to provide higher data transfer speeds and is hot-swappable and hot-swappable. connecting hard disk.
More high speed Disk access is provided using NCQ technology, which allows you to rearrange the order of reading files from the hard disk surface depending on their location. For a simpler understanding, the process can be described as follows: first, data that is closer in location is read, and then the reading head moves to files that are more distant on the surface of the hard drive. Moreover, the order of receipt of reading commands is ignored by the system. It is also worth noting that the performance increase is very noticeable when running resource-intensive applications (for example, games), and for more efficient work, hard drive must have a good cache.
Hot plugging or replacement of hard disk is a definite plus of using AHCI mode. When connected SATA drive with activated in BIOS mode AHCI, the drive is detected instantly by the system and is ready for use after power is applied. Almost the same way as a flash drive installed in a USB port is detected.
First of all, it is necessary to note the use solid state drives(SSD) to install the operating system - in this case there are no options for choosing a connection mode - only AHCI.
In case used in the system is hard the drive is connected using the SATA interface, and the motherboard has the ability to switch to AHCI mode, then activating it is preferable, as it will increase the performance of the system as a whole.
The only condition for activating the AHCI mode is when installed system Windows - the need to install drivers and make changes to the registry.
How to switch ahci to ide in bios?
To switch the mode in the BIOS, you need to find the “Controller Mode” item or similar, where you can select the IDE, AHCI, RAID or Compatibility mode. Although depending on the manufacturer BIOS given The parameter may be located in different menus.
Switching between ahci and ide modes - Option 1

Switching ahci and ide modes - Option 2

Switching ahci and ide modes - Option 3

Switching between ahci and ide modes - Option 4

Switching ahci and ide modes - Option 5
As can be seen from everything described above, AHCI mode is preferable for working with drives connected using the SATA interface and having sufficient cache. A big plus of using this mode when replacing or testing hard drives is that constant rebooting is not required. It is good practice to set the default AHCI mode to gaming computers and using resource-intensive applications for work.
IDE mode does not require any special manipulations with connection or configuration, and the speed of accessing the hard drive when using a computer to perform standard tasks quite sufficient, despite the outdated protocol.
Proper operation of a computer is possible only with coordinated interaction between the hardware and the operating system. Technologies are developing and lately This is most noticeable in the area of storage. Modern hard drives and SSD drives are many times faster than those used in computers 5-10 years ago. Used for data transmission SATA interface, through which the drive is connected to the computer. The SATA interface is capable of operating in two modes: IDE and AHCI, and if you have a modern hard drive or SSD installed, you can speed up your computer by enabling AHCI mode.
What is AHCI mode
As noted above, AHCI is one of the data transfer modes over the SATA interface. As you know, through the SATA interface you can transfer information at speeds from 1.5 to 6 Gigabytes per second. Maximum speed is supported specifically in AHCI mode, which should be used with all modern drives. As for the IDE mode, it is supported in the SATA interface for compatibility with older hard drives.
By default, AHCI mode is not always enabled in the Windows operating system, even if the drives are connected to the motherboard via SATA. Because of this, the user loses in computer performance, since the disk speed is limited by software. By setting the AHCI mode, you can increase the speed of the drive by 20-30%, which will affect the overall experience of the computer.
How to find out if AHCI mode is enabled in Windows
Most often, users do not even suspect that it is necessary to enable AHCI mode in order to improve computer performance. At the same time, Windows by default does not always work with HDDs and SSDs, even the most modern ones, in AHCI mode. To check if AHCI mode is enabled in Windows, you need to do the following:

Please note: Also, the absence of devices operating in AHCI mode in the list may be due to the fact that old drives that are not capable of operating in the new mode are connected to the motherboard.
You can also check whether the SATA interface works in AHCI or IDE mode through the BIOS. To do this, you need to restart the computer and press “Del” or F2 during the boot process. The BIOS will launch, where you will need to find the SATA Mode item and see whether the AHCI or IDE option is installed.

Important: If you notice in the BIOS that the SATA interface is set to work in IDE mode, you do not need to switch to AHCI mode, since this will not do any good.
How to enable AHCI mode in Windows
Microsoft began supporting AHCI mode in Windows operating systems with Windows 7. However, you can enable it in Windows XP if you download the necessary drivers on the Internet, made by enthusiasts, and install them. However, it is worth noting that this method does not always give a performance boost, and on Windows XP it is better to abandon the idea of using AHCI mode and work with drives through a standard IDE.
To enable the AHCI mode itself, just set the appropriate setting for SATA in the BIOS. But this must be done before installing the operating room Windows systems, otherwise, when loading, the computer will display error 0x0000007B INACCESSABLE_BOOT_DEVICE or go into the constant reboot. Therefore, to switch IDE mode to AHCI when installed Windows, you need to make some changes to the registry; below we will look at what actions to perform for each version of the operating system.
How to enable AHCI mode in Windows 10
In the modern Windows 10 operating system, Microsoft did not offer a setting that would enable support for AHCI mode on the fly if the SATA interface previously worked through the IDE. To correctly switch to AHCI mode, you will need to do the following:

After the computer boots, the Windows operating system will prompt you to install the necessary drivers to work with AHCI mode; be sure to do this.
How to enable AHCI mode in Windows 8 and Windows 8.1
To switch the Windows 8 or Windows 8.1 operating system to work with AHCI mode, you need to do some work in command line. You will need to do the following:

It is worth noting that if the computer runs on an Intel CPU, then you can use standard utility company that allows you to make the necessary settings for switch Windows to work with AHCI. This is done as follows:

Please note: The above method is only suitable for computers with Intel processors, for AMD such a decision V at the moment No.
How to enable AHCI mode in Windows 7
In the Windows 7 operating system, the method for enabling AHCI mode is close to that used in Windows 10. Here you will also need to make some changes to the registry as follows.
Good day.
Quite often I am asked about how to change the AHCI parameter to IDE in Laptop BIOS(computer). Most often they encounter this when they want to:
Check your computer hard drive Victoria program(or similar). By the way, such questions were in one of my articles: ;
Install "old" Windows XP on a relatively new laptop(if you don’t switch the parameter, the laptop simply won’t see your installation distribution).
So, in this article I want to look at this issue in more detail...
Difference between AHCI and IDE, mode selection
IDE is an older 40-pin connector that was previously used for connecting hard disks, drives and other devices. Today, this connector is not used in modern computers and laptops. This means that its popularity is falling and it is necessary to use this mode only in rare cases. certain cases(for example, if you decide to install the old Windows XP OS).
The IDE connector has been replaced by SATA, which is superior to IDE due to its increased speed. AHCI is an operating mode for SATA devices (for example, disks) that ensures their normal functioning.
What to choose?
It is better to choose AHCI (if you have such an option. On modern PCs it is everywhere...). You need to choose an IDE only in specific cases, for example, if SATA drivers are not “added” to your Windows OS.
And by choosing IDE mode, you kind of “force” modern computer emulate its work, but this certainly does not lead to an increase in productivity. Moreover, if we are talking about modern SSD drive when using which, you will get a speed gain only on AHCI and only on SATA II/III. In other cases, you don’t have to bother installing it...

You can read about how to find out what mode your disk is operating in in this article:
How to switch AHCI to IDE (using the example of a TOSHIBA laptop)
For example, I’ll take a more or less modern laptop brand TOSHIBA L745 ( By the way, in many other laptops the BIOS settings will be similar!).
To enable IDE mode in it, you need to do the following:
1) Go to the laptop BIOS (how this is done is described in my previous article:).
3) Then, in the Advanced tab, go to the System Configuration menu (screenshot below).
4) In the Sata Controller Mode tab, change the AHCI parameter to Compatibility (screen below). By the way, you may have to switch in the same section UEFI Boot to CSM Boot mode (so that the Sata Controller Mode tab appears).
Actually, it is the Compatibility mode that is similar to the IDE mode on Toshiba laptops(and some other brands). You don’t have to look for the IDE lines - you won’t find it!
Important! On some laptops (for example, HP, Sony, etc.), IDE mode cannot be enabled at all, since manufacturers have greatly reduced functionality Device BIOS. In this case, you will not be able to install on your laptop old Windows (however, I don’t quite understand why to do this - after all, the manufacturer doesn’t release drivers for old OS anyway...).
If you take an “older” laptop (for example, some Acer) - then, as a rule, switching is even simpler: just go to the Main tab and you will see Sata Mode in which there will be two modes: IDE and AHCI (just select the one you need, save BIOS settings and restart your computer).
This concludes the article, I hope that you can easily switch one parameter to another. Good luck!
In modern computer systems hard drives are connected to different modes: required parameter selected in BIOS. The desire to understand the difference between AHCI and IDE may arise when installing a new drive or operating system, which sometimes have strict protocol requirements. It is strongly recommended not to confuse these modes when migrating hard drives from one build to another.
AHCI mode(Advanced Host Controller Interface) assumes the implementation of the SATA connection protocol - serial interface data transfer.
IDE mode(Integrated Drive Electronics) allows you to emulate legacy parallel interface PATA data transfer.
Thus, in one of the modes the connected drive will work as a SATA drive, in the other - as IDE drive(physically remaining the same SATA). Such a substitution is necessary to ensure maximum compatibility of components and software, which does not support the new protocol.
Comparison
Any SATA drive can work in IDE mode, and users will not have any remorse about this; most will not even notice. Many motherboard manufacturers enable PATA compatibility by default in the BIOS: this will be safer. What happens if you connect, for example, a disk with Windows XP to a system in which the controller runs in AHCI (supports Microsoft operating systems starting with Vista)? A beautiful blue screen with white letters screaming an error. So it’s reasonable to play it safe.
Why then do we need a mode native to the SATA interface? First, the read speed of disk access is faster than PATA, which improves overall system performance. Secondly, two wonderful “buns” are available for SATA: NCQ and “hot plugging” of the drive. This is the main difference between AHCI and IDE: the latter is slower and less functional, although it is compatible with outdated components and software.
Native Command Queuing is a technology that allows you to rebuild the execution queue of read commands received by the hard drive from the system. Moving heads between data tracks takes longer the further away the tracks are from each other. NCQ makes it possible to turn first to those sectors that are nearby, even if the request arrived later. Thus, the operation of reading devices is optimized and speed increases. True, the user can evaluate the increase only at the time of loading the OS or while working with resource-intensive applications, and in other cases the test results indicate it.
If we connect the hard drive to the motherboard and power supply (if necessary) of a running computer, we will immediately notice the difference between AHCI and IDE. In native SATA mode, the new device will be detected by the system, as happens with USB drives, and you can work with it. This is convenient if you need to quickly transfer data or check the performance of someone else's HDD. The PATA interface, including the emulated one, requires complete shutdown computer. IN best case scenario when manipulating the disk, the system will ignore it; in the worst case, the equipment will cause a serious failure.
Another important point: In IDE mode, it is not possible to install operating systems on SSD drives. Solid State Drives require AHCI to be enabled.
SATA RAID/AHCI Mode
Possible values:
Disabled, RAID, AHCI
Description:
The option allows you to specify the operating mode of a modern IDE/SATA chipset controller. When value Disabled To access SATA drives, a mechanism similar to a conventional IDE controller will be used. Of course, this somewhat limits the performance of the disk subsystem, but you do not need to install additional drivers - everything you need is already included in any operating system.
Meaning RAID found only on motherboards that support RAID arrays of drives connected to a standard IDE/SATA chipset controller. Its choice makes it possible to combine hard drives into RAID arrays in order to increase the reliability of information storage or to increase operating speed. Just keep in mind that when installing the Windows 2000 or Windows XP operating system, you will definitely need a diskette with drivers (if your computer does not have a disk drive, this may lead to an unresolvable problem, since other drives are not supported). Drivers are also required for Windows Vista, but in this case, in addition to a floppy disk, they can also be written to a CD or Flash drive.
Naturally, you can only talk about a RAID array if you have two or more installed on your system. hard drives. Moreover, it is desirable that they be of the same brand and volume, ideally with the same firmware and from the same batch.
Meaning AHCI present only on fairly new motherboards whose IDE/SATA controller supports the SATA II interface. Selecting this option allows you to take full advantage of the Advanced Host Controller SATA II (AHCI stands for Advanced Host Controller Interface) - command queuing, hot plugging, etc. We should not forget about the higher performance of the disk subsystem in this mode. If your hard drives support SATA II, it makes sense to choose this value. Just keep in mind for Windows installations 2000 or Windows XP you will need a driver floppy disk.
For older operating systems ( Windows family 9x) the use of RAID arrays and an AHCI controller is hardly possible - necessary drivers simply doesn't exist.
It is necessary to change the operating mode of the standard IDE/SATA chipset controller before installing the operating system. If the system is installed, simple change mode in the BIOS will cause " blue screen death." If you still want to enable AHCI on the installed system, before changing the value of this option, force change the IDE/SATA controller driver to the desired one.