Selection of computer components online. Do-it-yourself construction set for adults: how to assemble a gaming computer without being a specialist
The first thing you need to understand is why you need such a system. This affects not only the cost of assembly, but also the nature of the choice of components. Most regular computer, performing standard tasks, can be assembled from elements entry level. There is even an opportunity to play low-cost games. If you are an avid gamer or are demanding on graphics, then this choice is indispensable. We need a so-called gaming computer. You will need more RAM (from 16 GB), a processor with at least 4 cores, one or two discrete video cards, and, of course, a powerful power supply that will handle it all. The price of this pleasure can exceed 100 thousand rubles. Is it worth pursuing? Everyone decides for themselves. But it is more advisable to opt for a mid-level car.
What do you need to assemble a computer?
CPU
The “heart” of a computer is considered to be the CPU, on whose power a lot depends - whether the external video card will show its full potential, whether it will be possible to open several resource-intensive applications at once, whether it will be comfortable to watch videos in UltraHD format. Intel processors (i5 or i7) are suitable for these purposes. The clock speed starts at 3 GHz. It should not be surprising that over 10 years this parameter has increased insignificantly. Engineers have achieved reduction technological process, which made it possible to increase the number of transistors on a chip, reducing power consumption.
It’s better to immediately pay attention to the seventh generation of Intel processors, since their built-in graphics card allows you to play video content in the H.265 format, which is gaining popularity. Codec latest generation supports not only high frequency frames, but also 10-bit color. A dual-core processor with four Pentium threads, the cost of which is minimal, can currently decode such material. Therefore, such a CPU is suitable for assembling not gaming system. For games in FullHd format, you need to take a closer look at the i5 line, for 4K games - at the i7 series.
A landmark event in 2017 was the release of competitive models from AMD. The Ryzen 7 1800X can perform on par with the Intel i7-7700k. The most powerful platform for the average user will be based on one of these “stones”. But you cannot build the cheapest computer on AMD Ryzen, since these processors do not have a built-in video core.

CPU cooling system
When the “stone” operates, heat is generated that must be removed. Therefore, a fan is required. CPUs come with a cooler ( BOX version) and without (OEM). If you are a connoisseur of silence in the room, then it is better to choose the second option. Typically, third-party coolers have lower noise levels. For example, in the model from Arctic Cooling - Alpine 11 PRO - this figure reaches 14 dB, which is 9 dB lower than that of “box” fans. Despite this, it is capable of cooling processors up to 95 Watts. But it won't work if you're going to increase clock frequency CPU specified in the specification. For a gaming system, you need to choose a cooling system with copper heat pipes. Copper base improves heat dissipation performance. For example, the TITAN Hati TTC-NC15TZ/KU cooler is designed for a maximum processor heat dissipation of 160 Watts.


Today, most cooling systems are made with speed control depending on the CPU temperature. When the system is not loaded, less energy is required. Therefore, the fan should rotate more slowly (from 500 rpm) and create less noise. This modification has a 4-pin power connector, without control - a 3-pin connector.
The cooler has various mountings for AMD platforms and Intel. The most common sockets are LGA 2011 and 1151, and boards with AM4 have begun to be released for AMD Ryzen processors. Compatibility is very important, check it in the instructions or on the manufacturer’s website.
Motherboard
The foundation on which the entire system rests is called the computer motherboard. Models differ in the socket where the central processor is installed. This has been said before. In turn, they are divided according to the type of chipset, which is link between components. For example, Intel has Z270 or X99, AMD has X370 or 970.
The form factor also matters (ATX, mATX or mini-ITX). It depends on the type of case in which all the elements of the computer are located. You can get an inexpensive machine based on mATX. This motherboard has shortened dimensions while maintaining all the necessary functions. The gaming modification does not involve savings; the ATX type is suitable for it. For enthusiasts who need maximum speed and detailed rendering in games, manufacturers have added SLI and CrossFire functions (combining the power of several video adapters). Modern technologies allow you to install up to four video cards with one graphics processor. If the model name contains the word “Gaming”, rest assured that it is supported here. A nice addition could be the presence of backlighting.
The backplane contains two or four RAM slots. For the future, it is better to purchase with four, so that later you can increase the total memory capacity. It is more profitable to choose a platform that supports DDR4 memory, the price of which is the same as DDR3. Check compatibility on the manufacturer's website.
If video is built into the central processor, you need to pay attention to which outputs are used to communicate with the monitor. HDMI and DVI interfaces are common.
Also on the rear panel are USB ports. On at the moment their fastest type is USB 3.1, including the input for various gadgets - Type-C.

All modern motherboards have PCI-E 3.0 x16 slots.
An audio controller will be important for music lovers or movie lovers with high-quality sound. We choose the most effective ones - SupremeFX S1220 or Realtek ALC1150/1220. Digital audio has better characteristics than analog. Therefore, manufacturers began to include an optical S/PDIF connector. Sound device With HDMI input can be connected via the corresponding output of the video card.
The power supply to the motherboard and processor must be 24+8 pin.

RAM
Previously, its volume was measured in megabytes. Now even 4 GB is not enough. Memory sticks are located in slots on the motherboard. Some applications and, especially, games require large resources. The minimum required volume can be considered 8 GB. For gamers, 16 GB is already required.
RAM performance increases if it operates in 2 or 4 channel modes. Therefore, we choose two sticks with a capacity of 4 or 8 GB, depending on the needs.
The bandwidth of DDR4 is higher than that of DDR3. At the same time, energy consumption is less. If the first operates in the voltage range of 1.2 - 1.35 V, then the second - at 1.5 V.
Memory frequency is critical if the video adapter is integrated into the processor. Otherwise, strips with a frequency from 2133 to 2666 MHz and a voltage of 1.2 V are suitable. Increasing the frequency will require increasing the supply voltage to 1.35 V, which will lead to greater energy consumption.
The ideal option is to purchase two sticks of 8 GB RAM with a frequency of 2666 MHz.

Video card
The graphics card is an important element for transmitting video information from the computer to the display. It comes in two types - built-in and external. The first does not require additional power and is not intended for gaming. The most advanced video core in Intel processors is HD Graphics 630, which is capable of decoding high-bitrate video in H.265 format. If you are happy with this, then you can save a lot on assembly without resorting to an external adapter. Otherwise, you can’t do without it.
It all comes down to price and performance. The market offers many options discrete video cards. Their power has grown so much that not one of them can do without fans, the number of which reaches three. Another important parameter appears - noise level.
Two manufacturers are fighting for the buyer in this segment - NVidia, which is more productive and cooler, and AMD, which balances price and quality.

For the average user, for whom the maximum requirement is the availability of online games, a model from NVidia’s junior line – GTX 1050TI – is suitable. It is equipped with a sufficient amount of video memory of 4 GB, the recommended power supply is only 300 Watt, supports high resolution 7680 x 4320.
Fans of high-end games need a more powerful video adapter. They have the following models to choose from: GeForce GTX 1060, GTX 1070, GTX 1080, GTX 1080TI and GTX Titan X. The latter has 12 GB of the fastest GDDR5X memory, but requires 250 watts of power. GeForce GTX 1080 with 8 GB of video memory and 180 Watt consumption is the best option for gaming in 4K resolution with the highest detail. If you are comfortable playing with medium settings, then we choose the GTX 1070 based on the price/performance ratio.
To improve energy efficiency, some cooling systems can stop fans from spinning when idle to reduce noise. The use of two or more coolers increases the reliability of the video system as a whole in the event of failure of one of them.
Storage media
Any computer cannot do without hard drives on which personal data will be stored or the operating system will be installed. For more fast loading and running Windows will require an SSD drive of at least 120 GB. It consumes less power than a mechanical drive, is silent and takes up less space in the case. But it is not without its shortcomings. The main ones are time between failures and a higher price. Therefore, if you record a large amount of information, it is cheaper to buy an internal or external hard drive with a size of 4 TB or more.


power unit
When all components of the PC platform have been selected, we will begin to search for the most important element on which the stability of the system depends. The power supply is involved in energy distribution and voltage stabilization.
If you have an office version of the computer (for example, without an external video card), then 400 watts of power will be enough. The average video adapter will require a 500-watt power supply. To power the GTX Titan X or several devices in SLI/CrossFire mode, you need a unit of 750 watts or more.
There are two main indicators - efficiency and PFC. Power supplies with an efficiency of more than 80% (80 Plus standard) are considered more efficient. The efficiency determines how much useful energy is transferred to the PC components. The larger it is, the less the power unit heats up. It is recommended to use a PSU with active power factor correction (APFC), as it further smoothes the voltage supplied to it. But it has a significant drawback - this type of device does not require the use of uninterruptible power supplies (UPS).
More details about selecting a power supply are written in the article Selecting a power supply for a computer.

Frame
All elements of the future system are placed in a metal box. The thicker the sheet, the more reliable it is. By size they are divided into ATX, mATX and mini-ITX. The choice is yours. Small enclosures have limited volume for good ventilation, but take up less space. The ATX size allows you to install a long video card.
A case with a transparent lid, where you can see the LED lighting inside, will look impressive. Expensive models are equipped with an additional cooling system. This is important for a gaming PC that experiences intense heat.
It is better to choose a lower location for the power supply, as it takes in cold air from under the bottom.

Peripherals
But the choice is not over yet. Without input keys it is impossible to use a computer. The mouse and keyboard are wired (USB and PS/2) and battery-powered. The second option is more practical, but the communication signal sometimes disappears. It's cheaper to buy a set right away. For a gaming PC, a mouse with multimedia buttons or a gamepad is suitable.
If there is a need to record information on optical media, then we purchase any DVD-RW drive.
Finding a monitor is a separate issue. We only note that you need to select LED displays, without flickering and with the ability to reduce blue radiation. It is recommended to check viewing comfort in the store, since TN+film, IPS and VA matrices differ in contrast and color rendition. Otherwise, the only difference is in resolution and diagonal.
How to assemble a computer yourself from components
PC components purchased. You can proceed directly to assembly.
We take the motherboard out of the box and place it on cardboard or foam rubber. We find a socket on the board for installing the CPU. We take the processor and carefully insert it there without any additional effort.

Thermal paste is included with the CPU cooler. Apply a thin layer of it to the surface of the “stone”. After reading the instructions, install the propeller on the base of the board. We check the tightness of the bases to each other. Connect the cooler power wires to the “CPU_Fan” connector. We find a similar connector for connecting a case fan.


We place the power supply in the case, which is secured with screws.

In the front part of the case, we attach the existing hard drives, SSD drives and floppy drives to a metal rack.

Before installing the motherboard, we screw special legs into the holes of the case to prevent short circuits.

Included with the backplane is a rear strip for connectors of external parts of the PC: monitor, sound speakers, USB devices.

Carefully place the board on the legs and fasten it with screws.


Remove the plug from the back of the case and insert it into the connector PCI Express x16 discrete video card.


It's time to connect everything installed elements cables.
We connect the plugs on the front panel of the case - indicators work hard disks and power availability, PC restart and shutdown buttons, as well as for USB ports. The connectors are usually located in one place under the PCI slots and are labeled.


We connect hard drives and drives to the system board with SATA cables.

Now is the time to start connecting components to the power supply. First, we insert a 24-pin (or 20+4 pin) cable, which is responsible for supplying power to the motherboard, then an 8-pin cable that powers the CPU.


Let's supply power to the recording and storage devices.


An external video accelerator usually requires additional power. We find this wire from the power supply (6 and 8-pin) and insert it into the connector on the device.
The computer assembly from scratch is completed. Close the housing with a lid. We connect the monitor with a wire to transmit video data, network cable We plug it into the power supply, and the mouse and keyboard into the corresponding USB or PS/2 ports. Turn on the computer.
Important steps in assembling a PC are determining the functions it will perform and calculating the power of the power supply. This will help save a lot of money. Next, we find out whether an external video card is needed. It's not cheap either. SSD drives are a necessary element for maximum performance systems. Effective cooling in the case will require an additional turntable. If the motherboard and graphics card have LED backlighting, then it is advisable to choose a frame with a window on the side wall. The main advantage of the assembly with my own hands– the ability to replace components at any time.
Most people know that the minimum composition of a completely ordinary system unit includes processor, motherboard, video card, RAM, hard drive, case with power supply and other less significant components. And most likely, no one needs to explain how important the correct selection of components for a PC is.
When and why you need to build a new computer
All these components interact with each other and work stably until something fails. As can be seen from practice, most computer hardware (hardware - computer components) is designed for long time work. As a result, the need to build a new PC arises not because of any breakdown, but because the internal components of the system unit inevitably become outdated and can no longer cope with modern tasks.
If you take a working system unit from 10 years ago, it will still perform its functions today, but you will immediately feel a huge difference between the old one and the fresh replacement. It’s not a matter of physical aging of components; it’s all to blame technical progress, because almost every year more productive components appear.
There is no point in constantly updating the computer system, due to the rather large monetary costs. In this regard, as a rule, an assembly intended for games is carried out with a view to several years in advance, and if the purpose of assembling a computer is to perform office tasks, then its service life should increase to an even longer service life, but there is no way to do without the right choice computer components. Information on how to choose a computer will also be very useful, and in some ways even similar.
Current selection of PC components for today
Choosing a processor for a future computer
The processor is the initial link, what you should start from when assembling a new computer in the first place, regardless of the further purpose of the computer. Only after a specific processor has been selected can you continue to solve the issue with components: the motherboard and RAM, etc.
Taking a look at the processor range, two competitors, Intel and AMD, will immediately catch your eye. If you look superficially at the tests and reviews of the choice between these trademarks, we can come to a small conclusion: Intel processors are good in terms of performance, and AMD is better in the price segment.
Selecting an AMD processor
If we take two processors identical in frequency and number of cores different manufacturers, then Intel is more likely to emerge victorious. After all, they have a well-implemented CPU structure that took years to develop. AMD is less productive as it may seem at first glance, but if we compare them a little differently, namely in terms of price and performance, then AMD in the mid-price segment is usually more productive.
Of course, choosing between one manufacturer or another is more of a philosophical question, since fans always support one of these competitors. First, you need to familiarize yourself with the leading solutions from AMD.
Data central processing units Today they are made for the AM3+ socket (connector type), having three series of FX models with 4, 6 and 8 cores and the costs of these technical solutions are correspondingly different. These processors will be great budget solution For modern games. At the same time, the number of cores will influence better multitasking, which is not unimportant now. But here the factor is in favor of Intel - the majority of current computer games adapted for four core processors.
As a current cheap addition to upgrading your computer today there will be 4-core AMD Athlon processors with socket FM2 and with socket AM3 AMD Athlon X4. But these processors do not have an integrated graphics core, which is quite significant, because for an office computer, buying a video card would be an unnecessary waste, so it is better not to use these models for assembling a promising gaming computer. If you want integrated video, which is considered optimal for a consumer or office computer, then you should take a closer look at processors with socket FM2/FM2+.
The most inexpensive and modern solution from AMD will be the FX 4100 - 4350 series processors. FX4XXX is positioned more as good platform For home computer, in its time as FX6XXX (FX6100 - 6350) it will be good to prove itself as a budget gaming computer with overclocking potential. Of course, for higher performance, you can choose FX 8xxx and 9xxx series processors, whose performance is considered the best by the manufacturer.
Selecting an Intel Processor
For processors from Intel system the choice is a little easier. The latter's processors will be the optimal build solution modern computer, have a socket 1150 and regardless of the price, all of these processors are equipped with an integrated graphics core, and the final series of the model range, like processors with socket 1155, is completed here Intel Core i7. It has 4 cores and hyper threading technology (8 threads). The junior Intel Core i3 model (2 cores, 4 threads) has everything you need for stable operation for fairly resource-intensive tasks.
The older model is designed for absolutely all occasions, from highly demanding games to video encoding and processing. As for the Intel Core i3, this is the entry-level gaming option, or the minimum option for a budget gaming computer. The golden mean of a productive computer would be the Intel Core i5, nothing extra here, just 4 cores. For office computers, there are two more series of dual-core models - Pentium and Celeron. The Pentium processor is more suitable for the home, since it is a little more productive, and therefore more expensive, while the Celeron, although it is suitable for not very resource-intensive tasks such as watching movies and listening to music, web surfing and social media, but its performance will clearly, although not everywhere, be lacking.
Motherboard
After a long decision about the choice of such a component for a PC as a processor, the time has come to think about the motherboard. First look at the socket of the pre-selected processor, then start selecting the motherboard based on these parameters. The connector of the motherboard and CPU must match mandatory. When selecting this type of component, you should pay attention to the chipset (it affects many things, for example, the maximum supported RAM frequency, the presence of SATA 3 and USB 3.0), the number of connectors (USB, SATA, PCI, DDR, DVI/VGA for integrated video) , form factor (board dimensions) and manufacturer.
The recommended manufacturers here are Gigabyte, Asus and MSI; some models of motherboards from other manufacturers can actually be even more productive and no less reliable, for example, like ASRock. These same manufacturing companies have proven themselves well in the production of video cards. But it is not at all necessary to buy the same brand of manufacturers and components for the same motherboard and video card. There are many motherboards on sale, but which one you prefer is a personal touch.
Video card
A computer needs a video card not only to display images on a monitor. She is also responsible for processing those same graphics, especially for three-dimensional entertainment. Today, in order to play comfortably at minimum settings, you need to choose a video card that is certainly no less productive than Nvidia GeForce 730 or AMD Radeon R7 240. Average optimal option GeForce 760/770. If you wish for a long time enjoy high or ultra settings, get ready to fork out for a GeForce 790 or AMD Radeon R9 270 290X, and maybe even a GeForce GTX 980. Don’t lose your head here, you won’t always have the best computer and what costs $1999 today will already be there tomorrow cost $299, although the difference between the performance and functionality of the models may not even be noticeable.
As for integrated video, everything is much simpler here. GPU already built into the CPU by the manufacturer. It will work instead of the video card, and will use the RAM memory to perform the functions of the video card. In the BIOS settings it is possible to independently select available memory for integrated video. The maximum permissible allocated volume depends on the capabilities of the motherboard (you can check it in the instructions or on the manufacturer’s official website).
RAM
For comfortable work today, the minimum amount is 4 GB of RAM. This applies to office computers and assemblies for simple tasks. It is advisable for a gaming PC to have 8 GB, or, if you really want, 16 GB, which may not be used, it’s up to you to decide. Here it is important to pay attention to the choice of RAM sticks with the required frequency. Buy RAM from maximum frequency- not necessary, here you need one that is simultaneously supported by the motherboard and processor. Well specialized in this issue such companies as Corsair, Goodram, Kingston, Silicon Power,Transcend.
Another important fact is the dual-channel operating mode inherent in most, if not all modern motherboards. It increases productivity by more than 15%. How to achieve this? Very simple. Buy two identical RAM modules. For example, 2 sticks of 2 GB each (4 GB of RAM) or 4 GB (8 GB of RAM); usually, stores already sell sets equipped with memory sticks of the same batch.
HDD and SSD
Here we come close to user memory. Everyone knows the purpose of a hard drive; it is where all the information is stored. But this does not mean that the operating system can be installed only on it. Today HDD drives remain good devices storing information, but to get more out of a computer for a partition for the OS, quite a lot of people already buy an SSD separately, with a capacity of 120 GB or more. SSD technology showed itself on the positive side in terms of performance. If you install all the system software on a solid-state drive, you will feel a significant difference between the most ordinary HDD and SSD. The computer will boot in a matter of seconds, all applications will open instantly, and you will forever forget about temporary freezes.
As for the hard drive, it still remains relevant in terms of data storage. It is profitable to buy a HDD with a capacity of 1 TB or more, since the cost of 1 GB of memory is cheaper. As for mechanics, the spindle speed is standard for all, 7200 rpm. It’s just not worth choosing less, unless of course the laptop is being updated, and even in them the SSD is no longer considered a novelty.
It is advisable to have a hard drive buffer size of at least 32 MB. The manufacturer is also considered an important point. Today they are almost all the same. At correct selection PC components such as HDD should take a closer look at manufacturers that have been on the market for a long time Western Digital and Seagate, it is recommended to focus on them, although this is not a mandatory rule that should be followed; even among these manufacturers there are defects, although with less probability.
Case and power supply
If you take a closer look at the range of cases, you can pay attention to the presence of a power supply supplied in the kit. Such a power supply can be used only if components with low power consumption are used and then no less than 400W. This power supply is certainly suitable for assembling an office computer with an integrated video adapter, or for some computer assemblies for the home.
Do you have a gaming build with a video card? Then go to the manufacturer’s website, look at the recommended power supply for your preferred video card, add 100-150W in reserve and buy a high-quality power supply. Under no circumstances connect the power supply that was included, there is a risk of burning the unit itself and other components. The fact is that such power supplies do not correspond to the declared power, while their quality generally leaves much to be desired. Focus on high-quality power supply from Cooler Master or Chieftec, or at least FSP and analogues. They are not only reliable, but also optimal in terms of connectors. They have an increased number of ports for powering SATA and other devices, and the cables themselves are longer. For a more correct understanding of what we are talking about, read the article: how to choose a computer case.
These benefits are especially important for game assembly computer, otherwise you can purchase cheaper models. As for the case, you can choose any one, focusing on the form factor and your taste, do not forget about good ventilation, because usually very powerful computers, especially after overclocking, heat up very well.
Other components
The last step is the other components personal computer. This includes DVD drive, other adapters, tuners, etc. Everyone has their own preferences here. However, an optical drive still remains relevant, since Blu Ray has been gaining popularity recently, although it is not in great demand. And some people specifically buy a drive just for the sake of installing the OS and drivers, probably not knowing about the capabilities of a bootable flash drive. If you decide to buy a drive, then the best quality is likely to be Asus and Nec, the probability of failure is quite low, although in reality it depends on your luck.
The brief information provided will be useful when selecting components for your future computer. However, after compiling a list of the desired hardware, if you do not have sufficient experience, it is better to consult a specialist to avoid an additional trip to the store to exchange the wrong components. Such a specialist may also be located in the store. Professionals will point out the mistakes that a beginner can make. They might even recommend something more worthy.
After you are 100% convinced of the correct selection of components and their compatibility, buy them and start assembling. There are many video reviews on the Internet showing how this is done. They will help you a lot in solving this problem. An extreme case is to give the hardware to a specialist, and he will assemble everything to the heap, usually assembly is included in free bonus after the purchase.
Hi all! The other day, one of my clients asked me to help with choosing a ready-made system unit in a digital supermarket. No matter how I tried to dissuade him, explaining that in assembled computers are almost always chosen incorrectly, and the prices for such products are greatly inflated, he stood his ground, and only after I calculated in detail the cost of the system unit, as if we had assembled it ourselves, and compared the resulting price with the price tag of an already assembled PC, my client agreed with me.
Friends, the whole point is that I know this “cuisine” from the inside. Almost always, a finished system unit is assembled from horribly matched components that could not be sold at retail, for example, along with a low-performance processor, such a computer can have a powerful video card installed (it is because of this that the PC will be called a gaming one), but this video card will never give it his all full power due to a defective processor. As for the quality of components, the story is similar. In particular, you will not be able to determine the manufacturer of the RAM and video card, and the processor cooling system will be factory and very noisy, solid state SSD drive turns out to be from an unknown Chinese "Fast Disk", and the power supply has no name at all, on the small microATX motherboard you will not find the PCI connector you need, and on the front panel of the ugly case there are USB 3.0 ports, instead of two case fans you will get one and it will hum will be heard a mile away. And most importantly, the price of this monster will be around 50 thousand rubles! You will be surprised, but if you assemble the system unit yourself, it will cost 10 thousand rubles less and the quality is undoubtedly better. Yes, I agree that in some cases you can find a decent ready-made computer with normal components, but its price will always be more expensive than if you assembled it yourself.
Selection of computer components
First, let's decide on the assembly sequence. In most cases, the components of a future computer need to be selected in this order: Processor->Motherboard->Video card->Power supply->Cooler->RAM->Storage devices->Case. There are many links that can be included in this chain ( external devices, add. PCI cards, add. coolers and so on)
CPU
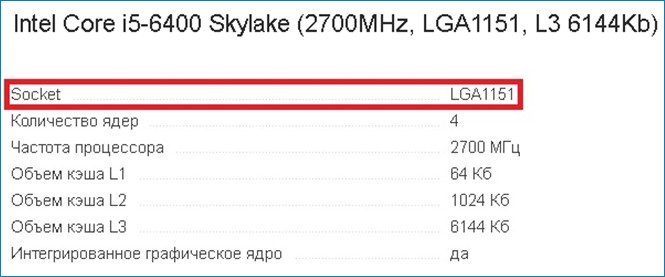
Let's get started! The very first one in line is . We start with the computer heart because components such as a video card, motherboard and cooler are selected for it, and not vice versa, but first things first. The modern computer market is teeming with a huge variety of processors from which you will have to choose. Personally, I chose the i5 6400 because it is powerful and inexpensive (11 thousand rubles), moreover, it is very easy to overclock (overclock) and operates at frequencies above 4.3 GHz.
So, after you have settled on a certain model, you basically need two things: remember the socket of this processor (a socket is a connector where the processor is inserted) and decide whether the processor will be overclocked ( ).
If you decide that you will overclock, then you will need a specific motherboard with a z170, z270 chipset (a chipset is a set of chips that coordinates the joint operation of all components).
Motherboard
We need to know the socket type of the processor for . Now we have smoothly arrived at the second step. In general, the motherboard offers the buyer the largest and most diverse set of functions and characteristics relative to other components. Everyone decides for themselves how many slots for RAM he needs the number and variety of ports on the panel, SATA connectors etc. etc. That is why you should approach its choice very carefully and prudently. I decided that I would drive the percentage. Accordingly, I need a motherboard on a z170 chipset (or z270) and with 1151 sockets. I set my sights on Asrock z170m pro 4s (price 7 thousand rubles).

If you don’t plan to overclock, then take any motherboard you like with the functionality and socket that suits you. Also, don’t forget to look in the “supported processors” column, in my case the i5 processor is on this list, everything is fine. Next, if you plan to install two or more video cards, make sure that the motherboard supports SLI/CrossFire mode and It had the required number of PCI-Express x16 slots.

The next thing you need to pay attention to is the type of RAM supported (DDR 2, 3, 4), the number of RAM slots and its maximum possible volume. This information will be useful to us directly when choosing the memory itself.

Now look at the parameters “Main power connector” and “Power connector for the processor”.
The main connectors are of two types: 20 pin and 24 pin. The processor power connector is 4pin, but 8pin is better.

Another characteristic we need is the form factor of the motherboard. There are four main types (not taking into account various modifications): mini-ITX, microATX, ATX, XL-ATX. Their main difference is their sizes. When selecting a case, for the most part we will be based on this parameter.

In my case, a MicroATX motherboard, when choosing it, I was guided by the fact that they are usually cheaper and it had everything I needed, why overpay for additional slots and connectors that I will never use (for example, I don’t need PCI slots).
Video card
Now let's move on to dessert - the video card!
When selecting components, let me again remind you that it is when matching each other, and not choosing, that the main parameters are the dimensions of the card, the recommended power of the power supply and additional power connectors. We will need to know the dimensions later when selecting a case, and the rest of the information will be needed when selecting a power supply unit, which is next in our line. By the way, the video card should be selected, as I already wrote above, for the processor, after all, it is the processor that reveals the full potential of the video card, and not vice versa.
In my case, the GeForce GTX 1060 3GB is ideal for the i5 6400.


power unit
So, . The main criteria for selection are power, types and number of power connectors. The recommended power of the power supply is indicated in the specifications for any video card on the manufacturer’s website, plus, if you are going to overclock the equipment, you need to buy an even more powerful unit. And there should always be a small reserve, because later a system upgrade or additional purchase is possible additional devices, which also require energy, albeit small.
As for the connectors, everything is simple. Let's look at the motherboard specifications, which we talked about just above. Main power connector and power supply for the processor. We select a block in accordance with these criteria. In general, the most universal power supply, regarding the type of connectors, is considered to be a unit with 24pin main power and 8pin processor power.
Also, do not forget about additional power supply to the video card, it can be 4, 6, 8, 12pin. Not all cards need it, but there are more and more of them now. Again, look above, in the specifications for the video card, everything is written there. Based on all these parameters, I chose a modest Aerocool KCAS 600W.


CPU cooler
Now we have reached. Here, we look at the socket that must match the motherboard socket, compatibility, dimensions, and connector type.

In my case, the DEEPCOOL GAMMAXX 400 tower cooler has socket 1151 and is compatible with an i5 processor.
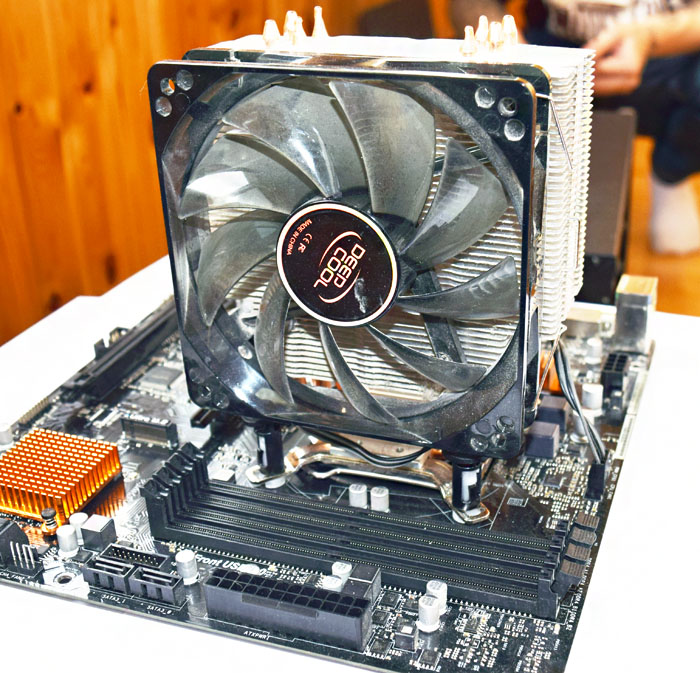
Of course, there are universal coolers that fit any socket, but still don’t forget to look at this parameter when choosing. Next are the sizes. We are mostly interested in the height, because if the cooler is too high, there is a chance that the side wall of the case will not be able to close, be careful. In general, there are two types of coolers - tower and box. Tower coolers have better system cooling and are installed mainly on overclocked hardware. The vast majority of boxed ones are installed either on office or weak gaming computers. So, if you choose a box cooler, then you don’t have to worry about the size, but if you choose a tower cooler, then be sure to pay attention to its dimensions. And lastly, this is the type of connector (CPU FAN), with the help of which the cooler receives the necessary energy from the power supply through the motherboard. They come in 3pin and 4pin. Now many will say that you can put a 3pin connector into a 4pin connector, and with the right skill and desire, vice versa. But I advise you to take a cooler with a connector in accordance with the connector on the motherboard.

RAM
That's it with the coolers, let's move on to the RAM. It must be selected based on such parameters as: memory type, speed indicators and frequency. Everything is simple with the type and frequency of memory. Motherboard specifications always indicate these two characteristics, which we have already highlighted above.
Based on this, I selected two AMD Radeon R7 Performance Series sticks of 8GB each.


Now about the speed indicator. Let's return to the processor for a moment. The specifications for it always indicate its throughput.
Ideally, the total RAM speed should be equal to the maximum possible processor throughput. In my case, the memory has a speed of 17000 MB/s.
Since I have two sticks, we multiply 17,000 by 2 and we get 34,000 MB/s.
I hope I didn't explain it too complicated and you understood me. If something is not clear, I will be glad to answer you in the comments. Also, do not forget about the maximum possible amount of memory supported by the motherboard. Although in current realities, few people may need more than 64GB of memory. Oh, I almost forgot about the two-channel mode. If, for example, you need 8GB of RAM, take two sticks of 4GB each. In dual-channel mode, the speed of processing and transmitting information is faster.

Well, I think everything is clear here, nothing needs to be explained. This concludes our selection. Finally, I want to say that selecting components is a very painstaking and tedious task, but in my opinion it is worth it. Be careful, do not rush, and you will be happy in the form of saved finances and a powerful computer.
Let's first determine the amount of the budget for the PC we are building, and also clarify that this budget applies to what will be placed in the system unit - this amount does not take into account the monitor, keyboard and mouse, since these components are the subject of a separate discussion.
And in this article, speaking about inexpensive computer, we will mean the budget for assembling a PC “from scratch” is no more than 30,000 rubles. For assembly we need the following components:
- CPU;
- System board;
- Hard drive;
- System case with power supply;
- Video card;
- Optical drive for CD/DVD discs.
Microprocessor selection
The computer processor is the main center of the computer's computing capabilities, and recently the graphics core has also been transferred to its substrate, so the assembly can exist without an external video card. However, in our case we are talking about a powerful PC, so we need an external video card.
 The choice of processor will determine the base platform of our PC. Today the most popular remain Intel platforms and AMD. We will build on the Intel platform, since processors from the computer giant Intel are considered more efficient and economical, although they are inferior in graphics capabilities to their AMD counterparts.
There is no point in saving on a microprocessor, since we want a powerful computer. We will also provide for the purchase of a boxed version of the microprocessor, which comes with a heat sink unit. Our choice will be a microprocessor with an LGA 1150 socket, which is by far the most common. The cost of this component should not exceed $100, and therefore good decision V in this case will become Pentium G3220 or G3240. Its cost will not even exceed $90.
System board
What we should save on is when choosing a motherboard, but even here the savings should be within reasonable limits. By selecting a microprocessor, we have significantly narrowed down our motherboard options, as we now only need to choose from those that provide the LGA 1150 socket.
 Savings in choosing a motherboard concern its layout. We don't need to buy a motherboard equipped with connectors that will never be used - this applies, for example, to RAID arrays. And the more connectors and “wider” wiring, the more expensive the motherboard. For our needs, it is enough that the motherboard has USB, SATA and one PCI-Express connectors for connecting a video card. Moreover, almost everything modern solutions have a built-in LAN port and VGA connector. In our budget case, we shouldn’t choose from full-size ATX, but mATX is quite suitable. Let's choose a motherboard from GigaByte - this is the GA-B85M-D2V board. It costs about $80, so we've already spent $170. Its connectors and ports are sufficient not only for connecting internal components PC, but also that all necessary computer peripherals are connected.
The motherboard we selected has two slots for DIMM memory sticks of the DDR3 type. At the same time, the supported frequency is 1333-1600 MHz, and the memory capacity is up to 16 GB.  In our case, at first 4 GB will be enough - we will fill only one slot. It is necessary, however, to understand that in 32-bit Windows user A little less than 4 “gigs” will be available. A smaller amount of memory cannot place a modern PC in the category of powerful ones, since the same operating system Windows environment 8 (64-bit version) already requires 2 GB of memory, and modern applications are also very demanding in this matter. Therefore, our choice will be based on Kingston memory DDR3 4Gb 1600 MHz. Its cost is about 50 dollars, and therefore total amount our purchase has already reached $220.
Video card
This is a component that you shouldn’t skimp on either, since it is the video card that is responsible for generating and outputting the computer’s graphics.  The higher the memory capacity graphics card, the higher the monitor resolution your PC can support, and the higher its bit depth, the faster graphics can be generated and displayed. In our case, we will need a budget option with a 64-bit bus and 2 GB GDDR3 memory. Let's choose a video card from the company Sapphire worth 80 dollars. In the future, it can be easily replaced with a more powerful one. Thus, the total amount of our purchase grows to $300, and we still have to choose a system unit, an optical drive and a hard drive.
Hard drive
Now we don’t need to purchase external hard drives in bulk, we need an internal HDD - we’ll stop our choice on a classic hard drive and won’t consider solid state drives.  The most common average hard drive size today is 500 GB, but some “terabytes” are only $10 more expensive. If you get caught IDE interface, then we skip this HDD and pay attention to the SATA interface. In our case, for example, hard from Western Digital WD10EZEX. The volume of this HDD is 1 TB, and the spindle speed is 7200 rpm. Also, it has a 64 MB cache and SATA interface 3, which is supported by our system board. The hard one we chose cost about $85, bringing our total purchase to $385.
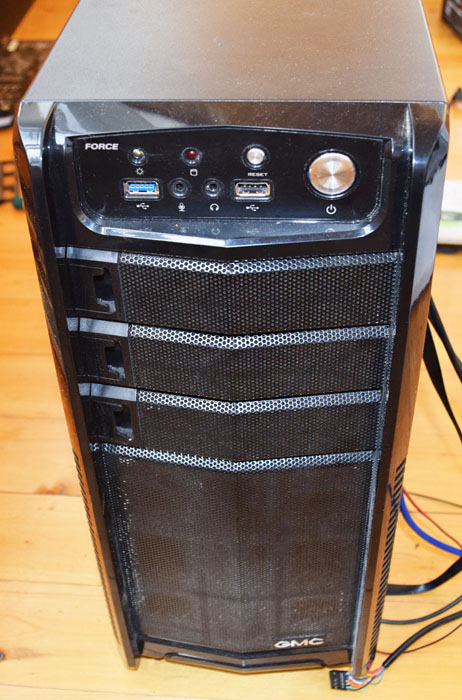
System unit
 To combine all the purchased components, we will need an inexpensive system unit with a 400 W power supply - this power is quite enough to service the purchased components. Since we chose a motherboard of the micro-ATX form factor, it is enough for us that this case supports motherboards of this particular form factor. But in the future, the computer user may want to upgrade it, and therefore we will choose a case that also supports full-size motherboards ATX form factor. In this case, a case, for example, from Logicpower with a built-in power supply for $30, is perfect. Thus, our amount increased to $415.
Optical drive
For full-fledged work We will also need an inexpensive optical drive that can play the contents of CDs and DVDs. We will need a drive with a SATA interface that costs no more than $25.

Our purchase did not exceed $500, but we assembled a fairly powerful computer with good technical performance and the ability to further modernize it. The motherboard, for example, allows you to add another memory stick and a number of expansion cards. The video card can be replaced with a more powerful one, and the case supports the ability to replace the motherboard itself with a full-size ATX version. In addition, the cooling system in the case can be improved by installing an additional case cooler. At the same time, we invested less than $450-500. It should also be taken into account that you will have to spend money on two data cables for the hard drive and optical drive, but their cost is incomparably less than the amount spent on assembly.
Well, if the components have already been purchased, and all that remains is to assemble your own computer from all this, then let’s figure out together what goes where and why
STAGE 1: Preparing for work
Assembling a computer yourself is not as difficult as it seems at first glance - the main thing is to do everything carefully and not to rush into anything. To build a computer you will need:
- Phillips screwdriver
- pliers
- cable ties
- wire cutters
- iodine or brilliant green with bandages
A Phillips screwdriver is the most basic tool. In principle, often only this is enough to completely assemble a computer.
Pliers may be needed, for example, for tightening stands for the motherboard or bending some elements of the case.
Ties are needed to carefully lay and tighten the wires inside the case after assembly, and wire cutters are needed to cut the ties and break out the case plugs.
Iodine, brilliant green, and bandages may be needed if your body has sharp edges. You can simply cut yourself, this happens quite often, so it’s better to have all this at hand.
STEP 2: Understanding the main types of fastenings
Fastenings for components must be supplied with the housing. Here is the purpose of the main ones:
1. To secure the side covers of the system unit: 
2. For screwing into plastic parts. Used, for example, to secure case fans:

3. Mounting stands are screwed into the system unit case at the places where the motherboard is attached:

4. Used for attaching hard drives and floppy drives. The same screws, but slightly smaller, are used to secure the motherboard:

5. To secure all other parts inside the system unit case, for example, video card, sound card, power supply. They can also be used to tighten the side covers of the case if fasteners No. 1 are missing:

When tightening, you must avoid excessive force; you must tighten firmly, but in moderation, so as not to strip the thread.
STAGE 3: Let's start assembly
Assembly must be done as carefully as possible, without rushing anywhere. Never use excessive force to anything - all the computer parts connect and fit into each other very easily.
If something screws on or is difficult to insert, then you are doing something wrong.
Any computer assembly begins with mounting the motherboard inside the case. Open the case cover and place it on its side. On the wall you will see holes for the motherboard racks. Place the motherboard inside the case so that its mounting holes line up with the holes in the side wall of the case. Now you need to screw in racks No. 3 into all the holes in the case that fit the holes in the motherboard. This is where pliers can come in handy:

After the mounting posts are screwed, insert into back case metal blank plate included with the motherboard:

And only after this do you finally insert the motherboard into its rightful place and screw it on.
STEP 4: Processor Installation
Once the motherboard is installed, you can install the processor on it. Remove the plastic cover from the motherboard socket and open it. If you don’t know how it opens, find the instructions for the motherboard and look in it, everything should be shown there in pictures:


When installing the processor, note that there are triangular marks on it and on the socket, and in some cases special grooves. They are needed so as not to confuse exactly how to install the processor. Align the marks and carefully insert the processor into the socket:


And remember - no force, neither physical nor Jedi!
The processor is extremely easy to insert, and using force can permanently damage the socket.
After installing the processor, the socket must be closed. This is done in exactly the same way as opening, only in reverse - but I think you figured it out yourself
STEP 5: Installing RAM
There shouldn't be any problems installing memory. First, move the holders along the edges of the slots, then insert the RAM sticks until they click:

Pay attention to the cut in the middle of the memory contacts and the bulge in the memory slot on the board - they must be aligned so that the strip fits properly:

RAM is one of the few parts that are inserted with some effort. When applying force, try not to bend the motherboard too much. If necessary, support her right side with your hand.
Pay attention to the colors of the RAM slots. For example, if you have two memory sticks, then they should be inserted into slots with the same colors. Thanks to this, the computer will be able to use dual-channel memory mode, which will allow it to work somewhat faster.
STEP 6: Install CPU Cooler
Before installing the cooling, be sure to remove the protective film, if any:

Apply a very thin layer of thermal paste to the base of the heatsink and install it on the processor. You can look at the instructions that came with your cooler for installing it.
Make sure that the cooler fits tightly to the surface of the processor and that there are no distortions after installing it. Incorrect cooling settings can result in constant overheating of the processor.
After installation, do not forget to connect the fan power to the motherboard.
On the motherboard, the fan connector is usually labeled "CPU":

The “CHA” connector is needed to connect case fans.
It is possible to connect 3-pin (three-pin) fans to a 4-pin (four-pin) motherboard connector.
STEP 7: Installing the graphics card
If you don't have a graphics card and decide to use your motherboard's integrated graphics, skip this step and move on to the next one.
There is nothing complicated about installing a video card. Break or pull out the plug at the back of the case in the place where the video card will be installed:

Please note if there is a latch mechanism on the PCI-Express video card slot, if there is, open it before installing the card. After inserting the card into the slot, the mechanism should snap into place:

Also, do not forget to fasten the video card with screw number 5 to prevent it from accidentally falling out of the slot.
STEP 8: Installing Hard Drives and Drives
At the front of the case is a hard drive cage. Install the hard drive into it with the cover facing up, with the contacts facing the motherboard. Hard drives are secured with #4 screws.
On the front panel of the case there are removable blank elements for installing disk drives. Remove the front cover from the housing and remove the plug. Also, in the case itself, break or pull out the iron plug in the front of the basket for installing disk drives.
Reinstall the front panel of the case, and then install the drive, remembering to fasten it with screws No. 4.
STEP 9: Chassis Ventilation System
For normal cooling, constant air ventilation inside the case is required. For this purpose, additional case fans are used.
Fans recommended anterior lower And side place parts of the body on fence(blowing) air into the housing. And the fans rear And top place parts of the body on blowing air. This ensures the most optimal ventilation of the internal space inside the case.
Fans are connected to connectors on the motherboard, designated “CHA” or “FAN,” or directly to the power supply, to a MOLEX connector, depending on what type of connectors is used on the fan:

In general, designing a cooling system is a topic for a separate article. Beginner assemblers are recommended to adhere to the scheme described above - it is the most optimal and common. Over time, an understanding will come of which parts require more cooling and which do not require cooling at all, how best to build a cooling system for this particular computer, etc.
STEP 10: Connecting the front panel of the chassis
Every motherboard has connectors system panel, where almost all elements of the front panel are connected. You can see where to connect what, either on the board itself or in the instructions for it:


Often, all motherboards use the same symbols:
- PWR LED– computer power indicator;
- HDD LED– indicator work hard disk;
- PWR SW– power button;
- RESET– “reset” button;
- SPEAKER– to connect a buzzer (which beeps when starting);
Be careful when connecting the PWR LED and HDD LED indicators - polarity is important for their operation, which is also indicated in the instructions. If you connect incorrectly, the indicators simply will not work. To find out what polarity the wire of the indicator you are connecting corresponds to, look at its color. Black is a minus, and any color is a plus. The system panel connectors are positioned such that the plus is always to the left of the minus, - knowing this rule, you can easily determine the polarity of wire connections.
STEP 11: Connect all other cables
Now you need to connect SATA cables, USB connectors, and audio outputs. All SATA ports on the board are numbered in order. It is recommended (but not required) to connect the system hard drive first, then the remaining drives, and after them the drive. This scheme is not fundamental, but sometimes it allows you to slightly reduce the time you turn on the computer.


If you have an additional (non-integrated) sound card installed, then you need to connect the cables to it, and not to the motherboard.
Then connect the USB port cables to the corresponding connectors on the board:

STEP 12: Install the power supply
Screw the power supply onto the top or bottom of the case, depending on its design:
 Next, you need to connect power to the motherboard and all components. To insert a cable in the wrong place, you need to have rare talent and considerable dexterity. So do not be afraid - if something is not inserted, then you are either inserting it incorrectly or in the wrong place.
Connect power to the motherboard:

Then CPU power:

Power to hard drives and drives:

If the video card has an input for connecting additional power, then connect the power there too.
If the fans are powered only by a MOLEX connector (large rectangular, with 4 pins), connect them to the power supply. If you can connect the fan to the motherboard, use it.
STAGE 13: Completion and start
Carefully inspect the entire computer assembly again. Is everything firmly in place, is everything inserted and connected completely? Drive the cat away and put on a bulletproof vest.
Connect your monitor, keyboard, mouse, power cable and get ready to start your computer for the first time.
If everything was done correctly, then when you press the power button on the computer case, it should turn on. If it does not turn on, check that the front panel buttons are connected correctly to the motherboard, check again that everything is connected correctly, and that the computer is plugged into a power outlet.
I hope everything worked out for you the first time, and the computer fans rustled joyfully. If you have any questions, ask in the comments.
BIOS setup and installation operating system we will look at in future articles.
P.S. If you have read this huge article to the end and still can’t get enough, I suggest watching the video “How not to build gaming computers”:
Did the article help?
You can help develop the site by donating any amount of money. All funds will be used exclusively for the development of the resource.