KeddrOlab experiment. Slightly slower horses. Reducing the maximum processor frequency of the Samsung Galaxy S II smartphone
Surely many users of Android devices have encountered the issue of system performance. For example, the tablet may not be able to handle several simultaneously running applications, or the graphics in a freshly installed game may begin to slow down. In addition to the amount of RAM, these indicators are significantly affected by the clock speed of the processor of your device. Third-party apps are best for overclocking
Even if some time ago your Android tablet was the flagship in its niche, progress does not stand still, and new programs and games require more and more hardware resources. On the other hand, this is not yet a reason to change the device to a faster (and more expensive!) one, so it makes sense to think about overclocking the processor.
Increasing CPU frequency using programs
For this procedure, developed special applications, they can be found and downloaded on Google Play or on our website. Programs for Android, using the example of which we will tell you how to overclock the CPU, are quite easy to use, but for them correct operation needed root rights- superuser rights allowing you to change engineering settings, access to which is usually limited to users.
AnTuTu CPU Master program
Available on Google Play both paid and free version. The functionality of the first one is a little wider, but for our main task it is quite suitable free option- download AnTuTu CPU Master. After installing and launching the program, we immediately see the main window.

The value on the green background is the current frequency. Below are sliders that adjust the maximum and minimum values. To speed up your work operating system In general, you need to increase the minimum frequency value. This program cannot change the maximum number.
After setting the desired values, you must save the settings and restart the tablet to apply them.
SetCPU
The application works in a similar way. SetCPU for Android. When you launch it, we see two buttons: standard CPU overclocking and going to advanced settings. The main function is implemented in approximately the same way as in the previous example: the current frequency value changes in real time as any processes start or stop, and the ability to adjust threshold values.

In addition, the SetCPU program has several other useful functions. In it you can not only overclock, but also create frequency profiles that the processor will use. You can, if necessary, switch between pre-saved profiles, and also set a profile change depending on the conditions of use: for example, reduce the frequency when the battery is low.
It is better to use the advanced functions of this program only for experienced Android users, since it is possible to regulate the level of power consumption for each specific frequency only if the user is aware of what each of his actions can lead to.
Pros and cons of CPU overclocking
The advantages of this procedure include:
- undoubtedly, increasing the performance and speed of the device;
- fast and smooth operation of resource-intensive games and programs.
But there are also some disadvantages that can make your tablet less comfortable:
- increasing the frequency will inevitably lead to increased power consumption, so be prepared for unusual fast discharge batteries;
- Heat transfer will also increase, that is, the device will heat up more than usual, even with a not very high load.

Precautions when overclocking a processor
Remember - each device is individual, and before you think about overclocking the CPU on Android, look for information regarding your model: it may not be possible to overclock it. For example, if your tablet is equipped with a single-core processor with a low frequency, then overclocking it will not give noticeable results. In general, a reasonable increase should be no more than 20-25% of the original figure. Unnecessarily high values may damage your device.
Overclocking the processor will in any case lead to a reduction in the battery life of the device: working at a high frequency, the processor will consume more energy. However, there is another side to this factor: using the same programs, you can extend the battery life if you lower the frequency thresholds. This is relevant for those who do not use resource-intensive programs, rarely play games, but highly value autonomy. After all, most standard processors on our Android devices are quite capable of operating at medium frequencies without any overclocking.

Conclusion
So, if you have decided to speed up your device, any of the programs described above will help you with this - of course, provided. Moreover, they can be useful even for those who do not decide on this procedure: after all, with their help you can not only increase, but also decrease the frequency, thereby saving energy consumption.
In this article I will tell you how to overclock android processor affects your animal. Overclocking the Android processor: even a child can handle this if he follows the clear instructions in this article.
Often, owners of Android smartphones express dissatisfaction with the performance of their devices and begin to think about overclocking their device. First, let's define the very concept of processor overclocking. Processor overclocking is the name given to forced operation in a non-standard mode (primarily these are operating modes when the frequency increases). Such overclocking will be advisable in two cases.
First case– this is the user’s desire to get the maximum return from his device, while spending a minimum amount of money on its purchase. In the vast majority of such cases, such acceleration is classified as light. In this case, the main goal is stable work smartphone for quite a long time, rather than obtaining the maximum operating frequency of the processor.
Second case- this is ordinary human passion, the desire to squeeze everything possible and impossible out of the device, at the same time surpassing everyone and everything and, thereby, asserting oneself, often only in one’s own eyes. Before starting overclocking, many people ask a completely reasonable question: is overclocking a processor dangerous? For the vast majority of cases, as long as efficient heat removal from the overclocked processor is ensured, the risk of processor failure is minimal. It is possible that after overclocking the lifespan of the processor will be slightly shortened, but such a reduction can be neglected in view of the fact that the processor is more likely to become obsolete than to be able to use up at least 50 percent of its resource. There is nothing complicated in the procedure for overclocking the processor of an Android smartphone; the most important thing here is to understand what you are doing and for what purpose.

Of course, you should be warned in advance that incorrect actions when overclocking a processor can lead to premature hardware failure. Therefore, it is immediately necessary to clearly understand that further operation of an overclocked smartphone will be carried out solely at your own peril and risk. If you want to more or less safely overclock the processor of an Android smartphone, then you should start increasing the processor clock speed smoothly, constantly monitoring the indicators using additional software (this can be various tests, benchmarks, etc.). That is, you must constantly test your processor for stability. It is completely safe to increase the processor frequency only by a small amount. In this case, the risk is reduced to almost zero, as is the need for such overclocking. I would like to warn you right away that there is no point in overclocking processors with a frequency of 1 GHz or higher, especially if they are dual-core processors.

As a rule, the performance of a processor is determined by its architecture and declared clock frequency. In this review, we will try to describe in detail the increase in the frequency of the smartphone processor. But first, you must make sure that you have Rooted Android. In order to implement safe overclocking we need a program to overclock the android processor. In this article we will look at several similar software products. But before you start overclocking, the first thing you need to do is install the selected application on your smartphone. If you are an experienced user of Android smartphones, you can skip the description of the installation process and immediately start reading the review of overclocking programs. For those who have recently become the owner of a treasured device, it will be useful to learn several ways to install programs on smartphones with Android. Below we will look at the two most convenient methods.
Installing applications using apk files
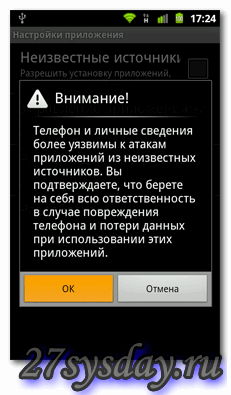
First way is the simplest. To install, you should first allow installation of applications from unknown sources. Go to the Settings -> Applications menu and check the box next to “Unknown Sources” and click OK, as shown in the figure below.


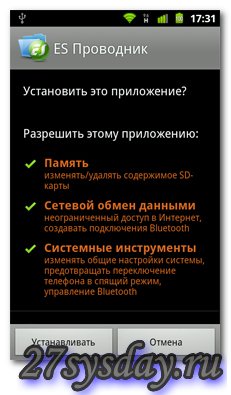
After that, copy the apk file to the SD card of your device. You can install the application from an apk file using any file manager that has a similar function. One of these managers can be ASTRO File Manager or ES File Explorer. Launch the file manager, find the apk file, select it and install it using the standard Android installer. The entire sequence of actions is demonstrated in the photo below.


To simplify the procedure for installing applications via an apk file as much as possible, there are many special programs, called "application managers". The most popular of them is SlideME Mobentoo App Installer. This manager is capable of automatic mode scan your smartphone's SD card for apk files. Then, with its help, you can quickly, literally in one click, install any application on your device.


If for some reason you do not want to install such programs, then you can install the application using a browser. To do this, enter the following link into the address bar of your browser:
"content://com.android.htmlfileprovider/sdcard/FileName.apk"
After this, the installation process will start automatically.
Installing applications via Android Market
Second way, no less popular is to install the applications you are interested in using Market programs.
Android Market is the official directory of Android applications.
It includes thousands of different programs for every taste. The Market program can be found in all stock and modified Android firmware. Most likely this program is also on your device.
The peculiarity of the Android operating system is that it is highly integrated into Google services. Therefore, Android Market is no exception here either. Therefore, to be able to use the Market program, you need to have a Gmail account.
In order to install an application using the Market program, you first need to launch it. When you first launch the program, you will be prompted to accept license agreement and fill out your Gmail account information. After this, you will be able to fully use the program.


As you can see in the photo, Android Market applications are conveniently structured by categories. About the same as the directory with Android applications. After selecting a specific application, you just need to click the “accept and download” button, the system will do the rest automatically.
Main advantage this method Application installation is the ability to automatically track updates. All applications that were installed on your smartphone when Android help Market, are literally updated with one finger click. The system automatically searches and updates installed programs. But this method also has one significant drawback - high traffic consumption. Therefore, if you don't have unlimited internet, then it is better to set a ban on the use of mobile GPRS. To make this as easy as shelling pears, go to Settings -> Wireless networks-> Mobile network -> and uncheck the box next to “Data transfer”.


Now that we have figured out how to install applications, we can move on to the processor overclocking programs themselves. First on the list is SetCPU.
The SetCPU program helps you change the processor frequency at your discretion. For example, if you want to increase the battery life of your smartphone, just reduce clock frequency in the application. The program also has a huge number of profiles and settings. In addition to this, the program has a whole set of tools that can automate the program. SetCPU is capable of automatically lowering the processor frequency when the battery charge level decreases. In this case, the user sets the level himself. The program can also lower the processor frequency when the temperature approaches the upper permissible threshold. But that's not all of her useful options. The SetCPU utility can improve the performance of your smartphone. When creating your own profiles, it allows you to set maximum and minimum processor frequency values, for example, when turning off the screen or connecting a charger. It is of no small importance that the smartphone has a modified kernel. Since overclocking is unlikely to work with a standard core.
After launching the application, the screen immediately begins to display the standard processor frequency. The upper slider is used to set maximum value processor frequency, and the lower one is the minimum. Here you can adjust these extreme values. In addition to this, SetCPU contains 6 special modes:
- Ondemand – this mode allows the processor to operate at a given low frequency and, if necessary, jumps to the maximum set frequency.

- Userspace – in this mode, control over frequency changes is carried out by the program itself.
- Performance – a mode in which the processor will constantly operate at the highest possible frequency.

- Conservative – if necessary, the processor can implement step-by-step exit at maximum operating frequency; if there is no need, then it will operate at minimum load.

- Powersave - this mode sets a constant minimum frequency for the processor, which will remain unchanged.
- Interactive – with this choice, the processor will be able to operate at the set lower frequency, and if necessary, it will be able to increase the operating frequency to the maximum value step by step.

In addition to the profiles given, the program allows you to use additional settings for very subtle changes in various characteristics of the processor.
Another very useful program for overclocking the Android processor is Milestone Overclock. First, you need to upload the apk package with the program to your memory card. Then install it using one of the methods given above. After launching Milestone Overcloc, something like this should appear on your smartphone screen:

Click the “Load module” button. The program will ask for root rights, allow it to use them. Select the “Settings” item and set the desired value. Then click OK.

Then move the slider to the right edge to the “custom” value, as shown in the photo below.

Check the box “Autoload on boot” and exit the program. Now you can run the SetCpu program that is already familiar to us; in the dialog box, select Autodetect Speeds Recommended.

Then, by moving the sliders, you can edit the maximum frequency (during load) and minimum (during idle). In principle, you can leave everything as is, in this case energy saving will increase. The Set on boot checkbox allows you to save the positions of sliders and settings when you turn on/off your smartphone.

To test the stability of your chosen processor overclocking settings, you need to use the Stress test utility.
To do this, in the SetCpu program you need to go to the “Info” tab and run the “Stress test” for 5-6 minutes. At the end of this time, press the Back key and see a window in which the system should report that testing was completed without errors. If the test was passed with errors, you need to change the CPU settings. You may have to set the voltage or clock speed lower. After overclocking, we recommend rebooting your smartphone and checking whether the settings you set are saved.
As you can see, the process of overclocking a processor is quite simple. But you must remember that all overclocking actions must be carried out extremely carefully, gradually increasing the frequency. Typically, with a slight overclock of the processor by 15-20%, an increase in voltage is not required. This option for a smartphone is the safest and most optimal. Below is a link to a video that describes the SetCpu processor overclocking program.
This article is a continuation of the series, the goal of which is to maximize the battery life of Android devices using software settings. This time we will look at processor operating modes, screen power consumption, and also try to overcome unwanted “invisible” activity.
Let us remind you that we have already discussed basic information about wireless interfaces in.
Well, let's get started. Let's start by changing the frequency and operating mode central processor. Let us immediately make a reservation that if you are careless in manual setting The operating frequency of the Android device processor may cause freezes, unstable operation, and, theoretically, complete failure of the device. So any action should be performed with extreme caution and with an understanding of what is being done. All modern devices, including Android devices, automatically control the dynamics of the processor depending on the loads placed on it. But this does not always initially happen completely correctly and optimally, and therefore battery consumption may not be the most economical. Thus, manual change The operating frequency of the central processor can give a noticeable increase in battery life, this is especially true for the most modern devices, in which the frequency of the central, often quad-core processor can reach 1.5 GHz or more. The most convenient way to adjust the processor frequency is using the SetCPU program. For it to work, you will need Root access, as, indeed, with any fine tuning operating system and kernel. IN this application You can easily configure the processor frequency to change according to profiles - for example, when the screen turns off or when the battery charge drops below a certain level. However, to achieve a noticeable increase in battery life, the processor frequency should be reduced by at least 25%, or better yet, even more. Minor changes, 10-15%, may not give a noticeable result. You can determine whether there are problems with the standard control of the frequency of the central processor and estimate the load on it over a period of time using Android System Info, in the System -> CPU tab.
If a significant portion of the time is spent running the processor at high frequencies, while resource-intensive applications and games are not actively used, then there is something to work on. It is worth turning to CPU load graphs, which can be compiled by monitoring programs such as SystemPanel or PowerTutor. If the processor is not loaded by any process or application that can increase its frequency, then the normal mode of dynamic control of the CPU frequency is not working correctly. This can be fixed by installing SetCPU and manual installation certain regimes processor operation. We looked at the kernel operating modes in more detail in . In general, you need to understand that the lower the average processor frequency, the less responsive user interface Android devices have lower performance, so you need to choose a comfortable mode independently and individually, having first tested several different presets. As an example, let us just cite that with the 1 GHz processor installed in the Samsung Galaxy S, we were able to achieve the following results: ondemand mode 100-800 MHz increased battery life by approximately 15-20%, ondemand 100-400 MHz for watching movies, increased this is the time for 30-40%, and no freezes were observed in any of the listed modes.
Now let's talk about the screen mobile Android device. As you know, this is one of the main consumers of energy. Its consumption depends on parameters such as physical size, pixel resolution, matrix type, brightness level, as well as the time the backlight is turned on after stopping active work with the device. On at the moment Manufacturers use such basic matrix types as IPS, TFT-LCD, SCLCD and OLED (AMOLED or SuperAMOLED). The most economical in terms of energy consumption, subject to certain conditions, which we will discuss below, are screens based on SuperAMOLED organic light-emitting diodes and their variations (SuperAMOLED Plus, SuperAMOLED HD). Savings are achieved due to the fact that there is no general backlighting of the matrix, the dots on the screen themselves glow, and thus, to display black, the necessary areas of the screen are simply turned off. So the picture displayed on the display has a significant impact on energy consumption - the more black and dark shades, the less battery consumption. To better understand what exactly is happening, here are several graphs that compare the energy consumption of OLED screens and classic LCD panels:


As you can see, if your device has an OLED screen, then it is more rational to use a theme with a predominance of black and dark tones and a color temperature above 6500K:

It is advisable to minimize the use of white backgrounds and light colors in programs, and use darker shells.
Display brightness also plays an important role; its level is significantly related to the battery life of an Android device. The average indicators are such that at a brightness level of 10-30% energy consumption practically does not change, at a level of 30-50% - energy consumption increases by 10-20%, 70-100% - energy consumption increases noticeably, up to 50%. Of course, these are average figures, and for each individual model they may differ. The greatest savings, accordingly, come from a value of up to 30% brightness - without too much noticeable impact on the usability of the device. Most modern devices provide automatic brightness adjustment depending on ambient lighting conditions. Naturally, this, on the one hand, saves battery power to some extent compared to a constant maximum brightness level, but at the same time, energy consumption is higher than with a fixed value of 30% - simply because sometimes the brightness level will rise up to 80-100%, for example, on the street under direct sunlight. Also important is the correctness and speed of response of the sensor, which perceives information about the level of external light (sometimes the reaction time to changes in brightness is too long), as well as the user’s daily routine (more frequent use of a mobile device outdoors or indoors, etc.). In general, you can experimentally determine which is more profitable; let’s say several days with automatic adjustment, and several days with fixed established level screen brightness.
Now let's get down to another very important issue, having decided which, you can significantly increase the battery life. We have already talked about the so-called “invisible” activity. Its essence is that some applications and processes running in the background can “wake up” the device from sleep mode, preventing it from switching to power saving mode. These are, for example, applications that constantly “communicate” with the network, such as various clients for social networks, instant messaging services, weather forecast widgets, music players when listening to music, monitoring programs with a high frequency of updating indicators, applications with errors in the program code, etc. so on. Before using any method to eliminate “invisible” activity, we recommend that you simply restart the device first, especially if this activity is quite significant with the “Running” indicator at a level of up to 100%. If this does not help, we resort to third-party applications.
Install SystemPanel. Check the box next to “Enable Monitoring” in Menu -> Settings. The remaining checkboxes can be checked as desired; the description of the items is intuitive. Thus, application activity monitoring is enabled, and a program icon appears in the system area. Now you need to leave the mobile device inactive for some time, the best and most convenient way is overnight. After a period of time has passed, go to Menu -> Monitoring and click the “History” button. Graphs will be built on the screen. At the top you can set the interval for displaying information. For example, if you monitored at night, you can set it to 8 hours.

Let's look at the graphs.
Battery charging – displays the battery level.
Device Usage - Displays usage mobile device with the screen on.
CPU activity – shows the processor load for the entire monitoring time, including in sleep mode. At the same time, loading up to 1% by system processes in sleep mode is quite normal for most devices, but more than 1% is unnecessary activity, the reason for which we will look for. While in “History”, click the “Chart” button and select “Top Applications”. The screen will display a list of all applications and processes, sorted by CPU load.

At the most active processes you can click and see information about them, below - the history of energy consumption in the form of a graph. You can click the “Compare” button and see the general graphs below. That is, you can compare the graph of one process with the graphs of all processes and find out the “contribution to the common cause” by the discharge of the battery. Don't forget, we are interested in the periods when the device's screen was turned off. This function useful when there were rare but strong peaks of activity. Moreover, such a process may not be at the beginning of the “Top Applications” list. The “System processes” item is divided into many small ones, and, if desired, you can search for the names of the most active ones to find out what they are responsible for and compare with the activity of the same processes on similar devices. As an example, here is a graph showing that Taskkiller is being overly active:

However, in general, this is too small an activity that it will not lead to serious energy expenditure. And here is another graph from this program, which clearly shows that MyTracks loads the device’s central processor too actively during sleep:

You can install the PowerTutor application, which in real time clearly displays the energy consumption of programs and processes in the background, both in total and for each individual application:

PowerTutor also builds consumption graphs for each application and accumulates statistics, which makes it possible to calculate “the one who is not sleeping,” that is, the waking process, based on the surge in activity on the graph of the central processor in sleep mode. Consumption in mW should not be trusted too much; rather, relative indicators should be assessed.
The OSMonitor program will also work. It can monitor application activity, including when the device is in sleep mode.

In this program, first of all, you need to pay attention to UTime, which shows how active a program or process is, including “in sleep” of the device. Programs that have high frequency updates, or those that do not go to sleep, will have an increased UTime, which, moreover, will grow rapidly. To determine whether UTime is increased or not, we start from the total UTime of the system, that is, the possible maximum. We should not forget that the UTime indicator for the “Contacts” or “Dialing” process is affected by the conversation time, “Keyboard” - how often the field for entering characters flashes on the screen (including if a search widget is installed on the desktop).
You can also use the “Battery Log” by selecting “CPU Usage”, “Partial Awakening” in the menu one by one - the culprits of “insomnia” will be at the top of the list.
If using such methods, deleting or disabling unnecessary applications and the processes that “wake up” the device were unable to reduce the value of “invisible” activity to an acceptable level, then we take the following sequential steps. After completing each of them, naturally, we monitor the “invisible” component of the device’s activity, and if it has not decreased, then move on to the next point.
Firstly, we remove all widgets from the desktops, icon programs from the information line, we also delete (or even better, we “freeze” when help Titanium Backup) applications that were installed after a period when “invisible” activity was normal.
Next, we perform a reset to factory settings, that is, wipe. Don't forget to do backups Using the same Titanium Backup, we format the SD card using the operating system of the mobile device. If, after a complete cleaning and reset to factory settings, the “invisible” activity “calms down”, it means that the problem was in the installed applications. Logically, we restore them one by one, and constantly monitor the level of “invisible” activity until we identify the specific application causing the problems. If after the reset the level of “invisible” activity remains the same, then we try to disable applications from the manufacturer - they are not deleted by a general reset. You can disable auto-loading of applications using Autostarts - then selected programs can only be launched manually. You can resort to the already mentioned “freezing” using Titanium Backup “until better times.”
If the actions taken did not lead to the desired result, then you should pay attention to the firmware and kernel of the device; you may have to upgrade to an alternative version (this could be either the newest or older official firmware, or even a custom build - but in this case be aware of the loss of warranty).
If changing the firmware also did not give anything, then most likely there are hardware problems. We fully charge the device, and then turn it off overnight without removing the battery. In the morning we turn it on and check the charge level. The self-discharge overnight should not exceed 1-3%, and if the discharge is still as strong as before charging, then the problem is definitely a hardware one - you need to contact a service center.
Note that in general, you should not “catch” indicator readings down to 1-2%, much less compare them between different smartphones or tablets, and even between yesterday's and today's indicators. This value is very relative and may depend on a large number of factors. The main thing is to get a rough idea of the device's energy consumption. In general, by performing the operations described in this short series of articles, you can increase the battery life, depending on the device, from 30-40 to 150-200% (yes, exactly, by 200%, that is, three times). We wish you good luck and enjoy your favorite Android “without a power outlet” for longer!
In four years, Android has transformed from a small but ambitious project into perhaps the most complex and feature-packed mobile OS of our time. Android supports a huge number of technologies and functions, many of which are hidden from the user or hidden in places you wouldn't even think to look at. This article is a collection of tips and tricks that can be applied to any Android device without the need to root it.
01. DISABLE THE AUTOMATIC CREATION OF ICONS ON THE DESKTOP
I think I’m not the only one who is annoyed by the way the market behaves when installing an application. For some reason he thinks that for any more or less software or the next game I definitely need an icon on the desktop, and he successfully creates it. And I have to delete it. And then another one. And so every time.
Fortunately, this behavior is easy to disable - just open the Google Play settings (in the left panel) and uncheck the “Add icons” checkbox. There you can also disable the forced password request every 30 minutes when purchasing applications, as well as the hated auto-update of applications.
02. DISABLE GOOGLE SEARCH AND OTHER USELESS SOFTWARE
The standard firmware of Android smartphones includes a huge amount of useless software, ranging from a bunch Google applications(do you know that Google requires manufacturing companies to include almost all the software it develops in the firmware of their devices?) and ending with all sorts of junk from the smartphone manufacturer. All of this (or at least most) can be disabled.
Go to “Settings → Applications → All”, tap on the desired software and click “Disable” (of course, you will be warned how “dangerous” this is). By the way, when you disable Google search, Google Now will disappear, as well as the search bar from the desktop (after a reboot), in its place there will be an empty area.
03. RESET TO SAFE MODE
Few people know, but Android, like many other operating systems, has a so-called Safe mode. This is a mode in which the operating system boots with third-party applications disabled. Malware that is not very skillfully written (one that is not registered in the system partition) then falls off, like any software that interferes with the normal operation of the system. Safe mode can be used to bypass screen blockers, applications that cause the smartphone to freeze, or, alternatively, to identify who is actually eating up the battery - the next firmware or software update.
The mode is turned on in a rather simple, but not at all obvious way: by holding down the power button and then holding your finger on the “Turn off power” item. After rebooting, the culprit of the problem can be removed through “Settings → Applications”.
04. GET RID OF INSTRUCTIVE NOTIFICATIONS
“The construction of the castle is finished!” - how did you get these notifications? Everyone who is not too lazy is trying to notify me about all possible and impossible events: “Vasya Dzhubga replied to you on Twitter,” “You have 100,500 new messages,” “You won surgery to enlarge your right leg.” You swipe away one notification, and three new ones appear in its place.
How to get rid of all this slag: hold your finger on the notification for a long time and uncheck the “Stop” button. This is the recipe for KitKat. In Lollipop, everything is a little different, but the essence is the same: hold down, then the i button, and in the window that opens, check the “Block” box. There you can also force the notification to be a priority so that it is always at the very top.
05. DON'T FORGET ABOUT THE SERVICE MENU
Another not at all obvious function is service menu. It can be opened by dialing *#*#4636#*#*. Basically there is various technical information like IMEI numbers, signal strength, current location, or network type. But there is also a very useful function for some situations to force the smartphone to switch to desired type networks (2G, 3G, LTE).
In conditions bad level The device tends to reset its 3G/LTE signal to 2G in order to save battery power and ensure subscriber availability. This behavior can be disabled. Open the service menu and in the “Set up preferred network type” item, select WCDMA only or LTE only. In the same way, you can switch your smartphone to 2G - GSM only. It will help if you need to save battery power and the Internet is rarely used. By the way, you can also disable the radio module there altogether (until the next reboot, of course). 
Smartphones based on Chinese MTK chips have their own and much more sophisticated service menu. His number is *#*#3646633#*#*. There is various system information and a huge number of tests, among which you can find several useful settings, such as adjusting the call volume or, for example, changing GPS/AGPS settings. The menu itself is terribly illogical and contains so much varied information that I don’t even dare to describe it, but will simply send the reader to three letters - XDA.
06. USE A STANDARD BROWSER
I don't know why users don't like the built-in one so much Android browser. In my opinion, he is wonderful. Lightweight, fast, on Chromium engine, can synchronize with a Google account (that is, it immediately includes all bookmarks and passwords from Chrome), but most importantly, it has a very convenient and almost ingenious navigation method. This is the so-called radial menu, which can be activated in the settings (only in Android 4.0–4.4).
07. MANAGE CONTACTS FROM YOUR COMPUTER
Google has web services not only for remotely installing software, blocking and searching for a smartphone, but also for managing contacts. All people's contacts ever saved and synchronized when connecting a new smartphone can always be found on the page google.com/contacts. They can be viewed, edited, added and deleted. Moreover, oddly enough, it is essentially part of Gmail.
08. MONITOR YOUR PROCESSOR LOAD
Android has a built-in feature that displays the current CPU load and currently active processes on top of the screen. In theory, it is intended for application and firmware developers and is hidden from ordinary users, but no one is stopping us from activating it. But first you will have to reach the “For Developers” settings section, which by default does not exist at all.
Go to settings, then “About phone”, find the line “Build number” and tap on it seven times in a row. The message “You have become a developer!” should appear on the screen. This means that the “For Developers” item is now open, and we go to it. We rewind almost to the very bottom of the screen and in the “Monitoring” section we find the “Show CPU load” switch.
Turn it on and see a list in the upper right part of the screen. The first line is the so-called loadavg, which shows the number of processes that had to run or wait their turn to run in the last minute, five and ten minutes. To put it very roughly: if these values, divided by the number of processor cores, are above one, this means 100% processor load in the last minute, five or ten minutes, respectively. Below is a list of the most power-hungry processes (essentially, an analogue of the top command from Linux).

09. USE ADB TO BACKUP SOFTWARE ON YOUR COMPUTER
We have already written more than once about a wonderful tool called ADB, which can significantly simplify managing a device from a computer for a person who is familiar with the console (here we are mainly talking about Linux, of course). In addition to the ability to install software, transfer files to a smartphone, view logs and other useful things, ADB has recently made it possible to backup all smartphone settings and applications.
To use this functionality, install the universal ADB driver (goo.gl/AzZrjR), then download ADB itself (goo.gl/3P7klM), install the driver, then expand the archive with ADB, connect the smartphone to the computer with a USB cable, launch command line and execute the command
A message will appear on the smartphone screen asking you to specify the encryption password for the backup - you can safely press “Next”. The application backup process will begin, which will affect both the APK packages themselves (the -apk flag in the command) and their settings. All applications from the memory card will also be included in the backup. You can restore a backup using the following command:
$ adb restore backup . ab |
10. DISABLE BACKGROUND DATA TRANSFER IN APPLICATIONS
Working in the background, applications can actively use the Internet for a variety of purposes, from updating their content to leaking information about your location. In addition, such activity in any case leads to increased battery consumption. 
Android has the ability to selectively restrict applications from transferring data in the background, but it is located in a place where most users would hardly ever look. To prevent any application from using the Internet in the background, you need to go to settings, then “Data transfer”, scroll down the screen to the list of applications actively using the network (for some it will be a surprise that it is there at all) and tap on the desired software. At the bottom there will be an option “Limit background mode" It is worth keeping in mind that the option will disable data transfer only via mobile network, so data will continue to flow over Wi-Fi.
11. USE THE SEARCH BAR
Often, smartphone owners Android based neglect the search bar at the top of the main screen. This is really logical, given the ability to search by typing a request into the address bar of any mobile browser.
Meanwhile, the search bar on your desktop does much more than just redirect your request to google.com. It allows you to search contacts, applications, calendar events, bookmarks and web browser history automatically. With normal use of a smartphone, it may not be so useful, but when connected external keyboard it is an indispensable tool. Just click
12. USE SMART LOCK
Smart Lock is one of those features that you don’t think about, but once you try it, you can’t live without it. This is one of the most notable new products Android Lollipop and one of the most useful features added to Android in lately. The idea of Smart Lock is extremely simple - it disables the PIN code or other lock screen protection if there is a specific Bluetooth device or map location nearby.
By default, Smart Lock is “sort of” disabled. That is, it does not light up anywhere, but after pairing with a new Bluetooth device (of any type), it will definitely offer to add it to its white list. After this you will forget about her again. But only until you enable lock screen protection in the “Security” section of the settings. Now it will work as it should.
The Smart Lock settings themselves are in the same section, and, in addition to adding new Bluetooth devices, you can specify “safe places” there, along with a list of options based on Google Now “observations.” By the way, if you disable it, as described in the first tip, then this functionality will also be lost.
13. SAVE ENERGY RIGHT
Another notable innovation from Lollipop is its power saving mode. It migrated to standard Android from the firmware of smartphone manufacturers, who previously sold it independently. Now the function is in pure Android- you use your smartphone to the fullest, and when the battery charge reaches 15%, the system suggests turning on the power saving mode, which turns off background transmission data, reduces brightness to a minimum, disables some sensors and reduces screen rendering FPS to a couple of tens of frames per second. For clarity, the status bar and on-screen buttons at the bottom of the screen turn red - so you don’t forget.
To save battery life on a smartphone with an AMOLED screen, you can set black wallpapers and use apps with black backgrounds.
The energy saving mode is customizable. Go to “Settings → Battery → menu → Power saving mode.” Here you can specify a condition automatic switching on mode (though the choice is meager: 5%, 15% or never) and, most importantly, turn on the mode right now. Very convenient if you have a long trip ahead without the possibility of recharging.
14. MONITOR TRAFFIC
Most likely, smartphone manufacturers, as usual, will shovel the standard Android 5.0 interface and change everything (hello Samsung - the biggest fan of breaking interfaces), but in a standard Lollipop curtain, or rather, in a “second curtain” with a  There is one highlight to the quick settings options. The data transfer button in the center does not switch data transfer at all, but expands into an interface that allows you not only to view the current traffic consumption, but also to disable data transfer using the switch on top.
15. SHARE NOT YOUR PHONE, BUT THE APPLICATION
Especially for those who like to give their phone to other people, Lollipop has a Screen pinning feature that allows you to lock your smartphone on one application without the ability to close it or switch to another. Like many other useful features, it is completely invisible and hidden quite deep in the settings. To activate, go to “Settings → Security”, scroll almost to the very end and turn on the “Block in application” option.

Now if you click the view button running applications(“Browse”), an pushbutton will appear at the bottom of the current application’s thumbnail. Once you tap the icon, the screen will be locked on the selected app and you will need to hold the Back and Overview buttons simultaneously to go back. In this case, you will have to enter a PIN code if it is set for the lock screen.
XX. USE ACITIVITY LAUNCHER
Any graphic Android application includes one or more so-called “activities”. Each of them is an application window (screen), for example the main screen or the settings screen, maybe even a file selection window. By default, you can open directly (from the desktop) only those activities that the application developer marks as main; the rest are accessible only through the application itself and only if the developer himself allows this.
However, having the right tool at hand, you can reach any other activity of any application and even create a shortcut for it on the desktop. Activity Launcher does just that. Just install the application, select “All actions” in the menu at the top and find the software you need. All of her activities will appear on the screen, and any of them can be opened with a simple tap or hung on the desktop by holding your finger for a long time.
An example of useful “internal” activities is the Chrome bookmarks window (Chrome →Bookmark), access to the hidden AppOps mechanism in Android< 4.4.2 (Настройки → AppOps), запуск поиска в TuneIn Radio (tunein.ui.activities.TuneInSearchActivity). Очень много активностей имеет в себе ES Проводник, включая редактор, музыкальный плеер, просмотрщик изображений и многое другое. Любую из них можно запустить напрямую с рабочего стола. Таким же образом можно открыть любой раздел настроек и получить доступ к некоторым функциям ОС, достучаться до которых проблематично. Это абсолютно легальная функцио нальность, и она не требует root.
Android has a large set of hotkeys for connected keyboards. You can use Arrow, Tab, and Enter to navigate the desktop and various menus. In addition, the following key combinations are available:
Esc - “Back” button;
Win + Esc - Home button;
Ctrl + Esc - “Menu” button;
Alt + Tab - switch between applications;
Ctrl + Space - switch layout;
Ctrl + P - open settings;
Ctrl + M - manage installed applications;
Ctrl + W - change wallpaper;
Win + E - write a letter;
Win + P - music player;
Win + A - calculator;
Win + S - write SMS;
Win + L - calendar;
Win + C - contacts;
Win + B - browser;
Win + M - Google maps;
Win + Space - search;To find out your MAC and IP address, go to “Settings → Wi-Fi → menu → Advanced
new functions.” MAC and IP will be at the very bottom.Lollipop has a built-in Flappy Bird style game. Go to “Settings → About phone”,
Tap on the “Android Version” item several times, then hold your finger on the “Lollipop” that appears. Let's play.Google Now supports large number Russian-language voice commands. All of them can be divided into two groups: voice search and the voice commands themselves. Voice search allows you to perform an intelligent search on Google, when the system displays a specific answer on the screen instead of a list of links, and voice commands allow you to perform certain actions, for example, send an SMS or set an alarm. The list of commands is shown in the image " Voice commands Google Now." Voice search includes more than a dozen various types questions:
Weather. What will the weather be like tomorrow morning?
Addresses. Where is the nearest pharmacy?
Flight information. When does Aeroflot flight number 2336 depart?
Time. What time is it in London?
Events. When is sunset today?
Computing. What is the square root of 2209?
Translation. How do you say "cucumber" in Spanish?
Sport. When does Spartak play?
Finance. What is the S&P 500 index today?
Facts. What is the height of the tallest building in the world?
Exchange rates. Convert 2600 rupees to US dollars.
Images. Show photos of the Golden Gate Bridge.
Interestingly, Google Now understands a large number of much less obvious questions in English. As an example we can give:
Should I wear a jacket today?
How much tip for 420 rubles?
Where is my package?
This, of course, is not all that could be talked about, but it will not be possible to lengthen the article, and many of the other possibilities are already known. Don't forget about these tricks, and your smartphone will become
a little more convenient. at January 26, 2017.
Undoubtedly, the main problem when using modern mobile devices is the lack of autonomy. We would all like our smartphone or tablet to work longer without being connected to charger. However, we see that this problem is reluctantly addressed by manufacturers, and there is virtually no progress in battery technology. We can say that the problem is global. “Slow” Android, “super-optimized” iOS, “fast” WP7, “exotic” MeeGo – regardless of the platform used, we hear users’ dissatisfaction with the operating time of their devices during active use.
Once again, I allow myself to express the opinion that with the same milliampere hours in the battery, with the same tasks, similar intensity of use of network interfaces, with the same number of background services and, most importantly, with the same operating time with the screen backlight on, the battery life of devices on different platforms is approximately the same. At least this is exactly the case in smartphones. I can say this based on personal experience operation. From time to time, screenshots of “record” battery life indicators that pop up on the Internet, when devices (regardless of the platform) are operated mainly in gentle and sleep modes, only confirm that I am right. Any modern smartphone, on any platform, can be easily discharged in 4-6 hours. At the same time, it will be able to work/lie for about 5-6 days in sleep mode with synchronization and rare screen activations.
However, it is worth noting that, nevertheless, some minor improvements in the form of increased battery life of modern Android flagships are present. This is achieved by reducing the manufacturing process of processors and chips, improving their operating efficiency in terms of improving performance without increasing power consumption, some slight increase in the capacity of base batteries, the use of energy-saving technologies in displays, and optimization of the operating system, finally. After all, something is happening inside the fast-growing Android? In principle, we can say that there were no significant differences between the first and second generation devices. However, now that we have the third wave of devices on our hands and are preparing for the fourth, it seems to me that we can talk about such a phenomenon. This is noticeable and I can name a quantitative increase in the autonomy of “new” devices – approximately 10-20%.
All of the above is also true for the current flagship of the platform - Samsung phone Galaxy S II. Compared to the previous model, autonomy is also slightly increased. Of course, this improvement could be attributed to an increased battery – by just 10%. However, given the dual-core processor, increased clock speed, larger screen size, and noticeably improved performance, I'd say there are some optimizations to be made. And yet, how can we further increase the autonomy of the device in active operation mode?
SGS2 is a very powerful device. I would even say that it is too powerful. Do we always need this power? Even without any experiments, we can assume that no. But let's check this statement in practice. We decided to try reducing the maximum operating frequency of the main processor and see how this affects the operating experience of the device. At the same time, we planned to use the device hard to install it maximum autonomy at maximum load. Besides, let's see do we need these gigahertz, which producers feed us? DOES THIS MAKE SENSE? That is, we will try to find a comfortable threshold for reducing the processor frequency.
Well, I think that the purpose of the experiment is clear, let’s proceed to its implementation.
So, how did we slow down the galaxy?
Our first task was to properly mount the dual-core, two-headed team of hot Exynos twin stallions. For these purposes, a core with overclocking capability was selected, which runs on Revolution HD 3.1.1 firmware and is called RAGEmod. Any other kernel with the ability to change processor operating parameters, for example Siyah Kernel, is also suitable. To directly control the processor, the SetCPU program was used (reins and shafts in the first diagram), with the help of which the horses were taken by the bridle - the upper threshold of the central processor frequency was set at 800 MHz.


Why was this particular value chosen? It was determined experimentally as the minimum required for normal operation most games on Android. Naturally, this is understandable - games are the most resource-intensive process. And with a processor frequency of 800 MHz, no slowdowns are yet noticeable; basically, everything always works fine.
Our special correspondent, junior researcher at the Moscow division of KeddrOlab Alexander Kurenkov reports on the results of field tests:
Recently, thanks to several cedar readers and ordinary logic, I decided, instead of increasing the letters and numbers next to the Apple inscription, to switch to the Android operating system. Naturally, the choice fell on one of the most powerful models on the market – Samsung Galaxy S2. Considering that I’m still in school, it so happened that I bought the phone during the holidays. He was at home, always on WiFi and near an outlet. At first, what the graphs showed was enough for me (~4-5 hours in hard use) – because I still didn’t understand what and where – I was studying the OS. When it came to weekdays, I thought that the phone would live at the level of an iPhone (well, under WiFi, I didn’t notice much of a difference, because time flew by quite quickly), but everything turned out to be completely different! On the first day, I decided to just see what would happen and used it in “ normal mode” for weekdays, but when I started watching the battery, I realized that at this rate it would not survive until lunch. I had to reduce the load and try not to use it at all. Anyway, somewhere in the evening I had 5% left for 2-3 days (at lunchtime I charged 25-30%). What I actually did:
1. Internet (ICQ, vk, twitter, a little youtube) ~20-30 minutes;
2. Games (I still wanted to spend a couple of minutes playing with toys) ~ 5-10 minutes;
3. Camera (well, it’s clear that it was necessary to capture some information) ~2-3 pictures per day.


After thinking and looking at my usage schedule, I realized that the phone uses its full power quite often, because I don’t play snake games, but 3D games. Something had to be done about it. First I remembered that Android is an open system and here you can overclock the processor (and therefore lower the frequency too), then I consulted with Vladislav and in the evening I fixed the maximum threshold frequency for the processor at 800 MHz. It helped, the phone began to live in “as always” mode longer. So if you are not satisfied with how much your animal works, you can try lowering the frequency. The second option is a reinforced battery.
I also sat with the restriction for several days maximum frequency 800 MHz processor, seeing some savings in battery usage during normal use.
I don’t play games, unlike Alexander, so basically one charge is enough for me for 12-13 hours. At 800 MHz I went out for 14-15 hours. Naturally, such an assessment is very subjective, but I tried to give approximately the same loads, turning on the phone screen with a certain frequency and performing my usual actions - viewing mail, Twitter, clicking on links and watching online videos.


However, I went even further and decided to set up a profile system that would regulate the operation of the processor depending on the current situation, since the SetCPU program allows you to configure a certain number of such profiles. In addition, I decided to observe the frequencies and power consumption of the smartphone to understand what real benefits such fine tuning provides.
Here's what I got:


As you can see I get maximum performance the device by overclocking the processor to 1.4 GHz while charging from a network power supply and using the standard 1.2 GHz when charging from a USB PC or laptop. When operating on battery power, the maximum processor frequency was gradually reduced in the following steps:
100-70% – 1200 MHz
70-50% – 1000 MHz
50-30% – 800 MHz
Below 30% – 500 MHz
We can say that I did not experience any inconvenience when using the phone due to such a decrease in the maximum processor frequency. The only thing is that at the last stage, with a limit of 500 MHz, one could notice slight system lags during complex tasks and scrolling the desktop with a 3D effect (Go Launcher EX).
Conclusions after the experiment:
1. Reducing the maximum operating frequency of the processor for SGS2 to 800 MHz practically does not bring any noticeable inconvenience when working with the phone, even in 3D games. Video playback also occurs without problems. However, recording 1080p video from the camera may be stuttering
2. Reducing the maximum processor frequency to 500 MHz can still be tolerated if you do not particularly load your smartphone and are not bothered by lags when scrolling. It is no longer possible to play games at this frequency due to noticeable slowdowns.
3. You won’t feel any huge benefits from lowering the maximum processor frequency in the SGS2, since in fact, most of the time the smartphone operates at 200 MHz, the same frequency is used when the device sleeps, when the screen is turned off. When scrolling through tables, menus, or launching programs, the processor frequency increases to 500-800 MHz, sometimes up to 1000 MHz. And only when shooting video in 720-1080p and playing games, the operating frequency rises to the standard maximum of 1200 MHz.


Therefore, you will feel the savings from lowering the upper threshold of the used processor frequency only if you use the device very intensively for complex tasks, often shoot videos and play a lot of games. For example, I can also assume that there will be some savings when long work GPS navigation (not tested). If, under standard processor operating conditions, you now have much more than 12 hours of battery life, for example 15-20 or more, you should not even start such games with frequencies. But if you use your smartphone very actively and have a current battery life of less than 8-10 hours, you can use such sophistications to get an additional hour and a half of battery life. Agree, in some situations this is quite a significant increase.
Try and experiment; fortunately, the procedure for lowering the processor frequency is absolutely safe. The only thing you may encounter is system slowdowns and interface lags.
The best result of the maximum operating screen time that I have seen on a standard battery was obtained a few days ago on the RevolutionHD v3.1.1 firmware with the Siyah Kernel 2.2 nolog kernel:


In continuation of this article, I am announcing the next topic for the 3rd series of KeddrOlab ScreenCast, which I will try to publish in a few days: using and setting the SetCPU program, types of processor profiles (CPU governors), overclocking & undervolting.
If you find an error, please highlight a piece of text and click Ctrl+Enter.