How to exit recovery mode. How to get your iPad out of the recovery loop. How to exit recovery mode. Especially for iPhone, iPad or iPod. Getting iPhone out of recovery mode
Apple devices are different high level reliability. Errors in them occur very rarely, “glitches” occur infrequently. Thanks to this, they have earned the honorary title of the most reliable and error-resistant smartphones/tablets. However, in some cases errors do occur, resulting in incorrect operation devices. What to do if your iPhone or iPad starts to behave incorrectly or stops loading altogether? How to enter recovery mode on iPhone or tablet?
In this article we will look at:
- How to start recovery mode on iPhone and iPad;
- How to enter DFU mode;
- What is the difference between recovery mode and DFU mode?
After reading this material, you will receive maximum information about restoring the functionality of Apple devices.
Recovery mode and DFU mode - the difference
We have already talked many times about restoring iPhone and iPad using DFU mode. Now we need to learn a new term - this is recovery mode (or Recovery Mode). It allows you to get rid of errors in the functionality of smartphones/tablets and perform a factory reset. How is it different from DFU mode?
The main difference is that user data is internal memory remain safe and sound. The recovery mode also has the following differences:
- Components and modules of the operating system are rolled back to factory settings, but are not created anew;
- All parameters are reset to factory settings;
- Integrity check performed file system– devices are preparing for correct startup.
The same DFU mode provides complete removal all user data, full formatting internal memory and re-creation of modules and components - that is, it is like a complete reinstallation of the entire operating system.
Although recovery mode is secure, backup copies before entering this mode you still need to create it - you never know what can happen to important data.
Entering iPad and iPhone Recovery Mode
We have already talked about how to enter DFU mode and restore the operating system to its original factory state. To do this, you need to hold down the Power key and the Home key, wait 10 seconds, release the Power key and continue to hold the Home key for another 10 seconds. Next, release the key and switch to DFU mode - all this time the smartphone/tablet must remain connected to the computer.
Please note that when entering DFU mode, iTunes must be running on your computer, which will restore your device. It recognizes the connected DFU mode device and prompts you to take the appropriate action.
In order to enter recovery mode on an iPad or iPhone (Recovery Mode), you must perform other steps. First, turn off the device completely - its screen should turn black. Next, click on the “Home” button and connect the smartphone/tablet to the computer. After a couple of seconds, an icon will appear on the device display iTunes applications– recovery mode is activated. By clicking on the corresponding button in iTunes itself, you will start restoring the operating system.
Here we see another difference between the recovery mode and the DFU mode - in the contents of the screen. If you enter DFU mode, the screen will be black, and iTunes will notify you about working in this mode. In Recovery Mode, the iTunes application icon with the cable connected will be displayed on the screen. In addition, when entering the mode iTunes recovery must be turned off on your computer - launch it after the logo of this application appears on the screen.
How to get iPhone out of recovery mode
Putting your iPhone into these modes does not affect your warranty, so you can use these modes as many times as needed. But what if you suddenly change your mind about returning your Apple device to its original condition? How to get iPhone or iPad out of recovery mode? This is done literally with one click of a button. The main thing is to think about your actions before the start of recovery, and not during the procedure.
To exit recovery mode, disconnect your iPhone from your computer and press the power button. Hold the button for 10 seconds until the smartphone reboots. After this it should start in normal mode, ensuring the operating system starts. Exit recovery mode on iPad in a similar way.
Don't interrupt under any circumstances recovery running– thereby you will harm your gadgets and damage the operating system.
Often users of iPhone, iPad and iPod touch you are given the opportunity to see a black screen showing a USB cable running to iTunes. Stability iOS work is rated with the highest scores, but no one is immune from such a turn of events. Today we will tell you how to get out of this situation, and at the same time we will tell you in more detail about Recovery Mode.
Recovery mode is not the most pleasant sight for an unprepared user. The i-device turns on, but instead of the friendly boot screen it shows the picture already described above with a USB cable and iTunes icon. This can happen for various reasons, but the most common is an error when updating iOS.

If you follow the advice displayed on the device screen and connect it to iTunes, the program will offer the easiest way - recovery. Were all your data and apps backed up yesterday? Feel free to restore! In another (and most common) case, you can try to bypass Recovery Mode without deleting all data from the device’s memory.
How to exit recovery mode:
- Reboot your device. Hold down the Home and Power buttons and do not release for 15 seconds. Then turn it on by pressing for a few seconds Power button.
- If the first method did not lead to exiting recovery mode, use special utility TinyUmbrella
- If the data on your iPhone, iPad or iPod Touch is not particularly valuable or the full backup was made recently, restore the device through iTunes by clicking Restore.
Based on the fact that the last method is not suitable for everyone, and the first method does not help as often as we would like, it is necessary to consider the operation of the TinyUmbrella program in more detail:
Step 1: Download and Launch TinyUmbrella
Step 2: Connect the device in recovery mode to your computer
Step 3. Click on the unidentified device that appears in the left column
Step 4. On the right side of the window, click the button Exit Recovery

Step 5: Wait for the device to reboot
After following these steps, your iPhone, iPad or iPod Touch can successfully exit recovery mode without losing any data. If this does not happen, a major failure has occurred and there is nothing left to do but restore the device using iTunes.
How to enter iPhone, iPad or iPod Touch into Recovery Mode yourself
Step 1: Turn off your device
Step 2: Press and hold the Home button
Step 3: Connect the USB cable to your device
After completing these steps, a notification will appear on the screen indicating that your device is ready to communicate with iTunes, during which you can full reset, restoring or flashing iPhone, iPad or iPod Touch.
Speaking of iPhone. Before you put your smartphone into recovery mode and start flashing the firmware, make sure that your model is officially unlocked.
Have a nice time! All you need to know about the DFU (Device Firmware Update) mode is that it allows you to put your iPhone or iPad into a state in which it is possible to completely restore the iOS system - after this operation, your gadget will be “like new”. No, scratches and abrasions will not go away, here simple restoration You can't get away with firmware via DFU - you need something more serious. But the inside of the device will be clean.
Why is this even necessary? Various software glitches correct removal jailbreak - all this can be cured and fixed only complete reinstallation systems. Which, in turn, cannot be completed without entering this mode.
As you can see, DFU is a useful thing. And now is the time to learn how to use it all. One, two, three. Let's go!
Putting any iPhone or iPad into DFU mode (if it has a mechanical Home button)
Follow these steps in sequence:
- Launch iTunes and connect your phone or tablet to your computer.
- Turn off the device (it should still be connected to the PC).
- Press and hold two buttons at the same time - Home (under the screen) and Power (located on the top edge of the device, except for iPhone 6 and older versions - here it was moved to the right side).
- We wait 10 seconds and release the Power button while holding the Home key.
- Continue holding the button for about 10 seconds.
- After a while iTunes time will inform you that the program has detected a device in recovery mode.
- Finally releasing the button :)
That's all, you can safely start restoring the firmware! The only thing is to avoid mistakes, use only original wires. Of course, non-certified ones also know how to charge (if there are any), but they don’t handle software updates very well.
By the way, when transferred to DFU, iOS devices do not show any signs. That is, the screen is completely black, nothing is written on it, there are no identification marks and no characteristic sounds are played.
Only iTunes will inform you about the successful result of all manipulations performed. Here's a sign like this
How to put iPhone 7, iPhone 8 and iPhone X into DFU mode?
A small update to the article related to iPhone release 7 (Plus), iPhone 8 (Plus) and iPhone X. As you know, the Home button in these models has ceased to be mechanical (in the “top ten” it was removed altogether) and is no longer pressable as before. How now to enter the DFU?
It's very simple, here it is short instructions:
- Launch iTunes and connect the iPhone to the computer.
- Turn off the gadget.
- On the phone we simultaneously press two buttons - power and volume down (!!!).
- We wait 10 seconds and release the power button, but continue to hold the “volume down” button.
- After 5-10 seconds, iTunes will see the device in recovery mode.
- Release the volume down key.
Congratulations, your iPhone has entered DFU mode, you can start restoring the firmware.
How to enable DFU mode on iPhone XS, iPhone XS Max and iPhone XR?
The devices are new, but entering the Device Firmware Update mode is carried out in the old way (exactly the same as in the “eight” and iPhone X).
However, as Malakhov says, do not rush to switch.
For those who have problems activating DFU mode using the method from the previous subheading, there are slightly modified instructions.
Hopefully this will be a little easier.
So, enter iPhone XS, iPhone XS Max and iPhone XR into DFU:
- Turn on iTunes and connect the phone to the computer.
- Press the power key and wait.
- The “Turn Off” slider appears. We wait and do nothing. Don't let go of the power button!
- After some time, the phone screen will turn black.
- Press and hold “Volume Down” (while continuing to hold the power button!).
- After 5 seconds, release the power button (“Volume down” still held!).
- After 5-10 seconds, iTunes will see the iPhone in DFU mode.
- Victory!
Let me remind you that these instructions are suitable for any iPhone starting with iPhone 8. Let’s use it!
We enter DFU mode without buttons, i.e. programmatically
Unfortunately, the previous methods may not always be suitable, because they are based on the use of buttons - Home, Power and “volume down”, but what if they don’t work? Remain without DFU mode and, accordingly, without the ability to restore software? Nothing of the kind - there is still a way out. We will need:
- Computer and wire for synchronization.
- File downloaded to PC from latest firmware for your device.
- Redsn0w program. Download links - redsn0w_win_0.9.15b3 and redsn0w_mac_0.9.15b3. The first is a version for Windows, the second for Mac OS.
Download and install redsn0w. In the window that opens, select Extras.


Follow DFU IPSW and indicate the previously downloaded official firmware.

We wait for some time and a modified software file appears on the desktop.
Now if at iOS recovery specify exactly this file, then you do not need to press any Home buttons or Power, DFU mode will be entered automatically.
How to get your iPhone or iPad out of DFU mode
There is also a small nuance here. In most cases, you can get away with simply rebooting the gadget. Well... you just have to hold the power button a little longer than usual.
Doesn't help? Then we perform a forced restart - . Naturally, you must first disconnect the device from the computer.
Here is such a short instruction. However, there is nothing more to describe here - they pressed and held two buttons, released one and connected it to the computer. All!:)
P.S. But if I missed something or have any questions, write in the comments, I’ll add to the article and answer with pleasure!
P.S.S. I almost forgot the most important thing! Attention! For successful and correct operation DFU mode, you must press the buttons social networks and like this article. Try it, it really works! :)
A smartphone from the Californian brand Apple is technological thoroughness, multiplied by the absolute practicality of the device, and all this is elevated to the degree of reliability. Such a statement in favor of the mentioned American company today is a kind of a priori in the industry mobile devices. But... no matter what perfect qualities an “Apple” phone has, without which the mode can be considered iPhone recovery, in a critical situation, the user will not be able to get by by definition, since the iOS operating environment is a system whose operation is associated with a mandatory process - setting up functionality. You, dear reader, will learn about this option and how to use it from the material in this article.
“Trouble came from where we didn’t expect it”: briefly about the causes of problems with the iPhone
Like any other computerized system, iOS is at risk of software failure, which may ultimately result in partial or complete inoperability of the device as a whole. Since the iPhone is, first of all, an individual means of communication, its functionality provides the ability to organize certain settings in accordance with the user’s preferences: display brightness, font size, notification type and a number of other changes. At the same time, we should not forget that the iPhone is a multifunctional mobile device that can interact with its owner through installed software. iPhone recovery mode will become a popular tool when the user makes incorrect installation of one or another application or implements third-party software solutions (with active jailbreak), which ultimately negatively affect the full functionality of the device.
As a reference: the concepts of “upgrade” and “rollback”
The name "iPhone Recovery Mode" is meant as an implementable method to return to initial settings device, so to speak, to factory settings, and performing an algorithm for updating the operating environment by complete replacement system files. In this case, the OS version can be left the same or upgraded to the current state. The two points described above are fundamentally different. Therefore, the user must independently decide which option is most appropriate in terms of implementation. However, in order to determine which method is the most rational, you should pay attention to the signs of a malfunction and only then use the iPhone recovery mode.
Analysis and diagnostics

So, first of all, you need to understand what exactly happened to the phone:
- Systematic “glitches” are observed during the operation of the communication device.
- The phone is frozen and does not respond at all to pressing the navigation keys.
- At the first stage of loading iOS, the logo simply “hangs”, without obvious signs OS activity.
- When you turn on the phone and nothing else...
- The mobile device reboots spontaneously.
- The user is firmly convinced that the phone was not subjected to any mechanical stress, and one of the devices on the device stopped working: Bluetooth, Wi-Fi or camera.
How to Enable iPhone Recovery Mode: step by step instructions
You should not immediately resort to drastic measures, one of which is considered to be immediate process flashing. It is likely that a simple “reset” will become precisely the means of restoring the functionality of the illuminated communication device. Perhaps activated “Recovery Mode” can cure mobile illness. Start with simple solutions and only if they are useless, move on to more serious iPhone reincarnation scenarios.
Step #1: Banal reboot

- You must simultaneously hold down the “On” and “Home” keys and hold them in this state for 10 seconds.
- After the logo appears, the phone will begin to “come to life”.
Step 2: Traditional reset through the settings menu
iPhone 5 Recovery Mode can be activated by using standard means device
- Go to the "Settings" menu.
- Then go to the "Basic" tab.
- Activate the "Reset" item.
- From the list that appears, select the type of memory cleaning that is most suitable for you.
Step #3: How to enter Recovery Mode

In order to use this recovery mode, the iPhone 5s or a similar device of another modification must be completely turned off.
- Press and hold the Home button and connect it to your phone USB cord from the kit.
- Only after the iTunes and USB logo is displayed on the mobile screen can the pressed key be released.
Of course, the connecting cable must be connected to a computer on which the current version of the above program for working with an iPhone device must be installed. If all your actions are performed correctly, a service message will appear on the monitor notifying you that the connection has been successfully completed.
Step #4: Return iOS to its original state using Recovery Mode
Knowledge of how to enable iPhone recovery mode is not enough to correctly and correctly carry out the entire process of this kind of software maintenance.

- After you have connected, a system prompt will appear on the screen with three buttons displayed (at the bottom of the window): cancel, update and restore.
- Your choice is the last option listed.
- In the window that opens iTunes programs You also need to activate the “Restore” button.
- After this, the recovery process will begin.
Step #5: iOS Update (Device Firmware Update)
Entering the iPhone into DFU recovery mode is quite simple, however, do not forget that after the subsequent firmware process, all user information from your device will be destroyed. Therefore, if such a possibility exists, you must first make a backup copy of the data.

- Connect your phone to your computer using a USB cable.
- Turn off the device completely.
- Hold the Home and Power buttons for 10 seconds.
- After the above time has elapsed, release the power key.
- After some time, a message will appear on the computer screen stating that iPhone 5 restoration (the modification is indicated as an example) has been activated, that is, you can carry out further actions with the phone.
Step No. 6: Firmware bypassing the device’s operating system
Even though the screen iPhone devices continues to frighten with its black display (meaning the “Device Firmware Update” mode), iTunes detects the connected device and displays a corresponding message on the monitor. The recovery algorithm remains the same (see step No. 4). However, in DFU mode, the firmware process proceeds most correctly, since the smartphone’s memory is subject to initial formatting and operating system installed in the cleared area of the mobile storage.
- Download from the official website Apple support current version iOS.
- Hold down the Shift key and click the Restore button.
- Specify the directory where the downloaded version of iOS is located.
- After a short firmware process, the user is given the opportunity to return the saved data (backup) to the updated device.
- If you don't have backup, simply disconnect your phone from your computer and deactivate recovery mode.

iPhone 4 or Apple device of another modification cannot be flashed downgraded version iOS. However this limitation of a purely official nature, since today there are a lot of ways in which older (than originally installed on the phone) system software, so to speak, which has proven itself to work stably, can well be installed on the iPhone without any further negative consequences. By the way, they are incredibly popular among owners of presentable Apple devices, since they allow you to significantly expand the functionality of the “canned” capabilities of the official iOS versions.
In conclusion
So, before you put your iPhone into recovery mode, you need to be firmly confident in your actions and the correctness of the chosen algorithm software repair. Meanwhile, it may well be that the user uses the cloud update option - iCloud. In this case, you need to charge your phone and be prepared for the fact that the recovery process will become a somewhat lengthy task. But there are no guarantees (when using this method) that everything will be successful, since often the speed of the Internet connection leaves much to be desired. Good luck with your recovery process and stable operation to your iPhone device!
Recovery Mode(recovery mode) - one of two emergency modes Apple technology. Recovery Mode makes it possible to restore functionality to the i-gadget if, due to a software glitch or as a result of an unsuccessful jailbreak, the device turns off, does not want to boot and generally does not respond to button presses.
Recovery Mode And DFU Mode– modes provided by Apple, so their use does not entail loss of warranty. The differences between them have been discussed in detail in this article. In short, Recovery Mode more “soft” in terms of impact on mobile device and at the same time less effective - many problems are too much for him to handle. DFU Mode bypasses iOS and creates all files from scratch. resort to DFU It is recommended only in critical situations and only when the recovery mode has already been tried.
Before entering the gadget into Recovery Mode, take the USB cable and connect it to the PC port. Do not connect the cord to the device itself yet.
Step 1. Turn off your smartphone by long pressing the “ Power» — wait until the screen goes dark. If the device is already turned off, you can skip this step.
Step 2. Hold down the " Home" and insert the cord. The iPhone will boot - you will see an image on its screen USB cable and logo iTunes. This is another difference between recovery mode: in DFU The iPhone just has a black screen - the user can understand that the mode is activated only by message in iTunes.
Step 3. A few seconds later in iTunes the following window will appear:

You need to click " OK». Then you can reset, restore or reflash the gadget.
How to get iPhone out of recovery mode
You need to exit recovery mode using the following algorithm:
Step 3. Click " Recovery Fix"and wait until the gadget boots up in normal mode.
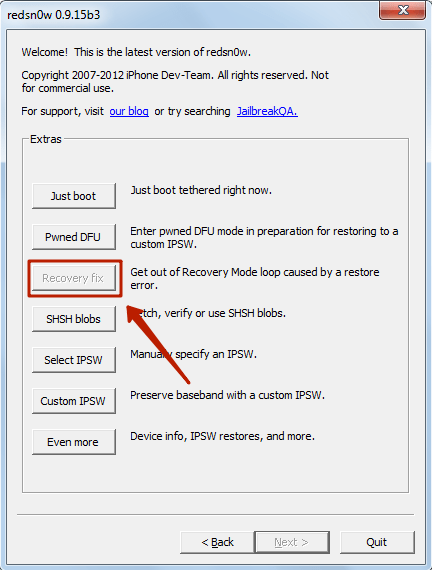
The Recovery Fix button becomes available only when the iPhone connected to the computer is in update mode.
You can also “break the loop” using iTunes. Just connect the gadget to your computer, go to device management mode and click “ Restore iPhone».

Why wasn't this method mentioned earlier? Because this way the user will lose all the data stored on the iPhone. In addition, the device will be updated to latest version iOS, and there will be no option to return to the previous one (which the owner of the gadget was probably 100% happy with). When using special utilities, there is a chance to get a device with the same operating system and content.
Conclusion
Recovery mode helps eliminate many iPhone problems, however, it is extremely important to enter the iPhone into recovery mode Right, otherwise there will be even more problems. If, for example, the user is in a hurry and disconnects the gadget from the PC before the update procedure is completed, the iPhone will fall into a recovery loop, from which the device can only be recovered by using special programs.