How to cut an oval in Photoshop. Cut a circle of a given diameter from a photo
Instructions
After launch Adobe Photoshop and loading into it the required document turn on the selection tool oval areas. If it was this one that was used in the previous selection operation, for restart It will be enough to press the key with the Latin letter M. If you previously used the default rectangular variation of this tool, move the mouse pointer to the second button in the toolbar, click left button and don't let go for a few seconds. As a result, a list of tool options attached to the button will open - select the line “Tool” Oval area"».
Mouse over left top corner future allocation. This is not the point that will lie on the border of the oval; it should correspond horizontally to the leftmost point of the oval, and vertically to its highest point. If it is difficult to determine this place by eye, turn on the display of horizontal and vertical rulers (Ctrl + R), a grid (Ctrl + E) or draw guides - hover the cursor over one of the rulers, press Alt and, while holding down the left button, draw a vertical or horizontal line. For greater accuracy, you can use the same method to mark the rightmost point of the selected area.
Move the cursor while holding down the left mouse button from the upper left to the lower right points selected in the previous step. When you release the button, the size of the oval will be fixed, but you can move it using the navigation buttons - arrow keys or mouse. The strictly oval shape of the selected area can be changed - tilted, rotated, reduced, distorted, etc. To do this, expand the “Selection” section in the menu and select “Transform selected area”. Then right-click inside the oval and select context menu one of more than a dozen transformation options. Change the selection using the selected method by moving the node points on the frame around the oval with the mouse.
When you have finished creating the selection area, select the desired one in the layers panel and press Ctrl + X or select “Cut” in the “Editing” section Photoshop menu.
Very often during preparation for holidays and events, creating interesting greeting cards and calendars, comic images and collages for friends and acquaintances, you need to cut out a person’s face on the computer along the contour original photo. The Adobe Photoshop program will help with this, allowing you to separate the desired part of the image from the rest with a few clicks of the mouse.
You will need
- Adobe Photoshop program, the image that needs to be edited.
Instructions
Run Adobe program Photoshop. Open the image you need to edit: File-Open.
The Layers tab will appear in the lower right corner, displaying all actions with this layer. Right-click on the name of the layer and in the menu that appears, select Duplicate Layer - “duplicate layer”, write the name you need and click OK. This will prevent you from damaging the original image while working. If you do not want to create a separate layer, then double-click on the layer name with the left mouse button - this will remove the protection from it, indicated by a small padlock.
Next step - direct work with image. On the right in the toolbar, select the Magic Wand Tool, indicated by a similar icon, or press from the keyboard English letter W.
Click the icon on the place you want to remove from the photo. IN in this case– the light background part of the image near the head. The fragment selected for deletion will be outlined with a dotted line. If the program correctly recognizes the zone that needs to be deleted, click Delete.
Remove the remaining part from the other side of the head in the same way.
If you need to leave on the image only head and neck, having removed part of the clothing, you also need to click with this tool on the clothing of the person in the photo.
If it so happens that the dotted line has captured part of the face, at the top of the program on the toolbar there is a button that allows you to move the selection away - Subtract from selection, indicated either by a minus sign near the " tool wand", or double square, and white should be at the top. To return to the option of selecting a zone to delete, click a regular square or oval on the same toolbar and select the zone to delete.
Erase the remaining unnecessary parts of the image with the Eraser Tool.
Sources:
- how to insert an animal head

Remember, if you accidentally captured part of the desired fragment while erasing, the action can always be canceled by pressing the Ctrl+Alt+Z key combination from the keyboard, or by selecting the appropriate option in the Edit-Undo toolbar - “edit - undo action”.
Sources:
- how to cut out a fragment in photoshop
Cut snowflake from - a simple and effective way to decorate a room for the New Year. Choose the color of the paper, arm yourself with sharp scissors and get creative with shape, size and design.

You will need
- - colored or metallized paper;
- - stationery scissors;
- - nail scissors.
Instructions
Take a sheet of paper, preferably thin, that can be easily folded several times. In addition, regular scissors are not suitable for thick paper. In this case, it is better to use a sharp cutter so that the edges of the patterns do not turn out torn. The most accurate snowflakes are made from A5 sheets, and you can make a lot of them using different patterns. To obtain this sheet size, a fairly ordinary album sheet cut in half.
Cut a strip of leaf to make a square. To do this, place it vertically on the table, fold it diagonally so that the edges of the top and sides meet, and cut or tear off the excess strip using a ruler. When folded, you have a triangle.
Place the triangle with the base facing up and fold in height to create a triangle that is half the size. Then fold the new triangle again in height, aligning the sides.
The most common New Year's pattern is the herringbone. This is at the same time the simplest drawing, since it is performed by simply cutting out parallel triangles of different or the same size. Take the triangle in your non-working hand so that the folded side is on the working side. With your other hand, use scissors to cut out triangles at the fold as shown in the picture.
Get creative by creating your own unique patterns, for example, cut out circles, ovals, squares and rectangles or other fancy shapes instead of triangles. When you're done, unroll the sheet and straighten it out.
Snowflakes can be rectangular, oval, round, have torn edges and a pattern in the middle. To give the decoration the desired shape, trim the edges of the folded sheet. If the intended design is too complex, use nail scissors.
Photoshop program Thanks to its wide graphic capabilities, it enjoys well-deserved popularity. One of the most common techniques for working in Photoshop is cropping an image and cutting out part of the image for later insertion.

What a wonderful baby!
Yes, of course, in the Photoshop program it is possible to cut a circle of a given diameter, just like any other shape, from any image, and without any problems, special knowledge or time.
To begin, take the Eliptical Marque Tool from the tool palette (which is on the left) and create a selected area.
Moreover, if you need to create a regular circle, then before starting to create a selection you should hold down the Shift key, and, if you want the circle to be created from the center, then hold down the Shift and Alt keys at the same time. Although, when setting the selection size, this is not required.
So, we selected the “Oval Area” tool, then at the top of the Photoshop working window, select the future selection style “Fixed Size”, as shown in the figure:

And enter your width and height of the circle in the appropriate fields, as you can see in the example, I entered 250 and 250 pixels.
Then we click on the document, a selection appears, and, using the mouse cursor, which will take the shape of a cross, we place the selection in the desired place.
All.
Alternative methods, for those who are not looking for easy ways)))
But, there are cases when it is impossible to enter the dimensions of the future circle or oval in advance, therefore, if you need to get a figure of a certain size, you need to use one of two methods.
1. Before creating a selection, open the Info palette; you can do this by going to the main menu tab Window-->Info or simply pressing the F8 key. While creating a circle, the palette shows the circle's dimensions, width and height. To obtain the required size, you need to accurately move the mouse. To simplify this procedure, before creating a circle, you need to zoom in on the document as much as possible so that only the desired area is displayed in the frame.

2. If you still couldn’t get the mouse given size selection, you can apply scaling to the selection itself after it is created.
For example, we need a circle with a width and height (in normal terms, diameter) of 250 pixels, but with the mouse it turns out sometimes larger, sometimes smaller, for example, the output is a selection with a width and height of 248 px, and that’s it. Let me remind you that we look at the size in the Info palette.
In this case, we adjust the size of the selection using scaling. Go to the main menu tab Select-->Transform Selection. We see that an overall frame has appeared around the selection, and at the top of the main Photoshop window the values have changed. The interface of this tool is identical to the Free Zoom tool. Now you need to enter required parameters in the windows H and W (height and width, in English W and H). A small problem - we need pixels, and then there are percentages. We need to count it. The size of our selection in the example is 248 pixels, so one percent will be equal to 2.48. From the desired size (250 px) subtract 248 px, we get 2 px. We divide these 2 pixels by the percentage value of 2.48 and get 2 / 2.48 = 0.806, which we round to 0.81. Therefore, we need to enter the value 100.81%.
Yes, first click on the button indicated in the figure, then enter your value 100.81% in the corresponding window instead of 100% and check the result in the Info palette. Everything is as it should be, the size is 250 pixels.
Good day, dear readers. The Internet is increasingly disappointing to me. I’m learning Photoshop and periodically I come across various kinds of tasks. I would like to work at the specialist level, but the articles that I can find are mostly written either by schoolchildren or for schoolchildren, to be done... somehow.
I need to cut an object along the edge, and the result after these posts is terrible. It was as if he was working with hundred-year-old creaking scissors. Horror that you can't put anywhere. You want a round photo, but they offer you a 500-page manual when everything is much simpler.
I'm terribly tired of identical and useless publications that are far from real life beginning designers and developers. We will have to take on the sacred educational mission upon ourselves.

To be fair, I have already created long posts on many of these topics myself, but time marches on. Everything changes and skills improve. This article is not that long, but it contains tips that will help in real life.
Today we’ll talk about one of the most important and common tasks: how to cut a picture in Photoshop professionally, smoothly and quickly. We will consider different cases. Somewhere I'll show you how to dig deeper so that the result turns out cool. At some point, on the contrary, I will describe accelerated process completing the task.
Image resize in two clicks
I, of course, am a sinner myself. I recently wrote and the article turned out to be not small, but comprehensive. Now I will describe how to do everything quickly, without unnecessary movements.
So, open Photoshop, and then the photo you will work with.

To do this you will need the Frame tool.

You can pull the edges to determine the size or cut off something extra.

But, as a rule, the main task of the designer is to work with specific dimensions. You need to either crop the photo to a certain size from all edges, or a suitable picture in width or height. There is a corresponding button for all this.

If you are interested in the ratio, choose top button and insert your values.

If one of the indicators, then select W x H x Resolution.

Insert your values.

Everything will be smooth, beautiful and in good resolution. By the way, I recommend over cropping, especially if there are a lot of photos, and the one installed on your computer slows down. This is a common story for the fat-bellied Photoshop, with its super-powers. Lightweight online service works much faster.
Make an image round in two minutes
There are many ways to cut a photo in a circle. Now I will tell you about the simplest thing. Literally 2-3 minutes and you're done.
Open the drawing.

And select the “Oval Marquee” tool. If you can’t find it, hold down the left mouse button on one or another panel button on the left. Perhaps the oval is “hiding” under the rectangle.

To draw smooth circle move the mouse and hold Shift at the same time and the proportions will be preserved.

Naturally, only the area of the picture we need should remain inside the circle. Move it using the arrow and mouse. There is no need to clamp anything else.

Now press Ctrl + C at the same time to copy the area inside the circle, and then Ctrl + V to paste it into this picture. Then remove the "eye" from the background.

You will get this option. Without a background, it will later be transparent.


So that the transparency remains and does not change to white, you need to select PNG() format. The familiar JPG does not understand what transparency is.

You don’t have to save it and just paste it into another photo. Ctrl + V.

To reduce round picture with a girl, you need to press CTRL and T at the same time, and then move the points along the perimeter of the square. Hold Shift to maintain proportions.

This method is much faster and easier than others.
Normal professional object cutting
With circles we saved time and we have somewhere to spend it. Cutting objects along the contour so that it looks great is not so much a difficult process as a long one. You'll have to try and dig deeper.
Open the photo.

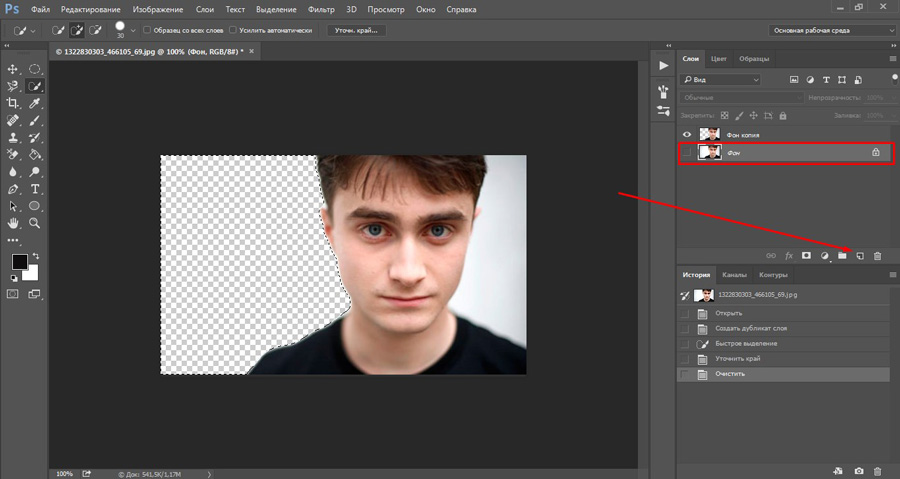
And first of all, create a duplicate layer. This is necessary in order to get rid of the background later.

There are a whole bunch of tools for selecting objects. The function that I will talk about further is suitable for any other option. This photo has a white background, so I can select my favorite Quick Selection.
If you want to know more information about carving tools for beginners, read the article on this topic, it is already on my blog. Then come back to improve your skills and knowledge.
If you can't wait to start with the secrets of mastery, take a picture with a plain background.

Swipe across the background and ants will crawl along the edge.

Now let's go to the Refine Edge tab.

Pay attention to the "view". It will come in handy more than once. There are many different options for displaying the changes that you will apply to the photo. Move from one to another to achieve perfect effect and see exactly what it will look like. Everyone will like their own display option.

Immediately put a tick on “Smart radius”. The indicators will have to be changed at your own discretion, by eye. Believe me, over time it will work out much better and faster.

Adjusting the edges. Use, try, experiment.

Now click “Ok”. As it turns out a little later, these values \u200b\u200bshould be remembered, but we will return to this later.


I don’t know about you, but this checker doesn’t really suit me. You can't see how everything has changed. Click on the background once so that this layer is highlighted, and then create new layer. This can be done through the menu at the top “Layer” - “New” or by clicking on the advising button on the left. I marked it with an arrow.
So, now click on the newly created layer and apply a fill to it.

Ideally, of course, immediately put the background on which the picture will be later. But, I will try to work in contrast. It’s immediately obvious that the option is not the best, but why not? We are learning.
So now let's go back to the copy layer.

And again we move on to refining the edges.

I like the right edge better. What conclusion can be drawn? We had to remember the values we applied to the left so that both parts looked the same. I've already said this. It was not for nothing that I left the article as is and did not change a word, although I could have deleted the information about this error.
Watch how people gain experience, make mistakes and come up with their own rules. There's nothing wrong with doing something wrong. This is where professionalism is born.
There are many tools that we can use now, and experts do just that. They don't leave the picture just like that. First, let's use blur. To make smooth edges.

This is how it worked out for me.

I don't really like it. Best option– change the background on the second layer. Agree, it’s not bad anymore.

You can download my layout, open it in Photoshop and make it much better. Send your results in the comments to this post.
If you think that Photoshop is difficult, then you are very mistaken. This is just a set of tools, and professionalism is developed only through experience, creating pictures one after another.
Imagine you have a garage and it’s full of everything: hammers, axes, machines. You can walk around them and think about what they are intended for, you can ask professionals for advice, but in any case, this will not make you a master.
If you want to quickly understand all the Photoshop tools, I can recommend you course for beginners from Zinaida Lukyanova . You will quickly learn all the methods, methods, tools. You will understand what is needed and why, what it is used for. The only thing left to do is practice, try and apply in one case or another. This is how they become masters.

If you are going to become a professional and dream of the money that you can get from creating websites, then you will also have to study basics in web design school. Within three days you will be given free access to all lessons. Frankly speaking, this is quite enough to understand a lot.

Well, for those who want to get big money and want to get very high, they will have to invest more seriously. This is a course from gurus, incredibly cool specialists from companies such as Kaspersky Lab. Unfortunately, other names are unlikely to give you any idea or evoke associations. Most likely you haven't even heard of them.
But believe me, as soon as you start spinning around in this area and moving towards your intended goal, you will see that you have missed a lot. “Web designer: effective website from idea to implementation” here you can really learn the profession of a web designer. The course costs a lot, but upon completion you will be given a diploma, thanks to which you can immediately break into the TOP and receive incredible amounts!
Instructions
Open the source file. To do this, press the combination CTRL keys+ O and find the required file in the dialog that opens. In the dialog window, you can view the contents of the selected file before opening it, so it’s difficult to make a mistake.
Now you need to select the required circular area of the photo. Move the cursor to the upper left corner of the image, press the left mouse button and, while holding it, move the cursor diagonally to the lower corner. The size of the selected area will increase, and when you release the mouse button, it will freeze. If you do all this while holding down the CTRL key, the selected area will be a geometrically regular circle. But without this you are free to create an oval of any degree of flattening.
After the selection is made, it is possible to perform additional manipulations with it. For example, it can be moved by dragging with the mouse or clicking with the arrows. Accelerated movement using the arrows is obtained by holding SHIFT key. You can change selections - to do this, expand the “Selection” menu section and select “Transform Selected Area”. When you finish adjusting the shape, copy the selected area by pressing CTRL + C.
Now create a new one - press CTRL + N. Photoshop will automatically select dimensions for it that match the width and height of the photo section you copied. All you have to do is select “Transparent” from the “Background Content” drop-down list and click the “OK” button.

Remains edited photograph- press the combination of four keys CTRL + SHIFT + ALT + S. In the dialog that opens, set desired file- select it in the second drop-down list from the top. GIF formats and PNG support transparency, JPEG does not. But JPEG can transmit better quality smooth transitions colors (gradients). Pick up the right option and click the “Save” button, and then specify where exactly and with what name the file should be saved.

Have a nice day everyone! How are you feeling? Are you preparing for the second holidays? I do. Tomorrow we are going to Yaroslavl until May 9, as I said. But I won’t leave you without an article. Recently I was asked to make regular photography round, that is, so that the portrait is in an oval frame. It's not difficult and of course I agreed to help.
And I decided to tell you how to do it too round photo in Photoshop, using the most simple methods. This thing will always come in handy for any decoration. Am I right? Well, due to the established tradition, I will show you several ways how this can be brought to life.
Oval selection
You probably already guessed that I am using the oval selection. Well, in principle, this is logical, and this method is probably the simplest. Are you ready? Then let's go!
And of course, as I promised, we will look at one more method. It is very simple and should not cause you to panic.
Ellipse

DON'T FORGET! To remember an image while maintaining transparency, you need to PNG format otherwise you will get rounded picture with a white background.
Well, if you want to fully study Photoshop from A to Z and gain real knowledge on this wonderful graphic editor, then I strongly recommend that you study this video course. These video lessons are designed for any level of user and can be listened to in one breath. See for yourself.
Well, I’m finishing my lesson for today. Look at other articles on my blog and you will definitely find something interesting for yourself. Good luck to you! Bye bye!
Best regards, Dmitry Kostin.