Solving problems with USB connection. How to connect a USB flash drive to an Android device using a special OTG cable: solving reading and recognition problems
Bulky USB connectors are not entirely suitable for compact smartphones. But this does not mean that flash drives cannot be connected to them. Agree that this can be very convenient in many situations, especially when the phone does not support the use of MicroSD. We invite you to consider all options for connecting a USB flash drive to gadgets with micro-USB connectors.
First, you need to find out whether your smartphone supports OTG technology. This means that micro USB port can supply power to external devices and make them visible in the system. This technology has begun to be implemented on devices with Android 3.1 and higher.
Information about OTG support can be found in the documentation for your smartphone or simply use the Internet. To be completely sure, download USB application OTG Checker, the purpose of which is to check the device for support of OTG technology. Just press the button "Check Device OS on USB OTG".

If the OTG support check is successful, you will see a picture as shown below. 
And if not, you will see this. 
Now you can consider options for connecting a flash drive to a smartphone, we will consider the following:
- using an OTG cable;
- using an adapter;
- using a USB OTG flash drive.
For iOS, there is one way - using special flash drives with a Lightning connector for iPhone.
Interesting: in some cases you can connect other devices, for example: mouse, keyboard, joystick, etc.
Method 1: Using an OTG cable
The most common way to connect a flash drive to mobile devices involves using a special adapter cable, which can be purchased at any place where mobile devices are sold. Some manufacturers include such cables with smartphones and tablets.
On one side, the OTG cable has a standard USB connector, on the other, a micro-USB plug. It’s easy to guess what to insert and where. 
If the flash drive has indicator lights, then you can determine from them that the power supply has started. A notification about the connected media may also appear on the smartphone itself, but not always.
The contents of the flash drive can be found along the path
/sdcard/usbStorage/sda1
To do this, use any file manager.
Method 2: Using an adapter
Recently, small adapters from USB to micro-USB have begun to appear on sale. This small device has a micro-USB output on one side and USB contacts on the other. Just insert the adapter into the flash drive interface, and you can connect it mobile device.
Method 3: Using a flash drive with an OTG connector
If you intend to connect the drive frequently, then the easiest option is to purchase a USB OTG flash drive. This storage medium has two ports at the same time: USB and micro-USB. It's convenient and practical. 
Today, USB OTG flash drives can be found almost everywhere they are sold. regular drives. At the same time, in terms of price they are not much more expensive.
Method 4: Flash drives for iPhone
There are several special media for iPhones. Transcend has developed the JetDrive Go 300 removable drive. It has a Lightning connector on one side and a regular USB. Actually, this is the only really working way to connect a flash drive to iOS smartphones. 
What to do if your smartphone does not see the connected flash drive

Team "Unmount" used for safe removal carrier. Please note that StickMount requires root access. You can get it, for example, using the program.
The ability to connect a USB flash drive to a smartphone primarily depends on the latter. It is necessary that the device supports OTG technology, and then you can use special cable, adapter or connect a micro-USB flash drive.
Few consumers know that a mobile device running on the Android operating system, unlike other portable devices, can be used as a flash drive. IN Lenovo smartphones On Android, manufacturers initially included functions that allow them to be used as a flash drive and used for their intended purpose. Thanks to this, the user can record necessary information, delete files from the device that are not used, but at the same time take up a lot of space on it.
Using an Android phone as a flash drive, there is no need to connect it to a computer, constantly carry with you the cable needed to connect to a laptop, that is, to perform a lot of manipulations that waste a lot of time.
Methods for connecting a mobile device as a flash drive
Let's look at how to connect your phone as a flash drive. To do this, you need to do a number of simple sequential actions:
- Select “Menu” on your device and find “Settings”.
- Immediately after this, a list will appear on the screen; you should find the line “SD Card” in it. Depending on the Android version, it can be found through applications or memory .

- In order for the smartphone to recognize the PC as a flash drive, you need to check the box next to the line labeled “Data storage device” in the displayed list. Or click on “Connect SD card”.
- As soon as the smartphone is connected to the computer, an icon will appear in the device’s status bar, which indicates that the USB flash drive is in working condition.
If you lower the curtain in the menu, the phone connection via USB port as a flash drive. If you need to turn off the drive, you must also lower the curtain and click on the corresponding inscription.
Options for connecting a phone with different versions of Android
Let's look at how to connect your phone as a flash drive, depending on the version of Android that is installed on the device. First, you should find out what operating system is installed on your smartphone. To do this, go to “Settings” and find the “About phone” or “About device” item. Usually it is the last one in the list that opens.

If Android OS 2.1 - 2.3.7 take the following steps:
- The device connects to the PC using a USB cable;
- The computer itself should detect the new device. If this does not happen, you need to disconnect the smartphone from the PC, go to “Settings” → “Applications” → “For Developer” → “USB Debugging”. After that, connect to the PC again.
- A drive icon will appear on the device; all you have to do is click “Connect via USB”, which you need to do as a media device.
If your phone has an Android operating system with version 4 or higher, you need to connect to a PC, do the following: “Menu” → “Settings” → “Memory” → “Connect to SD card” .
Android does not see the memory card
Situations arise in which the flash drive is not detected in the smartphone. In order to find it, it is recommended to use a file manager - ES Explorer or its equivalent. With the help of such programs you can find almost everything. In their functions they resemble the My Computer program.

In order to recognize a memory card, you need to launch ES Explorer by downloading it to your device prematurely. After launch, a menu will appear on the left side of the screen in which the memory card (SDcard) is located. All you have to do is click on it. It has been discovered and is open for business.
By following simple steps, anyone, even a novice user of a mobile device, will be able to detect a memory card in it. The reasons why the computer does not see the SDcard may be different. You may need to update the operating system on your PC or install the MediaTransferProtocol (MTP) protocol for Windows XP
(No ratings yet)
Lenovo laptop does not turn on: possible reasons How to install Root rights on Lenovo p780 Why the phone does not see the computer via USB: reasons and solutions How to connect wired internet To lenovo laptop: options How to add google account on the phone: instructions
Modern flash drives can store a huge amount of information, weighing up to 256 GB or even more. That's just due to the lack of the required connector, it is problematic to “sync” with a smartphone, and they come to help adapters. Today we will find out how to connect a USB flash drive to Android via OTG and what you will need for this.
What is OTG
The OTG cable is a special adapter, allowing you to connect devices with a standard USB connector to phones and tablets. In short, this is an adapter, one end of which is connected to the smartphone, and an accessory is inserted into the second.
You can connect to both mice and keyboards, and any external drive.
You can purchase an adapter at any store, which specializes in electronics and gadgets for them. We also note that Some phones already come with OTG. For example, this detail was noticed in Samsung smartphones and Sony.
How to check Android and OTG compatibility
Unfortunately, not all smartphones can boast of supporting the OTG protocol. But how can you find out in advance whether the device can recognize an additional gadget? The simplest thing is this is a visual definition. If the phone has standard microUSB, Most likely, in this case it will connect to the adapter without problems.
But for more qualitative test we recommend using special program, namely USB OTG Checker. This is very useful application with a minimum of functions, perfectly performing the main option - recognition OTG support or lack thereof on an Android smartphone.
USB OTG Checker app
The utility can be easily downloaded from . After installation, we launch it and after a few seconds we see either a green square or a red one on the main screen. Everything is very clear here : green means successful further synchronization, red – inability to connect to the adapter.
Below is a table with a little information about the device, where the phone model, its name and ID are indicated. This, in principle, is where all the functionality of the application ends.
If the result is negative – There are two options to solve this problem. Perhaps the flash drive is simply not recognized by the built-in Explorer. For this there are special utilities, which we will discuss below. Or the OTG protocol is completely blocked in the device. Then, unfortunately, you won’t be able to do anything except purchase new phone running Android.

The connection procedure itself is very simple: we insert the accessory into the adapter, and connect the adapter to the smartphone. If the flash drive is successfully recognized operating system, a corresponding notification should appear on the screen, on which you should click "Allow". The external flash drive is recognized by the device, but how can we now read information from it?
File managers will help here, they are also called explorers. These are applications that allow you to view all the information stored in the memory of your mobile device and the drives attached to it.
On some phones, e.g. Xiaomi company, there is already a built-in “Explorer”.
But you can also install any third-party manager, most best option– ES Explorer, which we talked about in detail in the article. We launch the program, go to the root menu and the external drive should be displayed there. Click on it and a list of materials appears. This way you can view images, videos, read documents and work with archives. All information stored on the flash drive is accessible from the smartphone.
But what to do if the drive is not recognized? The only way out is specialized utilities. For example, great program is Media Explorer, available for download from Google Play. Unfortunately, it is paid and there is no beta trial.
StickMount (Root)
Don't want to spend money? Don't despair, there is a free alternative - StickMout app, requesting . If you are already a “Superuser”, you can easily adapt to the program, but otherwise you will have to either buy the tool or get root, otherwise you will not be able to work with the flash drive.
Possible problems why the phone/tablet does not see the flash drive via OTG
You bought an adapter, downloaded the necessary file manager, are happy to connect the flash drive, but it is not readable by the device - what is the reason? Let's discuss the most common factors that prevent successful synchronization:
- Incorrect flash drive format. Android doesn't read file systems NTFS and ExFat. Only suitable FAT32.
- Inappropriate software or operating system. The issue may be in the firmware, or in special drivers, or in the Android version. To avoid such troubles - Check your phone in advance via USB OTG Charge.
- Dirty connectors, due to which no contact occurs. This also includes faulty flash drive or adapter.
- The flash drive contains too much information. For example, if you connect a 256 GB drive to a smartphone, which only has 4-8 GB permanent memory– problems are possible. Likewise with RAM less than 1 GB.
Video instruction: how to connect USB to a smartphone without OTG support
As you can see, it’s quite easy to connect a USB flash drive to Android via OTG; for this you just need to strictly follow the instructions and have it on hand necessary tools. Good luck!
It's easy to connect a flash drive to your smartphone. To do this, you just need support for a special protocol and several programs.
Definition of OTG support
Read also: TOP 12 Best USB flash drives for all occasions: for music, movies and backup data storage
To connect an external drive to a mobile device, you must first make sure that your smartphone supports OTG (On-The-Go) technology, which allows you to external device power supply via USB port.
It is worth noting this function implemented only in Android systems starting from version 3.1.
To make sure your mobile device supports it OTG function or not - you can use small program, which is called USB OTG Checker.

After the program tests your smartphone, it will display one of two messages.
First- in case of a positive result, implying that the device supports OTG technology.
In this case, you will see the following message on the monitor screen:

If your mobile device does not support the OTG function, you will see the following information window:

In the case with a positive result, you need to purchase a special adapter from a retail chain that allows you to connect an external drive (flash drive) to Micro socket USB of your mobile device.
Some manufacturers took care of this in advance and equipped their smartphones with a proprietary OTG cable.
If you want to connect several at once external drives or other devices to your smartphone - you will have to use a USB HUB.

Currently, it is quite possible to find a flash drive on sale that has both USB and Micro USB plug. It is quite convenient, as it allows you to avoid using an OTG cable.

Connecting a flash drive in OTG mode
Read also: TOP 12 Best memory cards for smartphones, cameras and DVRs | Review of popular models + Reviews
It’s impossible not to talk about such a useful technology as connecting a flash drive in OTG mode. Among its advantages is the fact that it is supported by most devices.
So the user does not have to suffer for a long time trying to connect an external flash drive to the gadget.
With one small cable, you can easily synchronize your existing devices for fast data transfer.
Such an adapter is inexpensive, so anyone can easily purchase it and try it. Here are two ways to check for OTG mode:
- Check out technical characteristics specified by the manufacturer.
- Having purchased suitable device, check its performance in practice.
If the gadget is not able to see the flash drive, we can say that the manufacturer, for his own reasons, deprived the device of such an ability.
VIDEO: How to connect a flash drive (disk) to NTFS via OTG on Android
How to connect a flash drive (disk) to NTFS via OTG on Android
Connecting a flash drive to a smartphone: Four ways (plus bonus)
Connecting a flash drive using USB
Read also:SIM card and memory card - How to install in one slot?
For many modern devices running Android OS, there is a standard micro-USB connector. So connecting a flash drive to a smartphone is very simple.
The flash drive will work on the device if On-The-Go technology is loaded. Manufacturers have been introducing a similar function into the gadget since the latest version.
Usually installed in modern mobile devices micro USB connector, so the user cannot do without a USB cable and an adapter for a flash drive.
Most manufacturers include adapters for flash drives. If you don't have it, you'll have to purchase it from a digital store.
If you cannot find a micro connector on the device, then most likely you will need to purchase not only a cable, but also a special adapter.
Of course, this will be quite inconvenient, since for a successful connection additional device you will have to use several cables. However, this is the only option possible in in this case connect the flash drive.
It is also worth mentioning the opening of an additional device. You can cope with this task by downloading one of the file managers.
Often it is already installed by the manufacturer along with a certain set of programs. If there is no file manager, you will have to install it.
Regarding Android smartphones- the most common are Total Commander and FX File Explorer. The user can choose the application he likes.
Connecting a USB flash drive to an Android device using StickMount
Read also:Formatting MicroSD, write protection and how to remove it - All methods
If the user has access to a mobile device, then he can automatically install a flash drive with access to it from any file manager.
For this you can use free application StickMount(if you wish, you can use a paid Pro version, which is also available on Google Play).
DownloadAfter connecting the gadget, open StickMount and give this application superuser rights.

After these steps, the user will have access to the files downloaded to the flash drive, which will be located in the corresponding folder in the file manager.
Support for a variety of file systems is affected by the device and its firmware. Most often this is fat or etxt2.
Various file systems from Linux are often used. Be sure to take this into account when connecting a flash drive.
You don't need them to work with them. root rights on the device. It's just that downloading them is paid. Further, they will be discussed in more detail.
USB Media Explorer
Read also:How to remove write protection from a USB flash drive - Solving basic problems
Among the main features of USB Media Explorer (formerly Nexus Media Importer), it is worth highlighting the fact that free memory for user information is limited.
But it is capable of quickly streaming the contents of any flash drives that are connected to USB wire to the device used in the form of conductors.
Please note that this may cause possible problems in the process of applying the add-on on Android 3.x.
For this device to work correctly, you need the following:
- Gadget controlled Android system O. Included in damaged lists similar devices includes Google Nexus 5 and Moto X. It also consists of Galaxy Nexus and Motorola Xoom. Try using the free Nexus Motorolla Xoom first if your device is not on this list and is not supported due to hardware limitations.
- You can't do without a USB cable, which costs about $10.
- You will also need a card reader with a built-in memory card. Before connecting an external hard drive or another device, be sure to go to the official website and read the instructions.
Before using NMI without an Internet connection, activate the license.
To do this when the Internet is connected, you just need to launch the installed application.

Read also:How to connect a modem to an Android tablet (Android) The easiest ways in 2018
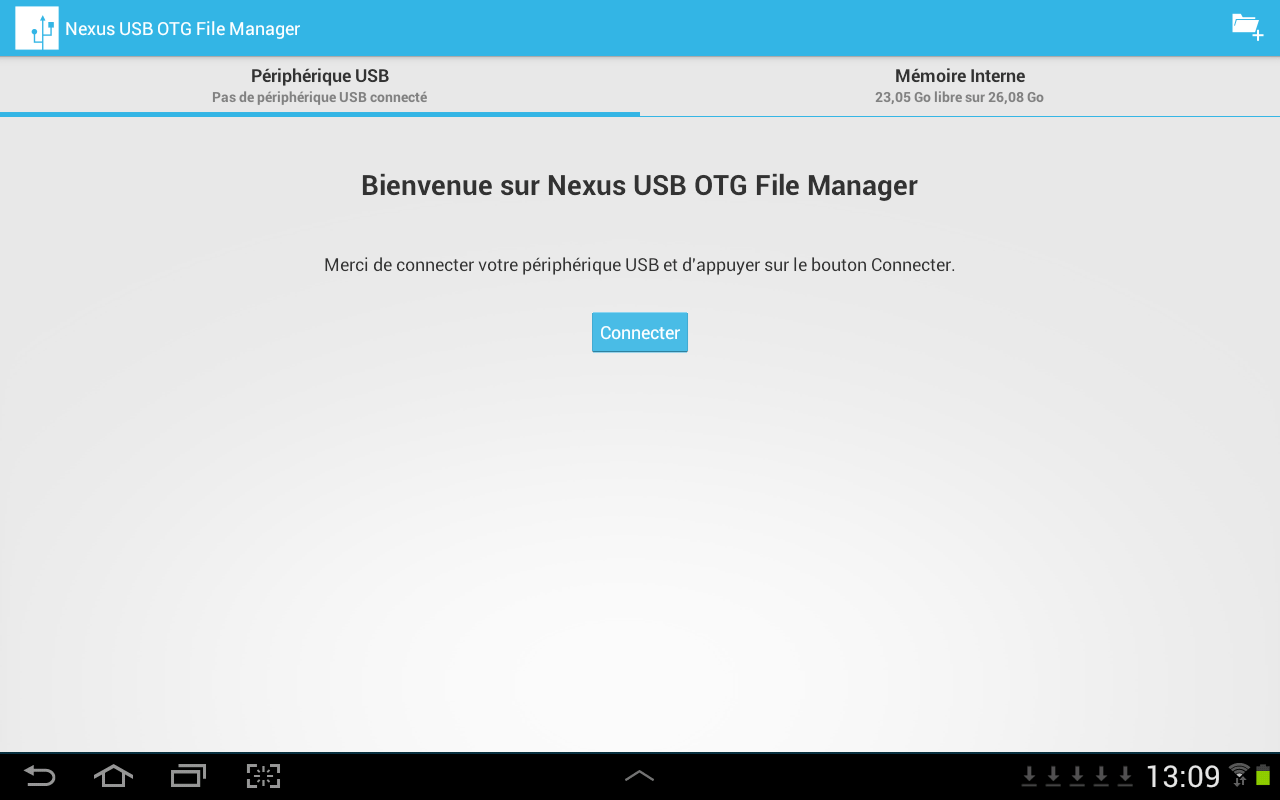
Using the Nexus USB OTG app File Manager you can easily copy files to a storage device that has a file storage FAT system 32. To do this you need to use a USB port.
As a result, the user will have the opportunity to work with documents, not only in internal memory, but also on a USB gadget.
He will be able to edit names various files, as well as add and remove necessary folders.
A similar application was developed by the creators of Nexus products equipped with an On-The-Go port. As an example, we can cite Nexus 5 and 7.
However, this program can work with any other devices, including different versions Android.
This add-on also has large number new opportunities. Yes, it can open necessary files directly from USB and does not transmit data to the Internet.
Thanks to Advanced More, the user has access to all documents from his device.
Advanced users will certainly appreciate this feature. Such an application is the property of Google.
Also, using this application, the user can easily download various modern games for android. They can be downloaded from websites that specialize in games.
Working with this program is a real pleasure and satisfies the user's needs.
It may be possible to recover lost, deleted or formatted files (such as photos, movies/videos, audio) from your device using our Android® recovery software.
Two of our best data recovery software packages are, And .
Like all our programs, they are available as a free trial/evaluation.
Just run trial version to see if the program can find the missing files.
These programs also work very well on other forms of digital media, such as flash drives, SD cards, etc..
You will need to connect the device to computer USB in Android Mass Storage mode.
If you don't know how to do this, the steps below outline how to do this with different versions of Android®.
For Android® version 2.3x (Gingerbread), while in old version Android®. There are still a number of devices using this version of Android, for example some tablets and some more early telephones Android®:
- Include USB debugging by clicking on Menu>Settings>Applications>Development>USB debugging
- Connect USB cable to your computer, and then connect it to your Android® device. If the connection is successful, the USB icon will appear in the device status bar.
- From your device's home screen, use your finger and pull down the status bar at the top....this is called curtains.
- Then, touch USB Connected
click to enlarge
- Then, touch Connect USB Storage, then click Fine.
- When the green Android® icon changes from green to orange, the Android® device is now in Mass mode Storage USB and should show up on the PC as a USB drive in devices with removable media, and it will be assigned a drive letter,.

click to enlarge
For Android® versions 4.0 – 4.1 (Gummies), which also covers some Kindle Fires:
- Go to Settings>More…
- IN to a greater extent, click on USB Utilities.
- Then, touch

click to enlarge
- Go to Settings>More…
- To a greater extent, click on USB Utilities.
- Then, touch Connect to computer for storage
- Now, connect the USB cable to your computer and then to your Android® device. A screen will appear with a green Android® USB Connected icon on the screen. Click OK. If successful, Android icon® will turn orange. Your device should appear on your PC as a drive USB disk in devices with removable media, and it will be assigned a drive letter,.
click to enlarge
For Android® version 4.2 (which is still Jelly Bean, although updated from 4.1) there is no debugging option. There is, however, a way to enable this option....it is only that the path is closed.
- Go to Settings>About the phone (tablet)…
- Go to Build number At the end of the scroll list
- Click on Build number 7 fast time. After the third tap, you should see a message saying that you only have 4 more pressures to become a developer. Continue until tapping after the 7th tap.
- Now, Developer Options will include USB debugging in the list of options. check the box next to it so that it is selected.

click to enlarge

click to enlarge
- Now, connect the USB cable to your computer and then to your Android® device. Your device should appear on your PC as a USB drive in devices with removable media, and it will be assigned a drive letter.
For Android® versions 4.3 and above, you will only need to plug the USB cable into your PC, then connect it to your Android device. Wait just a few seconds and it will connect. The USB icon will show in the status bar at the top. Then, pull down the “curtains” in the status bar, and select to connect as a drive.
After any of the above scenarios, after your Android® device shows as removable storage on your computer, start your recovery software, and select the drive letter assigned to your Android devices as the media device you want to restore. As usual, you will be asked to select removable media in the device, such as MicroSD cards. You can, however, also see the phone/tablet listed. Select the device you want to restore and start restoring.