Creating a menu in a VKontakte group step-by-step instructions. Lists can be either numbered or bulleted. Announcements of new videos, albums, events
And today, I decided to continue this topic and talk about how to create VKontakte graphic menu. After all, not every webmaster who wants to beautifully design his group will be satisfied with a text menu. Now, perhaps, a graphical menu is more relevant, since various images are perceived much better by visitors than text links. And with the help of graphics you can create something really beautiful and colorful.
Where to start?
Well, naturally, you should start by selecting suitable graphics or drawing a menu from scratch. Of course, not everyone can draw a menu from scratch. But the problem can be solved, as in world wide web full of various graphics, both free and paid, with which you can implement your plans. On at this stage, I won’t go into details, since it’s not difficult to find pictures on the Internet, and I don’t know how to draw. Let me start right away with the fact that we already have suitable graphics, but what to do next is not clear?
After you have downloaded or drawn the menu, you need to cut it. What is this for? This is necessary to create separate links for a particular image. Since, if our menu is placed entirely in a group, then it will not be possible to create more than one link, or I don’t know something. In addition, our menu needs to be adjusted in size, that is, it’s immediately worth considering that the maximum visible width is 388 pixels (one image), and the rest will either be cropped or adjusted to the dimensions that you specify when creating the menu in the group, while the image may stretch or, on the contrary, shrink, which can spoil the original idea. It is also worth considering that, for example, for a horizontal menu we will have to focus on a width equal to 370 pixels, otherwise the menu will not line up horizontally.
So, I will show, for example, the most common buttons. I will do all manipulations with graphics using Photoshop, so I recommend that you use it too. After we have sorted out the sizes, all that remains is to cut the menu. For this, you can use convenient tool"cutting"

Simply select the required areas with these tools, for example:
And save it for web devices.

In the window that appears, we can select the image format, its quality and much more. IN in this case I will choose the format: JPEG and best quality, and I’ll leave the rest as it is and save the VKontakte graphic menu.

Let's go to our group page. And we do some preparatory actions: In community management, we connect “materials” and save. If something is not clear at this stage, then read the article about the VKontakte text menu, everything is detailed there, it is said about it.
After this, we need to upload our pictures that we received when cutting out the menu. That is, click “add photos”.


Once the images are uploaded, we can start creating the menu. To do this, click on “edit” next to the latest news.

And now, we can add the code for our menu. In my case, it will look like this:
So, let's take a closer look at what's going on here:
photo-48249652_297601976 - the path to our image. The path is formed as follows: album number_number of the photo itself. How to find out the path to our image? It's very simple. We go to the photo album in which our pictures are located and click on desired image. Then, in address bar we will see the full path to our image.

130x46px;nopadding; — image options: 130x46px; - the width and height of our image (may differ from the size of the image itself) - for a vertical menu on VKoktakte it is not necessary to indicate; nopadding; - no spaces - when using this option, all spaces (indents) are removed and the images are merged into one.
Here's what I got:

The horizontal menu on VKontakte is done according to the same principle. The only difference is that when writing code, new menu items do not need to be placed on a new line. And also, do not forget that with this arrangement of images, we can only use 370 pixels of width. I slightly corrected the code shown above and this is what I got:
[][][]
And this is what it looks like:

And I would also like to add: There are situations when we need to insert a picture into the menu, but it should not be a link. It should serve as decoration. To do this, just use the “nolink” option. Here's a good example: Same horizontal menu, only the first button is not active link, but is a simple picture.
[][][]
Well, that's basically all. As you can see, making a graphic menu on VKontakte is not difficult, the most important thing is to draw it. And then, using all the knowledge gained in this article, you can do best menu, for your VKontakte group. And I want to note that horizontal and vertical menu can be combined, thereby achieving absolute uniqueness.
Now any manipulations in VKontakte groups (menu, navigation, pagination, news, etc.) will be much easier to perform, for this you just need to study my Video course on technical secrets VKontakte groups. You asked for video lessons, and I recorded a whole video course - take it!!!
Happy experimenting!
In this article I will tell you how to beautifully design a group in contact. Agree, the more beautiful the group, the more pleasant it is to subscribe to it. At the same time, the group will have a convenient menu that you just want to go to and view its contents.
Less talk, let's start creating menu for a group on VKontakte.
First, you need to actually create the group itself, as I wrote in a previous article.
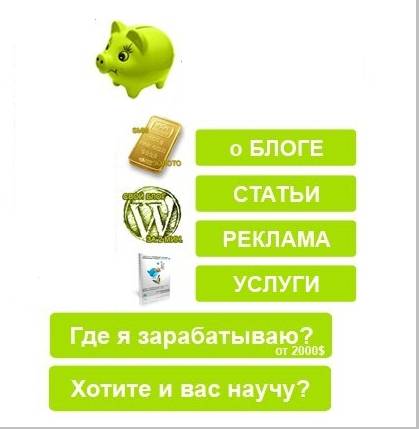
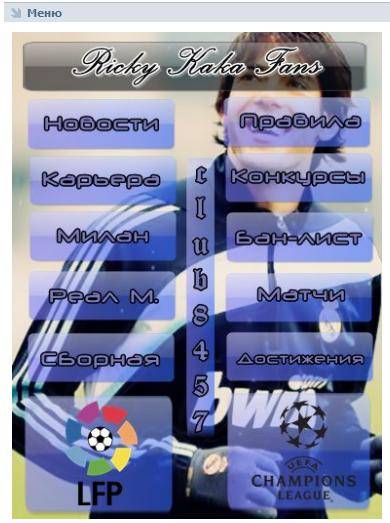
And so, it all starts in Photoshop, we create a picture of the menu you want. Basically, this is some kind of background with the names of the headings. A friend just asked me to do it beautiful group for his company aero-stomadent, deals with industrial ventilation, so I’ll do it.
I found a wonderful backdrop of Alaskan nature, and in fact, I will do everything on it.

We write the menu itself in the background. For example, I write about what the company does. These will be the buttons for which I will later make more pages. Each word will be a menu button in the future.

On the right, make this part the group's avatar in the future.
![]()
Now the mode is picture to small images. Select the "Cutting" function from the menu, then right-click on the canvas and cut so that each word is separate.


It is advisable to cut it approximately like this.

After cutting, we save the file, not just but through “Save for Web and devices...” (or Alt+Shift+Ctrl+S), it will create a folder with all the already cut files.


Now we are not going to the group yet, we still need to create a wiki markup. Or in other words, create a page.
How to create a Wiki page on VKontakte?
Opening new tab browser and insert the following link there: http://vk.com/pages?oid=-XXX&p=Name of page where XXX is your group ID. For example, this happened to me.
http://vk.com/pages?oid=-91934542&p=menu

Then click Fill with content. Here we see a very simple editor, select the camera function to add all our photos to the menu. It should turn out something similar to mine.

But there are spaces between the pictures, to remove the spaces - we enter the wiki markup mode (this is the quotation mark in the top right corner<>) enter the following tag "option;nopadding;" before photo sizes. For example []


And it all came together.

And so, all that remains now is to insert links into each button. Again, everything is done in wiki markup. We drive in previously prepared links to articles that you consider necessary.

Click save, see what happened, everything came together for me, if you click it goes to the links "https://vk.com/page-91934542_49969122"

Then I go to the group and before that I make a picture that will be displayed for people in the group.

And I just post. I paste a link to the menu and add a photo that I just took.
The goal of the creator of a group on social media. networks to attract more visitors. It is important that the guest wants to join, sign, read information, leave a comment or order a product. The need for the final result differs from the direction of activity.
The first seconds of stay form further actions guest. This is why the interface plays a big role.
Factors that leave a guest:
- avatar;
- description;
- Name;
- beautiful and practical menu;
- colorfulness;
- content.
It’s easy to create a practical menu that motivates more than just action. But first you need to figure out what it should be.
What should the menu be like?
Using a well-designed menu, the visitor can easily navigate through it and quickly get answers to their questions. Navigation also allows you to create the right impression of the project.
Three main goals of groups:
- sales;
- increase in traffic;
- increase in active visitors.
For sales, group navigation replaces in-store display.

The most important buttons should be here:
- catalog;
- price;
- delivery;
- promotional offers;
- reviews.
To increase traffic, the emphasis is on the content and flavor of the site or blog.

An approximate set of buttons:
video: menu for public
Working with Photoshop
Before you begin, you need to visually visualize the design or general view, as well as its components. No special knowledge is required, just follow the steps of the instructions.
Algorithm of actions:


This is done using the Rectangular Marquee tool:

Working with graphics:

It should look something like this:

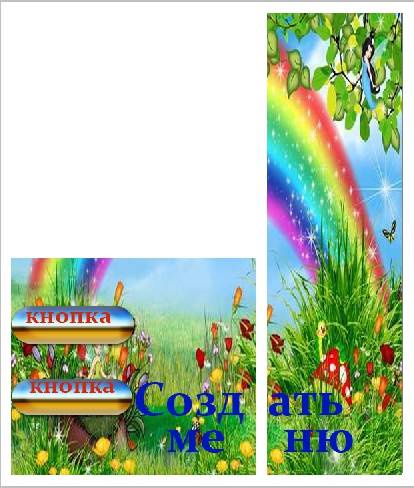
Save the rectangle located on the right as a separate image, setting the size to 200x500 pixels. This is a ready-made avatar, uploaded through the “Upload photo” button in the VK group.

The second picture still needs to be divided by the number of points. This is done in order to assign a link to each button.
First you need to make the markup:

Create fragments:

Saving images:

Technical part
Finished images must be transferred to the group. By following the steps below, this task can be easily completed.
Important! Uploading a menu differs from usually uploading photos or pictures.
Everything in order:

Now the most important thing is why all this was done. Add menu functionality. A separate image must be assigned its own link.
- find the required entry;
- left-click on it;
- copy the URL in the address bar.
- go to the source where you need to transfer the visitor;
- copy the required address.
Save the changes using the corresponding button at the bottom of the window.
Attention! Changes may not be reflected immediately. It is recommended to log out to your main profile and then log back into the group.
How to create a menu in a VKontakte group wiki markup
Wiki markup is special language, used to design web pages in social network groups.
 This tool allows you to create:
- effects;
- unusual menus;
- signs;
- navigation elements;
- format text.
In a word, this markup allows you to create a mini VKontakte website. This is very convenient, especially for sales and recruiting subscribers.
This design intuitively forces the visitor to stay and click on the button. That is, it delays and stimulates action - and this is exactly what is needed.
Visually, such a system is very similar to HTML layout. But it does not require long training and a special mindset.
Video: menu with search by category
Nuances of creation
Actually, what was done above (dividing and loading the image) are already markup elements. This is the advantage of this tool. Automatic conversion into tags when simply loading images.
However, it is important to know the individual tags that help you do more more features and beauty. For example, when we fill individual parts of the image, white stripes may form between them. You can remove them by simply adding the noborder tag.
Like this: []
The main tags are presented in the table below:

Photo: tags used for marking
Working with pictures
Where options is replaced with:
- noborder- removing the frame around the image;
- nopadding- removing spaces between images;
- plain- insert a link to the image. Designed as text, without graphics;
- nolink- removing the link to the picture;
- box- opening an image in a window;
- NNNxYYYpx or NNNpx- sets the photo size in pixels.
Creating a table
Regardless of what kind of menu (text or graphic) you create, you are unlikely to do without inserting a table. Otherwise, you can just paste the text into the news field and not format it, wasting so much time.

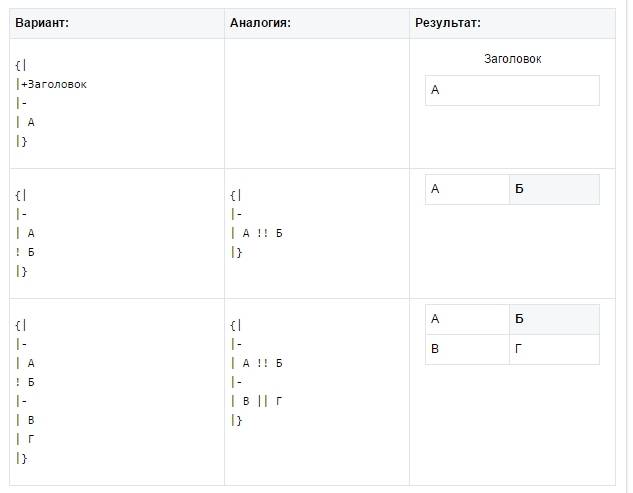
A table is created using a special set of characters, where each of them is responsible for a specific part of the table:
- {| symbol of the beginning of the table, without it there cannot be a table. Always used;
- |+ is responsible for positioning the table title in the center. Placed after the characters at the beginning of the table. Use as desired;
- | denotes the beginning new line and cells;
- | a character that makes the cell transparent;
- ! makes a cell dark color. If it is absent, the previous sign must be used;
- |} means the end of the table. The optional character, however, is used to prevent an error from occurring.
When filling out a table, the contents of each cell must be placed after the | sign, and when separating cells, you need to duplicate the row types like this: || or!!.
Markup features
There are many unwritten rules, and this causes a lot of trouble for novice programmers. As a rule, everything is learned through practice. Everyone finds their own loopholes, everyone faces their own difficulties.

In order to avoid basic mistakes, you should familiarize yourself with the main ones:
- you need to be careful when resizing the picture - if it is less than 131 pixels, its quality will deteriorate significantly;
- The width of the image should not exceed 610px;
- It is prohibited to place more than 17 unclosed tags on one wiki page;
- when changing the width of the image, its height changes automatically and proportionally;
- a list inside a table should be created using a tag
; - There should be no more than 8 list elements in one line of markup.
To create beautiful and functional navigation, you need to know the basics of Photoshop and wiki markup. However, the latter contains its own nuances, which, when faced with by a beginner, can get stuck and confused for a long time.
Important! Check that all tags are closed. Keep it consistent.
The main assistant in this matter is attentiveness and strict adherence to instructions. Can always help official page VK, which is called wiki markup.
The goal of the creator of a group on social media. networks to attract more visitors. It is important that the guest wants to join, sign, read information, leave a comment or order a product. The need for the final result differs from the direction of activity.
The first seconds of the stay shape the guest’s further actions. This is why the interface plays a big role.
Factors that leave a guest:
- avatar;
- description;
- Name;
- beautiful and practical menu;
- colorfulness;
- content.
It’s easy to create a practical menu that motivates more than just action. But first you need to figure out what it should be.
What should the menu be like?
Using a well-designed menu, the visitor can easily navigate through it and quickly get answers to their questions. Navigation also allows you to create the right impression of the project.
Three main goals of groups:
- sales;
- increase in traffic;
- increase in active visitors.
For sales, group navigation replaces in-store display.

The most important buttons should be here:
- catalog;
- price;
- delivery;
- promotional offers;
- reviews.
To increase traffic, the emphasis is on the content and flavor of the site or blog.
An approximate set of buttons:
- interesting articles;
- useful information;
- subscribe;
- reviews.
To increase the activity of participants, you should stimulate them with promotions, surveys and interesting and unusual content.
We offer the following buttons:
- subscribe to news;
- ask an interesting thematic question;
- stock;
- questionnaire;
- vote.
Let's look at how to create a menu for a group in contact, that's all technical points that require minimal knowledge graphic editor and basics of working with VKontakte.
We create in stages
Creating navigation is an interesting, complex and lengthy process. But the result is worth it.
The whole process is divided into 2 stages:
- working with photoshop;
- technical addition.
video: menu for public
Working with Photoshop
Before you begin, you need to visualize the design or overall appearance, as well as its components. No special knowledge is required, just follow the steps of the instructions.
Algorithm of actions:


This is done using the Rectangular Marquee tool:

Working with graphics:

It should look something like this:
Save the rectangle located on the right as a separate image, setting the size to 200x500 pixels. This is a ready-made avatar, uploaded through the “Upload photo” button in the VK group.

The second picture still needs to be divided by the number of points. This is done in order to assign a link to each button.
First you need to make the markup:

Create fragments:

Saving images:

How to clean your computer from unnecessary programs? Instructions here.
Technical part
Finished images must be transferred to the group. By following the steps below, this task can be easily completed.
Important! Uploading a menu differs from usually uploading photos or pictures.
Everything in order:

Now the most important thing is why all this was done. Add menu functionality. A separate image must be assigned its own link.
- find the required entry;
- left-click on it;
- copy the URL in the address bar.
- go to the source where you need to transfer the visitor;
- copy the required address.

Save the changes using the corresponding button at the bottom of the window.
Attention! Changes may not be reflected immediately. It is recommended to log out to your main profile and then log back into the group.
How to create a menu in a VKontakte group wiki markup
Wiki markup is a special language used to design web pages in social network groups.

This tool allows you to create:
- effects;
- unusual menus;
- signs;
- navigation elements;
- format text.
In a word, this markup allows you to create a mini VKontakte website. This is very convenient, especially for sales and recruiting subscribers.
This design intuitively forces the visitor to stay and click on the button. That is, it delays and stimulates action - and this is exactly what is needed.
Visually, such a system is very similar to HTML layout. But it does not require long training and a special mindset.
Video: menu with search by category
Nuances of creation
Actually, what was done above (dividing and loading the image) are already markup elements. This is the advantage of this tool. Automatic conversion into tags when simply loading images.
However, it is important to know the individual tags to help add even more functionality and beauty. For example, when we fill individual parts of the image, white stripes may form between them. You can remove them by simply adding the noborder tag.
Like this: []
The main tags are presented in the table below:

Working with pictures
[] .
Where options is replaced with:
- noborder- removing the frame around the image;
- nopadding- removing spaces between images;
- plain- insert a link to the image. Designed as text, without graphics;
- nolink- removing the link to the picture;
- box- opening an image in a window;
- NNNxYYYpx or NNNpx- sets the photo size in pixels.
Creating a table
Regardless of what kind of menu (text or graphic) you create, you are unlikely to do without inserting a table. Otherwise, you can just paste the text into the news field and not format it, wasting so much time.
A table is created using a special set of characters, where each of them is responsible for a specific part of the table:

The group menu is an interactive list of the main sections of the group, allowing you to go to the desired item in a second. How to make a menu in a VKontakte group? We tell you how to achieve a functional layout of blog sections.
- Join the group.
- Under your avatar, go to the “Community Management” section.
- Several items will open (photos, documents). Go to the “Materials” section by clicking on “Restricted”. This is a necessary measure: otherwise (if open access) anyone can create new pages by messing up the group menu.
- Return to the community home page. Remove pinned posts. Reload the page.
- Open the section called “Latest News” (it is located directly below the community description). You will see that the “Edit” item has appeared next to it.
- In the editing window that opens, select the wiki markup mode. It is selected by clicking the button on the right. Hover your cursor over it: the name of the mode you are currently in will be displayed.
- You can start editing. We change the basic title of the heading (“Latest News”) at our own discretion. Will do brief description: “Group menu.”
- To make new items, write the section names in a column, highlighting them with double square brackets. For example: [[Prices]], [[Contacts]].
- The “Page Preview” button will show you what the group menu looks like.
How to make a VKontakte group menu with buttons
Graphic buttons are often used by content managers, administrators, and moderators when creating a VKontakte group: it’s quite convenient. This technique holds the attention of even a casual visitor, “forces” him to stay on the page, study its content in detail (and even subscribe to updates). We answer the question: how to create a menu in a VKontakte group?
- Choose any a bright picture, which fits into the theme and style of the blog. Then upload it to a photo album on your personal page or to a community album.
- Find it in the photo album, copy the link to the photo in the address bar of your browser.
- Open the group editing mode as described in the previous section of the article. Requires wiki markup mode.
- We write code. photo-AAAAA_BBBBBB - paste this link from the photo address. Next: |400px| (image width, you can choose any value, up to 600 px). And finally, a working link - copy it to current line browser.
- Enclose what is written in doubles square brackets. Final link type: [].
How to make a group menu with pictures
A difficult task: how to design buttons in a group without using Photoshop? Not everyone knows how to masterfully use graphic editors. Ready-made images from the Internet will come to the rescue.
- Upload the necessary photos directly to the community photo album. If you want to “paint” text on them for greater expressiveness, do this in the Paint editor in advance.
- Select the section called “Latest News”, then move the cursor over the item with editing.
- Find on working panel“Add Photo” button (with a camera icon). If you decide not to upload photos directly to the group album, you can do so directly here by downloading the images from your computer.
- After the download is complete, you will see: links to photos have appeared in the text field.
- Put forward slash | at the end of each link, and after it indicate the address of the necessary pages to which the picture will be attached (link to video albums, photos, audio...).
- Having completed these manipulations, enclose the resulting links in double square brackets.
- Click on the preview button. If everything is ok, save the changes.
- Press the buttons in the menu to make sure everything works.
How to make a graphic menu in a group
If you want your group menu to look stylish and attractive, it’s time to think about graphic menu. Creating a menu in a VKontakte group is a rather long process if you are encountering it for the first time. The more clickable items in a menu, the more difficult it is to manage. What to consider?
- The width of the image should be no more than 370 px, maximum 390.
- The future menu should be cut into strips in Photoshop. Upload the resulting images to your account album.
- Click the “Latest News” section, the “Edit” button.
- Find the camera icon, upload pictures. You will see the download code for each image in the text field.
- Now you need to assign a link to each image. If you would like it to link to a community wall post, find it and copy the URL. If you need to go to another site, copy its address.
- Separate the image loading code with a forward slash | and paste the link after it.
- Save changes and preview.
How to make an interactive menu in a group

Many sales sites create interactive menu on home page. The effect of a pressed button, special highlights, underlining keys - effects make the site attractive to buyers. If you run a VKontakte business account, you will need the ability to create an interactive group menu.
- Create a document in Photoshop by placing an image with a menu header there.
- Design the navigation line: you can write the main sections of the future menu (“About us”, “Prices”, etc.) on a white background. Highlight them in different colors if necessary.
- Cut each picture so they are framed individually.
- Go to the VKontakte website (group, section “Latest news”, “Edit”, wiki markup mode).
- Upload photos from your computer.
- Copy the address desired page, insert it into the image code using a forward slash. A separate wiki page is created for each image.
- Clicking on these links will open the corresponding sections of the community. After the transition, you will see the “Fill with content” item. Load the same buttons, but with a different color order.
Ready! Now the buttons will begin to change color when navigating to different sections of the community.