Installing Android via recovery. Installing new firmware. CMD installations in FastBoot mode
In the last article I talked about. Today we will continue this topic and talk in detail about custom modes recovery, their advantages over stock ones and how to install them.
What is custom Recovery
Custom recovery is essentially an extended version of the recovery mode in smartphones and tablets. Its main advantage over the stock one is the presence of features that manufacturers usually hide from users in order to protect their devices from “those who like to experiment.”
With custom recovery you can:
- Make backup copies of various sections of the device’s memory or the entire firmware and restore them accordingly (Backup and Restore items)
- Install unofficial firmware(Custom Rom)
- Install unofficial add-ons and patches via the “install zip from sdcard” item
- Format various memory partitions (Among them are partitions such as: boot – boot partition, system – system partition, data – user data, cache – application cache, sdcard – memory card)
- Create new partitions on the memory card
The most common versions of custom recoveries are CWM (developed by ClockworkMod) and TWRP (developed by TeamWin). Both of these consoles have almost equal functionality and the choice of one or another recovery is usually determined by which one is easier to install or by the banal absence or presence of device support.
How to install CWM Recovery
Installation via RomManager
The easiest way to install CWM is to use the RomManager application. This application can be installed for free from Google Play, and flash CWM from it by selecting “Flash ClockworkMod Recovery” in the main window. From there you can reboot the device into recovery mode by selecting “Reboot into Recovery”. Please note that RomManager requires Root to operate. You can read how to get it.
Attention! Before installing recovery via RomMnager, be sure to check if your device model is in the list of supported ones here https://clockworkmod.com/rommanager. With rash actions you can turn your device into a “brick”!
Installation via Fastboot mode
The “classic” way to install recovery is to flash the recovery.img file directly into Recovery section your device via FastBoot mode. This method, unfortunately, cannot claim universality, because It requires an unlocked bootloader. But, firstly, it is not possible to unlock it on all devices, and secondly, not all devices have a Recovery section.
However, if your device meets all necessary requirements, you can safely use further instructions.

How to install TWRP Recovery
Installation via TWRP Manager
The easiest way is TWRP, similar to CWM, you can install it using special application TWRP Manager. Here you will also need Root rights.

Installation via ADB
Similar to FastBoot, TWRP can be installed via ADB
- Download and install the Android SDK, including Android packages SDK Tools, Android SDK Platform tools and Google USB Driver
- Download the Recovery.img file from the TeamWin website (http://teamw.in/twrp_view_all_devices) by selecting your device from the list.
- Rename it twrp.img and copy it to the root of your device's SD card
- Connect your device to your computer via USB
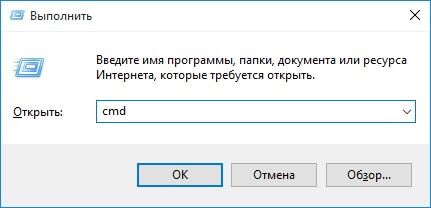
- Run command Windows string by typing “cmd” in the “Run” field in the “Start” menu
- In the window that opens, enter “cd C:\android-sdk-windows\platform-tools\adb”
- Enter the following lines:
su
dd if=/sdcard/twrp.img of=/dev/block/mmcblk0p34 - Reboot your device
Also, TWRP can be installed via FasBoot, in exactly the same way as I described for CWM.
What to do if your device is not on the supported list
Most often, in the absence official support developer, volunteers assemble their versions of CWM. The methods for installing them can vary greatly; it can be installation from an SD card, firmware via Flashtool or Odin (in the case of Samsung devices). On devices with a locked bootloader, installation can also be performed through third-party applications.
You can find out if it is possible to install a custom recovery on your device and how to do it in special branches on the Russian-language portal 4pda, or the global English-language portal
Today we will talk about how to install custom recovery on your line device Samsung Galaxy. I will only talk about TWRP recovery, since it has a huge number of advantages over its analogues. Also, the developers of this project offer a simple and convenient way installation, which involves using the Odin utility. You don't even need superuser rights (Root). This instruction Suitable for all smartphones and tablets from Samsung: Galaxy S5, S6, Note 4, Note 5 and any other models.
It is worth noting that after installing a custom recovery, you will not be able to install official ones. Samsung updates, downloaded “over the air”. Back up your data to mobile device so that if problems arise, you don’t lose them forever. I recommend saving contacts in the cloud of your Google account, and photos, videos and documents on your computer.
What you need to do before installing TWRP recovery via Odin:

Check before starting installation to make sure you haven't forgotten anything. Each of the above steps is very important.
How to install TWRP recovery on any Samsung Galaxy smartphone or tablet:

Ready! To enter TWRP recovery, you need to hold down the “Volume Up”, “Home” and “Power” buttons while the device is turned off, and release the buttons after the logo appears.

Now you can use the new recovery to install custom firmware, backup and restore installed firmware and much more. Through TWRP you can also clear cache memory, do a factory reset, or even wipe internal memory devices.
Because the topic Android firmware devices is very relevant, I decided to write about installation CWM Recovery Android smartphone or tablet. There are several ways to do this: for some, all actions are performed on the device itself, but this requires root rights, while for others, a computer is used to install custom recovery. Whatever seems easier or more convenient to you, use it.
Method 1. Installing CWM Recovery via ROM Manager
The first way to flash Recovery firmware is to use the ROM Manager program, which we already talked about in the article:. This application has a separate item that allows you to install in a couple of minutes ClockWorkMod Recovery.
I would like to point out right away that for work ROM Manager required root rights. You can read how to get them and.
After that go to official page https://clockworkmod.com/rommanager and see if your device is on the list of supported ones.
1. Now open the ROM Manager and select the first item “Recovery Setup”.

2. In the next window, in the “Install or update Recovery” section, select “ClockworkMod Recovery”.


4. At the bottom, click on “Install ClockworkMod”.

5. The download process will begin. At good internet connection it lasts a couple of seconds.

6. At the end of the download, you will be asked to grant root access to the application. Select Grant.

7. That's it! You will see a notification “Successfully flashed ClockworkMod recovery!” Just click "OK".

This is how easy it is to flash CWM Recovery via ROM Manager. Now you can open it and you will find new items in it that were not in the standard one.
Method 2. Install custom Recovery on Android using the FastBoot utility
All the steps described below are the same as installing TWRP Recovery:.

Unzip the folder to the “C:” drive – there will be “tools” inside, and the “android” file in it. Launch it.

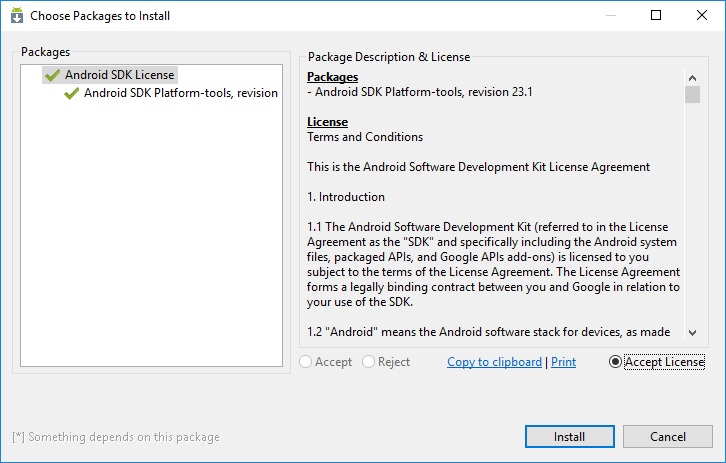
Select "Android SDK Platform-tools" and click "Install package".

Check the “Accept License” checkbox and then click “Install”.
After installation is complete, in the “tools_” folder version-windows" "platform-tools" will appear, and it contains "fastboot" and "adb". They will be useful to us later.
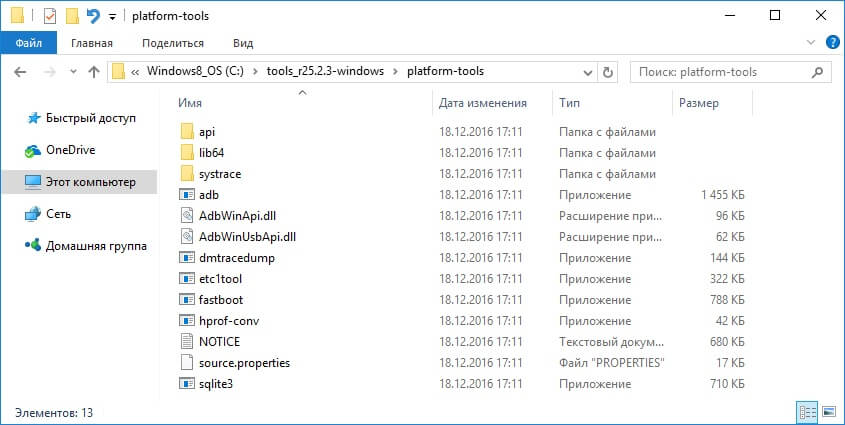
UPD: The “platform-tools” folder on my computer is in a different directory than yours. The fact is that this article was written back when there was an installer for the Android SDK. Starting from version 25, installation is carried out only from a ZIP archive: because of this, part of the instructions had to be edited. Therefore, the path to ADB and Fastboot is different from mine, everything else remains unchanged.
If you have Sony device, HTC, Nexus, Huawei or LG (some models), then Bootloader is blocked. How to unlock it is described on our website:
- For HTC: ,
Let's start flashing the Recovery firmware:
1. First of all, go to this page and download the version of the “recovery-clockwork.img” file for your device. Please note that most devices have both a touch and classic version. Download the one you like best.
2. Now place the CWM recovery file in the “platform-tools” folder. I also renamed it to “recovery.img” (later you will understand why). I recommend that you do the same.

3. Connect your tablet or smartphone to your computer using USB.
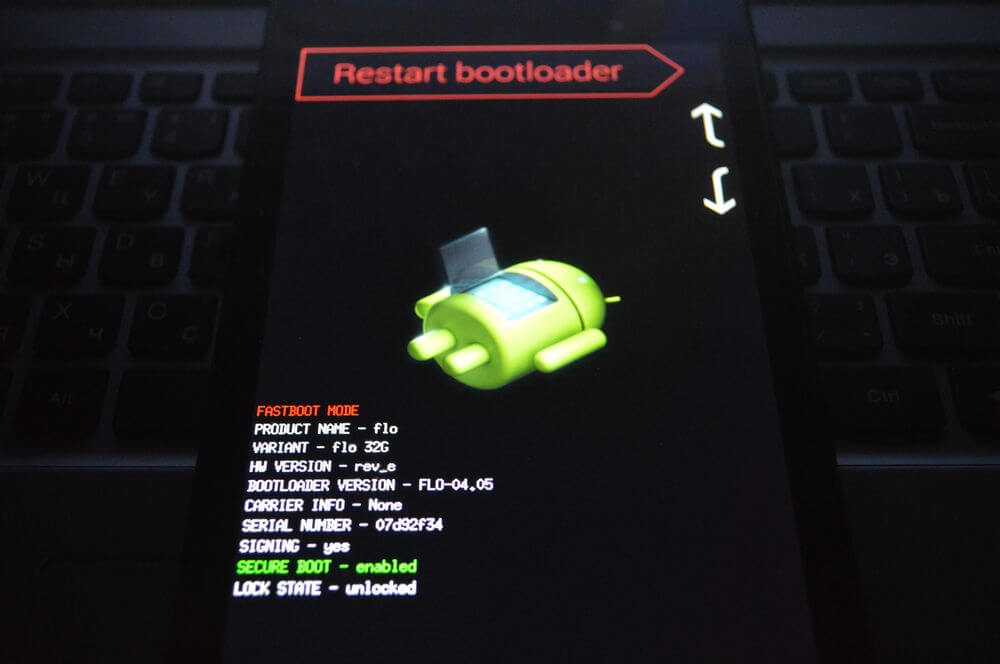
In this case, the device must be booted into fastboot mode. Typically, to do this, with the device turned off, you need to hold down the key combination: Power + Volume Down. But this combination may differ depending on the device manufacturer.
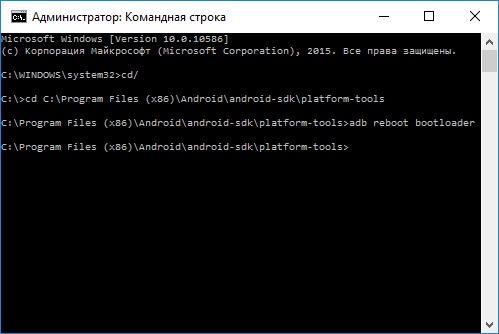
UPD: it’s much easier to switch to fastboot mode as follows: turn on the device, go to command line(point 4 below tells you how to get into it) and enter the commands sequentially, and after each press “Enter”.
CD path to "platform-tools"
I got it like this:
Your path will look different. If you acted exactly according to the instructions, it will come out (in any case, look at the path in the corresponding line of Explorer):
cd\tools_r25.2.3-windows\platform-tools
In the screenshot you can see how I entered the same commands. As a result, the device will boot into fastboot mode.
4. Now open the command line (or skip this item and continue working with it if you just switched Android to fastboot mode through it). The easiest way to get there is to press the key combination “Win” + “R” and enter:
After that, click "OK".
5. You will be taken to the command line.

6. Now you need to specify the path to the folder with the firmware. Type the following command to go back to the folder.
Press "Enter".

7. My path to the recovery folder is: “C:\ Program Files(x86)\Android\android-sdk\platform-tools". So I enter (you enter yours):
cd Program Files (x86)\Android\android-sdk\platform-tools
And press “Enter” again.

8. All that remains is to enter:
recovery.img“recovery.img” is the name of the file being flashed. Remember I advised you to rename the recovery file? We did this for convenience so as not to enter something like “recovery-clockwork-6.0.4.7-flo.img”.
After entering this command, press “Enter” again.
9. As a result, we receive the following message.

Congratulations! You have successfully installed custom recovery (CWM) using the Fastboot utility!
Method 3. Flash Recovery via the Rashr application
This method is also incredibly simple and convenient, but requires root rights. How to obtain them is written at the beginning of the article in “Method 1”.
1. Install the Rashr - Flash Tool application from Google Play, open it and provide Root rights.

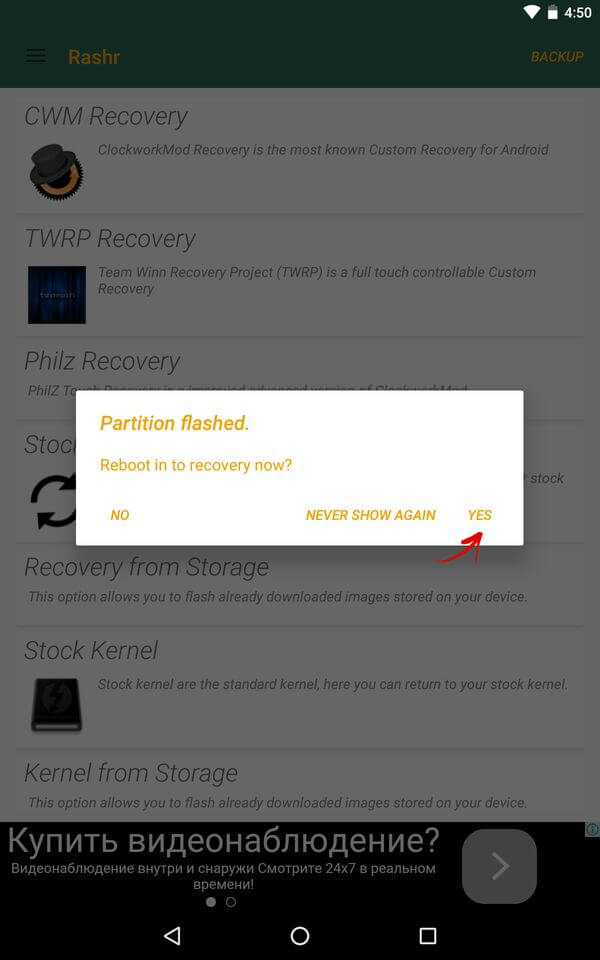
2. In the list of options, select “CWM Recovery”.

3. Then the program will display a list of available Recovery for your device. In my case, Rashr showed 2 options: ClockworkMod with support for taps on the screen and the classic option (controlled by the volume and power buttons).

4. When you see the download prompt, click Yes.

5. Then the download of CWM Recovery for your Android smartphone or tablet.

6. At the end, a notification will appear that the firmware was successful and you now have a modified recovery installed. You can reboot into it and try it out. To do this, click “Yes”.
Perhaps this installation method can be called the simplest. The only thing it needs is root rights.
Method 4. Install Recovery on Samsung in Odin
If you have samsung device, you can install ClockWorkMod Recovery on Android using proprietary utility Odin. Here I will briefly tell you what to do. I recommend reading our article: . In it detailed information about using Odin.
Sooner or later, standard firmware starts to get annoying or glitchy, which is why most users begin to “comb” mobile forums in search of a solution. There, an understanding already comes to mind: to change the firmware, you must first reinstall the recovery. Forum members advise installing TWRP, citing its maximum stable work and the ability to work with touch control. Therefore, it is worth telling how to install twrp recovery on Xiaomi, what problems may arise in this case and reveal options for solving them.
What is it and why do you need TWRP
Actually, this is an abbreviation, and it stands for team Win Recovery Project, thereby saying what the project is: a modified recovery that allows you to do much more than factory utilities. First of all, it is installed by those who want to install custom firmware on their device, which is why TWRP has the same purpose: full backup systems, installation of software, firmware, kernels, full wipes and a bunch of everything that hides the “stock” (factory) menu from the user.
With Xiaomi the situation is standard: the basic recovery is not suitable for installation custom firmware, because the first one simply does not allow you to do this, which is why people come to TWRP. Besides everything previously mentioned, Team Win can completely restore the firmware from a recovery file. So, this is an excellent tool for those who like to play it safe: even if the smartphone “dies” after changing the firmware, it can be “revived” without any problems.
In addition to such killer features, TWRP can provide full-fledged work with device files, creating partitions in memory, approximately like on the HDD of your desktop, connecting to a PC in flash card mode, while starting the system will not be required. It’s very convenient, for example, the wipes have already been made, but no one has transferred the firmware to the storage device, which has happened to your humble servant more than once.
Installing TWRP Recovery
Via the official application
It’s worth starting with the fact that there are several ways. The first, simplest one is to use a proprietary application or its analogues, just remember: for correct operation necessary . In Xiaomi, as a rule, advanced users already have them, all that remains is to give them to the application. Otherwise, you will have to first obtain those same rights, and then think about installing recovery.

The action itself takes place in just a few steps:
- Find the application on Google Play;
- Install it and run it;
- Agree to all permissions, grant root access if this has not been done before;
- Select your device and download the file using the "Download TWRP" button;
- Select the downloaded img file and install it through the "flash to recovery" button.
Here, perhaps, it is worth making a reservation: the name of the IMG file must correspond to the program: usually it is recovery.img, but proprietary applications, like TWRP, may require files to be named in a special way. In the case of Team Win, this is twrp.img, however, before installation, you should carefully read the description of the program, where, most likely, the required name will be indicated.
After such installation on Xiaomi Mi3, for example, the smartphone will automatically start in Recovery mode, from which all manipulations necessary for the user will be performed. It should be noted: stock firmware When installing a custom menu, it will not “fly” in any case, and this applies not only to Xiaomi.
Via fastboot
The second method is a little more complicated: it will require the most basic skills in working with the console and ADB, since the option is recovery installation via fastboot. Your device must be . So, the installation itself is carried out in several stages.
- The first is downloading ADB drivers and unpacking them. Here you should make sure that the path to the file contains only Latin characters, otherwise the console will throw an error.
- We install drivers for your device, taken from .
- Next stage– enable USB debugging. This is very easy to do: first, open the “about phone” item on your smartphone, after which you need to click on the MIUI version 8 times. The message “You are a developer” should appear. If this does not happen, then you either already have access to the developer settings, or the firmware simply does not allow you to do this.
- The next step will be to directly enable debugging, which is done in the “for developers” settings item.

- We run the command.bat file from the ADB folder, issue the command “adb devices” and check whether the smartphone is connected correctly, which may require authorization confirmation on the smartphone screen. If nothing happens during such manipulations, check the device connection and reinstall the drivers. It's better to be safe here.

- Let's launch Fastboot Mode on your smartphone using the command “adb reboot bootloader" After the command, the smartphone should automatically reboot and enter bootloader mode. Now we are ready to install custom recovery.

- Now you need to download the file recovery TWRP. Find your device and go to the "Download Links" section and select "Primary (Recommended)".

- The whole point of the installation comes down to entering the command “fastboot flash recovery twrp.img”. It is worth noting the following: the firmware file you downloaded should be called twrp.img or recovery.img, depending on the ADB version. You can find out where you download the corresponding programs or by reading the readme file, or simply try both options.

That's all, actually, install twrp on xiaomi redmi note 3 pro (in our case) is completed. However, there is no need to rush: you need to start the smartphone in TWRP, for which we press the power and volume down keys. Hold the power button until there is a vibration response, then release it and wait for the installed utility to start.

From here you can boot into the system or start installing custom firmware. All the methods described on the Internet are variations of the first and second described here, especially since there is usually no description of how to enter TWRP, so there is no point in describing them again.
Possible problems
And there is, in fact, only one problem: after the firmware, if the custom is installed on top of MIUI 8 version and newer, many users intensively googled the phrase “how to log into twrp recovery xiaomi", because the possibility of normal entry simply disappeared. This happened due to a conflict between the utility code and the firmware: the file emmc_appsboot.mbn, corresponding to MIUI, the overwriting of which simply does not make it possible to enter TvRP.
The solution is quite simple: you can simply reinstall the recovery. There is only one problem: this action will help for exactly one flashing, which is why the guys from w3bsit3-dns.com found a more reasonable and durable fix.
So, to fix the bug you need to download this file (only suitable for redmi 3, use at your own risk), turn off the phone, press the power and volume down buttons, connect USB cable to the phone and computer, run the file “1 run me.bat” from the archive, which, if executed successfully, should write “OKAY. Finished". After that, disconnect the cable and hold both volume and power buttons for 15 seconds, waiting for vibration. That's all, TWRP should work fine after such manipulations.
Conclusions
You should install the Team Win project only if it is really necessary. It is extremely difficult to ruin a phone with such a thing, but it is possible. By the way, you cannot do without the standard mention that you carry out all manipulations with your devices at your own peril and risk. I hope we were able to convey to you information about Team Win Recovery Project and how to install it. The method, by the way, is relevant for any Redmi and Mi models, even for Mi5 and Mi5s.
If you decide to switch from official Android firmware to a third-party modification of the OS, then in almost any case you will be faced with the need to install a custom recovery on the device.
By default the corresponding software used to restore the gadget to factory settings and update operating system. Custom recovery provides significantly more opportunities. With it you will not only be able to install custom firmware and all kinds of modifications, but also get a tool for full-fledged work With backup copies and sections of the memory card.
In addition, custom Recovery allows you to connect to a PC via USB in removable storage mode, which makes possible preservation important files even in the event of a complete system failure.
There is always a choice and this case is no exception. However, everything here is quite obvious: there are two options, but only one of them is relevant.
CWM Recovery

One of the first custom recovery environments from the ClockworkMod development team. Now the project is closed and is supported only by individual enthusiasts for a very small number of devices. So, if CWM is the only option for your gadget, below you will find out how you can install it.
TWRP Recovery

The most popular custom Recovery from the TeamWin team, which completely replaced CWM. The list of devices that support this tool is truly impressive, and if official version for your gadget no, most likely there will be an appropriately adapted user modification.
How to install custom Recovery
There are a number of installation methods modified recovery: some involve performing operations directly on a smartphone, while others involve using a PC. For some devices it is absolutely necessary to use special software- for example, Odin program for Samsung smartphones and tablets.
Firmware Alternative Recovery- The procedure is quite simple if you follow the instructions exactly. However, such operations are potentially dangerous and responsibility for all problems that arise lies solely with the user, that is, with you. Therefore, be extremely careful and attentive in your actions.
Method 1: Official TWRP App
The very name of the application tells us that this is an official tool for installing TeamWin Recovery on Android. If the device is directly supported by the recovery developer, you won't even have to download it first installation image- everything can be done directly in the TWRP App.
The method assumes that you have Root rights on your smartphone or tablet. If there are none, first read the relevant instructions and follow the necessary steps to obtain superuser privileges.
- First, install the application in question from Play Store and run it.

- Then attach one of the accounts to the TWRP App.

- Check the boxes "I agree" And "Run with root permissions", then click "OK".

Tap the button « TWRP Flash» and grant the application root rights.

- Next, you have two options. If the device is officially supported by the recovery developer, download the installation image using the application, otherwise import it from the smartphone’s memory or SD card.
In the first case, you need to open the dropdown list « Select Device» and select the desired gadget from the list provided.

Select latest version Recovery IMG image and confirm going to the download page.

To start downloading, click on the link like "Download twrp-*version*.img".

Well, to import an image from the built-in or external storage, use the button "Select a file to flash", then select the required document in the window file manager and press "Select".

- By adding installation file into the program, you can begin the procedure of flashing the recovery firmware onto the device. Okay, click on the button. "Flash to recovery" and confirm the start of the operation by tapping "Okay" in a pop-up window.

- The image installation process will not take much time. Once the procedure is complete, you can reboot into installed Recovery straight from the application. For this purpose in side menu select item "Reboot", tap "Reboot recovery", and then confirm the action in the pop-up window.
