How to install recovery img file. How to install custom recovery on Android. Installing CWM Recovery on Android: methods for every taste
Because the topic Android firmware devices is very relevant, I decided to write about installing CWM Recovery on an Android smartphone or tablet. There are several ways to do this: for some, all actions are performed on the device itself, but this requires root rights, while for others, a computer is used to install custom recovery. Whatever seems easier or more convenient to you, use it.
Method 1. Installing CWM Recovery via ROM Manager
The first way to flash Recovery firmware is to use the ROM Manager program, which we already talked about in the article:. This application has a separate item that allows you to install ClockWorkMod Recovery in a couple of minutes.
I would like to point out right away that for work ROM Manager required root rights. You can read how to get them and.
After that, go to the official page https://clockworkmod.com/rommanager and see if your device is on the list of supported ones.
1. Now open the ROM Manager and select the first item “Recovery Setup”.

2. In the next window, in the “Install or update Recovery” section, select “ ClockworkMod Recovery».


4. At the bottom, click on “Install ClockworkMod”.

5. The download process will begin. At good internet connection it lasts a couple of seconds.

6. At the end of the download, you will be asked to grant root access to the application. Select Grant.

7. That's it! You will see a notification “Successfully flashed ClockworkMod recovery!” Just click "OK".

This is how easy it is to flash CWM Recovery via ROM Manager. Now you can open it and you will find new items in it that were not in the standard one.
Method 2. Install custom Recovery on Android using the FastBoot utility
All steps described below are similar installing TWRP Recovery: .
Unzip the folder to drive “C:” - inside there will be “tools”, and in it the file “android”. Launch it.

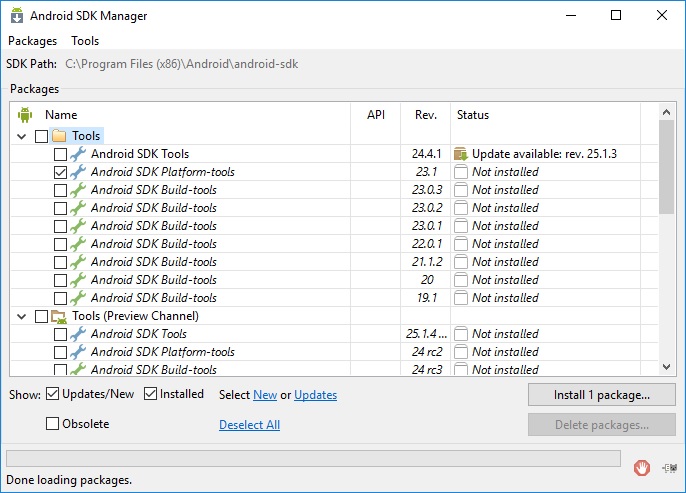
Select " Android SDK Platform-tools" and click "Install package".
Check the “Accept License” checkbox and then click “Install”.

After installation is complete, in the “tools_” folder version-windows" "platform-tools" will appear, and it contains "fastboot" and "adb". They will be useful to us later.

UPD: The “platform-tools” folder on my computer is in a different directory than yours. The fact is that this article was written back when there was an installer for the Android SDK. Starting from version 25, installation is carried out only from a ZIP archive: because of this, part of the instructions had to be edited. Therefore, the path to ADB and Fastboot is different from mine, everything else remains unchanged.
If you have Sony device, HTC, Nexus, Huawei or LG (some models), then Bootloader is blocked. How to unlock it is described on our website:
- For HTC: ,
Let's start flashing the Recovery firmware:
1. First of all, go to this page and download the version of the “recovery-clockwork.img” file for your device. Please note that most devices have both a touch and classic version. Download the one you like best.
2. Now place the CWM recovery file in the “platform-tools” folder. I also renamed it to “recovery.img” (later you will understand why). I recommend that you do the same.

3. Connect your tablet or smartphone to your computer using USB.
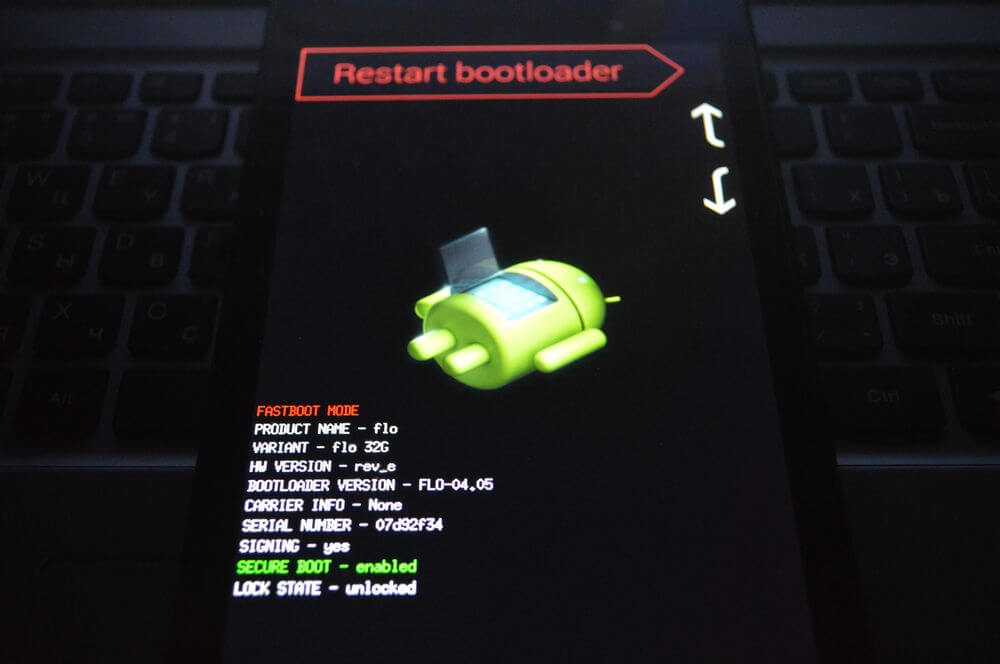
In this case, the device must be booted into fastboot mode. Typically, to do this, with the device turned off, you need to hold down the key combination: Power + Volume Down. But this combination may vary depending on the device manufacturer.
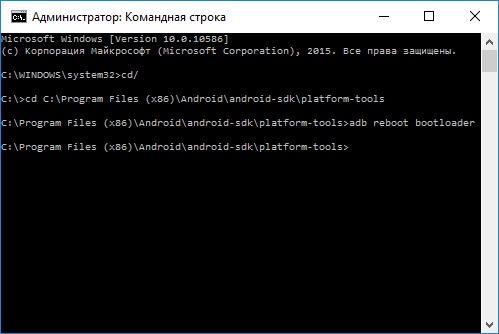
UPD: it’s much easier to switch to fastboot mode as follows: turn on the device, go to command line(point 4 below tells you how to get into it) and enter the commands sequentially, and after each press “Enter”.
CD path to "platform-tools"
I got it like this:
Your path will look different. If you acted exactly according to the instructions, it will come out (in any case, look at the path in the corresponding line of Explorer):
cd\tools_r25.2.3-windows\platform-tools
In the screenshot you can see how I entered the same commands. As a result, the device will boot into fastboot mode.
4. Now open the command line (or skip this item and continue working with it if you just switched Android to fastboot mode through it). The easiest way to get there is to press the key combination “Win” + “R” and enter:
After that, click "OK".

5. You will be taken to the command line.

6. Now you need to specify the path to the folder with the firmware. Type the following command to go back to the folder.
Press "Enter".

7. My path to the recovery folder is: “C:\ Program Files(x86)\Android\android-sdk\platform-tools". So I enter (you enter yours):
cd Program Files (x86)\Android\android-sdk\platform-tools
And press “Enter” again.

8. All that remains is to enter:
recovery.img“recovery.img” is the name of the file being flashed. Remember I advised you to rename the recovery file? We did this for convenience so as not to enter something like “recovery-clockwork-6.0.4.7-flo.img”.
After entering this command, press “Enter” again.
9. As a result, we receive the following message.

Congratulations! You have successfully installed custom recovery (CWM) using the Fastboot utility!
Method 3. Flash Recovery via the Rashr application
This method is also incredibly simple and convenient, but requires root rights. How to obtain them is written at the beginning of the article in “Method 1”.
1. Install the Rashr - Flash Tool application from Google Play, open it and grant Root rights.

2. In the list of options, select “CWM Recovery”.

3. Then the program will display a list of available Recovery for your device. In my case, Rashr showed 2 options: ClockworkMod with support for taps on the screen and the classic option (controlled by the volume and power buttons).

4. When you see the download prompt, click Yes.

5. Then the download of CWM Recovery for your Android smartphone or tablet.

6. At the end, a notification will appear that the firmware was successful and you now have a modified recovery installed. You can reboot into it and try it out. To do this, click “Yes”.

Perhaps this installation method can be called the simplest. The only thing it needs is root rights.
Method 4. Install Recovery on Samsung in Odin
If you have a Samsung device, you can install ClockWorkMod Recovery on Android using the proprietary Odin utility. Here I will briefly tell you what to do. I recommend reading our article: . In it detailed information about using Odin.
Nowadays, you won’t surprise people with a smartphone. Almost every 3rd person in Russia has such a gadget. Few people buy expensive devices, only the wealthy part of society. Therefore, most have gadgets on a budget basis. After a short period of time, when using it, the phone's memory runs out, the RAM memory becomes clogged, or other problems arise. Then people start experimenting with their phones, deleting something or installing some programs for system tasks, etc.
An unknowing person soon turns his smartphone into a brick. And to prevent this from happening, there are special forums where they talk about any gadget and give different step by step instructions, to solve problems with your device.
At the moment, you are on just such a forum. In this article, I would like to tell you, as a beginner, how to easily and quickly flash custom Recovery firmware for your smartphone. That is, replace (install) a modified one instead of the native, official Recovery.
Why are modified recoveries installed? Firstly, due to their various functions, you can perform various system actions with the gadget. Next, you can install any unofficial firmware on your phone (modified firmware). Also do Backup your device for further recovery. The following modified recovery firmwares exist: CWM Recovery, TWRP Recovery.
In this article, I will not explain in detail about modified firmware for recovery. On the Internet there is large number information on this issue.
Personally, I use the second type of firmware, namely TWRP Recovery.
In order to quickly and without any hassles install one of these firmwares, we will use the program - Mobileuncle MTK Tools
. This program is only suitable for those phones (smartphones) that run on a processor MTK.
To further perform actions with the phone, you must have Root rights, you must become the administrator of your gadget. How to do this? Our forum will also help you with this problem. Eat whole topic on this issue.
And lastly, you must download the recovery file itself, in following format: recovery.img
.
Remember!!! Each smartphone needs its own recovery file.
Preparatory part
1. We get Root rights to the phone.2. Download the archive with the program to your computer ().
3. Unpack the archive onto your computer. Read the instructions in the archive.
4. Drop the program onto your phone into the root of the CD card or into the created folder.
5. Download the file recovery.img, for your phone!
6. Upload the file recovery.img to the root of the CD card
This completes the preparatory part. Next we move on to step by step installation. Once again, this type of installation is suitable for any beginner in this not difficult task!
Installation

1. Install the program Mobileuncle MTK Tools on your phone. After installation, an icon will appear, a green smiley face in a mask (ToolHero).
2. Launch the program ToolHero(you can read the contents).
3. An update window will pop up. Do not update the program under any circumstances!
4. Click on the Recovery tab.
5. The program will find your file itself recovery.img on your device and show it to you.
6. Click on the Install button.
7. The modified recovery will be installed on your Android system.
8. Through the program ToolHero, reboot to the menu modified recovery.
This completes the installation of the modified recovery.
Tip: First of all, as soon as you go into Recovery, do Data backup your phone.
Warning!!! IN Recovery menu, I advise you not to press anything! Otherwise, there may be problems with the phone! Or it will turn into a brick. Just visually familiarize yourself with the menu and tabs. You can use it only after studying each menu tab. Find out what each tab does and how it works. Only after this can you use the program in full. Material for familiarizing yourself with the modified recovery can be found on forums on the Internet. If you don’t know where to get the material, write to me and I’ll help!
Good luck! Successful actions!
Any device with Android OS starts in Recovery mode. This standard function. However, with the factory version you can perform too narrow a range of tasks. So, this is resetting the phone to initial settings, clearing the cache, as well as updating the system from the update.zip file. Obviously, users who are expanding their knowledge in the IT field are very dissatisfied with such a meager list. This is where specially developed Recovery Modes come to the rescue. CWM Recovery is a popular tool among Android users and worthy replacement factory
Why do you need CWM Recovery mode?
Clockworkmod Recovery (CWM) - known alternative factory recovery mode, developed by Koushik Dutta. You can install it on most Android devices. CWM Recovery helps even in situations that sometimes seem hopeless to the average owner. That is why it is necessary to know about its existence, and also be able to use it.
 CWM mode has many options
What exactly does the utility do:
CWM: installation instructions
ClockworkMod is sewn into the internal memory of the device in place of the factory mode. In some cases, work is carried out on the gadget itself with access to Root rights, and in others - on a PC.
The article covers such basic methods as Rom Manager, FastBoot, Rashr and Odin. For many devices, companies themselves produce separate utilities, for example, Acer Recovery Installer for Acer devices. CWM is implemented into the device memory on these devices also through ADB software, which is suitable for devices manufactured by HTC.
Rom Manager: Rooting and embedding
Rom Manager is a utility created by the CWM developers. It is available for download on Google Play Market. Allows you to install CWM Recovery on the device itself without using a computer and a USB cable. Before using it, you must root the device, that is, obtain administrator rights.
Obtaining Root rights
The procedure is simple and can be easily carried out using special software. As an example, we can take the Framaroot program. Anyone can navigate its simple and intuitive interface, even without instructions.
 Click on the drop-down window
Select a method for obtaining Root rights. Follow the advice - restart the device for the changes to take effect.
 For the changes to take effect, restart the device
Launching Rom Manager
Now is the time to use the program:
 Select Recovery Setup
 Click on ClockworkMod Recovery to install
Video: how to flash Recovery with Rom Manager
Although the method is easy, it has a drawback: it is not suitable for all devices, as mentioned earlier. Before you start using this method, it would be logical to first determine that this program is compatible with the gadget. The list is available on the official Rom Manager website.
FastBoot Mode: Complex Method
Installation method CWM with using FastBoot will require skill from the user, since it is much more complex than the previous one. It runs not on the device, but on the computer. It is recommended to use it only if you already have skills in such operations. Before installation, you must download it to your computer or laptop. certain files. This list includes Android platform SDK available for Windows, Mac and Linux.
Preparatory stage
What you need to have before installing CWM using FastBoot mode:
The Android SDK utility will help you install the necessary Android SDK Tools and Android SDK Platform tools packages:
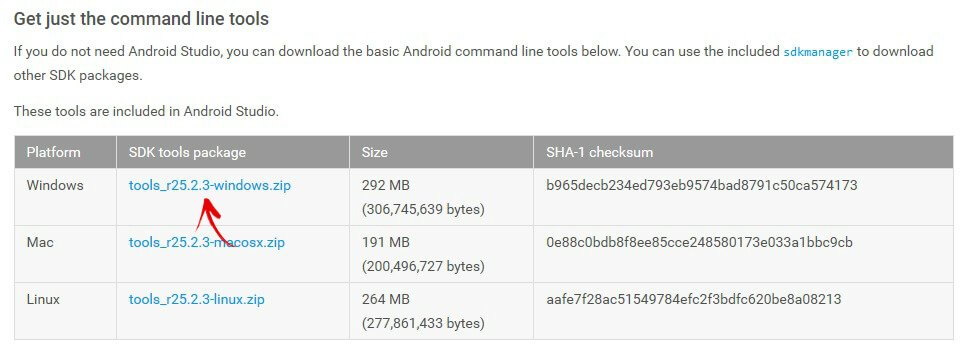
 Download the Anroid SDK zip archive for Windows from the official website
 Find the android file in the unzipped folder and open
Check the box to the left of Android SDK Platform-tools and click Install 1 package.
 Select Android SDK Platform-tools and click Install package
 Accept the license agreement
 The fastboot and adb files are located in the tools_version-windows folder after installation Android package SDK Platform-tools
What else needs to be done before starting the firmware itself? Judging by the list above, you need the recovery-clockwork.img file. This is one of the key tools for further work. Downloading it won't be difficult, but it doesn't end there. It is important to place this file in the platform-tools folder. For further convenience in the firmware, you need to rename it to recovery.img.
 Place the file in the platform-tools folder
Get straight to the point!
Now everything is ready for the CWM firmware, so you can safely get to work. Given below detailed description action in which it is quite difficult to get lost.
 Start your device in FastBoot mode
 To open the command prompt, go to Start and type cmd
 Type cd / and press Enter
 Enter the command with the path to the folder
 The adb devices command will help determine whether the PC sees the device
The level of complexity, as you can see, is high, so before the procedure it is strongly recommended to check that this method is suitable for the device, since it may not work in all gadgets. In practice, this method is good if the manufacturer of the device is HTC.
Rashr app
The installation method using Rashr is convenient and easy to perform; it is recommended for beginners. However, ironically, it also requires administrator rights. You can get them in a few steps. Detailed instructions was given earlier in the section on Rom Manager.
How to work with Rashr
First you need to download the application itself. It is located in free access in Play Market (Rashr - Flash Tool). You can also view the program on a third-party site, but you must beware of suspicious web pages so as not to catch a virus.
When the program is already on the phone, you need to open it and provide it with previously acquired Root rights upon request. Then everything is simple:
 Click CWM Recovery
 Select Recovery from the list of options available for your device
 Click Yes to confirm download
 To go to Recovery, click Yes
Video: CWM and Rashr
Odin: solution for Samsung
The previous three methods are suitable for different models devices. The same method is effective for Samsung devices. This proprietary utility, so it cannot be used for devices from other manufacturers. There are many versions of this application. The latest one is Odin 3.09.
Here the standard factory version of Recovery is changed to a modified one using a PC, as with FastBoot:
 Download Odin program on PC
- power/lock button and volume down (on older devices released before mid-2011);
- power/lock button, Home and volume down (all other devices).
 Click the Start button and wait for the firmware to finish
How to enable CWM Recovery mode after flashing
After CWM mode was installed using one of the above methods, you need to check if it works. You can launch ClockworkMod Recovery:
Possible difficulties
During installation Alternative Recovery Mode, in particular CWM, various kinds of difficulties and errors may arise. Which of them are the most common and how to solve them?
CWM Recovery does not recognize the memory card
CWM makes it possible to update your phone using an archive. When opening Recovery, the user sees a message that the flash card cannot be mounted. After installing another card, even with less memory, the problem disappears. The reason lies in the Windows system. The fact is that it diverges from card formatting standards. To ensure formatting is performed in accordance with the specification of SD/SDHC/SDXC flash cards, and not just in standard form, it is recommended to use specialized software, for example, SD Formatter.
 The SD Formatter program allows you to correctly format the SD card
 CWM does not see the internal memory of the device: problem solution
When the files to be recovered are on internal memory, and therefore can only be restored from there, a problem may arise. When connected USB cable to the PC and enable “USB Debugging”, the program reports that the Android device is not detected and you need to enable “USB Debugging”.
To solve this problem:
Recovery menu doesn't work
If when you launch the alternative recovery mode (volume + Home button or power) a picture appears with a lying robot, then the recovery was flashed, but when you restarted the device it was overwritten by the stock Recovery.
The problem is solved as follows.
Flashing a new Recovery mode means getting new functionality. Firmware methods vary in complexity, but ironically, the simplest of them require access to Root, that is, device administrator rights. When choosing a firmware method, you need to be guided by the phone model first. Rom Manager is not suitable for all devices. Suitable for HTC more way with FastBoot, and for Samsung it would be better to choose Odin.
Do you want to install a custom ROM on Android or in other words a third party OS version like CyanogenMod? Most likely you will also need to install a custom recovery.
At all Android devices recovery tool is already pre-installed. This software recovery can be used to restore the device to factory settings, update the operating system, or perform other tasks.
Stock recovery
Android devices already come with Google's recovery tool, which is often called "stock recovery." You can boot into recovery by pressing certain keys on your smartphone or tablet, or using the adb command, which will boot your device into recovery mode.
The recovery menu provides features that will help you restore your device, for example, from here you can restore to factory settings. Recovery mode can also be used to update OTA files. If you want to install new firmware to your device or restore factory firmware, then you will need to enter recovery mode first.
With stock recovery system limited. It can only be used, for example, for OTA updates files and firmware from the manufacturer.
Custom recovery. Basics
Custom recovery is a third-party recovery environment. It's like setting custom firmware, for example, CyanogenMod, but instead of replacing operating system The recovery environment is replaced.
The custom recovery environment will do the same as the stock one. However, she will also have additional features. Custom recoveries can often create and restore device backups. Custom recovery allows you to install custom firmware. ClockworkMod even provides a "ROM Manager" application that allows you to access many features from running system Android - This application requires a custom recovery.

Popular custom recoveries
ClockworkMod Recovery (CWM) can create and restore NANDroid backups - backup copies of all file system devices on Android based. ClockworkMod provides a ROM manager with a file browser that will allow you to view and install custom ROMs via ClockworkMod Recovery and manage and restore backups. It also has other additional features that will be useful when installing and working with custom ROMs.

Team Win Recovery Project (TWRP) is a push-based recovery environment. Unlike other recovery environments, including the stock one, where the volume keys are used for navigation and the power key for selection, this one uses an interface that can be used by tapping the screen. TWRP even supports themes. Just like CWM, TWRP provides the ability to install custom firmware and create and restore backup copies system, which is not in stock recovery.

CWM and TWRP are two of the most popular custom recoveries, but other custom recoveries may only be available for some devices.
When and why you need to install Custom Recovery
Custom recovery environments are useful if you install custom firmware, because... they provide the opportunity to backup data, as well as restore it, which will undoubtedly be useful to you. You will have to unlock the bootloader on your device to install the custom recovery.
Although this function is hidden and requires using adb commands You don't have to unlock the bootloader, install custom ROM, or even root to create or restore a full backup.
Install custom recovery if you want to install custom firmware or get a powerful backup tool. This action is often considered as a preparatory step before installing custom firmware, but it is not always necessary. For example, the CyanogenMod installer will also install ClockworkMod Recovery (CWM).
All in all, custom recovery only needed if you plan to install a custom ROM. Most Android users won't even notice the differences between custom and custom recovery.
How to install TWRP Recovery? - everyone asks this question Android user daring to install unofficial firmware. On some devices you cannot do without it even when obtaining root rights. Also, TWRP Recovery or CWM Recovery will allow you to make a high-quality backup of the system, which will save absolutely all application data.
TWRP Recovery differs from CWM Recovery first of all touch control, but there are also quite a few invisible differences; some firmware cannot be installed due to incorrect recovery. So, first of all, find out what kind of recovery you need.
You can download a suitable recovery simply by writing in the comment “I want to download TWRP Recovery for Samsung Galaxy S7", or "Where to download CWM Recovery on Xiaomi Redmi 3S?
How to install TWRP Recovery via TWRP Manager
To get started, get and download TWRP Manager from Google Play. Open the application and provide superuser rights, the menu is very simple, so the likelihood of errors during installation is minimal.
- Enter your device in the “Device Name” line and click “Recovery Version To Install”
- In the window that opens there will be a list from which you can download TWRP Recovery, select the latest available version of TWRP Recovery
- Click “Install Recovery”.
How to download CWM Recovery and install it using ROM Manager
- Install the app from Google Play and provide .
- Open the application and click Recovery Setup.
- In the window that opens, click “ClockworkMod Recovery” and confirm the model of your device. On this step you can click on the three dots in the upper right corner and open advanced mode, this will allow you to download CWM Recovery exactly the version you need.
- In the last window, click “Install ClockworkMod” and the program will begin downloading and installing.
- After installation, boot into CWM Recovery to check the installation result.

Installing custom recovery via Flashify
Installation via Flashify will not take much time. Install Flashify, allow it to use and click Recovery Image. Click download or select an already downloaded file on the flash drive, for example, Recovery.img, and click “YUP!” Done, recovery is installed.

Easy installation of CWM Recovery or TWRP Recovery via Rashr
In Rashr everything is extremely simple, in the application we select either one of the versions of recovery or recovery from memory, click on the one you are interested in and it will be installed, it couldn’t be simpler. Route is required.

How to install TWRP Recovery on Samsung? Odin!
Everything is approximately the same as in the smartphone firmware. The main thing here is that you don’t need root rights!
- Download Odin and drivers for your device, as well as a recovery archive, for example TWRP Recovery, install the whole thing and launch Odin.
- Uncheck “Auto Reboot” and click “AP”, select the downloaded archive from TWRP Recovery and press start.
- Put your phone into flash mode, usually the volume down, home and power buttons, and connect it to your computer. Odin will pick up your phone and flash a custom recovery.
- When finished, you need to immediately boot into CWM or TWRP Recovery, otherwise the system will restore the original one. You can find out the combination to enter TWRP Recovery in the comments by writing the model of your device.

SP Flash Tool as a recovery installer
If you know how to flash a phone using the SP Flash Tool, then there won’t be much new information for you here. Download and install SP Flash Tool and drivers for your phone. Now you need to download TWRP Recovery, or CWM Recovery for your device, after downloading, save your new recovery in a convenient place.
- Launch the Flash Tool and immediately check the “DA DL ALL With Check Sum” box in the settings.
- Next, click on “Scatter Loading” and select the Scatter file from the archive with the downloaded recovery, or take the Scatter from the official firmware.
- After that, you can click on start and connect the phone in firmware mode.
- Ready.

MobileUncle Tools and recovery
To install CWM Recovery using MobileUncle Tools you need to follow just a few steps:
- Download TWRP Recovery or CWM Recovery for your device
- Download MobileUncle Tools, aka ToolHero.
- Launch the application and click “Recovery Update”
- Select the downloaded file and click OK.
- Done, recovery is installed, enjoy full functionality.
