Application for installing recovery. How to enable CWM Recovery mode after flashing. Other ways to install custom recoveries
In general, the buyer of any Android device receives out of the box a device designed for the “average user.” Manufacturers understand that it will still not be possible to satisfy the needs of absolutely everyone. Of course, not every consumer is ready to put up with this state of affairs. This reality has led to the emergence of modified, custom firmware and simply various improved system components. To install such firmware and add-ons, as well as manipulate them, a special environment is required Android recovery – modified recovery. One of the first solutions of this kind, which became available to a wide range of users, is ClockworkMod Recovery(CWM).
CWM Recovery is an Android recovery environment modified by third-party developers, designed to perform many non-standard operations from the point of view of device manufacturers. The CWM recovery is being developed by the ClockworkMod team, but their brainchild is a fairly adaptable solution, so many users bring their own changes and, in turn, adapt the recovery to their devices and their own tasks.
Interface and management of CWM Recovery
The CWM interface is nothing special - these are ordinary menu items, the name of each of which corresponds to the title of the list of commands. Very similar to the standard factory recovery of most Android devices, only there are more items and the expandable lists of applicable commands are wider.

Control is carried out using physical buttons devices - " Volume+», « Volume-», « Nutrition" Depending on the device model, there may be variations; in particular, the physical button “ Home» or touch buttons below the screen. In general, the volume keys are used to move through items. Pressing " Volume+" results in moving up one point, " Volume-", respectively, one point down. Confirmation of entering a menu or executing a command is by pressing the " Nutrition", or the physical button " Home» on the device.

Installation *.zip
The main, and therefore most frequently used, function in CWM Recovery is the installation of firmware and various system patches. Most of these files are distributed in the format *.zip, so the corresponding CWM recovery item for installation is called quite logically - “ install zip" When you select this item, a list opens possible ways file location *.zip. You can install files from an SD card in various variations (1), as well as download firmware from using adb sideload(2).

An important positive point that allows you to avoid writing incorrect files to the device is the ability to check the firmware signature before starting the file transfer procedure - item “ toogle signature verification».

Cleaning partitions
To eliminate errors when installing firmware, many romodels recommend cleaning partitions Data And Cache before the procedure. In addition, such an operation is often simply necessary - without it it is impossible in most cases stable work devices when switching from one firmware to a solution of another type. In the main menu of CWM Recovery, the cleaning procedure has two items – “ wipe data/factory reset" And " wipe cache partition" In the drop-down list after selecting one or the second section, there are only two items: “ No" - to cancel, or " Yes, wipe...» to start the procedure.

Creating a backup
In order to save user data in case of problems during the firmware process, or to be on the safe side in case of an unsuccessful procedure, it is necessary to create a backup copy of the system. The developers of CWM Recovery have provided this feature in their recovery environment. The function in question is called by selecting the item “ backup and storage" This is not to say that the possibilities are varied, but they are quite sufficient for most users. You can copy information from device partitions to a memory card – “ backup to storage/sdcard0" Moreover, the procedure begins immediately after selecting this item, no additional settings not provided. But you can determine the file format of the future backup in advance by selecting “ choose default backup format" Other menu items " backup and storage»are intended for backup recovery operations.

Mounting and formatting partitions
The developers of CWM Recovery have combined the operations of mounting and formatting various partitions into one menu, called “ mount and storage" The list of revealed capabilities is minimally sufficient for basic procedures with device memory sections. All functions are performed in accordance with the names of the list items that call them.

Additional features
The last item in the main menu of CWM Recovery is “ advanced" This, according to the developer, is access to functions for advanced users. It is not clear what the “advancement” of the functions available in the menu is, but nevertheless they are present in the recovery and may be needed in many situations. Through the menu " advanced"The recovery itself is rebooted, rebooted into bootloader mode, and the partition is cleared" Dalvik Cache", viewing the log file and turning off the device when all manipulations in recovery are completed.

Advantages
- Not large number menu items that provide access to basic operations when working with device memory sections;
- There is a function for checking firmware signatures;
- For many outdated device models, this is the only way to easily make a backup and restore the device from a backup copy.
Flaws
- Lack of Russian interface language;
- Some non-obviousness of the actions proposed in the menu;
- Lack of control over procedures;
- No additional settings;
- Incorrect user actions in recovery can damage the device.
Despite the fact that the recovery from ClockworkMod is one of the first solutions that ensured widespread Android customization, today its relevance is gradually decreasing, especially on new devices. This is caused by the emergence of more advanced tools with more functionality. At the same time, CWM Recovery should not be completely written off as an environment that provides firmware flashing, backup creation and restoration of Android devices. For owners of somewhat outdated but fully functional devices, CWM Recovery is sometimes the only way to maintain a smartphone or tablet in a state that complies with modern trends in the Android world.
Today we will talk about how to install custom recovery on your line device Samsung Galaxy. I will only talk about TWRP recovery, since it has a huge number of advantages over its analogues. Also, the developers of this project offer a simple and convenient way installation, which involves using the Odin utility. You don't even need superuser rights (Root). This instruction Suitable for all smartphones and tablets from Samsung: Galaxy S5, S6, Note 4, Note 5 and any other models.
It is worth noting that after installing a custom recovery, you will not be able to install official ones. Samsung updates, downloaded “over the air”. Do backup copy your data on mobile device so that if problems arise, you don’t lose them forever. I recommend saving contacts in the cloud of your Google account, and photos, videos and documents on your computer.
What you need to do before installing TWRP recovery via Odin:

Check before starting installation to make sure you haven't forgotten anything. Each of the above steps is very important.
How to install TWRP recovery on any Samsung Galaxy smartphone or tablet:

Ready! To enter TWRP recovery, you need to hold down the “Volume Up”, “Home” and “Power” buttons while the device is turned off, and release the buttons after the logo appears.

Now you can use the new recovery to install custom firmware, backup and restore installed firmware and much more. Through TWRP you can also clear cache memory, do a factory reset, or even wipe internal memory devices.
Nowadays, you won’t surprise people with a smartphone. Almost every 3rd person in Russia has such a gadget. Few people buy expensive devices, only the wealthy part of society. Therefore, most have gadgets on a budget basis. After a short period of time, when using it, the phone's memory runs out, the RAM memory becomes clogged, or other problems arise. Then people start experimenting with their phones, deleting something or installing some programs for system tasks, etc.
An unknowing person soon turns his smartphone into a brick. And to prevent this from happening, there are special forums where they talk about any gadget and give various step-by-step instructions for solving problems with your device.
IN at the moment, You are on exactly such a forum. In this article, I would like to tell you, as a beginner, how to easily and quickly make firmware custom Recovery, your smartphone. That is, replace (install) a modified one instead of the native, official Recovery.
Why are modified recoveries installed? Firstly, due to their various functions, you can perform various system actions with the gadget. Next, you can install any unofficial firmware to the phone (modified firmware). Also do Backup your device for further recovery. The following modified recovery firmwares exist: CWM Recovery, TWRP Recovery
.
In this article, I will not explain in detail about modified firmware for recovery. There is a large amount of information on this issue on the Internet.
Personally, I use the second type of firmware, namely TWRP Recovery.
In order to quickly and without any hassles install one of these firmwares, we will use the program - Mobileuncle MTK Tools
. This program is only suitable for those phones (smartphones) that run on a processor MTK.
To further perform actions with the phone, you must have Root rights, you must become the administrator of your gadget. How to do this? Our forum will also help you with this problem. There is a whole thread on this issue.
And lastly, you must download the recovery file itself, in following format: recovery.img
.
Remember!!! Each smartphone needs its own recovery file.
Preparatory part
1. We get Root rights to the phone.2. Download the archive with the program to your computer ().
3. Unpack the archive onto your computer. Read the instructions in the archive.
4. Drop the program onto your phone into the root of the CD card or into the created folder.
5. Download the file recovery.img, for your phone!
6. Upload the file recovery.img to the root of the CD card
This completes the preparatory part. Next we move on to step by step installation. Once again, this type of installation is suitable for any beginner in this not difficult task!
Installation

1. Install the program Mobileuncle MTK Tools on your phone. After installation, an icon will appear, a green smiley face in a mask (ToolHero).
2. Launch the program ToolHero(you can read the contents).
3. An update window will pop up. Do not update the program under any circumstances!
4. Click on the Recovery tab.
5. The program will find your file itself recovery.img on your device and show it to you.
6. Click on the Install button.
7. The modified recovery will be installed on your Android system.
8. Through the program ToolHero, reboot into the modified recovery menu.
This completes the installation of the modified recovery.
Tip: First of all, as soon as you go into Recovery, do Data backup your phone.
Warning!!! IN Recovery menu, I advise you not to press anything! Otherwise, there may be problems with the phone! Or it will turn into a brick. Just visually familiarize yourself with the menu and tabs. You can use it only after studying each menu tab. Find out what each tab does and how it works. Only after this can you use the program in full. Material for familiarizing yourself with the modified recovery can be found on forums on the Internet. If you don’t know where to get the material, write to me and I’ll help!
Good luck! Successful actions!
For those who do not yet know what CWM or TWRP Recovery is, they can find out on the pages below:
Download CWM or TWRP Recovery and Create
Download CWM for your Android - clockworkmod.com/rommanager
Personally create CWM for your Android - builder.clockworkmod.com
Download TWRP (alternative recovery) - teamw.in/twrp_view_all_devices
Download Philz Recovery(based on CWM) - philz_touch/CWM_Advanced_Edition
Installing CWM or TWRP Recovery
After you have downloaded or created CWM or TWRP recovery, we move on to the flying stage - install custom Recovery.
Installing CWM or TWRP Recovery on Samsung
For manufacturer's devices Samsung installation occurs using firmware via Odin (if recovery has IMG extension, then it is necessary).
For Huawei you need to initially unlock the Bootloader
For Nexus you need to initially unlock the Bootloader
For Sony you need to initially unlock the Bootloader
For Motorola you need to initially unlock the Bootloader
Then put the downloaded file recovery to the Adb folder and flash it using the fastboot utility
fastboot flash recovery Imja_file.img(where Imja_file.img is the name of the file to be flashed):

Or you can use the ADB RUN utility with which you can very easily install Recovery:

Installing Recovery on Mediatek chips
1. Computer (OS Winwods XP/Vista/7 - preferable; 8/8.1 - problematic)
5. Undamaged MicroUSB cable
6. Recovery File which you personally found on the Internet for your Android device
7. Scatter file previously prepared (taken from the firmware) or created by you manually
How to flash Recovery on Android with MTK chips
1. Unpack SP Flash Tool and go to the folder with the program
2. Launch SP Flash Tool via the Flash_tool.exe file


4. Place a checkmark at the top next to DA DL All With Check Sum

5. In the list that appears below, click on Recovery

6. Select the Recovery file

7. Click the Download button and agree with the error

8. Android device turn off
9. Connect in off android state, after which the firmware will begin, when finished the device will boot, and a window with a green circle with the caption Download OK will appear in the SP Flash Tool

Installing CWM or TWRP - Recovery X Project
- Installed Root rights
- Unlocked Bootloader ( HTC, Huawei, Nexus, Sony)
- Install from app store Google Play - Recovery X
- Launch the application, select your model and click the button to install Recovery
Installing CWM and TWRP - Recovery Tools
For this method It is necessary that the Android smartphone or tablet has Root rights and an unlocked Bootloader.
Open the Recovery Tools - Flasher application and select the required installation menu to install (TWRP or CWM)


Installing TWRP - TWRP Manager Project
All you need to install Recovery on your Android smartphone or tablet is:
- Installed Root rights
- Unlocked Bootloader (
Today we propose to talk about such an interesting and at the same time complex thing as (recovery for Android). The majority of users who have just switched to smartphones running operating Android systems, and has no idea how multifunctional it is. An indispensable part of this OS is the recovery.
Surely you started looking for what it is after something bad happened to your smartphone (does not respond to button presses, a black screen hangs, etc.). Am I right? Then you have come to the right place! In this material we will try to explain in as much detail as possible what it is and why it is needed.
Recovery for Android (Stock) - what is it?
This, so to speak, thing is present in almost everyone Android smartphone called Mode. Translated as “Recovery Mode”, presented as a separate menu, including a set software. In this mode the user can:
- restore your device after any failure or virus infection;
- update (flashing) the system;
- install new patches;
- reset the device settings to factory settings;
- make a backup;
- create and mount partitions;
- get ROOT rights (superuser rights).
As you can see, there are many possibilities. Manufacturers try to fit into this mode as much as possible more features so that the user can independently perform various actions with his smartphone without special skills.
You won’t find the Recovery menu on regular desktops or in your smartphone settings. The recovery is “hidden” deeper in the system, and can be accessed by holding down a certain combination of buttons when turning on the device (it may differ for each smartphone).
The stock menu can be difficult for the user to master due to what is presented on English. In addition, control in recovery mode is carried out using physical buttons - touch controls do not work.
Stock recovery – what is it?
Typically, users who decide to figure out what it is will immediately find out that there are two types of recovery modes:
- Stock (stock, native recovery) – provided by default by manufacturers;
- Custom (custom, custom recovery) - a version modified by users, including more functions and capabilities (OCustom a little lower).
So, stock recovery is a recovery mode that is installed by the manufacturer of the smartphone or tablet. It is quite functional, it allows you to do everything that we listed just above, but with some reservations.
Stock does not provide for the installation of third-party firmware on the device - only official ones from the manufacturer.
For some, official firmware is enough (as a rule, owners popular smartphones, which do not remain without a fresh update for many years), for others (owners of models from little-known Chinese companies, who forget about their brainchild after one update) – it’s really not enough.
For custom recovery, there are thousands of firmware developed by users themselves. So, on a smartphone long forgotten by manufacturers, using Custom you can install relatively recent, albeit not official, firmware. But we’ll talk about customs a little lower.
For clarity, watch the video, which describes in detail the recovery mode on Android:

How to access the menu on Android?

Understanding what it is and what it is for is much easier than getting into it. The fact is that many manufacturers have a different set of physical buttons: one smartphone has three, another has four. As a result, the combinations differ.
As a rule, the power button and volume rocker are used. They must be held until the menu appears.
Below we will tell you how to enter recovery mode for the most popular Android smartphones.
How to get to Recovery Mode on Samsung

- connect the smartphone via USB to the PC;
- run the program (we recommend using “Run with administrator rights”);
- wait for it to load;

- a list will appear in front of us possible actions, presented in English;

we need the item “Reboot Devices”, which is presented under the number “4”;
Enter “4” from the keyboard and press “Enter”;
the following window appears;
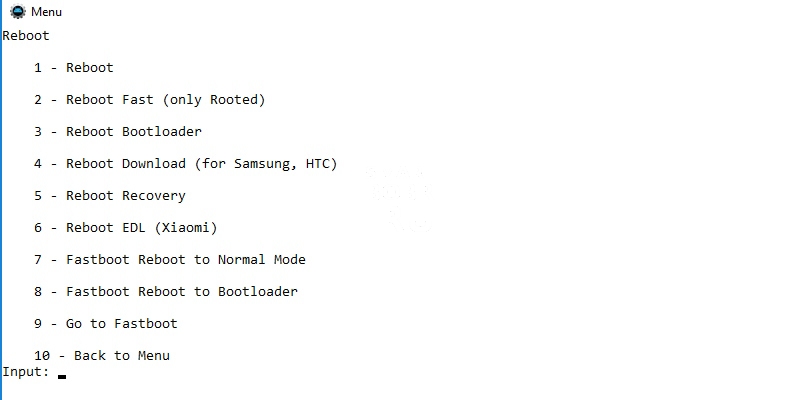
Now we select “Reboot” (reboot into recovery mode), the item is located under the number “5”, so we type it on the keyboard, press “Enter”;
your smartphone will reboot already in Recovery mode Mode.
Way 2 – “adb reboot recovery” command
If for some reason the first method did not work (although this is unlikely), there is another one. Let's start the program again Adb Run, Where:
- enter the number “7” (go to the “Manual Command and Unlock Bootloader” window) and confirm with “Enter”;
- in the next window, enter the number “1” to access the Adb command line;

here we enter the command “adb reboot" and confirm by pressing "Enter";

wait a few seconds until the smartphone reboots into .
Method 3 - commands for specific models
It’s rare, but it happens that the two above methods do not help (most often happens with LG smartphones). In this case, it is recommended to use other commands. What we do:
- also go to command line Adb Run (read above);
- enter one of the commands: adb shell, reboot recovery or adb reboot –bnr_recovery;
- After a few seconds, the smartphone will reboot.
Custom recovery – what is it and what are the differences?

Custom, as already noted, is a third-party recovery mode. Its main advantage over Stock is the ability to install the most different firmware, and not just the official ones.
Modified recovery (Custom) is the easiest and most convenient way to install third-party firmware.
The most common are two types of custom recovery:
- TeamWin R ecovery (TWRP);
- ClockworkMod Recovery (CWM) .
TWRP
TeamWin R ecovery is an unofficial modified recovery, there are versions for almost all devices running operating system Android. It boasts significantly greater capabilities than native Recovery. TWRP is often installed on smartphones by default, and can also be installed in parallel.
From the native menu TWRP recovery differs not only in its expanded functionality with the ability to install any firmware, but also in the presence touch control. We can also reset settings, create backups and mount partitions. You can download TeamWin R ecovery for free, about installing custom recovery below.
CWM
ClockworkMod is a popular analogue of TeamWin, which also offers an expanded set of functions and capabilities. You can find a version for almost every smartphone, with the exception of the most ancient models.
Many modern devices receive CWM by default.
Like its analogue, the main task is to help the user install third-party firmware on the device. In addition, CWM is ready to help you obtain ROOT rights, which will be useful to many. Controls in this recovery can be done in different ways, but in most cases the volume up/down buttons and the power key are used. Also, on the Internet, it will not be difficult to find a version of CWM touch, which allows you to select required functions by touching the screen.
Installation of custom recovery TWRP and CWM
You can install Custom in several ways, which differ significantly from each other, in addition, they may be suitable for one device, but incompatible with another.
Installing recovery via fastboot
F astboot is a section in the recovery menu, so this method is often called native.
That is, to install Custom in this way, your device must have stock recovery, which you will have to enter using one of the methods we discussed above. In addition, files will be required for installation and operation.
Recovery files need to be downloaded for specific model! If you try to download and install a recovery that is not for your model of smartphone or TV set-top box, you are guaranteed to get a brick!
In addition, in order to install recovery via fastboot, you must first unlock the bootloader.
Unlocking is done so that the device does not “resist” when you start installing a custom recovery or getting ROOT rights. Ways unlock bootloader There are plenty, but for each device it is preferable to use a specific one. Read more about unlocking in the topics for a specific smartphone.
Instructions
So, the instructions for installing Custom via fastboot are as follows:
- make sure that your smartphone has recovery;
- unlock the bootloader (look for information on thematic forums of your device);
- download Android package SDK, which includes a set various programs and files;
- look for and download a version of the Recovery.img file specifically for your device (again, go to thematic forums);
- rename the downloaded file to “recovery.img”;
- move the file to the “platform-tools” folder;
- connect the device to the PC by setting the FastBoot mode in Android SDK Tools;
- launch the command line on the PC (“Run” – cmd);
- here we write: “cd (space)” full path to the platform-tools folder”;
now enter the command : "fastboot flash recovery recovery.img";
We wait while the installation is completed.
Installing recovery via RomManager
This method, although it is one of the simplest, is not recommended, as it carries a number of nuances.
- firstly, you need ROOT rights;
- secondly, you need to make sure that your device is compatible with the application (otherwise there is a high risk of getting a “brick” (an inoperative device, which (not always) can only be restored in a service center).
So, if you decide to install recovery this way, then:
- we get ROOT rights;
- download the RomManager application (from the Play Market or from other sources);
- we launch it, granting superuser rights;
- Click on the “Install” item;
- wait for the end;
- To get to the recovery menu, select “reboot to recovery”.
Other ways to install custom recoveries

We told you about the two most popular methods, and we recommend using them first. True, in some cases this is not enough, so users have come up with many more ways Custom installations. And smartphone manufacturers are not particularly hindering their distribution.
The current option, if the first two methods do not work, is to flash the device using special software. For example, Odin software is designed specifically for Samsung devices, and SP Flash Tool is a tool for smartphones on SoC MediaTek, in Motorola smartphones– RSD Lite.
We recommend that you choose the method directly for a specific device model so that there are no compatibility problems. Look for information on thematic resources in topics dedicated to your device. For greater reliability, do not hesitate to ask questions to other users on the forums.
How to flash an Android device through recovery?
As a rule, users look for information about when there is a need to flash the device, and through the recovery menu this process can be made as fast and simple as possible.
If you are going to install official version firmware, it is not necessary to install custom recovery, otherwise you will have to.
You can try to find the official firmware for your smartphone on the manufacturer’s website, but not everyone posts them on open access to protect against hackers tampering with the code. Also, a copy of the official firmware is often shared by owners of similar devices on the relevant forums. Search.
So, the firmware process actually takes half an hour at most, if you understand all the features:
- download the firmware file (we find it specifically for your smartphone model);
- if the firmware is third-party, install custom recovery (instructions above);
- we move the downloaded file to external card memory;
- boot the smartphone into recovery mode (instructions above);
- look for the item “Apply update from external storage” and indicate the path to the firmware file;
- confirm actions;
- wait for the device update to finish;
- It wouldn’t hurt to clear traces of past software (look for the “Wipe data/factory reset” item);
- To complete the firmware and boot the device, click “ Reboot system now".
Ready! Your smartphone should boot successfully, appearing in an updated form.
Naturally, updating Android firmware through recovery does not always end successfully. Often smartphones refuse to be flashed stock recovery, often additional steps are required for flashing the firmware, as well as connecting to a PC. However official firmware in most cases it gets up without problems.
Bottom line
Well, today we told you everything about Recovery in as much detail as possible. We tried to convey the material very clearly so that none of our readers leaves without an answer.
At one point, it can really save your device by resetting the settings or creating a backup copy, and custom recovery will help you install your favorite firmware with updates. We hope you can now figure out the recovery menu without the help of a specialist.