How to flash a phone using help. Firmware using PC. How to install firmware using TWRP recovery utility
There are times when you need to change the software on your mobile phone. This thought makes many people's hair stand on end and their heart rate increase. And in vain, because in fact it is not difficult to do.
Why flash a mobile phone?
Now is the time computer technology and flat smartphones with touch screen. However, despite the technological boom, you should not discount the old push-button mobile phones. The same “bricks”, sliders and “clamshells” that everyone had just a few years ago. Nobody even thought about changing the software on these legendary devices. The question is, why flash them at all?
Firmware updating of a phone (Samsung, Nokia, etc.) can be done for the following reasons:
- the device software has broken down or started to work worse;
- to obtain newer software.
Few people have seen such a device crash, but this is quite possible, and there are plenty of reasons for this. In addition, official and independent developers release new firmware versions for these gadgets.
Flashing phone firmware via computer
Before installing new software, there are a few things to keep in mind.
- First you need to create a backup copy of all data (contacts, SMS, settings, etc.) on your phone to your computer. You can do this using specialized programs(MyPhoneExplorer and others).
- After this, you must charge your mobile phone: at least 80% of the battery, although 100% is better.
- It is best to flash the phone's firmware via a computer using a laptop. The reason is that it contains a battery, as a result of which, due to an accidental power outage, it will be possible to complete the process started. Otherwise, the consequences could be catastrophic.
For the firmware you will need the following things:
- of course, the phone is 100% charged;
- data cable (in most cases USB is used, but some mobile devices require a special data cable);
- firmware file; it needs to be downloaded from the Internet, but before that you need to carefully read the information, read comments and reviews, and before that you need to find out the version of the old firmware: enter the code *#06# on the keyboard (for Nokia there will be a different code - *#0000#);
- drivers for mobile device;
- program for flashing a phone (“flasher”).
Programs
There are quite a lot of utilities for firmware and they are divided into two categories:
- general ones that are suitable for all models;
- those that are intended for one manufacturer (for example, the Phoenix program for flashing Nokia phones).
General utilities can flash almost any model. However, if there is a program that is created specifically for a specific brand of mobile devices, it is better to use it, since it already contains all necessary drivers and perhaps the OS itself. Here is a small list of “flashing tools” for specific brands that will help “cure” the gadget:
- for Nokia - Phoenix Service and official Nokia service Software Update r;
- Sony Ericsson- PC Companion (updated SEUS), unofficial DaVinchi;
- LG - flashers Speedo, GsMulti;
- Motorola - Flash&Backup, P2K;
- Samsung - OptiFlash;
- BenQ - Winswup, Update Tool.
Let's look at the algorithm using the example of the Phoenix utility.
Flashing Nokia
Before flashing your phone's firmware, you need to download and install the Phoenix utility, which is designed specifically for this brand. In addition to the initial preparations described above, you need to do something else, namely, remove all programs that can somehow be associated with the mobile device (Nokia Software Update, Nokia PC Suite, etc.) and then clear the cache and register. Otherwise, the firmware of the Nokia phone may fail. Also, just in case, you should turn off your antivirus.

Now you need to install the Nokia Connectivity Cable Driver and Nokia Flashing Cable Driver. We connect the mobile device to the PC. You can make sure that all drivers are in place in Device Manager. Open Then select “Device Manager” and expand the Wireless Communication Devices item. The number of devices should be from four to six.
Connect to your computer (select PC Suite mode) and launch Phoenix. In the Connection item, click Setting. In the window that opens, select Add. Click on Driver, select USB and scan. Select the device that appears. Click Select. Now from the drop-down list in the Connection item, select required device. Next, go to the File\\Scan Product tab. After scanning, the desired mobile device should appear below. If this happens, move on.
Go to the Flashing section, where you need to click Firmware Update. Now you need to select a code. If we don’t have the slightest idea which one is needed, then we take any one. At the same time, you need to remember one point: if Russian is desired in the phone, then look for the words Russian, Cyrillic or RU in the name of the firmware file. When the Product Code is selected, click on Refurbish. Congratulations, flashing your phone via your computer has begun. It will last approximately 7-10 minutes. During this time, you should not touch the phone, cable or the program itself.
Flashtool
If there is no special utility and you need to flash the phone firmware via a computer, Flashtool program You can easily cope with this if you have an OS file and drivers that you will need to find yourself.

The work algorithm is as follows. Turn off the phone, remove and insert the battery. Turn on the Flashtool program. Click on the lightning icon and leave a dot on the Flashmode item. Next, select the downloaded firmware from the list in the left window and click “Ok”. Afterwards you should see instructions for connecting your smartphone to your PC via a USB cable. We do this, and the program for flashing the phone starts working.
Flashing Android

Mobile devices based on the Android operating system require an OS change much more often than regular mobile phones. The reason for this may be numerous malicious programs downloaded from unknown sources applications, etc. However, the most basic and most common reason If a smartphone fails, it is its owner.
The phone's firmware is flashed via a computer, but you can do without it (in Recovery mode).
Via PC
First you need to make some preparations.
- Download a special utility for flashing the firmware (Flashtool, Bootloader or a program from the official developer - PC Companion for Sony Ericsson, “Fly smartphone software update” for Fly, etc.).
- At the same time, download the firmware for specific model devices. In this case, you should definitely familiarize yourself with the characteristics, read comments and reviews. Copy the firmware to the Firmwares folder of the Flashtool program.
- Install drivers on the PC.
- We make a backup copy of the files from the smartphone, and also copy the contents of the flash drive to the computer (flashing the phone's firmware through the computer will not leave old marks about the location of the files on the flash card, so it will create new ones on top of the old ones).
- We find a USB cable, and also do USB debugging (go to “Settings”, find “Developer Features”, then check the “USB Debugging” checkbox).
- We charge the device 100%.
Then open the Flashtool utility and go through the algorithm described above.
Without PC
This is done through Recovery mode. To do this, the firmware file must be downloaded and moved to the memory card. Now turn off the smartphone and turn on Recovery. To do this, you need to simultaneously hold down a certain key combination (power and volume down, up or menu - the combination depends on the manufacturer). You can find out the exact combination by looking at the device passport. Next, select “Apply” Update From External Storage" (the firmware of a Samsung phone and many other Android-based smartphones happens the same way).

We are working on Windows Mobile

With smartphones things are much simpler. To do this, you will need, in fact, the gadget itself, a USB cable and a program Windows Phone Recovery Tool for computer. First, download this utility from the official website (or via this direct link: go.microsoft.com/fwlink/?linkid=522381, the download will start automatically), install and launch. The program will immediately begin searching for updates, after which it will ask you to connect your smartphone to your PC.

Now the search and installation of drivers for the connected device will begin. If they are not found, you can click on the corresponding button to search on the Internet. When the drivers are installed, a large tile with an image of the connected gadget will appear. By clicking on it, you will start downloading the firmware file. Don't panic if the process takes too long, as the file can weigh around a gigabyte. In addition, if the download is suddenly interrupted, it can always be resumed from where it stopped. There is also one nice thing: if you want to flash your smartphone again, you won’t have to download anything, since the OS will remain on the computer.
When the download is complete, the Reinstal Software button will appear, clicking on which will begin installing the software. At the same time, it is strictly undesirable to touch the phone, USB cable, or turn on/off the computer, since the results of such manipulations can be quite disastrous.
For each smartphone or tablet, there are both official and custom firmware. Their installation is carried out in different ways: OTA updates arrive by air, firmware in ZIP archives are installed manually via CWM, TWRP Recovery or application ROM Manager Using a computer, you can flash Android using the Fastboot and SP Flash Tool utilities.
After Android firmware, all data from internal memory will be erased, so to save contacts, settings and applications, first .
Android firmware via Recovery
Unofficial firmware in ZIP format, such as CyanogenMod, can be installed through custom Recovery: CWM or TWRP, as well as applications that use Recovery, for example, ROM Manager. Cores and patches are sewn in the same way. There are enough options to download the official “Update.zip” standard mode recovery, more details in the article linked above.
Install the ZIP file in CWM
All devices out of the box have stock Recovery from the manufacturer; instead, you need to install CWM using . Then find and download the ZIP archive with the firmware. Please note that firmware of other formats cannot be installed via CWM.
1. Now go to Recovery. To do this, turn off the device and press a certain combination of buttons. Depending on the manufacturer, the key combination differs, all are presented below possible options(the new one says how to enter Recovery on specific models):
- Volume up + power button
- Volume down + power button
- Volume up/down + power button + Home
- Volume up + volume down + power button
Great, you are in Recovery. The movement is carried out using the volume buttons, and the selection is confirmed with the power button.
2. Before installing the firmware, you must first reset the settings: select “wipe data/factory reset”.


4. Great! Return to the main menu and select "install zip".

5. After that “Choose zip from /sdcard”.

6. Navigate to the folder where you saved the firmware and select it.

7. A confirmation message will appear. Click “Yes – Install...”.

8. The firmware installation process will go through and at the end the message “Install” will appear at the bottom of the screen from sdcard complete".
Great, Android is flashed. We return to the main menu of CWM Recovery and reboot the system. To do this, select “reboot system now”.

How to install firmware via TWRP Recovery
If you prefer TWRP Recovery rather than CWM, flash it using . You can also install firmware from a ZIP archive through it:
1. Download the firmware and place it in any convenient location in your smartphone’s memory.
2. Go to TWRP. This is done in the same way as CWM.
3. Now you need to reset the system. To do this, select "Wipe" from the main menu.

4. To initiate a factory reset, drag the slider to the right.

5. When you finish cleaning your smartphone or tablet, press the “Back” button.

6. You will be returned to the main menu of TWRP Recovery. Now let's move directly to the firmware itself. To do this, select “Install”.

7. Navigate to the location in memory where the firmware is saved. Click on it.

8. Drag the slider to the right to begin installing the firmware.

9. The process will begin. It usually lasts 2-3 minutes.

10. At the end, a message indicating the successful completion of the firmware will appear. Click on "Reboot System" to boot into Android.

Considered another way to flash Android with ZIP help updates. You can also use special application. More on this below.
Using ROM Manager
The ROM Manager application allows . By the way, I advise you to make a backup of the internal memory before flashing the firmware in order to restore the data later. Now we will use another function of the program: flashing the phone using ROM Manager.
To operate the utility you need root rights - they are obtained using exploits: , or .
Must be installed custom Recovery(essentially, using ROM Manager, you flash the device through it, but at the same time you work with a simple and clear application interface, and not Recovery). Links to instructions are in the previous paragraphs.
So, install ROM Manager, find and download the required firmware for your device. Open the application and follow the instructions:
1. Place the .zip archive of the firmware in the memory of your Android phone or tablet.
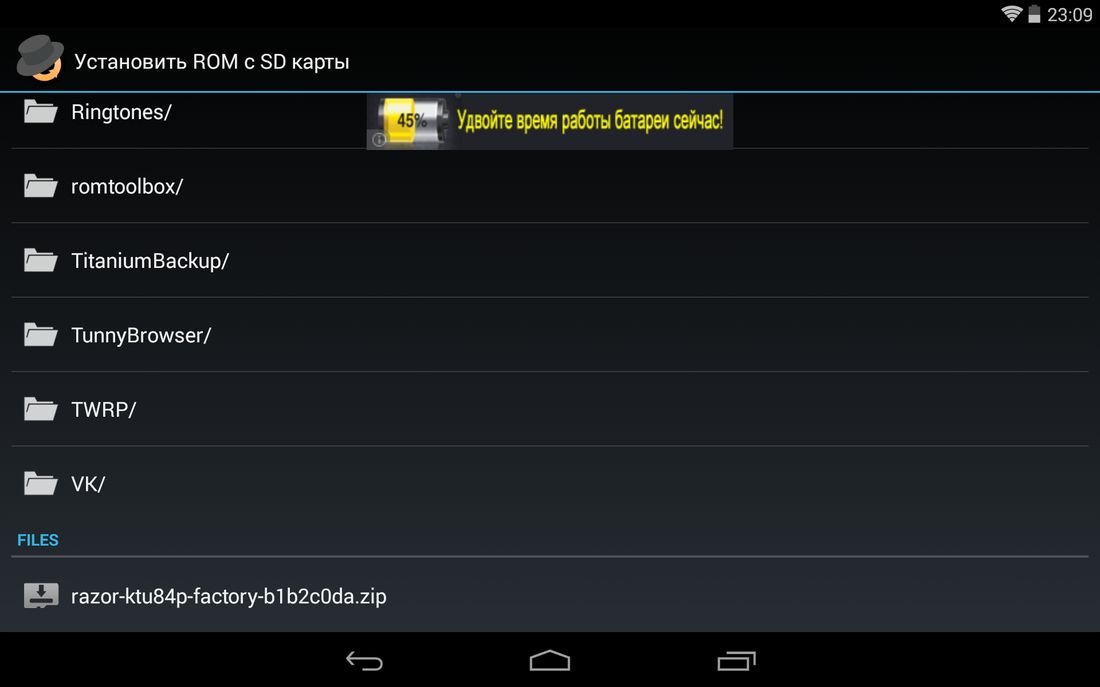
2. In the ROM Manager menu, open the “Install ROM from SD card” item.

3. Find the archive and click on it.
4. In the menu that opens, select “Reboot and Install”. I advise you to check the box next to “Save current ROM” so that you can restore the system if necessary.

5. In the next window, click “OK”, after which the device will boot into Recovery mode and the firmware process will begin.

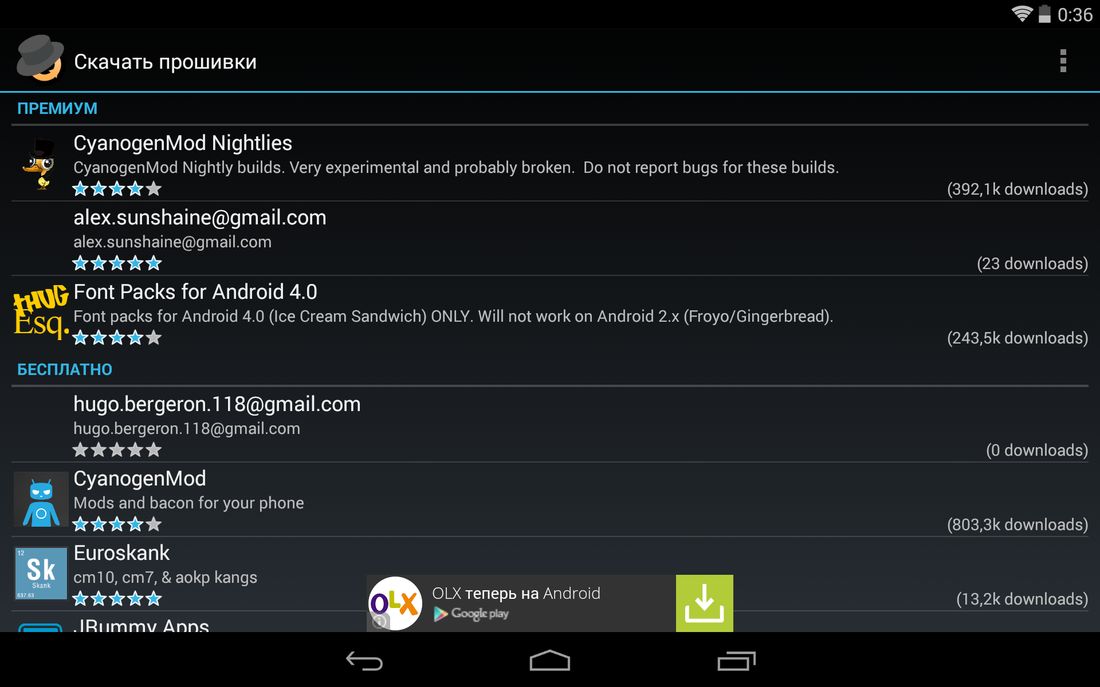
ROM Manager also has a function to search for ROMs for a device. In the main menu of the program, select “Download firmware”. Some of them are only available in the premium version of the program.
Above I talked about three ways to install firmware from ZIP archives on the device itself. Next will be information about updating Android firmware using a PC.
How to flash Android via computer
Many mobile devices are flashed using special PC utilities: below are instructions for working with Fastboot and SP Flash Tool. Through the second program various manipulations with Chinese phones are performed based on Mediatek processors.
Fastboot: instructions for flashing phone firmware
Many firmwares must be installed from a computer using Fastboot utilities, rebooting the mobile device into the mode of the same name. The program is included in the Android SDK Platform Tools, the installation of which is described in. In addition, you will need drivers (all information is available at the link).
Also, on devices from some manufacturers, you must first unlock the Bootloader:
- How to do it on HTC:
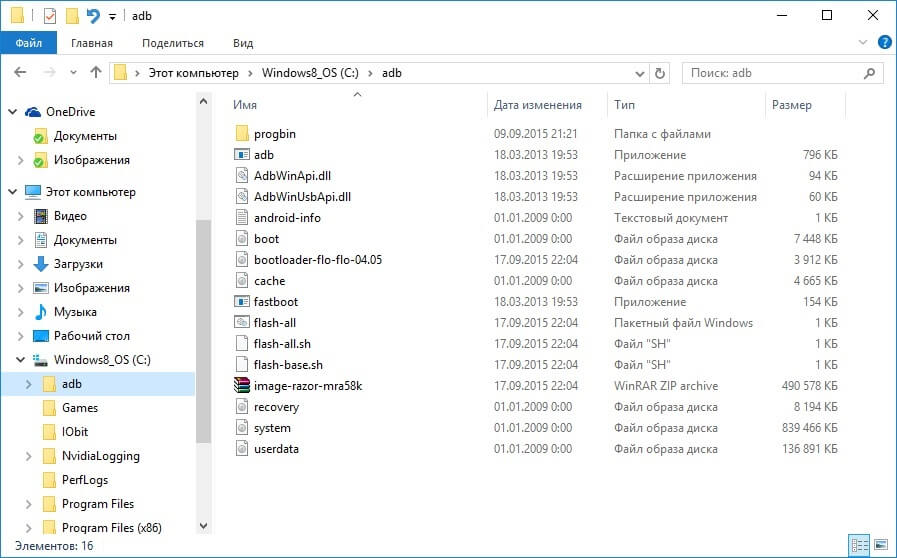
Next, download the archive with the required firmware and unzip it in the “platform-tools” folder, which contains “ADB” and “fastboot”. It should turn out something like this (I have the necessary components in a separate “adb” folder).
Then we connect Android to the computer via USB and transfer the smartphone or tablet to fastboot mode. The easiest way to do this is as follows:
- Turn on
- On the computer go to the command line
- We enter the commands sequentially and after each press “Enter”:
CD path to the "adb" file
For example, it is located in "C:\Program Files (x86)\Android\android-sdk\platform-tools". Then the path will look like this:
cd Program Files (x86)\Android\android-sdk\platform-tools
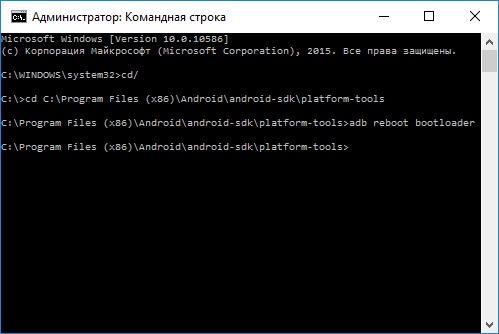
Then Android gadget will reboot into fastboot mode.

Before flashing any partition of the system, you first need to format it so that there are no problems with operation. To do this, use the commands (after entering each one, press “Enter”):
fastboot erase boot
fastboot erase userdata
fastboot erase system
fastboot erase recovery
fastboot erase cache
After cleaning the partitions, you can flash them. Enter commands (their number may be more - it all depends on availability certain files in one firmware or another, below is a set of basic ones):
fastboot flash boot imya-fayla.img
fastboot flash userdata imya-fayla.img
fastboot flash system imya-fayla.img
fastboot flash recovery imya-fayla.img
fastboot flash cache imya-fayla.img
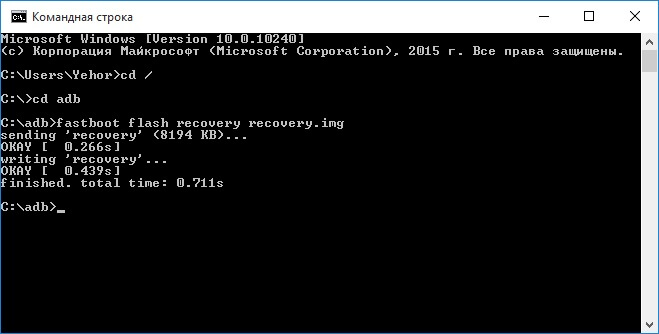
“Imya-fayla.img” is the name of the corresponding firmware file. For example, since in my case Recovery is being created and its image is called “recovery.img”, I enter:
fastboot flash recovery recovery.img
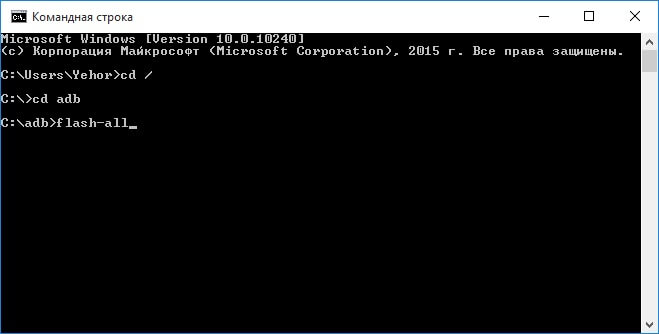
Usually the firmware can be installed in its entirety, that is, flashing all the files at once. To do this, “flash-all.bat” must be located in the folder with the firmware files. If it is, then simply enter this command and the firmware installation process will begin:
As a result, at the end a message indicating the successful completion of the firmware will appear.

You can boot the system. To do this, you need to exit fastboot mode on the device itself or using a computer. In the second case, you need to enter another command:
Installing ZIP updates in Fastboot
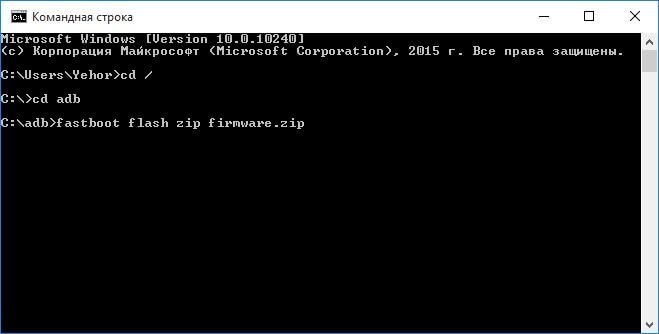
Using Fastboot you can install ZIP firmware. To do this, download and place the firmware in the folder where “ADB” is located. Put your smartphone or tablet into fastboot mode and enter the command:
fastboot flash zip imya-fayla.zip
“Imya-fayla.zip” is the name of your firmware, replace it with your own.
Wait for it to finish Android installations and reboot your device.
SP Flash Tool: flashing Chinese Android smartphones on MTK
Chinese Fly smartphones, Lenovo, Xiaomi, Meizu, ZTE, Doogee, Bluboo, UMI, Elephone, Oukitel, Blackview and others running on MTK processors are flashed special utility SP Flash Tool. She can sew individual partitions, format the system and create backup copies. Models based on MT6572, MT6577, MT6580, MT6582, MT6589, MT6592, MT6750, MT6737, Helio P10, Helio P20, Helio X10, Helio X20 and other less popular chips are supported.
The current version of the program is available on the website: http://spflashtool.com/. Before starting the process, install USB drivers under processor MTK(the link to the FAQ is in the “Fastboot” section of this manual).
1. Unzip the SP Flash Tool folder on the “C:\” drive and place the firmware next to it. The path to the files must not contain Cyrillic characters.
2. The folder contains the file “flash_tool”. Launch it.

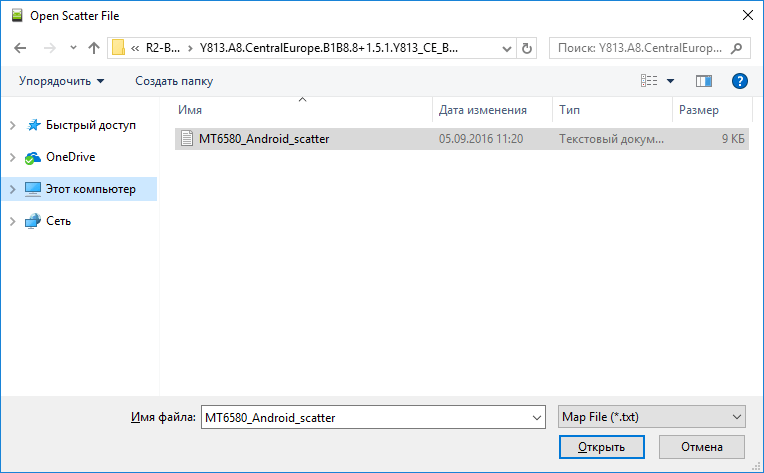
3. In the “Download-agent” field the path to “MTK_AllInOne_DA.bin” will already be indicated. Next, you need to click “Scatter-loading” and select the scatter file in the folder with the firmware.

4. Leave the switch on “Download Only” and mark which partitions need to be flashed (by default, all are selected).

5. Click “Download”. Then turn off the phone, remove the battery for a few seconds, insert it back and connect the turned off Android smartphone to the computer via USB.

6. First the red bar “Download DA 100%” will appear.

7. Then yellow with the firmware process. The percentages indicate how close the installation is to completion.

Nowadays, you can update or change the firmware of your device without contacting specialized centers. In essence, you are just wasting your money and time. How to reflash a phone yourself? We will give specific answers to this question in our article.
Features when flashing
We will now list a few important elements, which are necessary for flashing your cell phone.
- First, make sure the battery is charged at 50 percent or higher ( best option- this is a full recharge), since the flashing process can be quite lengthy.
- If you are afraid of losing important data contained on your cell phone, then make backup copies of the files and information you need.
- To flash the firmware, you will need a standard USB cable that comes with your phone.
- Your PC must have the appropriate software to flash your phone. You can find all drivers on the official websites of manufacturers or in numerous alternative sources. There are pirated and licensed versions Software that differs significantly in its functionality. It should be noted that official ones are not always better than pirated ones. After successful installation, you need to reboot your smartphone.
- Your device must have a clean ESN, that is, not be in the stolen or lost database.
- Next, you need to find out (for some models) MEID and ESN, where the first consists of 18 (starting with 2) or 15 digits, and the last of 8.
- Nowadays there are 3 types of firmware: from a ZIP archive, a TAR archive, or a three-file one. Below we will talk in more detail about each of them.
Are you still wondering how to reflash your phone? Believe me, it's not difficult at all. A little later you will see for yourself.

Firmware: “Android” from ZIP archive
This is one of best methods, used by many users. So, how to reflash an Android phone from a ZIP archive? First, you need to install root rights. It is worth noting that not all devices have this feature. Plus, once you achieve root rights, you will immediately lose the warranty on the device. Secondly, you need to make a backup, that is, a backup copy important files. What is needed for this? You can, for example, install a special program for system recovery, an excellent example of which is ClockWorkMod. It is designed for flashing phones on the Android OS, and in case of any failures, it allows you to return to the source code. To make a backup using the above program, you need to take the following steps:
- Launch ClockWorkMod Recovery.
- Select "Backup & restore".
- Next is “backup”.
- Confirm by pressing the “YES” button.
- Reboot your device by clicking “Reboot system now”.
After completing these steps, a backup should appear on your MicroSD in the “clockworkmod/backup” folder. After completing all the above operations, you can proceed directly to flashing. So, how to reflash an Android phone from a ZIP archive?
- Once the ROM file has downloaded, write it to the memory card. The firmware name may contain Latin letters and numbers, and the file itself must be in a ZIP archive.
- Disconnect your phone from your PC and charger.
- Next, turn off the mobile phone and start recovery mode.
- In the menu we find the “Wipe” item, which erases the current system information.
- Then you need to return to the root menu and select “Flash Zip from SD-Card” or “Install zip from sdcard”.
- We find the ROM firmware located in the ZIP archive.
- We confirm the firmware and follow the instructions on the screen.
- If everything went well and without errors, reboot the phone by selecting “Reboot system now”.
We are done with the first method. Now let's move on to the 3-file firmware.

How to reflash Android with three-file firmware
For this method, we will need the Mobile Odin Pro application, which is another program for Android firmware. If you decide to flash the firmware using this method, you don’t have to obtain root rights. How to reflash a phone with 3-file firmware? Let's move on to the algorithm of actions:
- First, you need to write files to your smartphone or tablet (3 files with the words CSC, CODE, Modem in their names). It is advisable to put all 3 files in one folder.
- IN Mobile application Odin Pro select “Open file”.
- Next, a window should appear where you need to select a file with the word “CODE” in the name. Click "OK".
- Then select “Modem” and press the “OK” button.
- We check that all sections contain data.
- After the check is completed, click “Flash Firmware”.
- We are waiting for the firmware process to finish, which can last over 15 minutes.
Finally, we move on to the last firmware method.
How to flash Android from a TAR archive
Not the most popular method, since there are very few firmwares that are packaged in a .TAR archive. Generally speaking, most of the process is the same as the previous method. How to reflash a phone from a TAR archive?
- In Mobile Odin Pro, select "Open file".
- In the window, find and select the downloaded firmware in .tar or .tar.md5 format, which was previously recorded in the “Firmware” folder. Click "OK".
- Then we check that all sections have the necessary data.
- Next, click “Flash Firmware”.
- We wait for the installation to complete and reboot the device.
I would like to say a few words about the firmware Chinese phones. Such devices are updated in exactly the same way, but there are a number of nuances. Firstly, finding high-quality firmware is very difficult, and for some gadgets it is completely impossible. Secondly, various fakes (like iPhone, Galaxy S4 and others) are unreliable, which is why custom firmware can cause irreparable harm to the device. That's all, we hope that our instructions answered your question on how to reflash a Chinese phone and original devices in order to update an already boring system. However, remember that flashing Android is an operation at your own peril and risk, which may not have very rosy consequences.
How to reflash a Samsung phone
In this section we will describe flashing using the MultiLoader application. After downloading it, you need to launch it and select “BRCM2133”. Then follow these instructions:
- Go to the “Download” mode by holding down the power (lock) and volume keys. If the message “Download” appears on the screen, it means that everything was successful.
- We connect the phone to the PC using a USB cable. After detecting the device, click the “Download” button and wait a couple of minutes.
- Disconnect USB and reboot the smartphone. If the mobile phone starts in English, then we do a simple “Pre-configuration” by typing “*#6984125*#” → “Pre-configuration”, after which we enter the password “*#73561*#”. Select your country of residence and reboot. Next, enter “*2767*3855#” in the window, which will help reset the settings.
- Everything is ready. The system has been updated. We think you understand how to reflash a Samsung phone.

Nokia firmware
New models support the firmware function “over the air”, that is, without connecting to a PC. All you need is high-speed Internet. So, how to reflash a Nokia phone? First of all, go to the “Settings” => “Phone” => “Phone Management” => “Device Update” section. You will be presented with all important information about the phone model and firmware version. Select “Functions” => “Check for updates”. If more than latest versions Software, you will be informed about this and offered to update old firmware. Everything is done automatically.
If you want to update the system via a computer by connecting a USB cable, then simply download Nokia app Software Updater and run it. Then follow the instructions that will appear on the screen of your smartphone.

How to reflash an HTC phone
First you need to download the firmware itself. In addition, it is important to obtain root rights and make a backup using the method we described earlier. You can also create a backup using Titanium applications Backup. Let's get started with the process:
- First we do a full “wipe”. We have already told you how to do this.
- Next, select “install zip from sd-card” in recovery.
- Then you need to enable or disable signature verification “toggle verification mode”.
- We find our firmware and launch it. We wait for the update to complete and reboot. At the end, “Installation completed” should be displayed.
As you can see, the firmware for phones of this model largely coincides with the method of flashing firmware from a ZIP archive that we described earlier.

Firmware Sony Xperia
To flash the firmware we will need the Flashtool program and a USB cable. Let's start the process. So, how to reflash Sony phone Xperia?
- First, we download the required firmware, which will be in .ftf format.
- Place this file in the /flashtool/firmwares folder.
- Then you need to launch the FlashTool utility, turn off the phone and wait 30-60 seconds. Next, click on the button in the application where the lightning is drawn and select “Flashmode”.
- A little later you will receive a message stating that the firmware is ready for installation and you need to connect the device.
- We hold down the key responsible for lowering the volume, after which the Flashtool program identifies your device.
- We wait for the end of the firmware until the message “Flashing finished” appears. Reboot the device and enjoy the updated software.
Let's move on to last phone, for which we will describe the firmware process.
Fly firmware
So, how to reflash a Fly phone? Follow the algorithm:
- We connect the phone (turned off) to the PC using a USB cable.
- Download, install and launch the same FlashTool.
- Go to the “Download” section, where we indicate the COM port and speed (we do not recommend setting it higher than 460800).
- Specify the downloader (“Download Agent”).
- We load the memory distribution scheme of your smartphone (“Scatter-loading”) and then check the lines with the areas of the device’s flash memory that are subject to programming.
- Click “Format FAT”, where we select “Manual Fat Format”. In “Begin address” and “Format Length” in hexadecimal format you must specify the starting address (0x0), as well as the size of the smartphone memory that needs to be cleared. Be careful as calibration data may be deleted inadvertently.
- Click “Ok”, then press the power button of the device.
- To start the firmware process, you must click the “Download” button.
- After the update is completed, disconnect the phone from the USB cable and reboot it (several times if necessary).
As you can see, everything is quite simple.

In conclusion
Many users of phones running Android OS sooner or later wonder about changing the firmware, since the original one becomes outdated, which affects the overall performance of the phone. At the same time, system interruptions very often occur, which is especially important for Chinese phones. However, for various reasons, not everyone wants to go to service center, preferring to reflash your smartphone yourself. In this article we have given many illustrative examples. this process. We think you found it interesting.
Today we will talk about how to reflash an Android smartphone or tablet via a computer, laptop or directly from a flash drive using system Recovery. Let us immediately note that this is not a very simple task. So, if you are not “friendly” with your computer at least at a basic level, we do not recommend getting into the jungle of firmware.
Firmware is a replacement for existing software, which includes the operating system itself. Android system and software for it. Moreover, the firmware may be different. For example, we can update the OS through the so-called OTA (Firmware Over The Air or " Software by air"). IN in this case The official version of the software is downloaded and automatically installed.
It is also possible to install other firmware using a PC or recovery. This option provides a much wider selection of systems for installation. For example, it could be CyanogenMod or Google Pixel. But such software will no longer be official, which will lead to loss of warranty and a violation of the security of the device.
One way or another, you are free to do whatever you want with your phone. Moreover, useful functions and the firmware process brings a lot of innovations. Today you will see this with your own eyes. We will show you how to flash an Android phone using our “experimental” Xiaomi as an example. Redmi Note 4x, computer running Windows 10 and TWRP Recovery.
Firmware rules
Before moving on to preparation and the firmware itself, you should consider several important points:

- be sure to look step by step instructions for dummies on flashing your phone. The fact is that each smartphone running Android OS is flashed differently. We will only show a manual for Chinese Xiaomi;
- Never download drivers, flashers or firmware themselves from suspicious sites. Take new ROMs (images) only from official sources or the time-tested 4PDA forum;
- Charge your phone to 100%. If the battery runs out of capacity during the firmware process, the device will turn off and the OS will be damaged. As a result, it will be much more difficult to restore it (in some cases, impossible);
- Use only the original USB cable that you bought with your phone. Also avoid connecting the cable to the front panel of the PC.
Important! Read the instructions carefully. You perform all actions at your own peril and risk. If something goes wrong, instead new firmware and a lot of useful functions you will get a “brick” in a beautiful case.
Data backup
Let's move on to one of the most important stages of preparing for the firmware. We need to save all the data which includes photos, music, videos, telephone numbers, calendar entries, etc. After all, after updating Android, in most cases, all this will be deleted.
So, in order to reserve contacts, SMS, calendar events, etc., you need to set up synchronization with Google. We will show how this is done using the example of Xiaomi. You act by analogy.
- Let's go to the smartphone settings (to do this, lower the notification shade or go to the application menu).

- Select the synchronization item.

- Tap on the Google tile.

- As you can see, some data is currently not synchronized, including contacts. Let's update the records. To do this, in our case, you need to click the “More” button.

- Next, click on the menu item indicated below.

As a result, all records were uploaded to Google servers and now we won’t lose them when we flash Android.

There are also special programs to create backup copies, For example, Titanium Backup.
As for photos, music and videos, everything is simpler here. Copy important data to a memory card or computer via a cord. Also make sure you remember your passwords various programs, For example, social networks. Once all files are saved, move on to the next step.
Flashing an Android smartphone
Now it's time for the firmware itself. For those who do not read the entire article, let us remind you: each Android phone is flashed differently - if you load the device with software or OS that is not suitable for it, you risk damaging the gadget, sometimes beyond the possibility of recovery. We show you how to flash Xiaomi phone Redmi Note 4x (the “x” symbol means that the device runs on Qualcomm processor, not MTK).
 The system bootloader is a small area of memory that is responsible for starting the OS itself (analogous to the MBR in Windows). This bootloader is the key to the security of your Android. It is after unlocking it that attackers can easily gain access to any data if the device is stolen or lost. This is the main disadvantage unofficial firmware. Although after installing third-party OSes, the bootloader can be blocked again.
So, in order for us to flash the phone, we also need to unlock the bootloader. In some phones this is very easy to do (Samsung directly flashes Odin program), in others it is much more difficult. For example, in the case of Xiaomi, you must make a request on the official website under the pretext that you are a designer (working on new themes for Xiaomi) or a developer (testing software). If access is approved, you will receive a message about this and will be able to open the phone's bootloader.
Firmware
You can flash Android in different ways. There are 3 main options:
- software update over the air (OTA). Automatic download and installation of new versions of programs and the operating system itself as part of developer support;
- firmware using a PC or laptop. In this way, you can install both official ROMs and any custom firmware;
- using Recovery. Using a special PreOS mode, you can install any ROM stored in the phone's memory or on a memory card.
Let's consider each of the options in order.
Standard update
Let's start with the simplest thing - updating Android to the latest version. It is important to understand that depending on the phone model and OS version, the location of menu items and their names may differ.
- Go to the device settings by tapping on the gear.

- Next, go to the “System Update” section.

- Select the menu item “About phone”.

- Here you should click the button to check for new versions, unless, of course, the process starts automatically.

In our case, the latest one is installed Android version. If you find materials for updating, simply confirm their installation. The phone will download the data and, after rebooting, install it.


Via computer
This method can already be considered a “real” firmware, and first we need to unlock that same bootloader. We wrote about how to get permission in the case of Xiaomi. You can find instructions for your gadgets on the 4PDA website.
So, let's start by unlocking the system bootloader (permission received from Xiaomi):
- Download and install the Mi Flash Unlock program on your computer/laptop from a well-known forum. Turn off the phone and simultaneously hold down the Volume and Power buttons. And we wait until the gadget is switched to FASTBOOT mode.

- Install the smartphone driver, launch Mi Flash Unlock and connect the phone to the computer via a cord. At the first stage, we accept the program license by clicking the button marked in the screenshot.

- Enter the data from your Mi account and click the authorization button.

- To start unlocking, we need to press the “Unlock” button.

- A small window will appear, warning us that if we open access to the bootloader, our device will become vulnerable to viruses that can damage it. We are waiting for the countdown to end.

- If you are reading these lines, it means you have not changed your mind. Click the button that says “Unlock anyway”.

- The unlocking process will begin, which consists of verification and, in fact, opening the bootloader.

- As a result, you will see a success message. Click the marked button.

After turning on the device, when the OS starts, the inscription “Unlocked” will be visible.
After our bootloader is unlocked, we can move on to the firmware itself. Let's look at how it goes:
- We will use the MiFlashPro utility. Download it, for example, from w3bsit3-dns.com and install it on your computer. We also need the firmware itself. The advantage of this utility is that it itself downloads the latest firmware versions from the official website. So, again we put the smartphone into FASTBOOT mode and connect it to USB. Go to the “ROM Packages” tab and start writing the model name in the search box, then select the desired item from the list that appears.

- Click the button marked in the screenshot to update the list of available firmware.

- Choose the required version, mark it with a checkbox and click “Download”.

- Go to the “Downloading” tab and wait for the firmware download to finish.

- When the required software is downloaded, it will appear in the appropriate section.

- To start flashing the firmware, go to the “Mi Flash” section.

- We remind you: at this moment your phone must be connected to FASTBOOT mode. Click the marked button so that the program can find it.

- Select the firmware image that we downloaded, as well as the firmware mode, and click “Flash”.
Description of firmware modes:
- cclean all. Full firmware with data deletion. The bootloader remains unlocked;
- save user data. The firmware only affects system partition memory, and your data remains untouched. The bootloader remains open;
- clean all and lock. Full firmware with removal of all user files. The bootloader is blocked.

- The Android firmware process started and was completed. This takes approximately 5–10 minutes. The phone will reboot automatically.


Ready! You have a fully customized smartphone in your hands.
Via Recovery
There is another way to flash firmware for an Android phone. It consists of using a special mode that works without loading the main operating system. The Recovery function is called and can be either standard or custom.
Let's look at an example TWRP installation and using it to flash the new version of Android 8 Oreo, taken from Google Pixel:
- Initially, you should unlock the device's bootloader. We described above how this is done. Next, we will have to download and unzip the folder with the files needed to install the recovery onto our computer. Then run the flash_and_boot.bat file.

- The process of writing Recovery to the system partition will occur. When it ends, press any button. The phone will reboot into recovery on its own.

- Now you need to download the firmware ROM in zip format and put it into the phone’s memory. After this we move on to pre-cleaning. Tap on the marked icon.

- Go to the “Selective Cleaning” tile.

- We check all the boxes except for the user’s internal memory, then move the slider.

- We are waiting for the Android cleaning process to complete.
Attention: this action will completely remove the existing operating system. Before you begin, make sure you have a working ROM of another firmware.

- Go to the main Recovery menu and click on the installation tile.

- Select the pre-loaded firmware ROM.

- To start the firmware, move the slider to the right.

- The firmware process has started. We are waiting for its completion.

- If your default firmware does not have Google services, they need to be flashed separately. To do this, download gaps from a special website, place them in the phone's memory and install them in the same way as the OS itself.
Attention! Choose Google Apps according to your processor bit, architecture, and Android version.

- Select the file by tapping on the name and install it.

- Finally, we move on to the reboot point to start the new system.

As a result, on our Chinese Xiaomi Redmi Note 4x has Google Pixel firmware installed.

There are also all necessary Google Services, including Play Market.

And, of course, this is the latest version of Android 8.1 Oreo.

TWRP is not the only custom recovery. There are other options, for example, CWM Recovery.
As a result, you know how to flash your Android smartphone using custom Recovery. Let's talk about what to do if the device does not boot.
If the phone does not start
Sometimes it happens that the phone simply does not turn on after flashing. It may not respond to buttons at all or get stuck at the startup logo. If this happens, try flashing the official ROM through your computer. Naturally, this option is possible if Android at least switches to FASTBOOT.

Again, this applies specifically to Xiaomi. In cases with other gadgets, for example, Lenovo, Prestigio, HTC, Samsung, ZTE or Fly, everything may be completely different. In any case, in order to eliminate or at least minimize the possibility of phone breakdown, you need to carefully follow the instructions specifically for your model and download firmware with programs only from trusted sources.
Conclusion
At this point, we consider the question of how to independently change the firmware on Android at home. If you need any additional information, we invite you to write about it in the comments. Just don’t say that something from our instructions doesn’t work. We took screenshots from a real device and everything went well.
Video instructions
Nowadays it has become fashionable to have Android phones. But, unfortunately, they have one drawback: the firmware often crashes, what could be causing this? 1) a virus 2) there was an Android update and the process suddenly stopped. But that’s not all, there can be a lot of reasons. So, how to change firmware on Android and what should we do if we have such a problem?
How to change firmware on Android from a computer
First, in order to change the firmware to Android, we need a computer (preferably with the Internet), our phone and an Android cord. We look under the battery for the model of our Android.
Attention! Before flashing the firmware, remove the SD card and SiM card, since after the firmware the data will be completely and irrevocably deleted. Next we need to find the firmware for our device. If you don't have one, you can find it online.
IMPORTANT. You need to download the firmware for your specific model. The firmware has been downloaded. Usually the firmware is in an archive, so you will need to extract all the data from there into a separate folder. Next, we need a driver for the phone and if it is on the website, download it. If not, you will have to do the weight manually.
Using a cord, we connect our Android to the computer when it is turned off, or select the boot menu in the phone. It all depends on the device model. Usually, to call the boot menu you need to press two buttons: the power button and the volume - minus button. But there are exceptions: if there is a button (ok), you will need to press that too.
So we connected the device to the computer, then the computer should go automatic search device driver. Our driver usually does not install itself. By the way, there are exceptions and it may install automatically.
Let's assume the following: the driver cannot install itself. What to do? To do this, right-click on the computer shortcut “computer”, select “manage”, click “device manager” and look for our device. Usually the following is displayed there: “device not recognized.” Then select it and click update driver.
If we have downloaded the driver, then select “search for driver” on the computer, after which the installation should begin immediately. If we don’t have a driver, we choose to search for a driver on the Internet (I usually do this). Next, the driver should be installed and our device will be recognized.
Now the next step: we need firmware program. Usually it is located next to the firmware on the website. So, let's download our program. Let's open it. The phone is connected to the computer. Select the firmware and press the “start” button. Usually the firmware should go straight away. Our Android will be flashed for about five minutes.
After successful firmware installation, the program will display a window indicating that the firmware was successfully installed. Now the phone can be disconnected from the computer. And after Android turns on, it will work like new.