Installing OS on Macbook. Installing Mac OS on MacBook. Update from the App Store. How to completely reinstall mac. Reinstalling Mac OS X via Recovery. Reinstalling the operating system
Any operating system sooner or later needs complete reinstallation. The reasons for this may be different: infection virus programs, bugs and so on. As a result of "pollution" unnecessary files, the device starts to work much slower due to processes. In some cases, it is easier to reinstall the system than to find the cause of the problem and fix it. Let's figure out how to reinstall Mac OS and what is required for this.
What is needed to reinstall?
Those users who are familiar only with operating computers Windows system, they won’t be able to without additional help reinstall OS on Mac. To reinstall Mac OS on a MacBook, you must prepare the following:
- MacBook () which is connected to the network;
- our step-by-step instructions.
Now let's move directly to the installation process clean version Mac OS. This instruction suitable for those who have the version installed operating system 10.7 or later. If you have an older version, then you should update it using standard means OS. You can check the software version using the following steps:

How to reinstall Mac OS Sierra from scratch?
To begin with, it’s worth noting that reinstalling a Mac involves completely deleting data from hard drive computer. Therefore, first copy all important information on third party media.
This can be done using the program for backup Time Machine. Following the instructions of the Copy Wizard, you can easily create a backup copy on external media. Time Machine can also create backups in automatic mode. Old copies will be deleted, and new ones will be saved on disk. This way you won't have to worry about the data being up to date.

Now you know how to reinstall mac os x on macbook pro or air, as well as on iMac. Next, you need to configure the system and complete the installation process.
Final setup before use

After the installation is complete, the program will prompt you to basic settings:
- On the first screen, select the Mac OS language. In the future, it can be changed within the software settings;
- on the second screen you will be prompted to connect to Wi-Fi (optional). This step can be skipped;
- the next step is transferring information. Before you reinstall your MacBook Pro, Air or iMac, you can back up all your data;
- authorization via Apple ID (optional);
- acceptance of the license agreement;
- Creation account Mac OS for computer.
Ready! Now you can independently install Mac OS on a MacBook of any version or an all-in-one iMac. The whole process is as simple as possible: only a few keystrokes are required from the user.
Reinstall any computer system or mobile equipment is carried out when such a need arises. The reasons for it are different: program failure, the desire to replace it with a newer, more advanced and effective version operating systems. The reinstallation process itself is not complicated. You need to have everything at hand. Another installation of the operating system different computers different. Next, we’ll find out how to do this on a MacBook Pro.
To do this, you will need either a (reinstallation) disk, a USB flash drive or the Internet. Mak must be plugged into a power outlet. Mandatory cleaning hard media using “ Disk Utility”, which is located in “Utilities”. To do this, in the “Apple” menu, click on “Restart”. And immediately press the “Command” and “R” buttons, holding them down until a list of commands appears in the window.

For reinstalling MacBook you don't need a lot of computer knowledge software systems. Now any schoolchild can do this, the main thing is to know what is what and carefully follow all the points of the instructions.
Quite often, Mac users are faced with the following problem - how to return the computer to factory settings, resetting all user information, and reinstall the operating system completely. Instructions for this process presented below.
Mac, like most other Apple devices, is designed to personal use. This means that usually computer owners fine-tune the system for themselves and another user will not be entirely comfortable working with it. If there is a need to completely get rid of existing data and settings, then you need to follow the simple steps described below.
Clean installation of macOS: preliminary steps
IMPORTANT: Before clean install(reinstallation, flashing, factory reset) Mac, be sure to check:
- Is the Mac tied specifically to yours and not to any other
- Do you remember the credentials (username and password) of your Apple ID. You can check, for example, by logging into this page (from your computer).
The fact is that if the function was activated on the Mac (located along the path: System Settings → iCloud → ), then after reinstalling the system (resetting to factory settings), the system will ask you to enter the Apple ID to which the device is linked.

ON TOPIC:
How to reset Macbook, iMac, Mac mini, Mac Pro to factory settings (how to reinstall macOS)
Boot Mac into Recovery Mode
1. Make sure you have an Internet connection (for later macOS installations), as well as electrical connections in the case of a MacBook.
Attention! Next steps will result in complete deletion of ALL data on your Mac - save in advance necessary information on external media;
2. Restart your computer (or turn it on if it was turned off) using the menu → Reboot;
3. During the reboot process, press and hold the key combination that suits you best:
⌘Cmd + R– installing the version of macOS that was running on the computer before problems arose. Those. your Mac will install exactly the same version as before.
⌥Option (Alt) + ⌘Cmd + R– Update to the latest version of macOS that your Mac is compatible with. For example, if the Mac ran on High Sierra, and the breakdown occurred after the release of the final build macOS Mojave, the system will download from the Internet and install Mojave.
⇧Shift + ⌥Option (Alt) + ⌘Cmd + R– installation of the version of macOS that was originally installed on the computer (or the closest available version to it).
Note: required macOS Sierra 10.12.4 or more new version OS.
4 . Then the window “ macOS Utilities"(on versions lower than macOS High Sierra may be called "Utilities" macOS programs"). Here you need to select " Disk Utility" and click " Continue";

1 . Select in Disk Utility your drive in the menu on the left (usually a Macintosh HD, it's at the very top).
2 . Click on the inscription First aid.
3 . Click Launch. The application will check boot disk on “health status”, i.e. functionality and correct existing errors. This process may take some time.

4 . After checking is completed, click Ready.

Erasing the boot disk
1. In the application Disk Utility, select a verified boot disk, go to the section "Erase"(at the top of the screen);

2. On the menu "Format" select APFS (for computers with installed macOS Sierra and more old version OS select Mac OS Extended) and click " Erase";


3.
Once the disk formatting process is complete, click " Finish" to exit Disk Utility.
Reinstalling the macOS operating system (factory reset)
Reinstall macOS using the appropriate item (screenshot below) and follow the instructions. Latest version macOS will be downloaded from the Internet and the macOS reinstallation process will begin. During this time, the computer may restart.
Note: If you're installing from scratch, you'll have to configure your Mac and program settings all over again.


It refused to boot. CMD+R doesn't help. What should I do?
The start of the working day did not foretell anything bad. A cup of coffee, a good mood, the Power key and the MacBook displays the following sad picture:

A worrying thought about the safety of the data immediately flashed through my head, current version backup copy TimeMachine(which was not at hand) and possible loss of information.
Attempt No. 1. Booting into recovery mode
Being an interested user and an avid Mac user, I immediately tried to start the MacBook in recovery mode by holding down the keys CMD+R. Instead of the usual disk utility, the system greeted me with a window with an attempt network recovery.

By selecting home network Wi-Fi, I started waiting further development events. After a few minutes, OS X's recovery progress was interrupted error -4403F.

Attempts to start the process again led to exactly the same result. Rebooting the router confirmed that network connection everything is fine.
About trying to diagnose a Mac, fixing it possible errors hard drive or simply reinstalling the system was now out of the question. Section with Recovery HD, in which the tools for restoration are stored, ordered to live long.
Attempt No. 2. Resetting PRAM and NVRAM
Mac computers were created by highly qualified engineers, so the correct organization of the entire system and the presence of “hidden hardware reserves” allows you to avoid a number of interruptions in its operation. One of these reserves is memory sections PRAM And NVRAM. It stores settings data that is not reset even after the computer is disconnected from power. To revive the fallen system, a decision was made reset PRAM settings and NVRAM.
1. Turn on the Mac.
2. After appearance white screen quickly press the key combination CMD + Option + P + R.
3. Hold until the Mac reboots again and the Mac greets the sound.

PRAM and NVRAM reset completed.
Although they say that hope dies last, it, lifeless and barely alive, continued to lurk in my mind. Resetting PRAM and NVRAM did not affect the error when loading the system. The MacBook continued to test my nerves.
Attempt No. 3. Reset SMS
Having become accustomed to storing all necessary data “in the cloud” or on removable media, the most simple solution global problems There was always a reinstallation of the system from scratch. This case was special. I needed data stored in memory and I needed a working Mac today.
In the Mac environment there is something called system management controller SMC. The stability of the entire system depends on the reliability of its operation. Resetting SMC settings can cure a number of problems like:
- - constantly high speed cooler rotation even at minimum load;
– freezes while the system is leaving Sleep mode;
– errors related to the operation of additional peripherals or external monitors, as well as fixing system boot problems.
For SMC reset the following steps should be followed:
- Laptops with built-in batteries
1. Turn off your MacBook and plug in the power adapter.
2. Press and hold the keys at the same time Shit + Control + Option + Power and hold until the MagSafe adapter indicator changes color.
3. Release all keys and press the key again Power.
- Laptops with removable batteries (older models)
1. Turn off your MacBook and unplug the power adapter.
2. Remove the battery from the laptop.
3. Hold down the key Power And hold for at least 5 seconds.
4. Release Power, insert the battery and connect the power adapter. Turn on your laptop.
- Desktops (iMac, Mac mini, Mac Pro)
1. Completely disconnect the computer from the mains power.
2. Wait at least 30 seconds.
3. Connect the power and wait another 5-10 seconds and then turn on the computer.
The above actions can become really effective and the system will start. In my case, a miracle did not happen.
Attempt No. 4. Recovery using a bootable USB flash drive
An attempt to revive the system using the above actions was unsuccessful. The only option left was to reinstall OS X using bootable flash drive. For this step you will need:
- another computer running the OS X operating system;
- Flash drive with a size of at least 8 GB.
Preparing a flash drive
1. In the store Mac applications App Store You will need to download the OS X Yosemite system distribution.
2. To create a bootable USB flash drive, download the DiskMaker X utility (distributed for free). You will need it to deploy the distribution.
3. Format the flash drive using Disk Utility V Mac OS Extended (Journaled).

4. After the distribution has finished downloading, cancel the proposed installation and run the utility DiskMaker X.
5. Choose a system Yosemite (10.10). The utility will detect the distribution in the folder Applications. Click Use this copy(use this copy).

6. Select the drive installed in the USB port and agree to the warning about complete removal all data present on the flash drive.

7. The process of mounting the distribution kit with OS X Yosemite to the drive will begin.

The copying process takes about 10-20 minutes and depends on the writing speed of the USB flash drive. During mounting, the screen may periodically open dialog boxes and folders. Never mind.

Once the OS X Yosemite image has successfully deployed, remove the drive.
System installation
1. Insert the flash drive into the USB port of the “problem Mac”, press the key Power and hold down the key Alt.
2. In the list of available partitions for downloading, select OS X Base System. Please note that there is no section Recovery.
.

3. The Mac will boot into recovery mode. After selecting the main system language, the installation menu will open. IN top menu you will find a standard list of utilities.
Take advantage disk utility and try checking your access rights first system partition and correct possible errors. If after rebooting the system still refuses to boot, you will need to separate a partition of at least 20 GB in size for installation purposes new system. Detailed instructions by disk partitioning you will find .
From the same menu, you can either begin the process of installing the system on a newly created partition, or restore the system using a TimeMachine backup (see).

CAREFULLY! Be careful when choosing the installation partition. The installation must be carried out not on top of the old partition, but on a newly created one.
After the installation is complete, you will have access to all the data located on the “damaged” partition with the old version of the system.
MAC OS, like Windows, sometimes requires reinstallation. This may be due to slow work your MAC devices or in connection with its sale (I don't think you'll be happy with the sale of a MAC with your personal information). Or vice versa, buying with hands MACBOOK(PRO, AIR) or iMAC with a bunch of strange files or not necessary programs. In general, there can be many reasons to reinstall MAC OS. In this article I will describe in detail how to reinstall MAC OS and get a “clean” operating system.
So, before you start, you need to transfer all the necessary information to external media, since after reinstalling MAC OS, it will be almost impossible to restore anything.
In order to reinstall MAC OS you will need:
1 Connected to source MACBOOK power supply(PRO, AIR) or iMAC;
2 Internet access from MACBOOK (PRO, AIR) or iMAC;
3 This article and about an hour of time.
To reinstall MAC OS using the method described below, you must be using OS 10.7 or higher (10.8, 10.9). In order to check what version of the operating system you have installed, click on the apple in the left top corner and select "About this MAC". The window that opens will contain information about the installed MAC versions OS.
If you are using a version older than 10.7, you need to update it.

You should load "OS X Utilities", if this does not happen, repeat the procedure by rebooting and pressing the "COMMAND" + "R" key combinations.
Select Disk Utility.

IMPORTANT!!! The following steps will delete all data on your drive, so you need to be sure that necessary files no on MAC.
Then select the disk with the system, open the “Erase” tab on the right and click the “Erase” button.

Confirm deletion by clicking the "Erase" button.

After that, close the Disk Utility window and select Reinstall MAC OS.

After this, confirm the installation, click the "Continue" button. With the release of the new OS X 10.10, OS X Yosemite will be installed.

In the next information window click "Continue".

The next step is to read license agreement and accept it.


Then select the installation drive. IN in this case the choice is obvious. Click the "Install" button.

After this, the MAC OS download process will begin.

After this, the MAC will automatically reboot and MAC OS installation will begin.

After the installation is complete, you will receive a “clean” MAC OS operating system, all that remains is to set some settings.
The next step is to select the country where you plan to use MACBOOK (PRO, AIR) or iMAC.

Select your keyboard layout.

You can connect to Wi-Fi networks(You can skip this step if you wish).

If you want to restore data made previously with Time help Machine or with Windows computer select the appropriate item, if you do not plan to restore anything, select “Do not transfer any information” and click “Continue”. The data you transferred to external media can be rescheduled later.

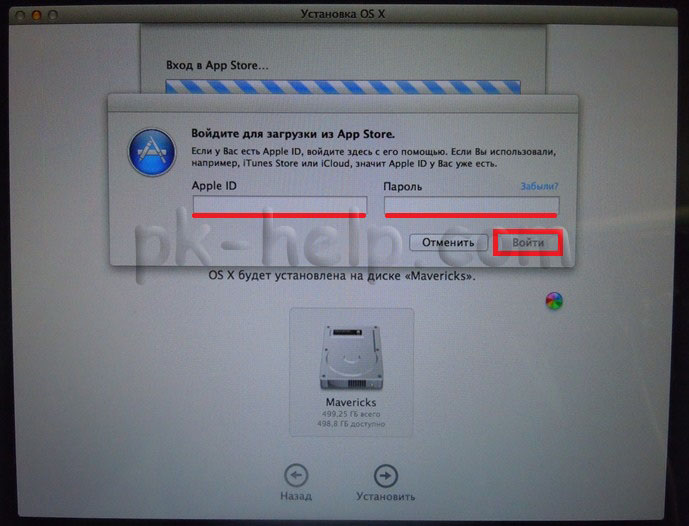
The next step is to sign in with your Apple ID. IN in this example I won't do this.

Then read the license agreement and accept it.

After this, provide your credentials (username and password) and click “Continue.”

The last step is to register your MAC (this step is optional).

And in the end you will get a "clean" MAC OS.
Video of reinstalling the MAC OS operating system on iMAC/MACBOOK PRO/AIR.
In my opinion, installing MAC OS is incredibly simplified, you don’t even need disks with the operating system - press a few keys + an hour of time and you have a “clean” MAC OS.