Installing windows 7 from a usb flash drive. Installing an operating system from a flash drive via BIOS
Step by step installation Windows 7 from a flash drive!
Are you planning to install Windows 7, but your DVD drive refuses to work? Or do you not have one at all, since you use a netbook? Indeed, the situation is not pleasant, but there is no need to despair. Great way way out of this situation - installing Windows 7 from a USB flash drive.
Please note that for the installation process you will need:
- A flash drive, the volume of which must be more than 4GB.
- ISO image with Windows 7.
- Windows 7 USB/DVD Download Tool 1.0.
For simplicity, we will conditionally divide the entire process of installing Windows 7 into several stages:
- Creating a bootable USB flash drive.
- Installation operating system.
Go to the “Start” menu, select “Control Panel”, then click on the item “ Accounts Users and Family Safety”, and lastly, select “User Accounts”. Here we click “Change User Account Control settings”.

Move the slider to the very bottom, then press OK.
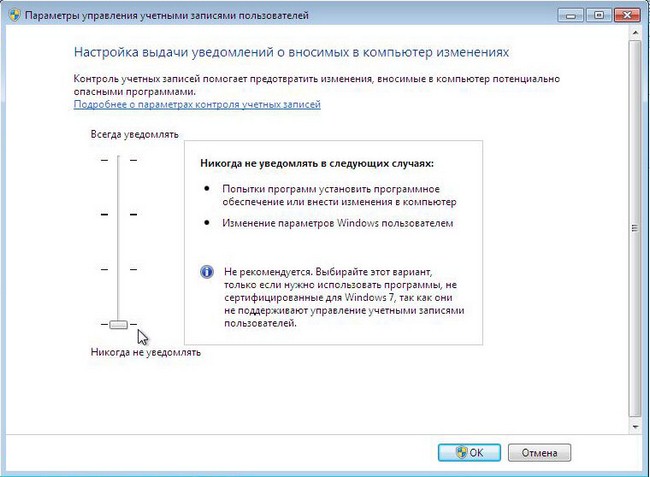
We confirm our decision by clicking Yes.

Congratulations, you have completed the first stage - disabling User Account Control.
2. Creating a bootable USB flash drive
There are several ways to install the Windows 7 operating system. Installation from a flash drive using the Windows 7 USB/DVD Download Tool 1.0 is the easiest and fastest. Connect the flash drive to the computer, having first copied all important information from it. Next, launch the USB/DVD Download Tool and click Browse.

Select the operating system ISO image and click Open.

After you have pointed to computer ISO image, click Next.

Click USB device.

In this window, select the connected flash drive and click Begin copying, which will start the copying process.

Click Erase USB Device to format the flash drive.

Click Yes to confirm your decision.
The process of writing the image to the flash drive has begun.

Once recording is complete, Backup completed will appear. You can safely close the program.

That's all. You created a bootable USB flash drive yourself. As you can see, installing Windows 7 from a flash drive is not at all difficult if you follow these steps.
Before you start installing Windows 7, you need to set the flash drive to first place in the boot priority in the BIOS. To get to the BIOS menu, you need to start a specific key when you boot your computer. This could be Del or F2. When loading, you may see this prompt at the bottom of the screen:

In Bios, look for the Boot tab. Here, in boot order, you need to put the bootable USB flash drive first. To do this, use the arrow keys, as well as F5 and F6. Use the arrow keys to select the flash drive, and use the F6 key to bring it to the first position. Next, save your changes and exit this menu by pressing F10.

A window will appear where you need to click Yes, confirming your intentions to put the flash drive first in the boot order. If you did everything as described here, then after restarting the computer, the installation of Windows 7 from the USB flash drive will begin.

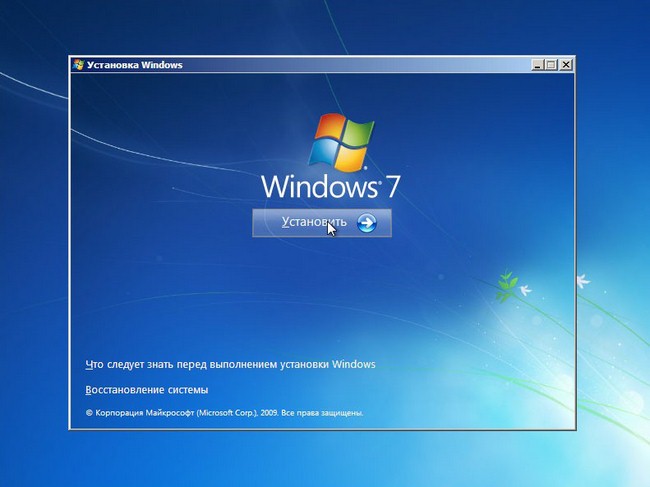
Select the basic installation options and click Next.

Click Install.
We agree with license agreement by checking the appropriate box. Click Next.

At this point, you will be offered several installation types. We recommend choosing the full installation.

Here you need to specify the partition (disk) on which Windows 7 will be installed. Please note! Do not install the operating system on hidden partitions, if there are any.

After selecting the partition where you plan to install the OS, click Disk Setup.

Click Format. Pay attention! Formatting will permanently delete all data on this drive.

If there is no important information, feel free to press ok.


The installation of Windows 7 from the USB flash drive will begin.

If all files are copied, the computer will reboot for the first time. If you don't want to wait for the 10 seconds to pass and the computer to reboot itself, click “Restart now.” During reboot, be sure to return hard drive to first place in boot priority, otherwise you will start installing the OS again.


Here you need to enter your Username and Computername. Let's move on.

If you wish, you can set a password for your account.

Enter license key in the field. Please note that you can enter the key after installing the system. Click Next.

Here we specify the security settings.

Enter the Date and Time.

Specify network settings.

If you followed these steps, then you will see this image, which indicates that the installation of Windows 7 is complete, for which we congratulate you!

Video tutorial on installing Windows 7 from a flash drive
Write in the comments below if something doesn’t work out for you or if you have any difficulties - we’ll figure it out together!
A netbook is a great thing, as long as it works, as long as Windows 7 runs on it. The real problems with all the ensuing troubles arise when you need to reinstall this very Windows 7.
Where should I put the disk? DVD drive Otherwise, no, and you don’t always want to buy an external one, although their cost is not that bad. But OUR man is different from THEIR, because he does not look for easy ways. Give us “cleaner”, “more hemorrhagic” methods, but so as not to pay anything. For those who want to save on buying a drive for a netbook, but reinstalling Windows 7 is painless, this lesson is written.
At least I know 3 ways to install Windows 7 from a flash drive. This article will probably not be entirely for beginners, but rather for those inquisitive minds who want to try everything in the world.
Method 1. Use the command line.
First, let's prepare the appropriate USB flash drive(flash drive) for future downloading and Windows installations 7. Please note that some flash drives cannot be put into download mode:
- Connect a USB flash drive (flash drive) of at least 4 GB to the USB port.
- In the Start menu search bar, enter cmd.exe, right-click on the one found and press Run as administrator
- Launch the disk management utility diskpart, wait for the invitation DISKPART>
- Execute the command list disk(displays a list of all PC drives)
- Are you looking for yours among them? USB disk, in my example this is Disk 2
- Execute the command select disk #(where # is the number of our USB drive obtained in the previous command). For our case - select disk 2. This command indicates diskpart that all further operations will be carried out with this disk.
- Execute the command clean(erases all data and partitions on the USB drive)
- Execute the command create partition primary(creating a new partition on the disk)
- Execute the command select partition 1(selecting a section as a further object for manipulation)
- Execute the command active– make the selected section active
- Execute the command format fs=NTFS– format the partition to the NTFS file system
- Execute the command assign– activate the process of connecting the device, receiving letters for the created partitions (if the autostart option is enabled, a window pops up as if you had just connected a USB drive)
- exit- get out of diskpart to the command line.
- Let's say that you have it installed in drive H:, then on the command line (not in diskpart !!!) run the command:
- Copy all files from your distribution to your USB flash drive (flash drive). For this use either Windows Explorer, or the command:
- Download the program Windows 7 USB/DVD Download Tool
- Install and run the program.
- In the first step, specify the path to your ISO file and click the button Next.
- Select the item in the second step USB Device
- Click the button in the third step Begin copying
- The fourth step will begin the process of creating an installation bootable flash drive.
- When the creation process is complete, close the program.
- Insert your flash drive into the USB port.
- Open ISO- Windows image UltraISO program
- On the list Disk Drive :, select your flash drive in the item Recording method: USB-HDD+ and press Write down.
- In the window that appears about the destruction of information Clue, press the button Yes. Wait for the recording to complete (5 to 20 minutes).
- Restart your computer without removing the flash drive from the USB port.
- Immediately after the restart begins, press Delete (Del) on your keyboard to get into the BIOS.
- Set the BIOS to boot from USB-HDD first.
- Save the settings and exit the BIOS. The computer will restart and begin booting from the flash drive.
- The installation itself is not much different from installation with bootable DVD, but there is one point. When the copying and unpacking of files is completed, and the computer reboots for the first time, you need to go to the BIOS again and set the boot priority back (from the hard drive by default) or remove the flash drive. Otherwise, it is possible that the download will start from the flash drive again.
14) Insert your existing Windows 7 distribution into the drive, or mount the image into a virtual disk.
H:\Boot\bootsect.exe /nt60 I:
H:\Boot\bootsect. exe/nt60I: |
where I: is the letter received by the newly prepared USB drive.
This command replaces the bootloader files on disk I: with those that are necessary for Windows boot 7.
The bit size of the base OS and the Windows distribution must be the same.
xcopy H: I: /s /e /h /
xcopy H : I : / s / e / h / |
That's it, the USB drive is ready. Boot your PC from the resulting USB flash drive.
To speed up the copying process experienced users can use the program RichCopy, she is graphical shell robocopy commands, and includes large number settings. Numerous options include sorting files by attributes and folders, error prevention, changing attributes, copy timing, editing the timestamp, setting the number of threads and the size of the cache to use.
Method 2. Using a program from Microsoft - Windows 7 USB/DVD Download Tool.
and finally...
Method 3. Using a third-party program - UltraISO.
Right-click on the ISO file and select Open using UltraISO
IN UltraISO program in the menu File click on the item Open, select the Windows 7 image you need and click Open.
3) After making sure that the image is open, select the item in the menu Burn a Hard Disk Image
I hope you can install Windows 7 on your netbook from a flash drive. If not? Write, ask questions - I will help you in any way I can. Good luck to you.
GD Star Rating
a WordPress rating system
Hello, dear readers! The obvious fact is that even careful and not the most active PC users sooner or later need to reinstall the operating system. Computer, long time running on the same OS begins to work slower, new errors appear and make it difficult to work normally with the device.
That is why it is recommended to periodically reinstall the system. Here the question arises: how can this be done if the distribution kit on disk is not at hand? There is only one answer - using a flash drive. This guide will help you quickly figure out how to properly reinstall Windows 7 from a flash drive without any problems - the debriefing will take a maximum of a few minutes!
Preparing for the upcoming procedure
Before you begin the reinstallation procedure, you need to prepare:
- Copy from system disk(usually “C”) all the necessary and valuable information for you to another partition of the hard drive, or better yet to removable media. During the reinstallation process, data from local disk“C” are erased as a result of formatting, so it is recommended to duplicate necessary information.
- Prepare in advance all the drivers necessary for the operation of your devices. It often happens that after Windows is reinstalled, some external devices will stop working due to lack of drivers. To avoid this problem, you will have to look for the drivers yourself before the procedure.
- Make sure that bootable flash drive with the distribution, the OS was recorded correctly. Check whether all the files from the image are on the media - to do this, just compare the number of files and volume. If the flash drive does not have all the data, it is recommended to overwrite it so that no problems arise during installation.
Now that everything is ready, you can start Windows installations 7 from a flash drive. Don’t be alarmed ahead of time - this procedure is much easier and faster than it might seem to a user, especially an inexperienced one.
Setting up the BIOS to reinstall the OS correctly
BIOS is a place where all the parameters of your PC are written, be it a computer or a laptop. These include system boot settings. In order for the device to start from a flash drive, you need to configure the BIOS to work with it. This is quite simple to do - follow the instructions below:
- Insert the media into the USB port and restart your PC.
- During reboot, press F2. In some BIOS models you need to press F11 or Delete. More detailed information you can find out when the OS starts - everything will be written in white font on a black background.
- In the opened BIOS menu select BOOT (name may vary). After this, a list will open with devices from which the system can boot. Select your media and move it to first place using the keys on your keyboard. Save the changes by pressing F10 and confirming exit from BIOS.
After BIOS settings you can proceed directly to something like Windows installation 7. How to do this?
Reinstalling the system in a few simple steps
In fact, you have already done the most difficult part in the previous stages - the actual installation of the system is carried out almost in automatic mode. We recommend that you read the following instructions:
- Insert the media into the USB port and restart your computer. The download should come from your flash drive.
- Wait for the installer's welcome window and follow the instructions it offers you.
- At the stage of selecting a disk for installation, select the system partition, format it and click “Next”.
- Wait until Windows 7 is installed on your PC - this procedure is performed automatically.
During installation, the PC will reboot several times. At the final stage, you will be asked to specify the PC name, date and time settings, and administration settings. There will be no problems at these stages.
After you have entered all the data, you will need to wait a few more minutes - after configuring the OS, you can start working - at this point the procedure for reinstalling the operating system is considered complete!
Share this article with your friends using social networks– they will be grateful to you when they learn to install the system from a flash drive! Subscribe to updates to always stay up to date with the latest blog articles!
In some situations, users may need information on how to install Windows from a flash drive via BIOS. Today, the question is relevant due to several reasons, including the need for an emergency reinstallation of the Windows software package. It may happen that the distribution will be recorded on the most regular USB flash drive, and not to disk, because using such a source of information storage is convenient. It is worth noting that many modern laptops simply do not have a DVD drive, which has allowed manufacturers to create ultra-thin devices. In this case, reinstalling the version of Windows XP, 7, 8.1, 10 required for operation is possible only from a flash drive or external hard drive that connect via USB. Anyone who has installed a software package knows that this process is not complicated, but it requires the user to have certain knowledge and skills, without which it will not be possible to start the process. Installation of the current version of Windows XP, 7, 8.1, 10 begins with entering the BIOS, the parameters of which you need to be able to understand. It should be noted that through BIOS from a flash drive you can not only install a software package, but also carry out a deep check of the system for the presence malware, which in some cases allows you to establish correct operation Windows XP, 7, 8.1, 10 on a user's computer or laptop.
When it is not possible to use a DVD drive, a flash drive comes to the rescue
Preparing for installation
If you purchased a laptop with a pre-installed licensed software package Windows 7, 8.1 or 10, then you should remember that it is called a factory distribution. We recommend that you prepare in advance for the situation when you need to reinstall the operating system and useful programs from the manufacturer. In this case, the distribution is written to DVD-R disc, flash drive or external hard drive. In the last two cases, it will be necessary to configure certain parameters in the BIOS.
Installing an unfamiliar version of Windows XP, 7, 8.1 or 10 is very similar to installing a factory distribution. The main task of the user is to start the process, and then the system automatically installs the software package on a computer or laptop. We recommend that you carefully select installation files, since you can find a huge number of installation files on the Internet. pirated versions software packages that do not work correctly after installation.

There are sequential instructions that describe the process of recording an operating system image onto a flash drive, which will be used to install Windows on a computer or laptop. The successful result will depend on the quality of the image and the correct execution of the algorithm.
So, reinstalling the operating system from a USB drive includes the following steps:
- Write installation files to a USB drive.
- Transferring all files needed in the future from drive C to protect them from deletion.
- Installing a flash drive into a USB connector.
- Launch BIOS and change settings in the menu. You need to search for information on how to enter the BIOS on specific computer or a portable laptop.
- Starting the installation of the operating system.
Launching BIOS
Before starting the BIOS, all users must understand that the flash drive must already be connected to a working connector laptop usb or computer. It is worth noting that the BIOS can be launched by a combination different keys, for example, pressing Del, Esc, F12, F10 multiple times. This action is always carried out at the moment the device boots. The input method depends on the BIOS manufacturer and the computer model. Users should be prepared for the fact that the mouse will not work in this mode. All control in the BIOS is performed by pressing keys. However, no one has any difficulties with this. The main task after entering such a menu is to launch automatic installation from a flash drive. Once Windows installation starts, no user intervention is required.

Key combinations vary by BIOS manufacturer
Changing BIOS settings and starting installation
Immediately after entering the BIOS, you need to find a tab called Boot. Often the required section is called in one word. Different versions BIOSes have different interfaces, but the Boot tab is usually present in all firmwares. After entering the tab, you should select the Hard Disk Drives item, where the order of device recognition will be presented.
Detailed description of several installation methods Windows 7 or Vista from a flash drive or memory card to any laptop, netbook or computer. The methods described below also apply to Windows 8, 8.1 And 10
Introduction to installing Windows from a flash drive
This guide will cover installation Windows 7 And Vista from a flash drive or memory card. The manual is intended primarily for novice users. It can also be used to install Windows 8, 8.1 And 10 .
This site has already described how to install Windows Vista() And Windows 7(). Everything would be fine, but what to do if you don’t have a DVD drive? But this is a fairly common situation. It is usually encountered by owners of netbooks, portable laptops, as well as those who simply do not have a DVD drive or simply do not have a disk.
Luckily, there is a simple solution to this problem: need to write down installation files to a USB flash drive or memory card, and then boot from it and install the system. We will consider how all this can be done within the framework of this material.
Preparing for installation
Before installation Windows 7 or Vista you need to copy all important data from the partition on which you are going to install the system to another partition, to a flash drive or to another computer. Do not forget that by default documents, desktop contents and programs are located on system partition. This is due to the fact that for the so-called “clean” installation of Windows, you need to format the partition on which you will install Windows.
Important Note: If you are installing Windows 7 instead of the pre-installed Windows 8, 8.1 or 10, then it is recommended that you familiarize yourself with the very important features of this process: Removing the pre-installed Windows 8.
In addition, it is recommended to download and save a set of drivers for your device in advance. This recommendation is due to the fact that the Windows distribution may not initially contain drivers for your network card, Wi-Fi adapter or your modem. As a result, on a freshly installed system you will not be able to access the Internet and download the required driver. Not the most pleasant development of events. To avoid getting into this vicious circle, it is recommended to download everything in advance. What drivers are needed and where to download them are described in more detail at the end of the article.
Installing Windows 7 or Vista can be roughly divided into the following basic operations:
- Preparing a flash drive or memory card with Windows 7 or Vista;
- Enabling booting from a flash drive or memory card in the BIOS;
- Direct installation of Windows;
- Finding and installing drivers;
- Installation of utilities and programs.
Let's start preparing the flash drive.
Preparing a flash drive or memory card with Windows 7 or Vista distribution
This guide will describe three ways to burn a distribution package with Windows Vista or Windows 7 to a USB flash drive. Difficulty first method easier than the second, and the third is a little simpler than the first.
The first way to install Windows from a flash drive
To install Windows using the first method, we will need:
- Distribution with operating system Windows system. It is recommended to use original MSDN assemblies as they have the least unexpected problems. Recently Windows distributions 7 can be downloaded from the Microsoft website after entering the serial number;
- A set of utilities that you can download from the links: / ;
- Flash drive or memory card with a capacity of 4 GB or more. It is advisable to use a flash drive or external USB card reader with a memory card. This recommendation is due to the fact that a laptop, tablet or PC does not always allow you to boot from a memory card in the built-in card reader.
Important Note: if you don't know which one Windows version installed on your laptop (32-bit or 64-bit), then I recommend that you familiarize yourself with this material: . I also recommend checking out this article: . It will help you choose the version of the operating system, and also give answers to many questions.
First, copy the image of Windows 7 or Vista in the format iso to the hard drive. Then install and run the utility Ultra ISO, which is present in the archive via the links above. A window like this should open:

Since we are using a demo version of this utility, click on Trial period . Now you need to open iso image with the operating system. To do this, click on the menu File -> Open...:

We indicate where the image with the operating system is located:
 and select the item Write down image of a tough disk:

Now insert the flash drive or memory card into your laptop or computer.
Important Note: the contents of the Flash drive or memory card will be deleted while the system image is being written to it. Therefore, it is necessary to copy all important data either to your hard drive or to another computer.
Click on the button Format:

Choose a type file system and press Begin:


Now click on the button Write down:


That's all. Now you have a memory card or flash drive with the system.
Let's now consider the second method. It will be more difficult.
Second way
As in the first method, we will need a distribution kit with the operating system (on disk or in the form iso image) and a flash drive/memory card with a capacity of 4 GB or more.
Important Note: Before starting preparation, you need to copy all the necessary information from a flash drive or memory card. It will be formatted and all information on it will be deleted.
First you need to insert a flash drive or memory card into your laptop and run Command line (this can be done either through the menu Start, and through Execute(press Win + R) and enter the command cmd). It looks something like this:

Enter the command diskpart and press Enter:

To display a list of all storage devices, enter the command list disk and press Enter:

The flash drive in the screenshot above appears as Disc 2. You may have it under a different number (1, for example). Enter the command select disk 2 and press Enter(2 is the disk number. If you have a flash drive number 1 (Disk 1), then you should enter the command select disk 1. This is very important!):

Enter the command clean, which cleans the selected disk, and press Enter:

Enter the command create partition primary:

Now we need to select the first section. To do this, enter the command select partition 1:
:
Enter the command active:

Format the section. To do this, enter format fs=NTFS and press Enter:

Assign a letter to the flash drive using the command assign letter=Z:

After this, the flash drive should appear in the system. Enter the command Exit and press Enter:

Now we copy all the files from the distribution disk to the flash drive. If you have an ISO image with a distribution, I recommend using the utility 7-Zip, which you can also find in the archive via the links above ( / ). Install this utility and choose iso Windows image:

Click on the button Extract and indicate your flash drive:


That's all. We figured out the second method.
The third easiest way to install Windows 7 or Vista
The third method is described in detail in this manual: . Everything is simple and clear even for a complete beginner.
So. We're done preparing the flash drive. If at this stage you have problems, then you can seek help in these forum topics: and. I urge you to read the topic before asking. Most likely, your problem has already been raised and resolved. This way you will save your time.
As a result, the flash drive should contain approximately the following files and folders:

Let's move on to the second point.
Enabling booting from a flash drive or memory card in the BIOS.
Turn off your laptop, netbook or computer, put a flash drive or memory card in it and turn it on. This is very important since some laptops and other equipment do not recognize BIOS flash drive, which were inserted after switching on. It should also be noted that not all laptops and netbooks are capable of booting from a memory card that is inserted into the built-in card reader. In this case, you need to look for either an external USB card reader or a USB flash drive.
Let's go to Laptop BIOS. To do this, when the laptop starts booting, you need to press a certain key. As a rule, when loading, the bottom of the screen indicates which button to press to enter the BIOS. Most often this F2, Del, Esc and others. How to enter the BIOS should be described in the instructions for the laptop and at the bottom of the screen when loading the BIOS.
After entering the BIOS, you need to find where the boot order is configured. Typically these settings are located on the tab BOOT. To change the boot order, buttons are usually used F5 And F6, sometimes something like a menu is used. Click on the item and select the device. As a rule, the settings page indicates which buttons can be used to change the download list. How to change the boot order should also be indicated in the instructions for the laptop.
Install your flash drive or memory card on first place in the download list. Flash drives usually act as USB-HDD. The loading order should look something like this:

After saving the settings, a reboot should follow. Now you can proceed to installing the system.
Direct installation of Windows 7 or Vista
Installation Windows 7 And Windows Vista from a flash drive or memory card completely similar installation from disk. The procedure itself is described in detail in the manuals: and. Pay special attention to operations with selecting a partition for installation and disk operations.
Finding and installing drivers
So. Windows you have installed. Now you need to start installing drivers.
Since this guide is intended primarily for beginners, we need to say a few words about what a driver is and what it is needed for. I think it’s no secret that a laptop, computer or other similar device consists of a great many components like motherboard, network card, video card, sound card. In order for the operating system to fully work with them, it needs some link. This link is the driver. IN Windows, like many other operating systems, many devices already have drivers. Yes, they work somehow, but they will not allow you to fully utilize the capabilities various devices on your laptop or computer. To fix this, you need to install drivers on the same video card, sound card and other devices.
For your convenience, guide pages have also been created with links to sets of drivers and applications for a wide variety of laptop models:
- Lenovo:
- Asus:
- Acer Packard Bell and eMachines: Drivers for Acer, eMachines and Packard Bell laptops
In general, you should start searching for a driver for your laptop or computer here: . There is a whole article on drivers for webcams: . The article is short and quite useful.
Also, the following forum topics can greatly help you in finding a driver for your laptop or computer:
- . The first message has a small guide on finding and installing the required driver;
- . Pay special attention to the first message of the topic;
When searching for a solution to a problem on the forum, pay special attention to the first messages of various topics. They usually contain typical solutions of the most common problems, and there are also extensive collections of drivers and instructions on what to do with everything.
They can help you in the process of solving problems. Answers to the most frequently asked questions are collected there.
Installing programs and utilities
So. We somehow sorted out the drivers. Now all that remains are programs and utilities. The situation here is complicated by the fact that each manufacturer has its own set of proprietary utilities. With those utilities some are often installed system drivers. Therefore, it is often impossible to ignore their installation. Some of them are really needed for normal operation laptop, namely for work additional keys, for display operation, for webcam, for wireless adapters and so on.
How these utilities are roughly installed and what to do with them in general using laptops as an example Asus shown in the manual: . To devices Acer, eMachines And Packard Bell installation of utilities comes down to installation Launch Manager, on laptops HP - HP Quick Launch Buttons and so on. Discuss proprietary utilities you can in this forum topic: .
If you have problems with drivers and some programs that are designed to Windows XP, V Windows Vista or Windows 7, then I recommend reading this article: .
That's all.
Please ask all questions related to installing Windows 7 in this forum topic: , questions about installing Windows Vista in this topic: . I remind you once again that before asking, read the topic. Your question has most likely already been asked and answered.
Detailed description of the system operation automatic recovery Windows with programs and drivers up to the state at the time of purchase of the laptop. The main part of the article concerns hidden sections on the hard drive.
Solving the problem with an upside-down image from a laptop webcam.
Description of how to install and run the full version Windows XP from under Windows Vista or Windows 7 using the program Oracle VirtualBox. IN in this case Windows XP is installed on virtual machine and runs like separate application in Windows Vista, Windows 7 or any other operating system, including various Linux distributions. This way you can solve compatibility problems various programs and drivers for Windows Vista, Windows 7 or another operating system.