Diskpart boot record recovery windows 7
Microsoft has been improving its recovery system for many years. operating system Windows and Windows 7 and Windows Vista she works practically automatic mode. If you boot from installation disk Windows 7 and click "" ("Repair Computer"), system Windows recovery will be launched and will independently try to correct all errors that it finds. She can fix large number problems, however, it is quite likely that the bootloader is damaged, and the recovery system cannot cope with this problem. In this case, you can restore the bootloader manually using the Bootrec.exe utility.
Application Bootrec.exe serves to correct errors associated with damage to the bootloader and, as a result, the inability to start operating systems Windows systems 7 and Windows Vista.
Sequence of actions

The utility will display help on the available command line switches.
Description of keys for launching the Bootrec.exe utility
Bootrec.exe /FixMbr- Launched with the /FixMbr switch, the utility writes a Windows 7 and Windows Vista compatible Master Boot Record (MBR) to system partition. Use this option to resolve problems related to damage to the main boot entry, or if you want to remove non-standard code from it. The existing partition table is not overwritten in this case
Bootrec.exe /FixBoot- Launched with the /FixBoot switch, the utility writes a new boot sector compatible with Windows 7 and Windows Vista to the system partition. This option should be used in the following cases:
- The Windows Vista or Windows 7 boot sector has been replaced with a non-standard boot sector.
- The boot sector is damaged.
- Has been installed previous version Windows operating system after Windows installations Vista or Windows 7. For example, if Windows XP was installed, NTLDR (Windows NT Loader, Windows NT loader) will be used, the code of the standard NT 6 loader (Bootmgr) will be overwritten by the Windows XP installation program.
It should be noted that a similar effect can be achieved using the bootsect.exe utility, also located on the Windows 7 bootable media. To do this, you need to run bootsect.exe with the following parameters:
bootsect /NT60 SYS- The boot sector of the system partition will be overwritten with code compatible with BOOTMGR. You can learn more about using the bootsect.exe utility by running it with the /help parameter.
Bootrec.exe /ScanOs- Launched with the key / ScanOs, the utility scans all disks for installed Windows Vista and Windows 7 operating systems. In addition, when using it, a list of found systems is displayed that are at the moment are not registered in the configuration data store Windows boot(Boot Configuration Data (BCD) Store)
Bootrec.exe /RebuildBcd- Launched with this key, the utility scans all disks for the presence of installed Windows Vista or Windows 7 operating systems. Found operating systems are displayed in a list from which they can be added to the Windows boot configuration data store (Boot Configuration Data Store). Also use this option if you want to completely rebuild the boot configuration data store. Before doing this, you must delete the previous storage. The set of commands could be as follows:
bcdedit /export C:\BCDcfg.bak
attrib -s -h -r c:\boot\bcd
del c:\boot\bcd
bootrec /RebuildBcd
In the above example, the current boot configuration store is exported to a file C:\BCDcfg.bak, the “system”, “hidden” and “read-only” attributes are removed from it, after which it is deleted with the DEL command and rebuilt with the command bootrec /RebuildBcd.

Of course the utility Bootrec.exe is very functional, however, it will not help if, for example, the Windows bootmgr file is damaged or physically missing. In this case, you can use another utility, also included in the Windows 7 distribution media - bcdboot.exe.
Restoring the boot environment using BCDboot.exe
BCDboot.exe is a tool that is used to create or restore a boot environment located on the active system partition. The utility can also be used to transfer download files from one hard drive or partition to another.
Command line in in this case might look like this:
bcdboot.exe e:\windows
Replace e:\windows to the path appropriate for your system. This operation will repair a corrupted Windows boot environment, including the Boot Configuration Data (BCD) store files, including the file mentioned above bootmgr.
Syntax of bcdboot command line parameters
The bcdboot.exe utility uses the following command line parameters:
BCDBOOT source ]
source- Indicates location Windows directory, used as a source when copying boot environment files.
/l- Optional parameter. Sets the boot environment language. The default is English (US).
/s- Optional parameter. Specifies the drive letter of the system partition where the boot environment files will be installed. By default, the system partition specified by the BIOS firmware is used.
/v- Optional parameter. Enables detailed logging mode of the utility operation.
/m- Optional parameter. Combines the parameters of the newly created and existing boot storage record and writes them to the new boot record. If an operating system boot loader GUID is specified, combines the boot loader object with the system template to create a boot entry.
Resume. The article discussed the principles of working with utilities bootrec.exe And bcdboot.exe, which are used to resolve problems related to the inability to start the Windows 7 operating system due to a damaged or missing boot loader
class="eliadunit">How to produce Windows 7 boot loader recovery, if restoring the startup using the 7 installation disk did not help. I’ll briefly explain what’s going on: Windows 7 was first installed on the computer, then the second system needed Windows XP, after installation it naturally started alone, to boot two operating systems I used the EasyBCD program. Later, XP was no longer needed and I formatted the partition on which it was located from Windows 7. Now, when loading, there is nothing except a black screen. What can be done in this case? More details if possible. Sergey.
Restoring the Windows 7 bootloader
The most important thing is don’t worry, your problem is not complicated and, in principle, the remedy is Recovery Windows startup 7should have helped, let's try something else. Let me remind you that you cannot install an older operating system after a younger one. Windows 7 will never boot after installation on Windows computer XP, since the latter, when installed, overwrites the master boot record (MBR) with itself. Therefore, you installed an additional boot manager EasyBCD, which is used to configure the boot of several operating systems and, in turn, has its own bootloader.
- The master boot record (MBR) is the first sector on the hard disk, which contains a partition table and a small boot loader program that reads data from which partition in this table hard drive load the OS, then the information is transferred to the partition with the installed operating system for loading it. If the master boot record contains incorrect information about the location of the system, then we will receive various errors during boot, one of which is Bootmgr is missing, or we will see a black screen. The problem is being fixed restoring the Windows 7 bootloader.
When you uninstalled old XP along with EasyBCD, you left your computer to the mercy of fate with an incomprehensible boot record, and it gives you a black screen as a sign of gratitude. To rectify the situation, we will carry out boot recoveryWindows 7, namely, we will overwrite the master boot record using the utility Bootrec.exe located on the recovery disk or installation disk Windows disk 7. We will also use this utility to record a new boot sector, understandable to Windows 7.
Boot from a recovery disk or installation disk with Windows 7, then System Restore.
Here you need to select the operating system that you need to restore, you most likely have only one, and then, even if there is nothing here, we need to get to the command line.


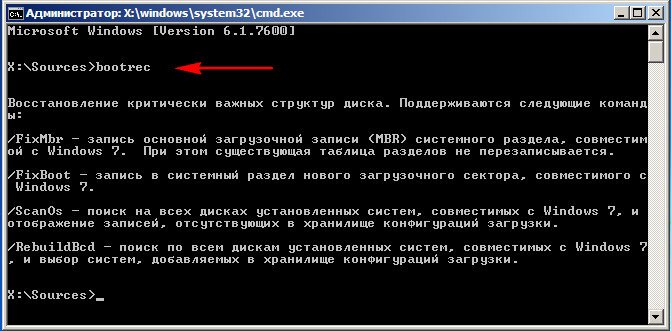
In the command line window, enter the command Bootrec And Enter

comes out full information about the utility's capabilities. Select the Master Boot Record entry Bootrec.exe /FixMbr.

The operation was completed successfully. To the first sector boot partition a new boot record has been written.
Second team Bootrec.exe /FixBoot writes a new boot sector.
Needed good advice how to produce Windows 7 boot loader recovery, if restoring the startup using the 7 installation disk did not help. I’ll briefly explain what’s going on: Windows 7 was first installed on the computer, then the second system needed Windows XP, after installation it naturally started alone, to boot two operating systems I used the EasyBCD program. Later, XP was no longer needed and I formatted the partition on which it was located from Windows 7. Now, when loading, there is nothing except a black screen. What can be done in this case? More details if possible. Sergey.
Restoring the Windows 7 bootloader
Hello friends! The most important thing is not to worry, your problem is not complicated and, in principle, the simple “Windows 7 Startup Recovery” tool described in our article should help, but! If this article does not help you, then two others should help:
These articles describe several more good ways restore the boot of your operating system, besides them there is another one, so try it and don’t just give up.
Let me remind you that you cannot install an older operating system after a younger one; Windows 7 will under no circumstances boot after installing Windows XP on a computer, since the latter overwrites the master boot record (MBR) during installation. Therefore, you installed an additional boot manager, which is used to configure the boot of several operating systems and, in turn, has its own bootloader.
- I also want to say that errors are often to blame for unsuccessful loading of Windows 7 file system, you can fix them even if the operating system does not boot, all the details are in our other article " "
- Friends, in this article we will work with the Windows 7 recovery environment, or more precisely, with the recovery environment command line. I will give you the necessary commands, but if it is difficult for you to remember them, you can. This will make your work much easier.
- The master boot record (MBR) is the first sector on the hard disk, which contains a partition table and a small bootloader program that reads in this table the data from which partition of the hard disk to boot the OS, and then the information is transferred to the partition with the installed operating system, to download it. If the master boot record contains incorrect information about the location of the system, then we will receive various errors during boot, here is one of them “BOOTMGR is missing press CTR-Alt-Del for restart” or we will see a black screen. The problem is being fixed restoring the Windows 7 bootloader.
When you uninstalled old XP along with EasyBCD, you left your computer to the mercy of fate with an incomprehensible boot record, and it gives you a black screen as a sign of gratitude. To rectify the situation, we will carry out boot recovery Windows 7, namely, we will overwrite the master boot record using the Bootrec.exe utility located on the recovery disk or on the Windows 7 installation disk (friends, if you have a netbook and you want to use the recovery environment located on a flash drive, then read the comments first). We will also use this utility to record a new boot sector, understandable to Windows 7.
Recovering Windows 7 bootloader automatically
We boot from a recovery disk or installation disk with Windows 7, in the initial phase of booting the computer, when you are prompted to boot from the disk “Press any key to boot from CD...”, press any key on the keyboard for 5 seconds, otherwise you will not boot from the disk

A short search takes place installed systems Windows and analysis of problems preventing them from loading

Usually problems are quickly found and the recovery environment offers to fix them automatically. Click on the "Fix and restart" button, after which the computer will restart and Windows 7 will be booted again.

If problems with loading the system continue or you are not prompted to fix the problems automatically, then in this window you need to select the operating system that you need to restore, you most likely have one and Next.

First of all, choose a productStartup recovery, it can also solve Windows 7 boot problems

Restoring the Windows 7 bootloader manually
If this remedy does not help, choose a remedy Command line

Enter the commands:
diskpart
lis vol (we display a list of hard drive partitions and see that “Volume 1” is a hidden System Reserved partition, volume 100 MB, Windows 7 boot files should be located on it and this is what needs to be made active). We also see a section with installed Windows 7, it has the letter D:, the capacity is 60 GB.
sel vol 1 (select Volume 1)
activ (make it active)
exit (exit diskpart)
bcdboot D:\Windows (where D: partition with Windows 7 installed), this command Recovers Windows 7 boot files (bootmgr file and boot store configuration files (BCD))!
"Download files created successfully"

Restoring the Windows 7 bootloader manually (method No. 2)
In the command line window, enter the command Bootrec and Enter
full information about the capabilities of the utility is displayed. Select the master boot record entry Bootrec.exe /FixMbr.
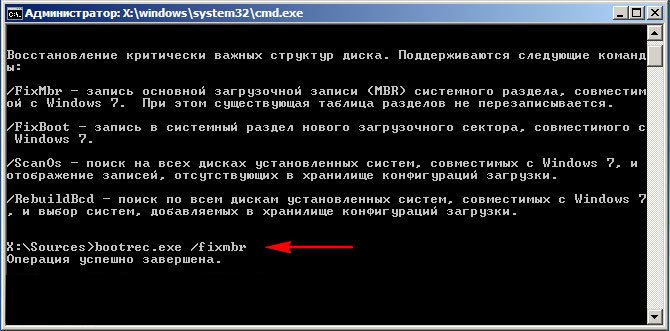
The operation was completed successfully. A new boot record is written to the first sector of the boot partition.
The second command, Bootrec.exe /FixBoot, writes a new boot sector.

The operation was completed successfully. Exit. Next, we try to load our Windows 7.

Friends, if the Bootrec.exe /FixMbr and Bootrec.exe /Fixboot commands do not help you, do not despair, there is another remedy.
Method No. 3
Enter the command Bootrec/ScanOs, she will scan all your hard drives and partitions for the presence of operating systems, and if any are found, a corresponding warning will be issued. Then you need to enter the command Bootrec.exe /RebuildBcd, this utility will offer to add the found Windows to the boot menu, we agree and enter Y and press Enter, all the found Windows are added to the boot menu.
In my case, two operating systems were found. Everything can be seen on the screenshot.

In addition to the above method, there is another one, enter into command line bootsect /NT60 SYS, the main boot code, will also be updated.

Exit
So, the error is that on both hard drives the first ones should be marked with a red flag hidden sections System Reserved. On Windows 7, the volume of such a partition is 100 MB, and on Windows 8, 350 MB, these partitions have the following attributes: System. Active and it is on these partitions that the boot store configuration files (BCD) and the system boot manager file (bootmgr file) are located. And it turns out that these attributes are carried by other sections. Because of this, Windows 7 and Windows 8 will not boot.

Choose the first one hard drive 1, right-click on the first System Reserved partition and select “Mark as active”

The System Reserved volume will be marked as active. Click OK.

We do the same with Disk 2. Acronis program Disk Director works in pending operation mode, for the changes to take effect, click the "Apply pending operations" button

Continue.

As you can see, after our changes, those sections that were needed became active.

We exit the program and reboot. The result of the work is positive - both operating systems are loaded one by one.
Skills that will help the user perform recovery windows boot loader 7 are necessary if the operating system does not start at all or a number of problems arise during the process of turning it on.
The operating system loader is system program, which is designed to launch the OS.
In simple terms, this is a utility with which you turn on your computer.
With the advent of new versions of operating systems, bootloaders also improve. For example, Windows XP boots from using UEFI.
Newer versions of the OS (starting from the seventh) during the boot process I use system utility BOOTMGR.
Types of bootloader problems
The most common cause for concern is the following errors:
- When you try to start the system, messages called “Bootmgr is missing” and/or “Non system disk” appear. They occur as a result of damage to the bootloader or master boot record;
- .
In this case, it is necessary to restore the bootloader if a message from a hacker asking to send money for destroying the virus appears immediately after the user presses the start button personal computer or laptop;
Remember! If the operating system has already begun the startup process and errors began to appear only later, this does not indicate a problem with the bootloader. Try turning on the OS in safe mode and troubleshooting any problems (for example, virus software).
Before attempting to set up the boot loader, go to the BIOS and make sure that the system is set to the correct boot order for all hard drives.
If you have two installed on your computer at once hard drives The order in which they are launched is incorrect and problems with the bootloader may occur.

The first in line should be the disk on which the operating system to be launched is installed.
Automatic recovery using USB drive
You need to solve the problem starting from the very beginning. easy way.
If you are unable to fix the bootloader using the method below, try the following solution to the problem presented in the article.
To begin the process of solving the problem, take the disk from which the OS was installed.
If you don’t have one, you can restore without a disk - in this case, you need to create a bootable external usb media.
The version of the operating system located on the media must fully match that installed on the computer.
To spend automatic recovery from a flash drive or disk, follow these steps:
- Insert the disk into the drive or flash drive into the slot. Start the computer and in the first few seconds press the F button on the keyboard. This way you will instantly launch the BIOS menu before a problem occurs.
In the BIOS, change the boot order of the OS components - the disk or flash drive should come first (depending on which device with the OS image you connected to the computer).
After the boot queue has been set, save all changes and exit the BIOS settings. The OS startup process will begin again, however, now it will boot directly from the image media. The following window will appear;

- At the bottom of the window (Figure 2), find the OS recovery item and click on it. Now you need to select the OS that needs to be restored (if several systems are installed on the computer at the same time);

- After you have decided on the name of the OS whose operation you want to fix, a window will appear with all the available operating system recovery options. To get started, select automatic elimination problems.
This method may help, but not in all cases. If the system still does not turn on after such an automatic fix, repeat steps 1-3 again and now select the second option (enabling a previously saved OS state).
Wait until all the necessary actions are carried out automatically by the program. If the system boots successfully, the problem is resolved. If not, you should restore it manually.

Recovering OS boot configuration data
OS startup configuration information contains detailed information about the order in which data should be loaded when the computer's operating system is turned on.
Often the OS boot loader fails to complete due to corrupted items in the Boot Configuration Data.
To fix the problem, you need to add new configuration data to the OS bootloader:
A complete configuration update can be performed using the rebuildbcd command.
To perform it, you need to open a command line window in the system recovery options (as in the figure above).
In the line, enter the text “bootrec.exe /rebuildbcd” (without quotes) and press the Enter button to execute the command. The update process may take several minutes.
After its completion, a line about the result of the command will appear in the utility window.

After restoring the data, you should turn off the computer, remove the disk with the OS image from it, configure the standard boot order in the BIOS and turn on the device again.
If all actions were done correctly, the system will start in standard mode.
If after executing the command you receive system notification that the configuration could not be restored, you need to boot into safe mode.
To do this, enter the command bootrec.exe/safeboot at the command line - it allows you to start the operating system using a minimum number of drivers and third party utilities, which may cause an OS boot loader error.
To view and edit boot loader configuration parameters, run the BCDEdit.exe command:

Bootloader configuration editing command