Where to disable auto-update in Windows 7. Correctly disable automatic update of Windows OS
By default, in operating Windows systems 7 and Window 8 update system included. The so-called “Center” is responsible for this Windows updates", he is responsible for regularly receiving and installing updates.
In some situations there is a need. For example, in order to save traffic. In addition, the update is disabled by users of pirated Windows versions. In this material we will talk about how to disable updating Windows 7 and Window 8.
Disabling Windows 7 and Window 8 updates via Control Panel
Open Control Panel. If you are using Windows 7, then you can open the Control Panel from the Start menu, if you are using Window 8, then open the Start screen and search for “Control Panel”.
In Control Panel, open System and Security.

After this, the “Windows Update” window will open in front of you. In this window you need to click on the “Settings” link. This link is in the left side menu.

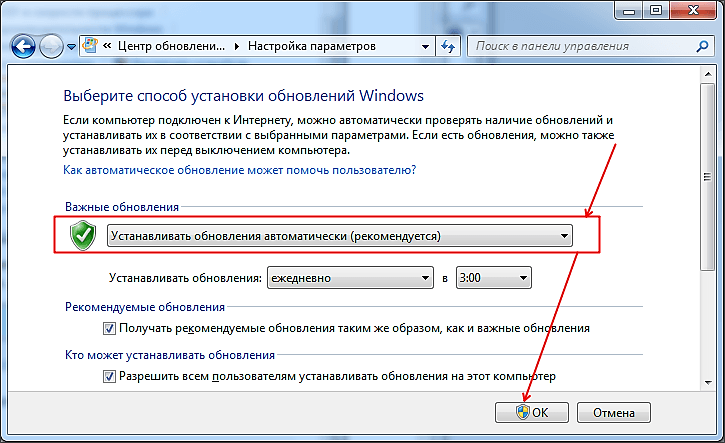
The default method is “Install updates automatically”. In order to completely disable Windows updates, you need to set the method to “Don’t check for updates.”

After you have changed the method for installing updates, you need to save the settings by clicking on the “OK” button. After these simple manipulations, Windows update will be disabled.
Disabling Windows 7 and Window 8 Update Service
Disabling it through the Control Panel is quite enough. But if necessary, you can also disable the service that is responsible for Windows Update.
Open the Computer Management window. The easiest way to do this is by searching. Open the Start menu or start screen (if you have Windows 8) and type “Computer management”. In the Computer Management window, go to the Services section.

In the list of services that opens, find “Windows Update.”

Open the properties of the Windows Update service, this can be done from the context menu or simply double click. After this, a window with the properties of this service will open in front of you. Here you need to change the “Startup Type” of the service from “Automatic” to “Disabled” and then click on the “Stop” button.

After completing all the steps, close the properties window by clicking on the “OK” button. These actions will result in the service being completely disabled.
An operating system is a product containing millions of lines program code. They contain certain shortcomings and errors. Hotfix packages are designed to solve these problems. Among OSes, Microsoft products remain the most popular. Users and thousands of application software developers have adapted to them. But the company by default builds a tool into its systems automatic download updates that users don’t like. After some packets, the computer begins to behave unpredictably.
You can disable auto-updates from the control panel
What are Windows updates and why are they needed?
Windows updates are software packages that fix found errors and vulnerabilities. The main task of updates is to maintain security, but it is not the only one. Let's look at what functions system updates perform:
- Protective. An OS with installed updates is less susceptible to virus infection and hacker attacks. The developers try to close holes as soon as they are discovered.
- Increased stability. Everyone makes mistakes. They lead to malfunctions, reboots, etc.
- Introduction of new functions. Without installing updates, new programs do not work on outdated operating systems.
Advice. Worth thinking before turning off Windows auto update 8 or any other. This will affect the security and stability of the computer.
Disabling updates
There are a number of reasons why users prefer to disable receiving OS patching packages, here are the main ones:
- possible failures in installing packages;
- additional busy place on the system disk;
- restrictions when running Windows;
- the duration of the process and its impact on productivity.
There are two options on how to disable updates on Windows 7:
- fully;
- partially, i.e. just remove automatic installation updates.
In the second option, the user chooses when to install the fixes.
Complete shutdown in Windows 7
Let's look at how in:
- Open the “Administration” tab, which is located in the “Control Panel”.
- Go to "Services".
- Find Windows 7 Update in the list and open it.
- Change the startup type to “Disabled”.
- Press the “Stop” and “Apply” buttons successively.
You no longer have to worry about updates. If necessary, you can return them by allowing the service to start.
Important! Stopping the update completely in Windows 7 through service control is recommended only for advanced users.
Disable auto updates in Windows 7
There is a less radical way. It allows you to completely disable Windows 7 auto-update through built-in management. The user himself will be able to install updates as needed.
- Open Update Center.
- In the left menu, click on the “Settings” link.
- In the list, select “Do not check” and the desired parameters for receiving corrections.
After this, auto-update will be completely disabled. If necessary, the user must check for updates manually.
Advice. There are other ways to remove Windows 7 auto-update. To do this, utilities are released or it is suggested to edit the registry. But only experienced users should do this.
Disable in Windows 8
With the release of OS version 8, Microsoft acquired a different interface. This made it difficult to complete ordinary tasks. Let's look at how to disable auto-update in Windows 8.1 (8).
Let's consider the procedure for 8.1 (8):
- Launch Update Center. It is located in the “Control Panel”, which is called up from the “Options” menu.
- Go to settings and select “Do not check” in the drop-down list. It is recommended to uncheck the two checkboxes below.
The system can prevent updates on Windows 8 from even being viewed by stopping the service. To do this, go through the “Control Panel” to the “Administration” section and go to the “Services and Applications” item. Here you need to find the update service. When you click on it, a window will open where you need to select the “Stopped” option in the “Startup type” field and click the “Stop” button. After this, all you have to do is confirm your actions by pressing the Ok button.
figure 4It is worth understanding that if you turn off updates on Windows 8 through stopping the service or system settings, the system will be at increased risk.
Disable forced reboot after receiving updates
The standard OS setup requires the user to reboot after downloading all packages and preparing for installation. It's inconvenient. You can correct the situation by adjusting group policies, to do this you need to:
- Launch the editor by pressing the Win+R key and typing the command gpedit.msc.
- Go sequentially in the window that opens to the folder Windows components and then to the Update Center.
- Find the "Do Not Execute" policy automatic reboot...", double-click on it and set the switch to the "On" position.
If you change parameters through the editor group policies If it doesn’t work, you can download the ShutdownGuard utility or a similar one.
WATCH THE VIDEO
Now you know how to disable updates on Windows 7, 8.
Many users face problems when updating their operating system. Unstable work may be due to the release of unsuccessful critical updates from developers. Sometimes installing a new update can make it impossible to start the operating system when the download gets stuck at the welcome message. With a slow Internet connection, downloading updates makes working online completely uncomfortable, because... All the speed is spent on loading system files. To solve the problem failed update, you have to delete them manually and perform a system restore. This article will discuss detailed instructions How to remove automatic Windows 7 updates.
Disabling updates through the control panel
The very first step is to disable Windows Update: Control Panel > System > Windows Update
In the window you need to go to the “Settings” section. There are several options available here for searching and installing updates. The goal is to prevent the system from making a request to the server on the Internet to download updates. To do this, select “Do not check for updates” in the “Important updates” field. Next stage– uncheck all the parameters specified in this window.

To prevent the system from changing update settings, you need to disable the service that is responsible for downloading them - “Windows Update”.
To open the window for changing these parameters, you need to do the following:
-find the “my computer” icon on the desktop and right-click on it. If it is not on the desktop, press start and right-click on the “computer” icon. IN context menu that opens after clicking, select the “Management” option.

In the window that opens, a tree of various settings will be available on the left. Next, you need to go to the “Services and Applications” directory, and then to the “Services” section. A list of all operating system services will appear in the central window. You need to scroll to the very bottom of the list, where the Windows Update service will be located.

To disable it, you need to right-click on the service name and select the “stop” option.

In addition to stopping the service, you need to prevent it from starting automatically. To do this, double click on the service name. In the window that appears, in the “startup type” line, select the “Disabled” option.

Now the system is completely disconnected from the need to establish a connection with Microsoft developer servers to receive updates.
Disabling notifications about the need to update the system
After the update service is locked, annoying reminders will appear on the taskbar (in the notification area) that the system is not receiving updates. To get rid of this, you need to click on the checkbox with a cross on the taskbar. Having gone to the “Support Center”, we find the “Support Center Settings” option in the left block of the window. In this window, you need to uncheck all the provided parameters. By clicking “OK”, the system will save the changes, and mentions of the need to update Windows will completely disappear from the taskbar.


How to remove already installed windows 7 updates
To remove unsuccessfully installed updates, you need to go to the “Programs and Features” section through the “Control Panel”. There is a “view installed updates” option here. Here you need to look at the installation date, correlating it with the date from which the PC began to work unstable (for example, December 1). Today is December 3rd.

Thus, all installed updates from December 1 to December 3 need to be removed (right-click on the update name and click “delete”). After this, disable the system from updates to save yourself from this problem in the future.
I'm tired of this already endless update Windows 7! Downloads and installs every day. Internet speed slows down, computer slows down, and reboots without asking. And this system doesn’t care whether I’m watching a movie, writing a term paper, or making an important report for management. And updates are installed for 2 hours, and do not allow you to turn off your PC or laptop.
And most importantly - there is almost no sense! Yes, vulnerabilities are eliminated, but you will not notice the difference at all BEFORE the update and AFTER it. Unless the traffic eats up, but there’s no room local disk C will pick it up again. In general, complete hemorrhoids.
Therefore, if you are also tired of this option, turn it off! Especially for those who do not know how to disable updates on Windows 7, below is attached detailed instructions with screenshots.
There are 2 ways to turn off the annoying Windows 7 auto-update feature
First, let's look at turning off automatic updates on Windows 7. This is necessary so that the system does not download anything and does not start installation without your permission.
If you suddenly need to turn on the search for updates, then open the same window and select one of the first three items to choose from (whichever is more convenient).
However, after this, the message “Windows Update is disabled” will constantly pop up at the bottom of the screen (near the clock). Please turn it on."

So that it doesn't get boring:

Ready. You just removed this message, and you won't be bothered by it anymore.
Method 2: Windows Update
To do this:

Ready. You have just completely disabled the update service on Windows 7 (searching for and installing them).
This procedure is carried out the same way on all computers and laptops running Windows 7. The version (Home, Professional, Ultimate) or bitness (32- or 64-bit) does not affect this.
Why do you need to turn off auto-update in Windows 7?
- Unlicensed installed copy of Windows. At the very least, activation may fail during the update. In the worst cases, the computer or laptop does not turn on after a reboot and you have to reinstall the OS (Microsoft developers know how to give surprises 🙂).
- Limited Internet. If you have a limited amount of traffic, then regular updates they'll cost a pretty penny.
- Slow internet speed. Auto-updates greatly reduce loading speed. And if yours is already small, then...
- Low hard drive space. Auto-updates do not take up much space, but over time they can accumulate to 10-20 GB. And if there is little space left on the hard drive, the computer (or laptop) will work slowly.
- You cannot turn off your PC during auto-update. This is terribly annoying (don't leave it on overnight!).
By the way, as an option, you can disable only auto-update. That is, select the 2nd or 3rd option in the Update Center settings (so that the installation decision is made by you personally).
Updating computer software is an important process. But sometimes it loses all meaning. Today we will try to figure out how to disable this service, according to many users, it does more harm than good. After all, it’s no secret that sometimes files are installed on a computer that disrupt the operation of the system. These errors are corrected with great difficulty. Sometimes this can only be done by reinstalling the operating system. So you’ll have to think carefully about how to turn off Windows 7 updates and generally get rid of some already installed files.
Services
Several options for the development of events can be proposed. The first one is perhaps the most difficult. More precisely, it is simply non-standard. And it will not be so easy for a novice user to cope with it. The thing is that 7" is located in the "Services" section, and to get rid of this process, you will have to look here.
Go to "Control Panel". There you should look into the “System and Security”, “Administration” folder, and then click on “Services”. In the window that appears, view the entire list of running applications and processes. The one we need is usually at the very bottom.
How to disable Windows 7 Update? To begin, find the corresponding line in system services and double-click on it. You will see a window with a choice of parameters. It is worth setting "Disabled" in the startup type. Then click on "Stop". And only then can you click “Ok”. The action is completed.
Disable verification
In principle, users often simply choose a simpler scenario. Enough to disable automatic check updates to save yourself from unnecessary problems. Even a novice user can cope with this task.

More precisely, the center responsible for this process? Go to it using the system tray, and then go to “Settings”. You will see a window in which you can select the type of check for all updates. There you will see two columns - “Important” and “Recommended”. How to disable Windows 7 Update? Just in the first case, select the “Do not check” option (it is marked with a red shield and the caption “Not recommended”), and in the second case, uncheck it. You can confirm your actions. Problem solved. The program will no longer work automatically. All updates can be downloaded manually during self-checking or even forgotten about this application. As you can see, there is nothing complicated about this.
Cancel installed
True, it is not always necessary to completely abandon the Windows 7 update center. Sometimes it is enough to get rid of some potentially dangerous files that have already been installed. But how do you cancel a Windows update?
This is quite easy and simple to do. Go to "Update Center" and select "View update history" there. In the window that appears, at the very top, the inscription " Installed updates". Now you should click here. And then you will be taken to a service where you can get rid of all installed files. This is exactly what we need.

Now all you have to do is find necessary files updates, and then highlight them. Click the right mouse button, and then select the “Delete” command from the list that appears. Agree with the warning and click on “Ok”. A few minutes of waiting - and all problems will be solved. Next, don't forget to turn off checking for updates. Just ban it, otherwise the result of the process will be almost useless.
Pirate version
True, there is another rather interesting and simple way to solve the issue. Are you wondering how to disable the Windows 7 update center once and for all, and don’t even plan to use it in the future? Then you can just set yourself pirated version operating system. There, as a rule, this service basically disabled. Or it is completely absent.
In truth, this is the option that attracts many users. Especially those who are generally accustomed to using unlicensed operating systems. Installer builders try to save the public from many problems. Therefore, in some, the update center is not included in the list of available system services. Not the most honest and legal scenario, but it has its place. And, as already mentioned, this approach is in great demand.

Results
So we figured out how to disable the Windows 7 update center. As you can see, there are several options. This or complete shutdown applications, or working with program settings, or deleting existing “dangerous” files with changes to the center configuration. In addition, there is also the option of installing the operating system without this service.
Which approach to choose is up to you to decide. In any case, remember that you should not immediately choose the “piracy” method. In such operating systems There are already a lot of errors and problems. It is better to use some more honest methods.