How to change a specific color in Photoshop. Replace color in Photoshop
1 voteGood day, dear readers of my blog. Today we are again talking about Photoshop and its tools. Not many people know that the “Color Replacement” brush is hidden among them. Nevertheless, thanks to it you can very coolly change the color of any object in the photo.
I already wrote about this, but if you use the tips from that article, you can quickly get rid of a certain shade from the entire photo.

Today we will talk about the Color Replacement tool in Photoshop. I'll show you how to work with certain objects. For example, change not all the red in the picture, but only the hair. You don't have to bother with any masks. Everything will be very easy and simple. A couple of moves and you're done.
Well, shall we begin?
Color Replacement Tool
How does Color Replacement work? It recolors pixels of one color to another. And although this method cannot be called super-professional, the darker and lighter areas and highlights remain as such even when repainted.
The method is very easy to use and is ideal for solving simple tasks of changing colors and shades in Photoshop.
This tool “hides” on the same button as the other brushes. Hold down the pressed button for a few seconds left button mouse and additional tools open.

You can control the size of the brush using brackets ( and ) (“X” and “B” on the keyboard). In this, the brush is no different from its other “brothers”.
How does the brush work? You move the arrow and everything that falls within the diameter of the brush changes its color to the one you need. It's very easy to set it up. This is active. To replace it, just click on the front color plate, select a shade and click “OK”.

Look, I took the black color and moved it over the girl’s head. Her hair has changed, but all the shades have been preserved. They don't look like a dark spot.

Tool Settings
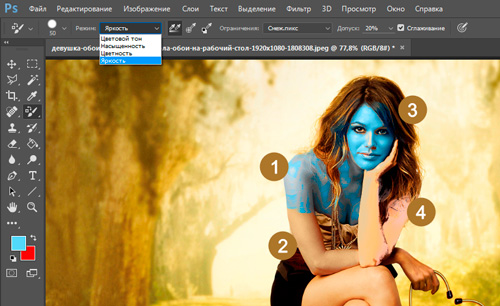
If you zoom in on the image, you will see that the color has moved onto the girl’s body. One of the brush parameters is “Tolerance.” It determines how different the color can be from the samples. By default this figure is 30%. If I set it to 90, I’ll go over the girl’s forehead and eyes, but if I set it to 1, I won’t paint anything.

There's another one here interesting setting- mode. If you try to change something now, it will seem to you that the option does not work. The whole point is that you first need to set the settings, and then work with the brush.

See in the picture below, I tried all 4 modes. 1 – hue, 2 – saturation, 3 – chroma (this parameter is set by default) and 4 – brightness. You already know how to use them, but what is each of them?
If the colors in the photo are not too saturated and minor changes are required, then it is best to use “Color Tone”. In this case, you will only change the hue, but the saturation and brightness of the original color will not change. The hand looks dull blue.
If you need to slightly reduce the intensity or even completely remove the color, then it is better to use the “Saturation” mode. It will not affect the hue or its brightness. The lower part of the arm has remained virtually unchanged. The color only hints that the hand is bluish.
“Color” will change both the hue and its saturation, but the brightness will remain unchanged. The girl's face became like the Avatar's.
“Brightness” will not change the hue and saturation, but its brightness, of course, will be completely different. You see, in my case, the girl’s hand became almost white.
Another interesting setting is “Restrictions”. Of the three available options in life, as a rule, only two are used: Adjacent and all pixels. The settings determine the location of the points that you are going to change.

In the “Adjacent Pixels” mode, only those points that are adjacent to the center of the cursor and do not differ from them in color change. This allows you to make changes more accurately, taking into account contrasting borders. If the diameter of the brush suddenly contains a color of a completely different shade, it will not change.
If you set the “All pixels” mode, the photo will be “blurred” evenly, without taking into account the difference in shades.

Well, that's all. The tool, in principle, is not complicated. To make a real masterpiece you will have to dig deeper, but changing parts of the object will not be so difficult. If you need to turn a large photo into a spectacular miniature, then better tool just can't be found.
If you are concerned about how to make the quality of your work more impressive, then I would probably still recommend that you take a deeper look at Photoshop. Get to know him better. The course will help you cope with this " Photoshop from scratch in video format ».
In this course you will be told all about the tools and capabilities that this program has. You no longer have to look for answers to your questions on the Internet. They will appear on their own. You will be able to find ways to solve any problem yourself and create incredible masterpieces.
Well, if you already know enough and want to start making money on your skills, then I’ll advise you another “ Commercial Web Design Basics " These lessons will help you understand what web designers do. If you already know something about Photoshop and want to take this hobby to a whole new level, then this option is for you.
 An online course with the support of the author is a reliable investment in your future profession.
 Stop inventing your own work. Let other people pay you to solve their problems with this powerful program. I assure you, you will be able to quickly find clients, and thanks to the ability to make collages, you will be able to complete the most incredible projects.
Read my introductory article about web design and learn as much as you can. I'm not talking about scams and games, but about real work, for which someone is willing to pay. I won’t hide that at first the money won’t be that much, but now you don’t earn anything from your hobby. Isn't it?
I wish you success and want you to succeed. Subscribe to the newsletter and VK group, and let every day bring you one step closer to your dream of becoming better.
See you again and good luck in your endeavors.
11.02.2015 27.01.2018
In this lesson I will tell you in detail about ways to change colors in Photoshop. I will describe all the steps in detail, accompany them with pictures to make it clear and clearly explain where and what function can be used.
1 way
The first way to replace a color is to use the ready-made function in Photoshop “Replace Color” or Replace Color in English.
I will show you with a simple example, a simple picture. Let's take the icon and open it in Photoshop.
Trowel on a yellow icon. We will replace yellow with any other color that interests us. To do this, go to the menu Image – Correction – Replace Color (Image – Adjustments – Replace Color)
.png)
The Color Replacement Function dialog box appears. Now we must indicate what color we will change; to do this, activate the Eyedropper tool (see arrow) and click on the trowel with it. You'll see this color appear in the dialog box at the top, which is labeled Highlight.
.png)
At the bottom is the Replacement heading - there you can change the selected color. But first, you can set the Scatter in the selection parameter. The larger the parameter, the more colors it will capture. IN in this case can be set to maximum. It will capture all the yellow in the image.
Configure the Color Replacement settings - with the color you want to see instead of the one being replaced. I made it green by setting the Hue, Saturation and Brightness parameters.
.png)
When you're ready to change the color, click OK.
So we changed one color to another.
Method 2
The second method in terms of operation can be said to be identical to the first. But we will look at it in a more difficult image.
For example, I chose a photo with a car. Now I will show you how to replace the color of a car in Photoshop.
.jpg)
As always, we need to indicate what color we will replace. To do this, you can create a selection using the color range function. In other words, select an image by color.
To do this, go to the menu Selection – Color Range (Select – Color Range)
.jpg)
Next, all you have to do is click on the red color of the car and we will see the function that defined it - coloring it white in the preview window. White shows which part of the image is highlighted. The spread in this case can be adjusted to the maximum value. Click OK.
.jpg)
After you click OK, you will see how the selection has been created:
.jpg)
Now you can change the color of the selected image. To do this, use the function – Image – Correction – Hue/Saturation (Image – Adjustments – Hue/Saturation)
.jpg)
A dialog box will appear.
Immediately check the Toning option (bottom right). Now using the Hue, Saturation and Brightness parameters you can adjust the color. I adjusted the color blue.
.jpg)
All. The color has changed.
.jpg)
It was - it became:
.jpg)
Changing colors
Team Replace Color creates a temporary mask around specified colors and then replaces them with other colors. The principle of a team is in many ways similar to a team Color Range. Let's see the action of this command using an example. Open graphic file(Fig. 3.29).
Rice. 3.29. Original image
Select a team Image | Adjustments | Replace Color. In the window that appears as a result of executing the command, select the switch Selection to see the mask in the preview window. Check the box Preview ( Preview) to see how the color adjustment will be reflected in the image. Tool Pipette Click on the darkest part of the background. Part of the background has been highlighted. If you click not the background, but the flower, then the color of the flower will not be replaced, but the color of the flower will be replaced - fig. 3.30.

Rice. 3.30. Example of replacing object color
Select the middle pipette Add to Sample and click it on an adjacent area of the background several times until almost the entire background turns white. Increase the slider value Fuzziness. If after this there are still unselected areas, click on them with the eyedropper with the plus sign. Changing the position of the sliders Hue, Saturation And Lightness you can change the background color in a wide range of colors.
Are you unhappy with the color of your shirt or hair? Do you want to experiment and maybe change something? Everything is in your hands!
In this tutorial I'll show you how to quickly and easily change the color of any element in your photo.
So, open the image we need.
Personally, I chose this photo:
Now you need to select the area of the image whose color you want to change. In this case, it will be a T-shirt.
Use the tool Lasso and other selection tools ( Straight-line lasso, Magnetic lasso, as well as a tool Quick selection
And Wand):

In order to highlight the contours as carefully as possible, I recommend zooming in as much as possible.
Don't forget to pay attention to the fact that the outline of the selected area must be closed:

If the areas you want to select are not adjacent to each other, hold down the SHIFT. This will add the selected area to the previous one.
Don't worry if you accidentally go a little beyond the outline, or highlight an unwanted area. We'll sort this out a little later.
So, once you're done with your selection, go back to 100% scale on your image.
Now click on the icon Editing in quick mask mode, which is located in the toolbar directly below the colors:

You will see something similar to my result - the selected area has retained its previous color, but the rest is filled with a translucent red color. This is the quick mask mode:

Then, making sure that the colors White and Black are selected, take the tool Brush, 13 pixels in size, with hard edges:. If you start "painting" on your image black, this means that the sketched areas will be added to the selected area, but if white- they will be deleted. This way we can adjust the boundaries of our selection.
To quickly change white and black colors, you can use the key X on the keyboard.
If the brush size is too large, or, on the contrary, is small, adjust it to your liking.
But do not forget that you need to use only hard brushes, as soft ones will make the selection sloppy.
Once everything is ready, turn off the mask mode using the same icon as to activate it.
Now you have a neat, carefully selected area. If you suddenly notice that you missed any spot or detail, go back to quick mask to fix everything.
Now it's time to play with flowers.
Create new layer for Hue/Saturation mode using the commands:
Layer - New - Layer.
Next: Image - Correction - Hue/Saturation.
and you can start your experiments!
The main thing is not to overdo it, as in some cases shadows and textural features may be lost, and the image will look unnatural.