How to create a rounded rectangle in Photoshop. How to round edges in Photoshop
In this short tutorial I'll show you how you can make rounded corners in Photoshop using simple methods masking and filters.
You can adjust the corner radius to round the edge of your shape, text, etc. This is a quick and easy method that will create rounded corners. To create them you can use a layer mask.
Using a series simple steps in Photoshop, you can make a rectangle with rounded corners. Photoshop doesn't have a filter or any tool to immediately make round corner but you can do it with using Illustrator. It will allow you to create a rounded corner effect for almost every object. In it you need to go to the menu Effects > Stylization > Rounded Corners(Effects > Stylize > Rounded Corners).
Step 1
In this quick lesson I'll show you a simple method that will allow you to create rounded corners in Photoshop using rasterized text, a shape, or some image. Let's take vector image stars with sharp corners(this method will work well with right angles as well).

Step 2
Now you need to rasterize the layer. To do this, right-click on the star layer thumbnail in the layers palette and in context menu select Rasterize layer(Rasterize Layer). You should do the same if you are using a text layer.

Step 3
Go to menu Filter > Blur(Filter > Blur) and select Gaussian Blur(Gaussian Blur). The blur radius will depend on the size of your image and the result you would like to achieve. I'll choose a radius of 5 pixels.

Step 4
Hold down the Ctrl key and click on the layer thumbnail to activate image selection. Next we go to the menu Selection and choose Refine edge(Select > Refine Edge). You can experiment with the parameters Antialiasing(Smooth) and Shading(Feather) to select the desired effect. Contrast(Contrast) make it 100.

Step 5
Take the color of the shape, in our case it is yellow and fill the entire selection with this color. You can do this by pressing the key combination “Shift + F5”.

Step 6
Without removing the selection, you must add a layer mask by clicking on the icon that is located at the bottom of the layers palette. That's all, now the star has rounded corners.

You can use the same method to create text with rounded corners as shown in the image below. Now you can come up with your own font.
Everyone likes right angles in images. But still, there are times when these same corners need to be rounded. Then the Photoshop program will come to your aid again. In this article we will look at one of the many ways how this can be done. Keep in mind that my method also involves cutting off the image a little at the edges, this is a kind of sacrifice in the name of rounded corners.
For those who like more clarity, I recorded a video tutorial that can be watched at the end of this lesson. So, let's start rounding the corners of the image:
Step 1
By default, all images opened in Photoshop become the background image. Photoshop names this layer as “Background” and also blocks it from unnecessary editing. This is indicated to us by a small padlock icon.
To unlock such a layer, you need to double-click on it. The New Layer dialog box appears. Don't change anything, just click OK. The lock should now disappear.
Step 5
In the layers panel, click on the very first layer with our original image and press the key combination Ctrl+Shift+I. As a result, we should select the entire area outside the boundaries of our square. It's called. Take a closer look at what has changed:

Step 6
Now press the key combination Ctrl+X (edit - cut) to delete the selected area. The selection should disappear and a checkerboard background (transparency) will appear where the image once was.

Step 7
Now let's make our shape layer invisible. To do this, in the layers panel, click on the eye icon opposite the square layer. Here is the original image with rounded corners.

Step 8
Run the command Image - to have Photoshop remove all the extra space around the image. As a result, the transparency mode should be visible only in the corners.
In the future, to use such an image, it must be saved in PNG format! In this case, the corners will remain transparent. Otherwise, if you save, for example, in JPG format, the corners will automatically become with a white background.
So, everything is ready. The image with rounded corners will look like this:

How to make only, for example, one rounded corner?
Very simple. Let's go back to the stage when we drew the figure. Stretch it so that only one rounded corner is visible to you, and the other three are hidden outside the canvas. Here, then follow the instructions described above. Everything is the same.
I hope the instructions helped you and you can make something cool! Good luck.
If you notice an error in the text, select it and press Ctrl + Enter. Thank you!
Last update:18/01/16
How to round corners in a picture in Photoshop
When designing blogs, I have repeatedly made rounded corners on images, but what is done not so often and not automatically enough is quickly forgotten. And I again complained about the need to describe the work done right away. Therefore, now, almost without delay, I will describe the sequence of actions. True, due to the disease, the “hot tracks” were no longer hot.
For those who like to watch everything, a short video on “how to round corners in Photoshop”:
First of all, you need Photoshop. Where to get it, there are two options:
- buy on the official website
- find on torrents
Which option to choose is up to you.
So, let's launch Photoshop. Open the picture whose corners need to be rounded in Photoshop (File → Open). If the image dimensions are larger than you need, you can change the dimensions (Image → Image Size).
On the right, in the preview image, there is a small lock that blocks editing the original image (background layer). To create new layer and work with it, click on it 2 times with the left mouse button, do not change anything in the window that appears, click “Yes”.

If there is no lock, then one of two things:
or in your version of Photoshop the background layer can be edited (which is doubtful, but suddenly)
or the above can be done using another operation: from the top, in the menu bar, select “Layers”, in the submenu that opens, select “New” and follow the arrow - “from the background”, and in the same window that opens, click “Yes”.
In the tools, select “Rectangle with rounded corners”.

Select the mode on the top of the settings panel: “Outlines”. Set the radius to round corners in Photoshop. I chose 40 pixels, you can choose the one that suits your picture.
Draw a rectangle of the required size in the picture: place the cursor (it takes the shape of a cross) at the desired point on the top left and, without releasing the mouse button, move to the opposite corner until desired point. Our picture has a transparent rectangle with rounded corners.
Right-click on the rectangle. In the context menu, select “Create selected area”, set the feathering radius to 1 pixel and click the “Yes” button.
Using the menu Select → Invert, select everything outside the rounded rectangle and delete the selection with the Delete key.
If you did not overlay a rectangle over the entire picture, then the excess transparent background can be removed using the sequence of commands Image → Trimming → Based on transparent pixels → Yes.
We received a picture with rounded corners. We save it for the Web: File → Save for Web and Devices. Select Preset: PNG-24, Transparency and click Save. The image is saved in PNG-24 format from transparent background, so that it can be integrated into any website design. 
The same can be done with the Ellipse tool, then you will get round picture or in an elliptical frame.
So, today we learned how to round the corners of any picture in Photoshop.
Good day, dear beginning website developers. Finally, I'm moving on to talking about what methods to use to create cool websites. Today I will tell you how to process a photo in a few minutes and thereby make the portal more beautiful, and the duration of visits is significantly longer. Don't believe me? But in vain...
Since the advent of selling sites large company We began to closely study the tastes of the audience. They carefully try to hide some of their discoveries, since the techniques work too well, while others are quite difficult to conceal, they are used too often.
Everyone has long been accustomed to smooth, rectangular photographs. They are used when it comes to serious business dealing with responsible matters.

When a company or service is simpler, then pictures from smooth transitions can be seen much more often. You can verify this on any good sales page, which will be a collection best practices journalism, marketing and psychology.

Today you will learn all the methods on how to round corners in Photoshop. If you are thinking about holding attention and winning over, then use streamlined shapes, and if you are making a serious portal and want to create some kind of barrier between yourself and the reader, then it is better to use rectangular images: “We are serious guys, if you want quality - to us."
A quick way to round out a photo
So, we will work in Photoshop. Open the image.

Find the Rounded Rectangle tool.

If you can’t find it, then hold down the left mouse button on the menu buttons for a couple of seconds to open additional options.

It doesn't matter what color you choose. Drag the object across the picture so that the area you need is inside the shape.

Pay attention to the properties. You can “play” with the indicators indicated in the picture and bend the edges more. Enter your number and press enter to see the result. When you are satisfied with it, press enter again.

Now, holding CTRL button, click on the center of the layer that contains the rectangle you just drew. Be careful, if you click on the text, nothing will happen. You need to click exactly on the center of the icon with a miniature image.

Now we remove the visibility. To do this, click on the “eye” next to the layer.

Let's move on to working with the layer, select it: click on either the text or the icon. Doesn't matter. Don't skip this step or the magic won't happen.


Ready. If you are going to display a picture on the site, you can save it, the main thing is not to make a mistake with the format.

You need exactly png.

In this case, the edges with the checker will be transparent. Select jpeg and they will be replaced by an unattractive white border.

You can also add this picture to your photo. In this case, saving and opening again is not necessary.

Just select it (Ctrl+A) then copy (Ctrl+C) and paste it into another image (Ctrl+V).

Rounding for designers, speeding up the process of working on a project
Let's say you are working on some important cool project. Everything is almost ready and you want to see how it will look with rounded corners. It is not necessary to open a hundred thousand tabs: cut, paste, and so on. Everything can be done much faster and easier.
Here's a look at my example. By the way, if you want, you can download this psd file, open it in Photoshop and practice ( download ).

Select the layer we need. I'm going to be working with a large image of an owl. Therefore, I hold down Ctrl and click on the center of the thumbnail image of this layer. Not by text or eye. According to the picture with the picture. Sorry for the tautology.


First of all, check the box next to “apply effect on borders”. Then we set the radius.
Unfortunately, you have to choose by eye. Here, as a rule, they set it to 15. This is the standard, but, as you understand, you can deviate from it.

We select the ideal option.

Then in the “Selection” tab we find “Inversion”.

Press the “del” button on the keyboard and you’re done.

To remove crawling ants along the edges, you need to press Ctrl and D at the same time.

If you liked these lessons, you can find more. To do this, you don’t have to search on Youtube for whatever comes to mind. Can be studied all the chips “from A to Z” according to video lessons. Get a free presentation latest version course on Russian Photoshop. In this case, you will not only be able to do basic things, but also learn how to do complex work, see how real specialists use simple skills and what comes out of it.
Look, for example, what you learned today can be applied not only to trimming corners.

You already know how to make a picture in triangles. Don't you understand? It's very simple.
Take the first cropping method from this article as a basis, but instead of working with a rectangle, choose a polygon.

Don’t forget to set “three sides” in the panel at the top so as not to fool yourself with transforming the figure.
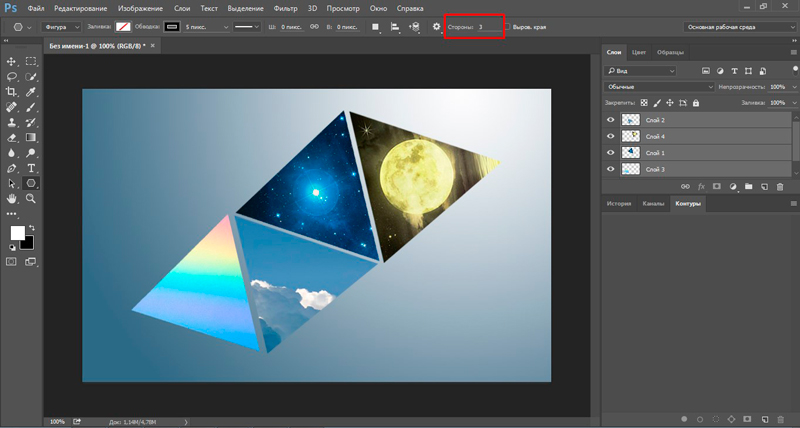
And, if you don’t want the corners to be as sharp as mine, just set the anti-aliasing in the settings.

This drawing in psd format you can download directly from my blog and work with it ( download ). I think improving it is not a problem.
If this article was helpful, please subscribe to my blog newsletter. There are still a lot of interesting things waiting for you! And finally, a video about how a girl can be turned into a pizza using Photoshop. Watch until the end, it's funny.
In this section of my site I decided to place photoshop lessons, which may be useful to you when creating a website design. I think it would not be superfluous, on my part, before starting to learn Photoshop, to introduce you Photoshop hotkeys. Using Photoshop hotkeys, you will make your work easier and save time. .
My first Photoshop lesson will tell you how round the corners photo.
When creating websites, you often have to deal with the problem of how to round the corners of a picture, or how to round the corners photo. In this lesson Photoshop I'll teach you how round the corners drawing in photoshop. Also this one Photoshop lesson will allow you round the corners photos. I hope this is clear to you. After all, for Photoshop both the picture and the photograph are all the same. In my work I use Adobe Photoshop SC5, Russian version. Well, I'm not good at languages.
Today's lesson is about rounding the corners of a photo in Photoshop. Let's take a photo together with rounded corners like in my picture.
1. To implement rounding corners in Photoshop, open with Photoshop the picture (photo) we need. As an example, I took one of the photographs from my photo archive.
2. We bring the dimensions of the drawing to the parameters we need. To do this, press ALT+CTRL+I. The Image Size window opens. We set the dimensions we need. You can simply crop the image to the desired size.

3. Select the picture (CTRL+A) (a dotted line around the perimeter will appear) and copy it (CTRL+C); We copy the photo so that the original image remains unchanged after we complete the rounding corners in Photoshop. Although we can work on the original, when the rounded corners are ready, we will simply save the photo as another image.
4. Open a new window (CTRL+N), set the required image dimensions and click “OK”. Please note that I set the background to “transparent”. You can immediately set the background to the color you require;

5. Paste the copied image into a new window (CTRL+V) and create a new layer (CTRL+SHIFT+N). In This Layer, use the Rectangle Tool rounded corners"Draw a rectangle of the required size. The color of the rectangle does not matter. The tool is selected by clicking on the right mouse button. Or by simply pressing the key (U). We set the radius of curvature at our discretion (see the figure below);

If necessary, you can move the drawn shape using the arrows on the keyboard or using the mouse while holding down the left key. First, do not forget to activate “move” on the toolbar ( top button). You can also resize figures. To do this, press (CTRL+T) and stretch the shape to required sizes using the mouse while holding down the left key. If you want to change the size while maintaining the proportions, you need to hold SHIFT and drag by the corner of the shape.
6. Go to the layers panel. While holding CTRL, left-click on the preview (picture) of the rectangle layer. A dotted outline of the shape appears.

7. Move on to the bottom layer. To do this, click on the right side of the image in the layers panel. In our case - layer 1. Selection blue will go to layer 1.
8. Press CTRL+ SHIFT+I. A dotted selection will appear along the border of that part of the picture that is located outside our rectangle having rounded corners.
9. Press DEL on the keyboard. The part of the image that is outside the rectangle will be deleted.
10. Reactivate the rectangle layer. Delete it by clicking on the trash can icon.

11. Press the "M" key and left-click anywhere in the image. The selection has been removed. ready. You can save the image that we received by rounding corners in Photoshop, in the format we need.
If such an image will be used to create a website design, save it for Web and devices (ALT+SHIFT+CTRL+S).

12. Attention! If you have images around the edges with rounded corners There are still transparent pixels, you need to perform trimming. To do this, click “Image”, select “Trimming”, in the window that appears, set the settings as in my picture and click “Ok”. The canvas will be resized to the size of the image and any extra transparent pixels will be removed.

Given photoshop lesson can be used for both oval and shaped photographs. To do this, in step 5, instead of the "rectangle with rounded corners" select the "ellipse", "polygon" or " tool any figure". Then we perform all the same actions that we did to get rounding corners.