How to enable virtualization. How to enable VT (Virtualization Technology) to improve performance
When working with software product VirtualBox virtualization, problems and malfunctions often arise related to the installation of a particular operating system on a virtual machine. The reasons for errors in operation may be different and with one of them, which states that "hardware acceleration(VT-x AMD-V) is not available on your system", we will understand in this article.
IN in this case, this problem arose when installing the Windows 8 operating system, although when installing the Windows 7 OS, such an error did not occur. How can we decide this problem? Let's find out below.
So, first of all we need to make sure that the processor supports the function VT-x/AMD-V, for this read the article How to check if your processor supports hardware virtualization Intel VT-x/VT-d and AMD-V. And to enable it, you need to go to Motherboard BIOS fees. To do this, reboot the computer and go to the BIOS of our system.
In order to go to BIOS, we need to press a key when turning on the computer Delete on the keyboard. (If it does not enter using the key delete try it F1, F2) When you turn on the computer, you can usually see on the start screen which key leads to BIOS.

As a result, we get into the BIOS of our computer. Next, select the tab " Advanced". There we see the tab " CPU Configuration" select it and press " Enter"

We get to the configuration menu, where we see the tab "Secure Virtual Machine Mode" opposite is the value "Disabled" what does disabled mean, we just need to enable it, to do this, click on the tab and select the value "Enabled".

As we see in the figure, the value has changed, now we need to save the changes made.

To save the changes made, go to the tab "Exit" then select the tab "Exit & Save Changes". In the window that opens, where we are asked to save changes made, press "OK" and wait until the computer reboots.

Next, open the VirtualBox program, go to " settings" the system that you wanted to install, in my case it is Windows 8.1. Click on the tab " system", further "acceleration", check the boxes next to the items indicated in the picture and click "OK."

All! The error no longer appears, you can begin the installation.

ABOUT Give your opinion about this article, and of course, ask your questions if something suddenly goes wrong for you.
Thank you for your attention!
Virtualization technology allows on one physical computer create several virtual ones with your own operating systems. Guest operating systems will use the resources of the real PC allocated to them within the established limits. In this case, there is no need to partition the disk and there is no danger of damaging the bootloader. The user's personal data is not affected and is safe. If you are interested in these opportunities, stay tuned. Today we will tell you how to enable virtualization in Windows 10.
A hypervisor developed by Microsoft called Hyper-V is included in the system as additional component. It can only be used in x64 bit OS Windows 10 Enterprise or Pro. In corporate Microsoft environment even recommends specific laptops HP and Lenovo. Users of the “Home” edition and all x32 bit systems this option is not available.
- Quickly find out the parameters installed Windows You can use the keyboard shortcut Win + X. In the expanded menu, select the item marked with a frame.
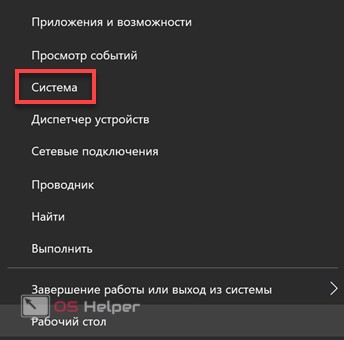
- The window that opens contains two blocks of information. In the first we look at the volume installed memory and bit depth. Hyper V requires at least 4 GB of RAM. In the second block we pay attention to the OS release.

- By system parameters The computer is suitable for installing and running a Microsoft VM. Additionally, Hyper-V requires the processor to support nested SLAT paging. Intel implemented it in Core line i3/5/7, and AMD since the first 64-bit Opterons. The processor model is indicated in the device characteristics, so there is no need to check it in the BIOS or UEFI. We can verify the support of Hyper technologies using the command line. Enter the “systeminfo” command and look for the data block indicated in the screenshot.

As we see, everything necessary requirements completed and we checked without going to the BIOS. Having made sure that the hardware configuration is suitable for using the virtual machine, we can proceed to installation.
Installation
Hyper-V is a component of the operating system. It cannot be downloaded and installed separately. You can only enable use in Windows environment. Let's look at several options for connecting Microsoft Virtual Machine.
Graphics mode
Let's start by using the graphic mode, as it is the most familiar to users.
- Using the Win + R key combination, open the “Run” dialog box and enter the “control” command in the text field as shown in the screenshot.

- The result of our actions will be the appearance of a classic panel Windows management. We look for the specified item and open it.

- In this window we will use navigation menu responsible for working with operating system components.

- Turn on Hyper-V. Expand the “Hyper” branch and make sure that all its components are checked. We complete the work in this section by clicking the “OK” button.

- Windows internally searches for and installs the ordered components.

- After completing changes to the software configuration, the system will prompt you to reboot.

This completes the installation and the PC is ready to use the built-in virtualization tools.
Command line
You can also install hypervisor components using command line capabilities.
- Open the Power User menu and launch PowerShell or CMD shell as administrator.

- Enter the following line in the window that opens:

- Windows processes the received command to install additional components.

- Finally, we will be asked to confirm the changes made and reboot. Enter English letter"Y" in any case.

The computer will immediately exit graphics mode and display standard window working with updates. The system will start with Hyper-V enabled.
The last method involves using the Windows Image Deployment and Management Tool.
- Let's launch command line with administrative rights. Enter the following line:

- After installing the components, DISM asks for confirmation.

Entering the letter “Y” causes an immediate reboot of the PC, during which the initial setup Hyper-V.
Usage
Once the installation is complete, you can begin creating a new virtual machine.
- The new component is located in the Administrative Tools section of the Start menu.

- Hyper-V Manager is a standard Windows management console. Enabling and configuring operations is done in the Action area. Select the marked item to launch the wizard.

- A three-item selection menu will open. Select the one indicated by the frame.

- The first window is informational. By placing a checkmark in the specified place, you will no longer see it during subsequent launches. To create a machine with your own configuration, select the button marked with a frame.

- Here we set the name of the machine being created and can change the storage location for its files.

- The generation should be selected based on the bit depth of the OS to be installed. For 32-bit versions we leave the first, but modern distributions belong to the second.

- The size of the allocated memory depends on the physical capabilities of the PC. The most simple solution there will be an allocation of 2 GB (2048 MB). This is the minimum amount required to run 64-bit Windows. It is enough to install any version of Linux.

- In the network settings, open the drop-down menu and select specified parameter. VM Manager will automatically configure the connection for the virtual machine using your current Internet connection.

- The disk size that will be used for installation can be limited to 32 GB. This is enough to run a guest OS with a set of programs.

- We agree with the proposal to install the guest system later. This can be done using DVD media or an ISO image.

The virtual machine is ready. To disable Hyper-V and remove guests you need to undo the use of this Windows component in the control panel.
Alternative
Owners Windows Home Those who cannot access Hyper-V can use a free alternative solution from Oracle. Unlike the product Microsoft application VirtualBox runs on 32-bit systems, has more features and is less resource intensive. It does not require a special set of processor instructions.
Almost all existing operating systems will run in VirtualBox, which cannot be said about Hyper-V. The choice is limited to a few Windows versions, and more recently also Linux.

In conclusion
To use virtual machines comfortably, do not forget that they consume physical computer resources. Ideally, a PC should have 8 GB of memory to ensure simultaneous operation of the current and guest OS with running applications.
Video
To help users who want to better understand the settings Windows virtualization 10, below are links to videos.
Enable hardware virtualization central processing units, AMD technologies - AMD-V and Intel - VT-X. Learn more about how to check whether virtualization is supported by the processor and how to enable virtualization in the BIOS. The technology is checked and activated simply...
Virtualization is — virtualization means a processor architecture with the ability to simulate hardware (virtual guest systems) using software methods. Virtualization technology makes possible launch several operating systems (virtual OS) on one real physical computer, with isolated separated computing processes, with dedicated logical resources, partly processor power, volume RAM, file subsystem from the common pool.
In simple words, virtualization allows the user to run on one physical personal computer diverse virtual machines with different types of operating systems (Windows, Android, Linux, MacOS X) or the same ones, with any set of programs. Most in demand at at the moment for gamers, allows you to launch and speed up .
How to check whether virtualization is supported and enabled.
For those who are afraid to enter the BIOS, you can check whether the processor supports virtualization technology or not and whether it is enabled in the BIOS, you can use the SecurAble program. The utility is free, does not require installation - the portable version, literally in two clicks - launched, found out the result, closed. You can download the program by going to SecurAble official website or download via direct link from - office. site.


Securable parameters:
1. Parameter value Maximum Bit Length indicates the maximum available bit depth of the system, 32-bit or 64-bit.
2. Values Hardware D.E.P.— technology responsible for security, introduced to counter the launch of malicious code.
3. Option Hardware Virtualization— the parameter can produce four values:
Yes— virtualization technology is supported by the processor — enabled;
No— virtualization is not supported by the processor;
Locked On— enabled and supported, but cannot be disabled in the BIOS;
Locked Off— the technology is supported, but it is disabled and cannot be enabled in the BIOS.
The inscription Locked Off is not always a sentence - BIOS flashing can correct the situation.
How to enable virtualization in BIOS.
Virtualization Technology is responsible for enabling hardware virtualization in the BIOS. To disable the option or enable virtualization in the BIOS, we send the PC to reboot. When the first signs of loading appear, click on the keyboard key “F2” or “Delete” (different BIOS versions), look for a hint at the bottom of the screen at the start.
Go to the “Advanced BIOS - Features” section, find the “Virtualization” or “Advanced” → “CPU Configuration” option, “Intel Virtualization Technology” option.

We move using the keyboard arrows (in BIOS UEFI with the mouse), press “Enter”, change the “Virtualization” parameter from “Disabled” to “Enabled” (enabled). Virtualization has been enabled in the BIOS, all that remains is not to miss one important click - don’t forget to press the “F10” button, which corresponds to the value - save settings (Save).

And most importantly, remember - Virtualization Technology only creates an environment for Android emulators and operating systems and does not affect the actual performance of the hardware in any way (it does not make the computer powerful). Work hard first , choosing components wisely and only then demand something from it.
In general, the other day I encountered such a problem as the inability to launch guest operating systems on virtual machine. More precisely, I could not run exactly 64 bit systems, although my processor quite supports these. Also, there was a problem with starting Linux distribution from a flash drive, the same problem appeared.
After searching the Internet one night, I discovered a certain parameter called Virtualization Technology, which turns on virtualization technology. It is activated in the BIOS. Thus, if you activate it, you will be able to use guest systems on such virtual machines, like others, for example. Mostly, this function does not affect the operation of the system; by default, it is disabled (Disabled).
IN different systems BIOS can have different names, for example, Virtualization, Vanderpool Technology, VT Technology.
So, hardware virtualization, we realized that it provides support with special features. Processor architecture. There are two virtualization technologies: AMD-V and Intel-VT.
AMD-V – this technology also has the abbreviation SVM (Secure Virtual Machines). IOMMU input/output technology. It turns out that it is even more efficient than Intel-VT.
Intel-VT (Intel Virtualization Technology)– this technology implements virtualization of real addressing. May be abbreviated VMX (Virtual Machine eXtension).
I will not describe in detail what these technologies mean, since a lot of information has been written about this on the Internet.
How to enable Virtualization Technology?
Well, actually, everything is very simple here. First you need, and then find the item Virtualization Technology, it may be called a little differently, as I wrote above, for example.
IN different types The BIOS item may be located in different places, for example, in BIOS from AWARD and system Gigabyte boards you will see it as soon as you get into the BIOS, to enable it, you just need to move the parameter to position "Enabled".

In the company BIOS American Megatrends Inc this technology is enabled by default and is located in the tab "Advanced". There you can enable or disable it.

In the BIOS of some HP (Hewlett-Packard Company) laptops and BIOS InsydeH20 Setup Utility Virtualization feature is disabled. To activate it you need to go to the tab "System Configuration".

In versions this parameter can be found on the tab "Advanced".

Hardware virtualization provides the performance of a virtual machine almost identical to that of a non-virtualized machine, this technology is necessary in order to be able to work with virtual machines on your computer. By default, virtualization may be disabled on some. In this article I will tell you how to find out whether your processor supports Intel VT-X technology (Intel processors) or AMD-V technology (AMD processors). Also from this article you will learn how to enable Intel VT-X and AMD-V technology.
Intel VT-x This is hardware virtualization from Intel. To find out if your processor supports the technology Intel VT-X download the CPU-Z program . . After launching, in the program window we look at the technologies that your processor supports:
If there is VT-X in the “Instruction” column, then your processor supports virtualization.
AMD-V
AMD-V is a hardware virtualization technology from AMD. To check whether your processor supports this technology, we will also need CPU-Z program, launch it and look at the “instruction” item. If there is AMD-V there, then your processor supports virtualization:
Enabling VT-X/AMD-V in Bios
Boot into Bios. In Bios, the picture may be different for everyone, we need to find a mention of virtualization (intel virtualization technology or virtualization) and enable this feature. In my case it was like this:
 Save the Bios settings and reboot. That's it, virtualization is enabled and enabled!
Enabling VT-X/AMD-V in UEFI
In the case of UEFI, I had to go to the Advanced > CPU configuration tab and enable virtualization there:

After enabling VT-X and AMD-V, you have the ability to create virtual machines on your computer
We enable hardware virtualization of central processors, AMD - AMD-V and Intel - VT-X technologies. Learn more about how to check whether virtualization is supported by the processor and how to enable virtualization in the BIOS. The technology is checked and activated simply...
Virtualization is - virtualization means a processor architecture with the ability to simulate hardware (virtual guest systems) using software methods. Virtualization technology makes it possible to run several operating systems (virtual OS) on one real physical computer, with isolated, separated computing processes, with dedicated logical resources, some of which include processor power, RAM, and a file subsystem from a common pool.
In simple words, virtualization allows the user to run diverse virtual machines with different types of operating systems (Windows, Android, Linux, MacOS X) or the same ones with any set of programs on one physical personal computer. Most in demand at the moment among gamers, it allows you to launch and speed up .
How to check whether virtualization is supported and enabled.
For those who are afraid to enter the BIOS, you can check whether the processor supports virtualization technology or not and whether it is enabled in the BIOS, you can use the SecurAble program. The utility is free, does not require installation - the portable version, literally in two clicks - launched, found out the result, closed. You can download the program by going to SecurAble official website or download via direct link from - office. site.


Securable parameters:
1. Parameter value Maximum Bit Length indicates the maximum available bit depth of the system, 32-bit or 64-bit.
2. Values Hardware D.E.P.- technology responsible for security, introduced to counter the launch of malicious code.
3. Option Hardware Virtualization- the parameter can produce four values:
Yes- virtualization technology is supported by the processor - enabled;
No- virtualization is not supported by the processor;
Locked On- enabled and supported, but cannot be disabled in the BIOS;
Locked Off- the technology is supported, but it is disabled and cannot be enabled in the BIOS.
The Locked Off message is not always a death sentence - flashing the BIOS can correct the situation.
How to enable virtualization in BIOS.
Virtualization Technology is responsible for enabling hardware virtualization in the BIOS. To disable the option or enable virtualization in the BIOS, we send the PC to reboot. When the first signs of loading appear, click on the keyboard key “F2” or “Delete” (different BIOS versions), look for a hint at the bottom of the screen at the start.
Go to the “Advanced BIOS - Features” section, find the “Virtualization” or “Advanced” → “CPU Configuration” option, “Intel Virtualization Technology” option.

We move using the keyboard arrows (in BIOS UEFI with the mouse), press “Enter”, change the “Virtualization” parameter from “Disabled” to “Enabled” (enabled). Virtualization has been enabled in the BIOS, all that remains is not to miss one important click - don’t forget to press the “F10” button, which corresponds to the value - save settings (Save).

And most importantly, remember - Virtualization Technology only creates an environment for Android emulators and operating systems and does not affect the actual performance of the hardware in any way (it does not make the computer powerful). Work hard first , choosing components wisely and only then demand something from it.
Today it is known that support for hardware virtualization Intel VT-x/VT-d and AMD-V necessary for the operation of virtual machines, such as VirtualBox And VMware Workstation , as well as for the operation of so-called emulator programs for mobile operating systems, for example for Android OS.
Nowadays almost everything modern computers have support for this technology, but of course there are those that do not support it. And in order to find out whether our processor supports this technology, we will first go to BIOS our computer and see if the setting we are interested in is there. I have added to the article several examples of what the virtualization enable item looks like in different BIOS versions. Basically enabling this option is in the tab advanced further, as can be seen in the picture below, under the name there is hidden evidence that this computer supports this technology.
In this version BIOS go to the tab advanced BIOS features where we also see in the paragraph virtualization support for this technology.

And here at the point advanced BIOS features It can be seen that hardware virtualization is supported by the processor.

Well, the last option, where in the tab advanced at point secure virtual machine mode, we can also enable this technology.

But there are also cases when our computer’s BIOS does not have an option to enable hardware virtualization secure virtual machine mode or intel virtualization technology, although they say that the processor that is in your computer supports this technology. To make sure of this, a small utility called Securable which will accurately show whether our processor supports hardware virtualization. We go to the official website of the manufacturer using the link https://www.grc.com/securable.htm, where we click on the item below Download Now. The download will begin, then we launch the program, there is no need to install it, since this is a portable version.

After launch, the program will immediately show information about whether your processor supports or does not support virtualization technology. You can see this in the third block. As you may have guessed, if there is an inscription yes it means there is support.

If it is written Locked OFF, this means that there is support for this technology, but it must be turned on. And it turns on, as we already know, in BIOS-e of our computer.

Well, if the block has the inscription NO, This means that hardware virtualization technology is not supported by your processor.

ABOUT Give your opinion about this article, and of course, ask your questions if something suddenly goes wrong for you.
Thank you for your attention!
In general, the other day I encountered a problem such as the inability to run guest operating systems on a virtual machine. More precisely, I could not run 64-bit systems, although my processor fully supports such systems. Also, there was a problem with launching a Linux distribution from a flash drive, the same problem appeared.
After searching the Internet one night, I discovered a certain parameter called Virtualization Technology, which turns on virtualization technology. It is activated in the BIOS. Thus, if you activate it, you can easily use guest systems on such virtual machines as, for example, others. Basically, this function does not affect the operation of the system; by default, it is disabled (Disabled).
In different BIOS systems it may have different names, for example, Virtualization, Vanderpool Technology, VT Technology.
So, hardware virtualization, we realized that it provides support with special features. Processor architecture. There are two virtualization technologies: AMD-V and Intel-VT.
AMD-V– this technology also has the abbreviation SVM (Secure Virtual Machines). IOMMU input/output technology. It turns out that it is even more efficient than Intel-VT.
Intel-VT (Intel Virtualization Technology)– this technology implements virtualization of real addressing. May be abbreviated VMX (Virtual Machine eXtension).
I will not describe in detail what these technologies mean, since a lot of information has been written about this on the Internet.
How to enable Virtualization Technology?
Well, actually, everything is very simple here. First you need, and then find the item Virtualization Technology, it may be called a little differently, as I wrote above, for example.
In different types of BIOS, the item may be located in different places, for example, in the BIOS from AWARD and Gigabyte motherboards you will see it as soon as you get into the BIOS, to enable it, you just need to move the parameter to the position "Enabled".

In the BIOS of American Megatrends Inc, this technology is enabled by default and is located in the "Advanced". There you can enable or disable it.

In the BIOS of some HP (Hewlett-Packard Company) laptops and the BIOS InsydeH20 Setup Utility, the virtualization feature is disabled. To activate it you need to go to the tab "System Configuration".
 http://site/wp-content/uploads/2016/06/virtualization-technology.jpghttp://site/wp-content/uploads/2016/06/virtualization-technology-150x150.jpg 2017-04-21T11:45:19+00:00 EvilSin225 Windows AMD-V,intel virtualization technology what is it,Intel-VT,virtualization technology,virtualization technology in BIOS what is itIn general, the other day I encountered a problem such as the inability to run guest operating systems on a virtual machine. More precisely, I could not run 64-bit systems, although my processor fully supports such systems. Also, there was a problem with launching a Linux distribution from a flash drive, the same thing appeared...EvilSin225 Andrey Terekhov Administrator Computer technology