Layer Styles in Photoshop. Layer Styles: Introduction
Author Irina Spdarenko. A link to the article and author is required.
What are styles?
Styles in Photoshop are a set of layer effects. Combinations of these effects create styles. As a rule, this set imitates some material or effect, some state of matter. For example, sparkling gold, sparkling ice, colored glass, mosaic, etc.

When creating a composition, you simply draw the desired element and apply the appropriate style to it. Most often styles are used for quick creation text effects.
A number of styles are available in Photoshop by default.


You can view existing styles by opening the Styles window.
To do this, use the menu command Window > Styles.

How to apply a style
Create some image or inscription in a separate layer, then select some style in the Styles palette and look at the result. If you want to draw with a drawing tool (pencil or brush) immediately in a style, then first select a style and then draw.
If you do not find the style you need in the collection, you should download it from our website or elsewhere. The style file must have an ASL extension (the file can be in rar archive or zip, you need to unpack)


How to add styles
The style file with ASL resolution must be placed in the folder where the styles are stored and they will become available in Photoshop. If you have installed Photoshop program on the C: drive, then most likely you will have it in the \Program Files\ folder. The styles may be in the folder C:\Program Files\Adobe\Photoshop CS\Presets\Styles. But not necessarily, it depends on the version of Photoshop.
If the folder with styles is not found, then you need to know that styles do not have to be stored in this folder. They can be placed anywhere.
But then they will not appear on their own, and they must be downloaded.
How to load styles
Open Photoshop. On the right top corner The Styles panel has a small button with a triangle.

Click it and open a menu that lists the actions you can do with styles. To load a new set, click Load Styles, select the file with the ASL extension, click OK.
Or another way: Menu command Edit>Preset Manager, press the Load button.

How to change the style
Sometimes you like a style but aren't quite happy with it, for example the border is too wide or the color needs to be a little darker. Then you need to correct it - edit it.
Please note that in the Layers panel, symbols have appeared on the image of the layer in which you applied the style fx and a list of effects from which the style is composed appeared under the layer (If you don’t see the list of effects, click the triangular button next to the symbols).

Double-click on this layer in the Layers panel and open the Layer style settings dialog box. At the top right there is a Styles command that opens a window in which you can select or change the style

Experiment with effects and get a new style.
How to save a style in Photoshop
If the experiment was successful and you like the style, you should save the changes using the New Style button ( New style), located in the upper right corner of the Layer style panel, immediately below OK and Cancel. Click on it and a new style will appear in the Styles panel.
How to save a style in a separate file
Styles can only be saved as a set in one file. If you want to create a set of new styles, it is better to first clear the layers panel of unnecessary styles, then create new ones and save them separately. To save, click on the round button with a triangle and select Save Styles from the list.
It must be remembered that
The style affects all image details that are on the same layer. If you want to create an image using different styles, then create an image from different layers and apply effects for each layer separately.
If the style is not displayed quite adequately when applied, then change the resolution of the file you are working with. Menu Image>Image Size, in the parameters window, pay attention to the Resolution line. Some styles do not work correctly at a resolution of 300 dpi, but if you change the value to 72 dpi, then everything will be fine.

When the image size is changed, the style elements are scaled.


To avoid this, there is a simple way: add a new transparent layer and merge the style layer with this new one transparent layer(Team context menu Merge). After that, transform as you wish.

After meeting Photoshop basics, where it is possible to work with image layers, it will be useful to learn about a set of different layer effects, which in the latest versions of Photoshop are called Layer Styles. Layer styles apply to the entire image on the layer, and you cannot limit the style to a selection area. The main advantage of styles is that they are not applied tightly, like Filters. Styles are effects whose settings you can always go into and change parameters. Styles can and should be saved - this is their main meaning: application to all objects of the same type. You can use sample styles from .
To open the Layer Style dialog box, double-click on the line of the selected layer in the Layers palette, or use the fx icon, which is located in the layer control group at the bottom of the Layers palette. By clicking on this icon, we will have access to a list of all Layer Styles that can be applied to the selected layer. Another way to open the Layer Style dialog box is to double-click with the left mouse button on the layer line in the Layers palette or single-right-click in the same place, additionally specifying the “Blending Options” option in the drop-down menu. The layer style settings window can also be accessed through the top horizontal menu program by going to the Layer menu and selecting first Layer Style, then Blending Options. This menu also contains other style settings.
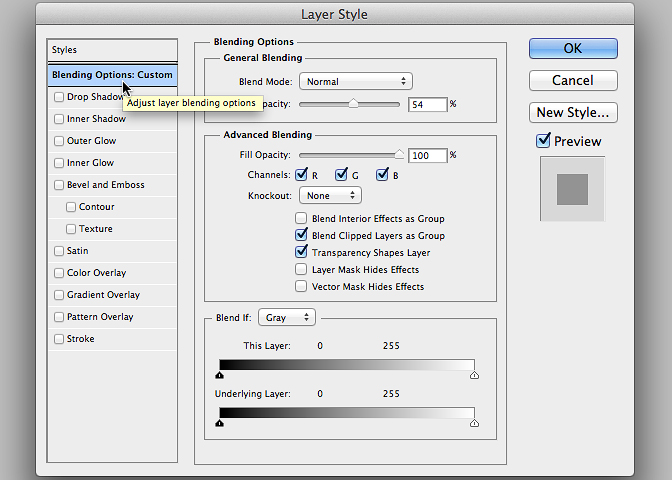
Layer Style Dialog Box
Let's look at the structure of the Layer Style window. For clarity, as an example, let’s print text using the Type Tool. Then open Layer Style using any of the previously described methods. The Layer Style dialog box consists of three areas. On the left is a list of all the styles for the layer, as well as the layer overlay settings and the styles window. Styles can be used individually or in combination with each other. To apply a style, you just need to check the box next to its name. Style settings - medium large area. Here are the settings for the specific style selected. Using the right narrow area, you can approve the layer style, save it or cancel the result of the settings, as well as a small preview window to visually demonstrate the effect of applying the selected style in real time. Next, let's look at each of the effects.Blending Options. The first item on the list is the so-called transparency and overlay settings. General Blending - basic layer settings. In the Blend Mode drop-down menu, you can select a layer blending algorithm and set the opacity parameter for the layer to Opacity Advanced Blending - advanced settings for layer properties. Here you can set the Fill Opacity parameter - this is the same as Fill in the Layers palette and specify those color channels, which should be displayed in this layer. Blend if - section for controlling selective transparency. Selectivity lies in the fact that we at will We can make dark or light areas of the layer transparent. To control this transparency, there are two sliders, one is called This Layer (current layer) and the other is called Underlying Layer (subject layer).
Drop Shadow(Shadow)- one of the most popular functions in Photoshop. This effect is designed to cast a shadow. Despite the huge number of settings, there is nothing complicated in controlling this effect.
Inner Shadow ( Inner shadow) . The inner shadow effect is very similar to the previous one, the only difference being that it is used inside the object rather than outside it. The inner shadow settings are the same as the previous effect, with the exception of replacing the Spread parameter with Choke. The greater the contraction, the thicker the shadow inside the object.
Outer Glow. In its effect, the style resembles the effect of a shadow. Outer glow is often used to separate the edges of an object from dark background. In the settings, the Technique drop-down menu will allow you to select the type of shine - Soften (soft) or Precise (hard). The Spread parameter regulates the softness of the radiance boundaries in the first case, but in the second it has virtually no noticeable effect. In the Qality section, you can select the contour type - the Countor drop-down menu. The Range parameter allows you to change the thickness of the glow. The lower the value of the variable, the thicker the light edge. A 1px range will turn your subject's glow into a stroke.
Inner Glow. The style action occurs within the object, not outside of it. The settings for this effect are similar to the previous style, except for one more thing added: Source. He is responsible for the direction of the glow. There are two options: from the center of the object or from its edges to the center. The second option is basic setup and is the default...
Bevel and Emboss. The effect is very popular because it creates the illusion of volume by adding light and shadow to layer shapes. The Structure section is designed to create a structure for a pseudo-volume. View volumetric effect select Style from the drop-down menu. The default effect is Inner Bevel, which creates an edge around an image on a layer using the "inside" of the image. The size of the edge is controlled by the Size parameter. The Depth parameter is responsible for the visual depth of the effect. Direction - lighting control: Up - lighting from above, Down - lighting from below. The Technique drop-down menu allows you to select the type of edge - soft, softened and sharp. The settings in the Shading section allow you to get a semblance of a shadow effect. Set the lighting direction and distance from the light source to the image. The Gloss Counter menu gives the edge a metallic sheen effect. By affecting the Hightlights (lit surfaces) and Shadows (shadow fragments) of the edges, you can achieve an additional volume effect. All these settings consist of choosing a blending mode and transparency for each type of area. Next, we list the style options from the Style drop-down menu. The Outer Bevel style simulates the concavity of an image on a layer. The effect is controlled in the same way as Inner Bevel. The effect will be more noticeable if there is another Emboss Style layer under the selected layer. In essence, this is an imitation of bas-relief. The Pillow Emboss style creates a slit effect around the image. The Stroke Emboss style only works in conjunction with the Stroke style. Additional settings - Countor (different types of edge creation) and Texture. The image can be filled with a texture selected from a set of standard ones or uploaded by the user. The Scale parameter controls the size of the minimum texture cell. The Depth parameter is the depth (volume) of the texture itself.
Satin (Satin gloss). The style is used quite rarely. If you carefully select the parameters of this effect, you can imitate a pattern on fabric. The settings are standard and have already been discussed in detail above.
Color Overlay. The layer style is incredibly easy to use. The function of the style is to cover the image with the selected color. The style can be adjusted using three parameters: blending mode, color and opacity. The style allows you to quickly change the color of the text and creates a certain convenience when working in web design.
Gradient Overlay. The difference from using the Color Overlay style is that the image is filled with a gradient rather than color. The Style parameter can be linear, radial, mirror, angular and diamond. The Scale of the gradient increases or decreases depending on the size of the image object. The Reverse option allows you to swap the beginning and end of an already defined gradient, eliminating the need to create a new gradient.
Pattern Overlay. The style allows you to cover an image with a pattern. This effect is very similar in effect to texture mapping in the Bevel and Emboss style.
Stroke. The last style in the list of effects. A stroke creates a border around your subject. Many of the options in the settings dialog box for this style have been seen before. The Position option specifies the location of the stroke: Inside, Outside, or Center. For example, when laying out for subsequent, most sharp corners frames are formed when you select the Inside option. Size adjusts the thickness of the stroke. By default, the parameter is set to 3 px, but a 1 px stroke is more often used. The Fill Type option allows you to fill the stroke with a color, gradient, or pattern. By default, the stroke is filled with color.
Instructions
IN latest versions The program has several types of ready-to-use styles. They are located in the Styles panel. To call this panel, open the Window menu - “Window” and select the appropriate line. A palette will open in front of you, showing examples of loaded styles. Styles are not applied to the entire image, but to individual layers. Using ready-made styles is quite simple. While on the desired layer, double-click on the icon with the selected sample.
To see all available style sets, click on the tiny triangle in the upper right corner of the palette. A window with options will appear in front of you, at the bottom of which there is a list of loaded styles. Click on the title the required set, for example, Abstract Style - “Abstract style”. A dialog box will open asking: Replace current style with the style from Abstract Style? - “Do you want to replace the established style with “Abstract style?” To agree to the program's offer, click OK. If you want to add a new set while keeping the previous ones, click the Append button.
By changing layer effects, you can edit ready-made styles, as well as create new ones. Click the fx icon at the bottom left of the Layers palette. The Layer Style dialog box will open, on the left side of which you will see a list of sections. The first of them is Styles - “Styles” is intended for selecting and managing ready-made styles. The next section Blending Options: Default - “Default Blending Options” is used to configure the layer’s blending mode. The remaining sections are used to select and configure individual effects.
By using these effects in different combinations and experimenting with the settings, you can create your own unique styles. To select an effect, click on the line with its name. The configurable parameters will be shown on the right side of the window. After adjusting all the selected effects, save the created style. To do this, click the New Style button and assign a suitable name to it in the window that opens. Now click on the OK button and your style will be added last to the downloaded set. You will be able to use it at any time.
To simulate volume, create chamfers and reliefs, use the Bevel and Emboss effect - “Embossing”. It is well suited for processing text layers and shapes. If you need to create a colored or gradient stroke, apply the Stroke effect. The Inner Shadow parameter - “Inner Shadow” creates a shadow from the boundaries within the object itself. Applying this effect makes it appear as if the subject has been cut out from the background. To simulate light coming from inside an object, use Inner Glow.
To create the impression of blur and silky highlights, together with other effects, use the Satin function - “Gloss”. Effects of the Overlay group - “Overlay” cover the contents of a layer with a color, gradient or pattern fill. The effects of this group can be used together. If you need to highlight text on a multi-color background, use the Outer Glow effect. Apply the Drop Shadow effect - “Shadow” to simulate a shadow from an object on a plane.
Let's look at each of these methods in more detail.
Apply a preset layer style
Open or create Photoshop document and duplicate the background layer. Go to the main menu tab Window --> Styles to open the Layer Styles palette and simply click on one of the preset thumbnails in this palette. You'll immediately see the style automatically applied to the layer. By the way, the white rectangle crossed out by a red stripe, which is the very top left, removes the style from the layer, if, of course, it existed. The picture shows the preset in Photoshop CS6:
Create and add a layer style manually
Open or create a Photoshop document and duplicate the background layer. Styles cannot be applied to the background; see the background layer tutorial for details.
In the Layers panel, double-click on the layer (but not on the name!), or click on the icon in the form of stylized letters fx at the bottom of the palette and select the line “Blending Options”:

Either way, this will open the Layer Styles dialog box:

In the next layer style guide, we'll look at each menu item individually. Translation of styles from English into Russian.
If you add any effects to a layer, a list of them will appear in the Layers palette. You can show/hide any of the effects by clicking on the eye icon located to the left of each effect name, similar to turning off the visibility of layers. This allows you to quickly hide a certain effect, while keeping its settings unchanged, so that you can turn it on again at any subsequent time:

How to load presets (sets with layer styles)
There are many free and paid layer styles available for download online, so now we'll look at how to load sets you downloaded online into Photoshop.
After you have downloaded the style file (it must have an ASL extension!), save it to some folder on your computer.
Open the Styles palette in Photoshop and simply drag and drop the ASL file from a folder on your computer into this window:

After which the icons of the styles in the moved set will immediately appear in the palette:

How to save ready-made presets
If you have created your own presets or want to collect all the styles in your palette into one file, you can easily save them from this palette.
To save, click on the button in the upper right corner of the palette, in the menu that opens, select the line “Save Styles”. You will be asked to select a name for the set and a folder on your computer, after which then simply click the "Save" button.
1. Layer styles cannot be added to locked layers, including the background one, however this can be done before locking. Once locked, editing styles will not be possible; to edit, you must unlock the layer.
2. You can increase the size of the thumbnails in the Style Palette. To do this, click on the button in the upper right corner of the palette and in the list that opens, select one of the items: “Names only”, “Small thumbnails”, “Large thumbnails”, “Small thumbnails and names”, “Large thumbnails and names” (Text Only, Small Thumbnail, Large Thumbnail, Small List, and Large Lis).
3. Most layer styles are created for large objects and/or fonts. If you apply a style you found online and are unhappy with the result, try applying it to a larger object/font.
4. Pre-made layer styles themselves can be changed.
5. You can copy a style from one layer and paste it into another in the same or different documents. To copy, right-click on the layer and select Copy Layer Style. To paste, repeat these steps, but select Paste Layer Style.
6. You can hide the contents of the layer, showing only the effects. Select the layer in the palette and change its Fill parameter to 0%, . This creates transparent drops, effects on glass, etc.
Layer styles in the program Photoshop capable of completely changing appearance layer. Photoshop design professionals use them quite often, considering layer styles an important component of the creative process. In this lesson you will learn what effects can be achieved on an image using these convenient functions programs.
In this tutorial, we'll take a look at each layer style characteristic and explore its capabilities in detail, using examples. However, it should be remembered that the use of Layer Styles is not the same everywhere: if their application on one image gives an excellent result, then on another it may have the exact opposite effect. The more you learn about this function, the more your creativity will open up.
Here are the topics we will discuss:
1. What is a Layer Style?
2. Applying Layer Styles.
3. Layer Style dialog box.
4. Drop Shadow.
5. Inner Shadow.
6. Outer Glow.
7. Inner Glow.
8. Embossing, textures (Bevel and Emboss (Contour/Texture).
9. Gloss (Satin).
10. Color Overlay.
11. Gradient Overlay.
12. Pattern Overlay.
13. Stroke.
14. Additional tips for applying layer styles. (A few layer type tips).
What is a layer style?
A layer style is one or more layer effects and blending options added to an original layer. Layer effects include shadow, stroke, color overlay, etc.
Here's an example of a layer with three effects added to it: a shadow, an inner glow, and a stroke.
You can always turn off the visibility of effects by clicking on the eye next to the layer icon in the Layers palette and see what the layer looks like without them applied.

In addition, it is possible to disable the visibility of each effect (style) individually. In the example below, the “Shadow” effect is turned off. (Drop Shadow).

Adding Layer Styles.
Use this feature's dialog box to customize layer styles. There are several ways to open it.
1. Right-click on the layer line and select the “Blending Options” option from the drop-down menu (Blending Options).

2. Double-click with the left mouse button on the layer line in the layers panel.

3. The layer style settings window can be accessed through the top settings panel of the program window. Find the Layer tab - Layer Styles (Layer > Layer Style), then select the dialog box for all style settings (Blending Options) or any one option from the style menu (Shadow, Gloss, Gradient overlay, etc.).

Use Layer Style swatches using the Styles panel.
The “Styles” panel contains samples of effects installed by the program itself. To apply any style from a given set to a layer, click on its icon. Sample styles can be viewed through the “Window” - “Styles” tab. (Window > Styles) V top panel program settings.

Layer Styles Dialog Box.
When you open the Styles dialog box, you'll see a Blending Options option at the top. (Blending Options). By activating it, you can adjust the blending mode for the layer, its opacity level, and the amount of fill. There are more detailed parameters settings for this option located below.

A layer style can have one or more different effects. To apply the effect, activate the checkbox in the box next to the style name.
Don't forget to turn on the Preview feature (Preview) to monitor changes in real time.
Changes to the layer will help you see the preview window located on the right side of the Layer Styles dialog box under the function Preview.

Drop Shadow.
Drop shadow is one of the most commonly used functions in Photoshop. The dialog box for this option is activated when you click on its line with the mouse.

Blend Mode allows you to apply shadow to the background in different ways (Overlay, Multiply, etc.). You can also select the shadow color using the color palette (the square next to the blending mode bar). The program's default shadow color is black.
Below is the shadow opacity level function (Opacity). The setting is adjusted by moving the slider, increasing or decreasing the saturation of the shadow.
Corner (Angle) provides the position of the shadow of an object relative to the light source.
Distance/offset (Distance) allows you to place the shadow closer or further from the object.
Scope (Spread) makes the shadow denser.
Size (Size) increases or decreases the size of the shadow.
Option Quality (Quality) allows you to add noise to your shadow and change its outline.
Example 1:
IN in this example The direction of the shadow doesn't matter, so setting the Offset (Distance) I set it to 0, which puts the shadow in the center.
This action can be used to remove an image from its background. It is advisable to use this effect on a light background (white or light gray).

Example 2:
The following example uses the same settings, but with lower opacity and increased Offset, Span and Size parameters (Distance, Spread, Size). As you can see, the shadow of the photo is more in the lower right corner, which gives the impression that the light source is in the upper left.

Inner Shadow.
The inner shadow effect is very similar to the previous one. The only difference is that it is used inside the object, and not outside it.

All inner shadow settings are similar to the previous option, with the exception of changing the Swipe parameter (Spread) on contraction (Choke). The greater the contraction, the thicker the shadow inside the object.
Example 1:
In this example, we'll use the settings from the first example of the previous option so you can compare and contrast them. Applying an inner shadow gives the image the effect of being behind the background, as if outside a window.

Example 2:
The inner shadow can be used to create an aged, vintage effect on an image by adding a little noise and increasing the size (Size) shadows. Using this style, you can darken the corners and edges of the image, as in worn-out photographs.

Example 3:
Another option for using an inner shadow is to create the effect of printed text, with the letters slightly pressed inward. The settings are very similar to the first example of this option, however it is changing the Offsets setting (Distance) at 2 px simulates typing.

Outer Glow.
This layer style is very similar to the shadow effect in its effect on the object. Outer glow is often used to create subtle cosmic lighting effects where the edge of an object needs to stand out brightly from the background. Usually used on a dark background.

In the Outer Glow settings, you can change the settings for blending modes, opacity and noise level, as well as size and span, just like in the Shadows settings. Here, unlike the shadow, you can choose one of the glow methods: soft or precise (Technique). A soft glow makes the light thinner and weaker, while a precise glow expands the halo, increasing its density. The Range option allows you to change the thickness of the glow. The lower the value of the option, the thicker the light edge. Setting the range to 1px for example will give your object a stroke rather than a glow.
Example:
In this example, the values for the outer glow are set to blue:

Inner Glow.
This layer style, unlike the previous one, takes place inside the object rather than outside it.

The parameters of this effect are similar to the previous style, except for one more thing added: Source (Source). It allows you to make your glow emanate from the center of the object, or from its edges towards the center (default).
Example 1:
In the example, the inner glow extends from the edge, similar to the effect of the inner shadow.

Example 2:
In the following example, the glow source comes from the center in the Overlay blending mode (Overlay), which brightens the interior of the photo and helps increase contrast levels.

Embossing (Bevel and Emboss).
This layer style adds a convex, conical shape to the image or, conversely, pressed into space (Emboss). The Emboss option includes two more effects: outline and texture (Contour,Texture).

Activating the Outline checkbox allows you to make the embossing of the edges of your shape sharper or softer.

Using Texture adds a patterned finish to an object.

When applying the Emboss style, the following conditions apply: the higher the depth (Depth), the sharper the embossing structure, the higher the size (Size), the closer to the center the embossing is done. Setting Shading (Shading) allows you to set the opacity level of the highlight and the angle at which the light hits the embossed area of the object.
Example 1:
In the example below, strong embossing is used with a large depth level of up to 1000%, but a low size and softening indicator (Size, Soften), which gives sharp outlines to the convex edges of the image.

Example 2:
The second example is similar to the previous one, but here the embossing depth is slightly reduced and the “Outline” function is activated. Applying an outline sharpens the edges of the embossing, like a fine 1 px line. It also highlights the light on the right and top portions of the photo.

Example 3:
This example uses the same parameters as the previous one, but adds a texture effect. You can use texture sets, installed by the program, or use your own. The texture scale and depth settings are adjusted by moving the sliders. Activating the "Invert" checkbox (Invert) allows you to choose between raised and beveled embossing.

Gloss (Satin).
The Gloss layer style, in my experience, is used quite rarely. I used this effect to create an antique effect in a photo, although there are many other options that can help you achieve this.

The Gloss option settings dialog box has the same settings as in the styles we studied earlier. They are very easy to use.
Example 1:
In this example, I chose red as the base color, offset (Distance) I set the gloss to 72 px and its size to 0 px to create a patterned design for my photo.

Example 2:
The second example has similar settings, except for increasing the size (Size). As you can see, than larger size gloss, the stronger the blur effect in the image.

Color Overlay.
This layer style is incredibly easy to use. Its function is to cover your image with any color.

There are three settings for this option in the dialog box: blending mode, color, and opacity. Very often you need a quick color change to work in web design, for example, in text. In this case, color overlay turns out to be a necessary function.
Example 1:
The program's default setting uses red when blending.

Example 2:
One application of color overlay is to create beautiful color tones in an image. For this technique, you need to select any shade and reduce the opacity of the layer to make the object visible. Although it is better to perform this technique using adjustment layers for high-quality control over color.

Example 3:
When using black as the base color and setting the blending mode to Overlay (Overlay) With an opacity of 100%, you can completely eliminate some of the colors in the image, which can be useful when isolating a subject from its background.

Gradient Overlay.
This layer style performs a similar action on the image as in the previous effect, only the image is filled not with color, but with a gradient.

Style (Style) gradient can be linear, radial, mirror, angular and diamond-shaped. Scale (Scale) The gradient increases or decreases depending on the size of the image object.
There is a Reverse option (Reverse), which allows you to swap the start and end of a gradient, eliminating the need to create a new gradient.
When you click on the gradient scale, a set of gradients installed by the program opens. But you can always set your own settings.

Example 1:
This layer style is often used to create a stamped effect on text along with the Inner Shadow style. The color is selected in grayscale, the default option.

Example 2:
In the second example, all settings are set to default, except for the gradient style. It is changed to Radial.

Pattern Overlay.
Like all overlay styles, this style covers the image with a pattern. This effect is very similar in its effect to the Texture overlay in the “Emboss” style.

You can choose any pattern from those installed by the program, or use your own.
Example 1:
This is what the program's default pattern overlay setting looks like.

Example 2:
Using the Scale option (Scale) you can increase or decrease the resolution of your pattern.

Example 3:
Using standard templates patterns, you can apply them to text. By setting the tile pattern, we got the effect of stripes on the text.

Stroke.
This layer style is the last in the list of effects. A stroke creates a border around your subject.

We have encountered many of the options in the dialog box of this style before.
Let's talk about unfamiliar effect parameters.
The Position option specifies the location of the stroke: inside, outside, or from the center of the object. The thickness of the stroke is adjusted by moving the slider in the “Size” option (Size). By default, the program uses a 3 px size, but a 1 px stroke is more often used. Stroke Type Option (Fill Type) Lets you fill the stroke with a color, gradient, or pattern. By default, the stroke is filled with color.
Example 1:
This example shows a layer style with default settings.

Example 2:
Here the stroke is filled with a gradient, which looks more interesting. The gradient blends into the color of the letter at the top, which simulates the lack of a stroke there.

Layer styles are automatically added to all other objects on that layer besides the one you're applying effects to. If you want to prevent styles from affecting a layer object, move it to another layer.
If you have many layer styles applied to an object and then want to transfer those styles to another object, right-click on the layer row and select Copy Layer Styles (Copy Layer Style). Then, going to the layer you need, right-click on the layer again and select “Paste Layer Style” (Paste Layer Style). This technique saves your time.

To delete a layer style, right-click on the layer row and select "Delete Layer Style" (Clear Layer Style).
Not all layer styles are visually pleasing, so don't overdo them. Apply effects carefully and subtly to make your work look professional rather than crude and primitive. In the examples in this tutorial, the layer styles were exaggeratedly flashy for clarity, which should not be a model for your creativity.
Using layer styles allows you to master the program Photoshop will expand significantly.